Setup Guide (Operating Instructions)
Page 8
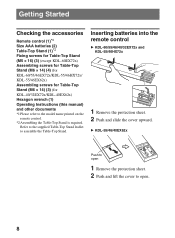
Inserting batteries into the remote control B KDL-60/55/46/40/32EX72x and KDL-55/46HX72x 1 Remove the protection sheet. 2 Push and slide the cover upward. B KDL-55/46/40EX62x Push to open . 8 Getting Started Checking the accessories Remote control (1)*1 Size AAA batteries (2) Table-Top ...Stand (1)*2 Fixing screws for Table-Top Stand (M5 × 16) (3) (except KDL-60EX72x) Assembling screws for Table-Top Stand (M6 ...
Inserting batteries into the remote control B KDL-60/55/46/40/32EX72x and KDL-55/46HX72x 1 Remove the protection sheet. 2 Push and slide the cover upward. B KDL-55/46/40EX62x Push to open . 8 Getting Started Checking the accessories Remote control (1)*1 Size AAA batteries (2) Table-Top ...Stand (1)*2 Fixing screws for Table-Top Stand (M5 × 16) (3) (except KDL-60EX72x) Assembling screws for Table-Top Stand (M6 ...
Setup Guide (Operating Instructions)
Page 9
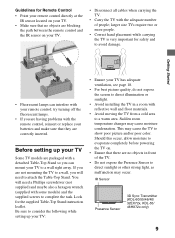
... the screen to direct illumination or sunlight. • Avoid installing the TV in front of people; IR Sensor Presence Sensor 3D Sync Transmitter (KDL-60/55/46/40/ 32EX72x, KDL-55/ 46HX72x only) 9 You will need a Phillips screwdriver (not supplied) and maybe also a hexagon wrench (supplied with a detached Table-Top Stand so you...
... the screen to direct illumination or sunlight. • Avoid installing the TV in front of people; IR Sensor Presence Sensor 3D Sync Transmitter (KDL-60/55/46/40/ 32EX72x, KDL-55/ 46HX72x only) 9 You will need a Phillips screwdriver (not supplied) and maybe also a hexagon wrench (supplied with a detached Table-Top Stand so you...

Setup Guide (Operating Instructions)
Page 10
Guide pins For KDL-60EX72x 1 Align with the supplied screw and hexagon wrench. ~ • Align the TV from the top, slide it in until the guide pins cannot be ... the supplied Table-Top Stand instruction leaflet for proper attachment. ~ • Do not put stress on the Table-Top Stand. For KDL-55/46HX72x, KDL-55/46/40/32EX72x and KDL-55/46/40EX62x 1 Place the TV unit on the LCD panel or the frame around the screen. • Be careful to not pinch your...
Guide pins For KDL-60EX72x 1 Align with the supplied screw and hexagon wrench. ~ • Align the TV from the top, slide it in until the guide pins cannot be ... the supplied Table-Top Stand instruction leaflet for proper attachment. ~ • Do not put stress on the Table-Top Stand. For KDL-55/46HX72x, KDL-55/46/40/32EX72x and KDL-55/46/40EX62x 1 Place the TV unit on the LCD panel or the frame around the screen. • Be careful to not pinch your...

Setup Guide (Operating Instructions)
Page 20
Press 1 (power) on the TV or I /1 button located on the TV. or To use the Guide Press GUIDE to display the Rovi On Screen Guide to view scheduled programs or to select a program to turn on the TV. (For KDL-60/55/46/40/32EX72x and KDL-55/46HX72x, you may use 0-9 2 For example, to enter 2.1, press , and . 20 Press again to exit the Guide. 0-9 To use the I /1 on the remote control to watch. Using Your BRAVIA TV Watching the TV 1 1 2 GUIDE 1 Turn on the front or back of the remote control.) 2 Select a TV channel or select an input.
Press 1 (power) on the TV or I /1 button located on the TV. or To use the Guide Press GUIDE to display the Rovi On Screen Guide to view scheduled programs or to select a program to turn on the TV. (For KDL-60/55/46/40/32EX72x and KDL-55/46HX72x, you may use 0-9 2 For example, to enter 2.1, press , and . 20 Press again to exit the Guide. 0-9 To use the I /1 on the remote control to watch. Using Your BRAVIA TV Watching the TV 1 1 2 GUIDE 1 Turn on the front or back of the remote control.) 2 Select a TV channel or select an input.
Setup Guide (Operating Instructions)
Page 21
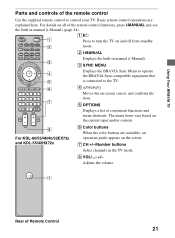
For KDL-60/55/46/40/32EX72x and KDL-55/46HX72x 6 Color buttons When the color buttons are explained here. For details on all of the remote control functions, press i-MANUAL and see the ...
For KDL-60/55/46/40/32EX72x and KDL-55/46HX72x 6 Color buttons When the color buttons are explained here. For details on all of the remote control functions, press i-MANUAL and see the ...
Setup Guide (Operating Instructions)
Page 33
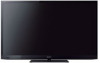
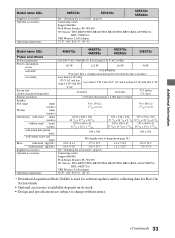
... Dimensions with stand (mm) (inches) without stand (mm) (inches) wall-mount hole pattern (mm) wall-mount screw size (mm) Mass with 240 V AC V AC 46 inches 40 inches 31.5 inches (32 class) 1,920 dots (horizontal) × 1,080 lines (vertical) 30 × 150 (2) 1 3/16 × 6 (2) - ... the accessories" (page 8). Connecting cables Support Belt Kit Wall-Mount Bracket: SU-WL500 3D Glasses: TDG-BR250/TDG-BR200/TDG-BR100/TDG-BR50 (KDL-46/40/32EX72x, KDL-46HX72x) USB Wireless LAN Adapter 32 °F - 104 °F (0 °C - 40 °C) * Download Acquisition Mode (DAM) is ...
... Dimensions with stand (mm) (inches) without stand (mm) (inches) wall-mount hole pattern (mm) wall-mount screw size (mm) Mass with 240 V AC V AC 46 inches 40 inches 31.5 inches (32 class) 1,920 dots (horizontal) × 1,080 lines (vertical) 30 × 150 (2) 1 3/16 × 6 (2) - ... the accessories" (page 8). Connecting cables Support Belt Kit Wall-Mount Bracket: SU-WL500 3D Glasses: TDG-BR250/TDG-BR200/TDG-BR100/TDG-BR50 (KDL-46/40/32EX72x, KDL-46HX72x) USB Wireless LAN Adapter 32 °F - 104 °F (0 °C - 40 °C) * Download Acquisition Mode (DAM) is ...

