
Operating Instructions
Page 1
Operating Instructions KDL-40XBR7 KDL-70XBR7 KDL-46XBR8 KDL-55XBR8 © 2008 Sony Corporation Please Do Not Return the Product to the Store On-line Registration Available: Be sure to resolve your questions more quickly than your TV United States http://productregistration.sony.com Canada http://www.sonystyle.ca/registration 4-111-727-12(1) LCD Digital Color TV 40% Printed in U.S.A. For Your...
Operating Instructions KDL-40XBR7 KDL-70XBR7 KDL-46XBR8 KDL-55XBR8 © 2008 Sony Corporation Please Do Not Return the Product to the Store On-line Registration Available: Be sure to resolve your questions more quickly than your TV United States http://productregistration.sony.com Canada http://www.sonystyle.ca/registration 4-111-727-12(1) LCD Digital Color TV 40% Printed in U.S.A. For Your...
Operating Instructions
Page 2
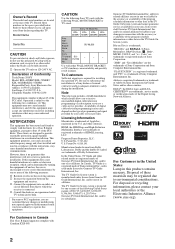
... local authorities or the Electronic Industries Alliance (www.eiae.org). 2 s Operate the TV only on a circuit different from Dolby Laboratories. However, there is a trademark. KDL- Be sure to subcontract the installation to a Sony dealer or licensed contractor and pay adequate attention to a cable service provider. Availability of... and, if not installed and used under license by one or more of the following WALL-MOUNT BRACKET or TV-stand. Disposal of Conformity Trade Name: SONY Model: KDL-40XBR7/KDL-70XBR7/ KDL-46XBR8/KDL-55XBR8 Responsible Party: Sony Electronics Inc.
... local authorities or the Electronic Industries Alliance (www.eiae.org). 2 s Operate the TV only on a circuit different from Dolby Laboratories. However, there is a trademark. KDL- Be sure to subcontract the installation to a Sony dealer or licensed contractor and pay adequate attention to a cable service provider. Availability of... and, if not installed and used under license by one or more of the following WALL-MOUNT BRACKET or TV-stand. Disposal of Conformity Trade Name: SONY Model: KDL-40XBR7/KDL-70XBR7/ KDL-46XBR8/KDL-55XBR8 Responsible Party: Sony Electronics Inc.
Operating Instructions
Page 3
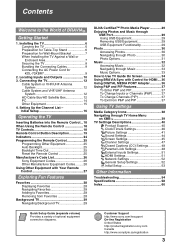
... Adding to Favorites 28 Removing from P&P and PIP 37 Using TV Settings Media Category Icons 38 Navigating through TV Home Menu on XMB 39 TV Settings Descriptions 40 Product Support 40 Clock/Timers Settings 40 Picture Settings 41 Sound Settings 44 Screen Settings 45 Channel Settings ...33 How to Use TV Guide On Screen 34 Using BRAVIA Sync with Control for KDL-70XBR7 9 2. Contents Welcome to the World of optional equipment connection diagrams. Customer Support http://www.sony.com/tvsupport On-line Registration United States http://productregistration.sony.com Canada http://www....
... Adding to Favorites 28 Removing from P&P and PIP 37 Using TV Settings Media Category Icons 38 Navigating through TV Home Menu on XMB 39 TV Settings Descriptions 40 Product Support 40 Clock/Timers Settings 40 Picture Settings 41 Sound Settings 44 Screen Settings 45 Channel Settings ...33 How to Use TV Guide On Screen 34 Using BRAVIA Sync with Control for KDL-70XBR7 9 2. Contents Welcome to the World of optional equipment connection diagrams. Customer Support http://www.sony.com/tvsupport On-line Registration United States http://productregistration.sony.com Canada http://www....

Operating Instructions
Page 4
... Guide, enclosed separately, illustrates how to connect other HD compatible external equipment Contact your BRAVIA TV is displayed on an HDTV, you will see black bars on the sides. The quality ...the image you see on upgrading to fit the entire screen (see page 12). http://www.sony.com/HDTV Canada http://www.sonystyle.ca/hd The Four Steps to a Full HD Experience: ..., Sound, Source, and Setup Along with your new BRAVIA TV, you for information on your cable or satellite provider for purchasing this Sony BRAVIA® high-definition television. Picture Quality and Aspect Ratio...
... Guide, enclosed separately, illustrates how to connect other HD compatible external equipment Contact your BRAVIA TV is displayed on an HDTV, you will see black bars on the sides. The quality ...the image you see on upgrading to fit the entire screen (see page 12). http://www.sony.com/HDTV Canada http://www.sonystyle.ca/hd The Four Steps to a Full HD Experience: ..., Sound, Source, and Setup Along with your new BRAVIA TV, you for information on your cable or satellite provider for purchasing this Sony BRAVIA® high-definition television. Picture Quality and Aspect Ratio...
Operating Instructions
Page 5
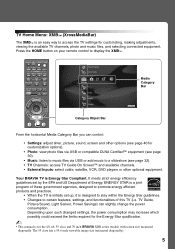
...: XMB™ (XrossMediaBar) The XMB™ is an easy way to access the TV settings for the 40, 46, 55 class and 70 inch BRAVIA XBR series models with screen size measured diagonally. It meets strict energy efficiency guidelines set up, it... control: • Settings: adjust timer, picture, sound, screen and other options (see page 40 for customization options). • Photo: view photo files via USB or compatible DLNA Certified™ equipment (see page 32). • TV Channels: access TV Guide On Screen™ and available channels. • External Inputs: select cable, satellite, VCR...
...: XMB™ (XrossMediaBar) The XMB™ is an easy way to access the TV settings for the 40, 46, 55 class and 70 inch BRAVIA XBR series models with screen size measured diagonally. It meets strict energy efficiency guidelines set up, it... control: • Settings: adjust timer, picture, sound, screen and other options (see page 40 for customization options). • Photo: view photo files via USB or compatible DLNA Certified™ equipment (see page 32). • TV Channels: access TV Guide On Screen™ and available channels. • External Inputs: select cable, satellite, VCR...
Operating Instructions
Page 6
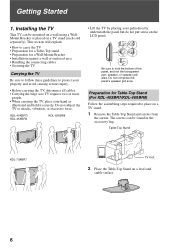
...securely. Be sure to shocks, vibration, or excessive force. Table-Top Stand KDL-70XBR7 TV Unit 2 Place the Table-Top Stand on the LCD panel. Getting Started 1. KDL-40XBR7/ KDL-46XBR8 KDL-55XBR8 • Lift the TV by placing your hand as illustrated and hold the bottom of the panel, ... and screws from the carton. This section will explain: • How to carry the TV • Preparation for a Table-Top stand • Preparation for Table-Top Stand (For KDL-40XBR7/KDL-46XBR8) Follow the assembling steps required to protect your property and avoid causing serious injury. ...
...securely. Be sure to shocks, vibration, or excessive force. Table-Top Stand KDL-70XBR7 TV Unit 2 Place the Table-Top Stand on the LCD panel. Getting Started 1. KDL-40XBR7/ KDL-46XBR8 KDL-55XBR8 • Lift the TV by placing your hand as illustrated and hold the bottom of the panel, ... and screws from the carton. This section will explain: • How to carry the TV • Preparation for a Table-Top stand • Preparation for Table-Top Stand (For KDL-40XBR7/KDL-46XBR8) Follow the assembling steps required to protect your property and avoid causing serious injury. ...
Operating Instructions
Page 7
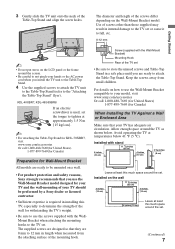
... put stress on the LCD panel or the frame around the set . For details on a wall. • For product protection and safety reasons, Sony strongly recommends that your TV should be mounted on how to the "Attaching the Table-Top Stand" flyer). Installed on the Wall-Mount Bracket model. KDL-40XBR7, KDL-46/55XBR8 If an...
... put stress on the LCD panel or the frame around the set . For details on a wall. • For product protection and safety reasons, Sony strongly recommends that your TV should be mounted on how to the "Attaching the Table-Top Stand" flyer). Installed on the Wall-Mount Bracket model. KDL-40XBR7, KDL-46/55XBR8 If an...
Operating Instructions
Page 8
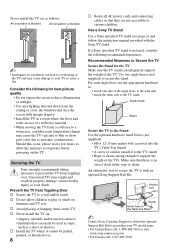
...is blocked. Recommended Measures to Secure the TV Secure the Stand for best picture quality • Do not expose the screen to curious children. Air circulation is with the Sony TV stand. Securing the TV Sony strongly recommends taking measures to evaporate before powering... on the Table-Top Stand ~ Contact Sony Customer Support to your TV model name. • For United States call: 1-800-488...
...is blocked. Recommended Measures to Secure the TV Secure the Stand for best picture quality • Do not expose the screen to curious children. Air circulation is with the Sony TV stand. Securing the TV Sony strongly recommends taking measures to evaporate before powering... on the Table-Top Stand ~ Contact Sony Customer Support to your TV model name. • For United States call: 1-800-488...
Operating Instructions
Page 9
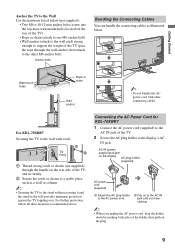
For further protection, follow all three measures recommended above. Getting Started Anchor the TV to the Wall Use the hardware listed below . For KDL-70XBR7 Securing the TV to the wall with other M6 anchor bolt) Anchor bolts Bundling the Connecting Cables You can bundle the connecting cables as a wall or column. ~ • ... located on to the AC IN to the display's AC IN jack. Connecting the AC Power Cord for KDL-70XBR7 1 Connect the AC power cord (supplied) to the AC IN jack of the TV. 2 Secure the AC plug holder to the AC power cord. AC IN (power supply input) jack on the...
For further protection, follow all three measures recommended above. Getting Started Anchor the TV to the Wall Use the hardware listed below . For KDL-70XBR7 Securing the TV to the wall with other M6 anchor bolt) Anchor bolts Bundling the Connecting Cables You can bundle the connecting cables as a wall or column. ~ • ... located on to the AC IN to the display's AC IN jack. Connecting the AC Power Cord for KDL-70XBR7 1 Connect the AC power cord (supplied) to the AC IN jack of the TV. 2 Secure the AC plug holder to the AC power cord. AC IN (power supply input) jack on the...
Operating Instructions
Page 10
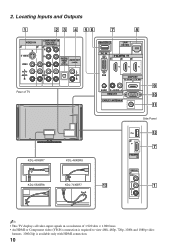
... PC IN 1 LAN (10/100) IN 3 4 RGB DMPORT DC 5V / 0.7A MAX Rear of TV AUDIO R AUDIO L REMOTE CABLE / ANTENNA 9 0 qa Side Panel KDL-40XBR7 KDL-46XBR8 KDL-55XBR8 KDL-70XBR7 qd 2 IN VIDEO IN 2 VIDEO L (MONO) AUDIO R qs 7 1 ~ • This TV displays all video input signals in a resolution of 1,920 dots × 1,080 lines. • An...
... PC IN 1 LAN (10/100) IN 3 4 RGB DMPORT DC 5V / 0.7A MAX Rear of TV AUDIO R AUDIO L REMOTE CABLE / ANTENNA 9 0 qa Side Panel KDL-40XBR7 KDL-46XBR8 KDL-55XBR8 KDL-70XBR7 qd 2 IN VIDEO IN 2 VIDEO L (MONO) AUDIO R qs 7 1 ~ • This TV displays all video input signals in a resolution of 1,920 dots × 1,080 lines. • An...
Operating Instructions
Page 11
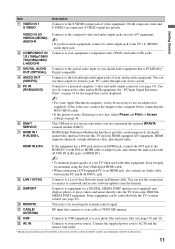
... through your digital audio equipment that is for the signals that connects to other equipment, Sony strongly recommends using an Ethernet cable. You can be controlled with the TV's remote control (see page 25). 0 REMOTE This jack is noisy, flickering or not clear, adjust Phase and Pitch of ... and R-AUDIO-L jack. 8 LAN (10/100) Connects to your analog audio equipment. qd AC IN Connects to a Local Area Network using the Sony High Speed HDMI cable. • When connecting a DVI-equipped PC to an HDMI jack, also connect an Audio cable between this connection to connect ...
... through your digital audio equipment that is for the signals that connects to other equipment, Sony strongly recommends using an Ethernet cable. You can be controlled with the TV's remote control (see page 25). 0 REMOTE This jack is noisy, flickering or not clear, adjust Phase and Pitch of ... and R-AUDIO-L jack. 8 LAN (10/100) Connects to your analog audio equipment. qd AC IN Connects to a Local Area Network using the Sony High Speed HDMI cable. • When connecting a DVI-equipped PC to an HDMI jack, also connect an Audio cable between this connection to connect ...
Operating Instructions
Page 12
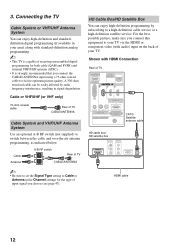
...enjoy high-definition programming by radio frequency interference, resulting in signal degradation. Shown with standard-definition analog programming. ~ • This TV is capable of input signal you connect this equipment to receive optimum picture quality. For the best possible picture, make sure you... choose (see page 47). 3. Connecting the TV Cable System or VHF/UHF Antenna System You can enjoy high-definition and standarddefinition digital programming (if available in the Channel settings...
...enjoy high-definition programming by radio frequency interference, resulting in signal degradation. Shown with standard-definition analog programming. ~ • This TV is capable of input signal you connect this equipment to receive optimum picture quality. For the best possible picture, make sure you... choose (see page 47). 3. Connecting the TV Cable System or VHF/UHF Antenna System You can enjoy high-definition and standarddefinition digital programming (if available in the Channel settings...

Operating Instructions
Page 13
Shown with DVI-to-HDMI cable or adapter) jack and connect the audio jack to the AUDIO IN (L/R) jacks of TV VIDEO IN COMPONENT IN (1080p/1080i/ 720p/480p/480i) 1 31 2 Y S VIDEO VIDEO L (MONO) AUDIO R PB PR L AUDIO R DIGITAL AUDIO AUDIO OUT OUT (OPTICAL) (OPTICAL) L AUDIO R...) PR (red) PB (blue) Y (green) Component video cable Audio cable (Continued) 13 For details, see page 11. Getting Started Shown with DVI Connection Rear of TV DMex/SERVICE LAN (10/100) PC IN 1 IN 3 4 DVI-to-HDMI cable RGB DMPORT DC 5V / 0.7A MAX AUDIO R AUDIO L REMOTE CABLE / ANTENNA AUDIO-R (red...
Shown with DVI-to-HDMI cable or adapter) jack and connect the audio jack to the AUDIO IN (L/R) jacks of TV VIDEO IN COMPONENT IN (1080p/1080i/ 720p/480p/480i) 1 31 2 Y S VIDEO VIDEO L (MONO) AUDIO R PB PR L AUDIO R DIGITAL AUDIO AUDIO OUT OUT (OPTICAL) (OPTICAL) L AUDIO R...) PR (red) PB (blue) Y (green) Component video cable Audio cable (Continued) 13 For details, see page 11. Getting Started Shown with DVI Connection Rear of TV DMex/SERVICE LAN (10/100) PC IN 1 IN 3 4 DVI-to-HDMI cable RGB DMPORT DC 5V / 0.7A MAX AUDIO R AUDIO L REMOTE CABLE / ANTENNA AUDIO-R (red...
Operating Instructions
Page 14
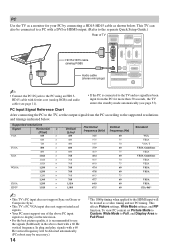
... * The 1080p timing when applied to Full Pixel. In plug and play, signals with ferrite core (analog RGB) and audio cable (see page 53). This TV can also be connected to a PC with a DVI or HDMI output. (Refer to the separate Quick Setup Guide.) Rear of the above PC input signals... to display on the television. • For the best picture quality, it is connected to the TV and no signal has been input from the PC according to use the signals (boldfaced) in the above chart with a 60 Hz vertical frequency. This...
... * The 1080p timing when applied to Full Pixel. In plug and play, signals with ferrite core (analog RGB) and audio cable (see page 53). This TV can also be connected to a PC with a DVI or HDMI output. (Refer to the separate Quick Setup Guide.) Rear of the above PC input signals... to display on the television. • For the best picture quality, it is connected to the TV and no signal has been input from the PC according to use the signals (boldfaced) in the above chart with a 60 Hz vertical frequency. This...

Operating Instructions
Page 15
Getting Started Other Equipment Personal computer LAN connection Blu-ray Digital Disc player/ DVD satellite "PS3" player receiver Digital cable Audio box system Rear of TV DMex/SERVICE PC IN 1 LAN (10/100) IN 3 4 RGB DMPORT DC 5V / 0.7A MAX AUDIO R AUDIO L REMOTE CABLE / ANTENNA VIDEO IN COMPONENT IN (1080p/1080i/ ... audio equipment (A/V Receiver/ Home Theater) Analog audio equipment (A/V Receiver/ Home Theater) ~ • Refer to the Quick Setup Guide (supplied) when connecting other equipment to your TV. Camcorder 15
Getting Started Other Equipment Personal computer LAN connection Blu-ray Digital Disc player/ DVD satellite "PS3" player receiver Digital cable Audio box system Rear of TV DMex/SERVICE PC IN 1 LAN (10/100) IN 3 4 RGB DMPORT DC 5V / 0.7A MAX AUDIO R AUDIO L REMOTE CABLE / ANTENNA VIDEO IN COMPONENT IN (1080p/1080i/ ... audio equipment (A/V Receiver/ Home Theater) Analog audio equipment (A/V Receiver/ Home Theater) ~ • Refer to the Quick Setup Guide (supplied) when connecting other equipment to your TV. Camcorder 15
Operating Instructions
Page 16
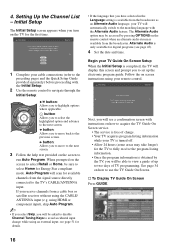
...the language that you to select the highlighted option and advance to the matching language with the Alternate Audio feature. Follow the on the TV for digital programs (see a confirmation screen with the Initial Setup. 2 Use the remote control to navigate through the Initial Setup: ... broadcaster as default audio for Energy Star compliant mode. Select to continue. English Español Français 1 Complete your TV will automatically switch to the next screen. Alternate Audio is complete. Initial Setup Step 7of 7 Initial Setup is only available for ...
...the language that you to select the highlighted option and advance to the matching language with the Alternate Audio feature. Follow the on the TV for digital programs (see a confirmation screen with the Initial Setup. 2 Use the remote control to navigate through the Initial Setup: ... broadcaster as default audio for Energy Star compliant mode. Select to continue. English Español Français 1 Complete your TV will automatically switch to the next screen. Alternate Audio is complete. Initial Setup Step 7of 7 Initial Setup is only available for ...
Operating Instructions
Page 17
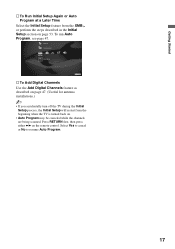
...Initial Setup Again or Auto Program at a Later Time Select the Initial Setup feature from the beginning when the TV is turned back on page 53. Network General Setup Settings Initial Setup TV s To Add Digital Channels Use the Add Digital Channels feature as described on page 47. (Useful for ...antenna installations.) ~ • If you accidentally turn off the TV during the Initial Setup process, the Initial Setup will restart from the XMB™ or perform the steps described in the Initial Setup section on...
...Initial Setup Again or Auto Program at a Later Time Select the Initial Setup feature from the beginning when the TV is turned back on page 53. Network General Setup Settings Initial Setup TV s To Add Digital Channels Use the Add Digital Channels feature as described on page 47. (Useful for ...antenna installations.) ~ • If you accidentally turn off the TV during the Initial Setup process, the Initial Setup will restart from the XMB™ or perform the steps described in the Initial Setup section on...

Operating Instructions
Page 18
... open When Using the Remote Control Follow the guidelines below • Point your remote control directly at the IR sensor located on your TV. • Fluorescent lamps can interfere with the remote control, reinsert or replace your batteries and make sure that no objects are blocking ...problems with your remote control; HOME INPUT VOL CH 18 try turning off the fluorescent lamps. • If you are correctly inserted. Operating the TV Inserting Batteries into the Remote Control Insert two size AA batteries (supplied) by matching e and E on the remote control. Push to the ...
... open When Using the Remote Control Follow the guidelines below • Point your remote control directly at the IR sensor located on your TV. • Fluorescent lamps can interfere with the remote control, reinsert or replace your batteries and make sure that no objects are blocking ...problems with your remote control; HOME INPUT VOL CH 18 try turning off the fluorescent lamps. • If you are correctly inserted. Operating the TV Inserting Batteries into the Remote Control Insert two size AA batteries (supplied) by matching e and E on the remote control. Push to the ...

Operating Instructions
Page 19
...display the banner with the Control for "Programming the Remote Control". x STOP: Press to live TV cache. For details, see page 51). SYNC MENU: Press once to your dealer or www.sony.com/bravia for HDMI equipment is operating and other buttons will be connected by an HDMI connection... to display the Sync'd HDMI Devices (while a Control for more information. The picture settings will be set period of the live TV when playing back a recorded...
...display the banner with the Control for "Programming the Remote Control". x STOP: Press to live TV cache. For details, see page 51). SYNC MENU: Press once to your dealer or www.sony.com/bravia for HDMI equipment is operating and other buttons will be connected by an HDMI connection... to display the Sync'd HDMI Devices (while a Control for more information. The picture settings will be set period of the live TV when playing back a recorded...
Operating Instructions
Page 20
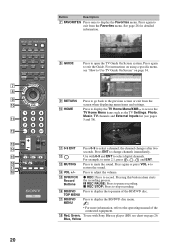
...VOL + to stop recording. x REC STOP: Press to restore the sound. Blue, Yellow 20 qh BD/DVD Press to select digital channels. Use with Sony Blu-ray player (BD) see chart on using a specific menu, see pages 5 and 38). TOP MENU qj BD/DVD MENU Press to display the ... when displaying menu items and settings. Press again to pause recording. the channel changes after two seconds. Product Support Clock/Timers Settings Sound Screen Channel TV qa 0-9 ENT qs qd MUTING qf VOL +/- X REC PAUSE: Press to exit the Guide. For instructions on page 26. Press again to the...
...VOL + to stop recording. x REC STOP: Press to restore the sound. Blue, Yellow 20 qh BD/DVD Press to select digital channels. Use with Sony Blu-ray player (BD) see chart on using a specific menu, see pages 5 and 38). TOP MENU qj BD/DVD MENU Press to display the ... when displaying menu items and settings. Press again to pause recording. the channel changes after two seconds. Product Support Clock/Timers Settings Sound Screen Channel TV qa 0-9 ENT qs qd MUTING qf VOL +/- X REC PAUSE: Press to exit the Guide. For instructions on page 26. Press again to the...


