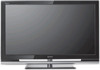
Operating Instructions
Page 2
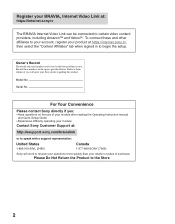
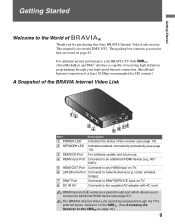
... questions more quickly than your retailer or place of purchase. For Your Convenience Please contact Sony directly if you call upon your Sony dealer regarding this product. Register your BRAVIA® Internet Video Link at: https://internet.sony.tv The BRAVIA Internet Video Link can be connected to them whenever you : z Have questions on the use...
... questions more quickly than your retailer or place of purchase. For Your Convenience Please contact Sony directly if you call upon your Sony dealer regarding this product. Register your BRAVIA® Internet Video Link at: https://internet.sony.tv The BRAVIA Internet Video Link can be connected to them whenever you : z Have questions on the use...
Operating Instructions
Page 3
... authority to operate this product. If this equipment does cause harmful interference to radio or television reception, which the receiver is intended for help. Trademark Information "BRAVIA" and Sony Corporation. Inc. This device incorporates High-Definition Multimedia Interface (HDMI™) technology. Reverse ...shock to persons. s Consult the dealer or an experienced radio/TV technician for home and other outlet unless the blades can be placed on the receiver. Amazon is a trademark of Sony Computer Entertainment Inc. HDMI, the HDMI logo and High-Definition ...
... authority to operate this product. If this equipment does cause harmful interference to radio or television reception, which the receiver is intended for help. Trademark Information "BRAVIA" and Sony Corporation. Inc. This device incorporates High-Definition Multimedia Interface (HDMI™) technology. Reverse ...shock to persons. s Consult the dealer or an experienced radio/TV technician for home and other outlet unless the blades can be placed on the receiver. Amazon is a trademark of Sony Computer Entertainment Inc. HDMI, the HDMI logo and High-Definition ...
Operating Instructions
Page 5
... a place subject to protect it from overheating, these ventilation holes must never be repairable, ask a qualified service technician to pick up the TV set. SERVICING Damage requiring service If the surface of the receiver cracks, do not use the receiver as they may expose you unplug the...of any objects on the receiver. s Avoid operating the receiver at temperature below 41°F (5°C). s When mounted to the back of TV, do not touch the receiver until you to have the same characteristics as specified by the manufacturer that could result in safe operating condition, and...
... a place subject to protect it from overheating, these ventilation holes must never be repairable, ask a qualified service technician to pick up the TV set. SERVICING Damage requiring service If the surface of the receiver cracks, do not use the receiver as they may expose you unplug the...of any objects on the receiver. s Avoid operating the receiver at temperature below 41°F (5°C). s When mounted to the back of TV, do not touch the receiver until you to have the same characteristics as specified by the manufacturer that could result in safe operating condition, and...

Operating Instructions
Page 7
... Setting up the BRAVIA Internet Video Link 11 Cable Connections ...12 Connect to the Internet 13 Confirm Connection 15 Basic Remote Control Instruction 16 Accessing the Receiver on the XMB 16 Confirm Network Connection 17 Exiting Your Receiver 19 Attaching the Receiver to Your TV 20 Mounting to... the Back of Your TV 20 Navigating with Your TV's Remote Control Remote Control ...23 New Icons on the XMB™ Internet Video Menu...25 Video Menu...
... Setting up the BRAVIA Internet Video Link 11 Cable Connections ...12 Connect to the Internet 13 Confirm Connection 15 Basic Remote Control Instruction 16 Accessing the Receiver on the XMB 16 Confirm Network Connection 17 Exiting Your Receiver 19 Attaching the Receiver to Your TV 20 Mounting to... the Back of Your TV 20 Navigating with Your TV's Remote Control Remote Control ...23 New Icons on the XMB™ Internet Video Menu...25 Video Menu...
Operating Instructions
Page 9
...it on the XMBTM. (See Accessing the Receiver on the XMBTM on TV. 8 DC IN 9V Connects to the supplied AC adapter with XMBTM (XrossMediaBar) and DMex interface is for purchasing this Sony BRAVIA Internet Video Link receiver. For optimum picture performance, your high-speed Internet...Connects to an additional HDMI device (e.g. This manual is capable of receiving high definition programming through the TV's external inputs. The BRAVIA Internet Video Link cannot be accessed through your BRAVIA TV with AC cord. HDMI input port 4 works as a pass-through port which allows you for...
...it on the XMBTM. (See Accessing the Receiver on the XMBTM on TV. 8 DC IN 9V Connects to the supplied AC adapter with XMBTM (XrossMediaBar) and DMex interface is for purchasing this Sony BRAVIA Internet Video Link receiver. For optimum picture performance, your high-speed Internet...Connects to an additional HDMI device (e.g. This manual is capable of receiving high definition programming through the TV's external inputs. The BRAVIA Internet Video Link cannot be accessed through your BRAVIA TV with AC cord. HDMI input port 4 works as a pass-through port which allows you for...

Operating Instructions
Page 10
Orange (Blinking) The receiver is connected to the Internet. Red (Blinking) Unable to connect to the home network. Check cable connections. Network LED Indicators Green The receiver is connected to TV. Check the Troubleshooting section for additional information on . Getting Started LED Indicators Power LED Indicators Green The receiver is powered on LED indicators. 10 Green (Blinking) The receiver has network activity. 1 NETWORK 1 NETWORK Power LED Network LED Make sure your home network is installing new software (do not disconnect AC power).
Orange (Blinking) The receiver is connected to the Internet. Red (Blinking) Unable to connect to the home network. Check cable connections. Network LED Indicators Green The receiver is connected to TV. Check the Troubleshooting section for additional information on . Getting Started LED Indicators Power LED Indicators Green The receiver is powered on LED indicators. 10 Green (Blinking) The receiver has network activity. 1 NETWORK 1 NETWORK Power LED Network LED Make sure your home network is installing new software (do not disconnect AC power).

Operating Instructions
Page 11
Getting Started Getting Started Setting up the BRAVIA Internet Video Link Perform the following simple tasks to setup your receiver: make the cable connections, connect to the Internet, and attach the receiver to your TV before making any cable connections. The receiver is packaged with the Cable Cover attached. Begin by removing...LAN DC IN 9V Gently slide the Cable Cover toward the rear side of the receiver, then pull down. 11 Be sure to Your TV on page 20 and the supplied Attachment Guide for attachment instructions. Refer to the section Attaching the Receiver to turn off your...
Getting Started Getting Started Setting up the BRAVIA Internet Video Link Perform the following simple tasks to setup your receiver: make the cable connections, connect to the Internet, and attach the receiver to your TV before making any cable connections. The receiver is packaged with the Cable Cover attached. Begin by removing...LAN DC IN 9V Gently slide the Cable Cover toward the rear side of the receiver, then pull down. 11 Be sure to Your TV on page 20 and the supplied Attachment Guide for attachment instructions. Refer to the section Attaching the Receiver to turn off your...

Operating Instructions
Page 12
... the large (type A) end of the HDMI cable to the DMex/SERVICE port on the TV. D Connect the straight end of the USB cable to any HDMI port on the receiver.... LAN OUT DC IN 9V " # $ % OUT LAN DC IN 9V % $ #" B A Connect the AC adapter to the LAN Ethernet port on the TV. OUT LAN DC IN 9V B B DMex D HDMI VIDEO IN 1 3 S VIDEO VIDEO L (MONO) AUDIO R COMPONENT IN PC IN 1 2 Y RGB...on the receiver. Getting Started Cable Connections 1 Connect the four cables to your TV set. 12 Do not plug into the wall outlet at this time. C Connect one end of the USB ...
... the large (type A) end of the HDMI cable to the DMex/SERVICE port on the TV. D Connect the straight end of the USB cable to any HDMI port on the receiver.... LAN OUT DC IN 9V " # $ % OUT LAN DC IN 9V % $ #" B A Connect the AC adapter to the LAN Ethernet port on the TV. OUT LAN DC IN 9V B B DMex D HDMI VIDEO IN 1 3 S VIDEO VIDEO L (MONO) AUDIO R COMPONENT IN PC IN 1 2 Y RGB...on the receiver. Getting Started Cable Connections 1 Connect the four cables to your TV set. 12 Do not plug into the wall outlet at this time. C Connect one end of the USB ...

Operating Instructions
Page 15
... for a description of all LED indicator colors. 15 Getting Started Option 3. Direct to confirm the connection. Confirm Connection 1 Plug in the receiver. 2 Power on the TV. 3 Confirm the LED lights are green as shown below , to Router Connection Getting Started VIDEO IN 1 3 S VIDEO VIDEO L (MONO) AUDIO R COMPONENT IN PC IN 1 2 Y RGB...
... for a description of all LED indicator colors. 15 Getting Started Option 3. Direct to confirm the connection. Confirm Connection 1 Plug in the receiver. 2 Power on the TV. 3 Confirm the LED lights are green as shown below , to Router Connection Getting Started VIDEO IN 1 3 S VIDEO VIDEO L (MONO) AUDIO R COMPONENT IN PC IN 1 2 Y RGB...

Operating Instructions
Page 16
... Category Bar Category Object Bar You can only access the BRAVIA Internet Video Link from the XMBTM or by switching external inputs using the INPUT button on the XMBTM The BRAVIA Internet Video Link is properly connected to the TV and has made a successful Internet connection, new icons related... to the BRAVIA Internet Video Link will be available on your connection and to confirm your...
... Category Bar Category Object Bar You can only access the BRAVIA Internet Video Link from the XMBTM or by switching external inputs using the INPUT button on the XMBTM The BRAVIA Internet Video Link is properly connected to the TV and has made a successful Internet connection, new icons related... to the BRAVIA Internet Video Link will be available on your connection and to confirm your...

Operating Instructions
Page 17
... module" appears on the screen, wait a few minutes to complete. 3 To continue the connection, begin Region Setup to enter your region settings and customize your TV's remote control to view the connection status. Getting Started Getting Started Confirm Network Connection Follow these instructions to confirm that your Internet Video Link receiver... screen below does not appear, proceed to choose Continue and install the update. The update may need to be updated. Press the button on your TV's remote control to step 3.
... module" appears on the screen, wait a few minutes to complete. 3 To continue the connection, begin Region Setup to enter your region settings and customize your TV's remote control to view the connection status. Getting Started Getting Started Confirm Network Connection Follow these instructions to confirm that your Internet Video Link receiver... screen below does not appear, proceed to choose Continue and install the update. The update may need to be updated. Press the button on your TV's remote control to step 3.

Operating Instructions
Page 18
Upon successful connection to enter your ZIP code. Press the B button on your region, the receiver will see page 47 for the Country and City List). 4 Once you will attempt to connect to switch countries if applicable. Highlight your country and press the button (see the screen below. 18 Press the V/v/B/b and 0-9 buttons to the Internet, you have setup your TV's remote control to the Internet. Getting Started The default country is the United States.
Upon successful connection to enter your ZIP code. Press the B button on your region, the receiver will see page 47 for the Country and City List). 4 Once you will attempt to connect to switch countries if applicable. Highlight your country and press the button (see the screen below. 18 Press the V/v/B/b and 0-9 buttons to the Internet, you have setup your TV's remote control to the Internet. Getting Started The default country is the United States.

Operating Instructions
Page 19
...From My Page, press the DMex button to toggle to previous input. It is available on the remote control to access the BRAVIA Internet Video Link. OR ● Change the TV's input by pressing the INPUT button. Highlight a channel to External Inputs. OR ● Press the HOME button and scroll.... ● Press the HOME button and scroll to TV. New services are available on the Network and Video menus, and Internet Video Link settings are several ways to exit the BRAVIA Internet Video Link and resume watching your TV's remote control to access the XMBTM (XrossMediaBar). Selecting any input ...
...From My Page, press the DMex button to toggle to previous input. It is available on the remote control to access the BRAVIA Internet Video Link. OR ● Change the TV's input by pressing the INPUT button. Highlight a channel to External Inputs. OR ● Press the HOME button and scroll.... ● Press the HOME button and scroll to TV. New services are available on the Network and Video menus, and Internet Video Link settings are several ways to exit the BRAVIA Internet Video Link and resume watching your TV's remote control to access the XMBTM (XrossMediaBar). Selecting any input ...

Operating Instructions
Page 20
... PB IN DIGITAL 1 AUDIO OUT (OPTICAL) 3 PR L AUDIO R AUDIO (1080p/1080i/720p/480p/480i) 4 AUDIO OUT R AUDIO L L AUDIO R (VAR/FIX) DMex/ SERVICE LCD TV Mounting Plastic Fasteners (Type 1) only CABLE / ANTENNA 20 Make sure the notches on the Cable Cover align with those indicated on the receiver. Getting Started... Attaching the Receiver to Your TV Before you will need to the Back of Your TV 1 Find the location where you begin the attachment, slide the Cable Cover back into place. Front of ...
... PB IN DIGITAL 1 AUDIO OUT (OPTICAL) 3 PR L AUDIO R AUDIO (1080p/1080i/720p/480p/480i) 4 AUDIO OUT R AUDIO L L AUDIO R (VAR/FIX) DMex/ SERVICE LCD TV Mounting Plastic Fasteners (Type 1) only CABLE / ANTENNA 20 Make sure the notches on the Cable Cover align with those indicated on the receiver. Getting Started... Attaching the Receiver to Your TV Before you will need to the Back of Your TV 1 Find the location where you begin the attachment, slide the Cable Cover back into place. Front of ...

Operating Instructions
Page 21
... head of your finger until you have inserted the fasteners into the holes on the TV. 2 Take the Mounting Knobs and hand twist into the hole on the bracket, .... 21 Getting Started Getting Started 2 Take the bracket and match the holes on the bracket to your TV using the two Plastic Fasteners (supplied). Press in the head of the fasteners with the bracket (holes A ...and C) for right side attachment to the LCD TV. 1 Secure the attachment bracket to the screw holes on the TV are shown with your TV. The screw holes on the back of the fasteners until they click...
... head of your finger until you have inserted the fasteners into the holes on the TV. 2 Take the Mounting Knobs and hand twist into the hole on the bracket, .... 21 Getting Started Getting Started 2 Take the bracket and match the holes on the bracket to your TV using the two Plastic Fasteners (supplied). Press in the head of the fasteners with the bracket (holes A ...and C) for right side attachment to the LCD TV. 1 Secure the attachment bracket to the screw holes on the TV are shown with your TV. The screw holes on the back of the fasteners until they click...
Operating Instructions
Page 23
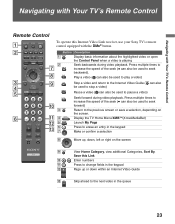
...to the next video in the keypad Make or confirm a selection 8 Move up, down, left or right on the screen. 6 qa 4 Display the TV Home Menu/XMB™(XrossMediaBar) qs 5 Launch My Page 6 qd 7 Press to seek backward). Press multiple times to increase the speed of the seek ...a selection, depending on the screen 9 q; qa qs View Home Category, view additional Categories, Sort By, Save this Internet Video Link receiver, use your Sony TV's remote 1 control equipped with the DMex button. Press multiple times to increase the speed of the seek (B can also be used to pause a video)...
...to the next video in the keypad Make or confirm a selection 8 Move up, down, left or right on the screen. 6 qa 4 Display the TV Home Menu/XMB™(XrossMediaBar) qs 5 Launch My Page 6 qd 7 Press to seek backward). Press multiple times to increase the speed of the seek ...a selection, depending on the screen 9 q; qa qs View Home Category, view additional Categories, Sort By, Save this Internet Video Link receiver, use your Sony TV's remote 1 control equipped with the DMex button. Press multiple times to increase the speed of the seek (B can also be used to pause a video)...

Operating Instructions
Page 27
...Internet Video Link Features Internet Video Guide Select an Internet channel to display the next page. To view more information on the appropriate TV or Movie Rating. Save this Link Choose to save video to sort the videos by the options available. to view its Internet Video... Guide. Options Menu Option Description Sort By Choose to a folder for information on activating and using your TV's Operating Instruction Manual for easy repeat viewing (see more items on the Options menu. 4 Press the OPTIONS button to select a different category...
...Internet Video Link Features Internet Video Guide Select an Internet channel to display the next page. To view more information on the appropriate TV or Movie Rating. Save this Link Choose to save video to sort the videos by the options available. to view its Internet Video... Guide. Options Menu Option Description Sort By Choose to a folder for information on activating and using your TV's Operating Instruction Manual for easy repeat viewing (see more items on the Options menu. 4 Press the OPTIONS button to select a different category...
Operating Instructions
Page 30
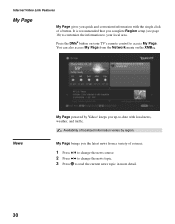
.... You can also access My Page from a variety of sources. 1 Press V/v to change the news source. 2 Press B/b to change the news topic. 3 Press to your TV's remote control to -date with the single click of localized information varies by Yahoo! Press the DMex button on the XMB™. Availability of a button...
.... You can also access My Page from a variety of sources. 1 Press V/v to change the news source. 2 Press B/b to change the news topic. 3 Press to your TV's remote control to -date with the single click of localized information varies by Yahoo! Press the DMex button on the XMB™. Availability of a button...
Operating Instructions
Page 34
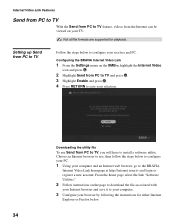
... , then follow the steps below . 34 Configuring the BRAVIA Internet Video Link 1 From the Settings menu on the page to download the file associated with your Internet browser and save your TV. Setting up Send from PC to TV Follow the steps below to configure your computer and an... either Internet Explorer or Firefox below to install a software utility. Choose an Internet browser to use Send from PC to TV and press . 3 Highlight Enable and press . 4 Press RETURN to save it to the BRAVIA Internet Video Link homepage at http://internet.sony.tv and login or register a new account.
... , then follow the steps below . 34 Configuring the BRAVIA Internet Video Link 1 From the Settings menu on the page to download the file associated with your Internet browser and save your TV. Setting up Send from PC to TV Follow the steps below to configure your computer and an... either Internet Explorer or Firefox below to install a software utility. Choose an Internet browser to use Send from PC to TV and press . 3 Highlight Enable and press . 4 Press RETURN to save it to the BRAVIA Internet Video Link homepage at http://internet.sony.tv and login or register a new account.

Operating Instructions
Page 35
... turned on and the receiver is installed, select Start from the main Windows menu, then select Programs. 3 Select Send from PC to TV Configuration 4 Type in your IP address (this can be found on the Device Information menu; Internet Video Link Features Internet Video Link Features Configuration ... utility file in your IP address (this can be found on the Device Information menu; Proceed to "Using Send from PC to play on your TV. 35 see page 39 for usage instructions. see page 39 for details). 5 Close all browser windows and restart Internet Explorer. 6 Your web-browser is ...
... turned on and the receiver is installed, select Start from the main Windows menu, then select Programs. 3 Select Send from PC to TV Configuration 4 Type in your IP address (this can be found on the Device Information menu; Internet Video Link Features Internet Video Link Features Configuration ... utility file in your IP address (this can be found on the Device Information menu; Proceed to "Using Send from PC to play on your TV. 35 see page 39 for usage instructions. see page 39 for details). 5 Close all browser windows and restart Internet Explorer. 6 Your web-browser is ...


