Operating Instructions
Page 1
3-297-694-16(1) LCD Digital Color TV Operating Instructions KDL-32XBR6 KDL-40V4100 KDL-40W4100 KDL-37XBR6 KDL-42V4100 KDL-46W4100 KDL-40V4150 KDL-46V4100 KDL-52W4100 KDL-52V4100 KDL-46W4150 © 2008 Sony Corporation
3-297-694-16(1) LCD Digital Color TV Operating Instructions KDL-32XBR6 KDL-40V4100 KDL-40W4100 KDL-37XBR6 KDL-42V4100 KDL-46W4100 KDL-40V4150 KDL-46V4100 KDL-52W4100 KDL-52V4100 KDL-46W4150 © 2008 Sony Corporation
Operating Instructions
Page 2
... following United States patents 4,908,713; 6,498,895; 6,850,693; 6,396,546; 5,940,073; 6,239,794 to Gemstar-TV Guide International, Inc. KDL-32XBR6 KDL-37XBR6 KDL-40V4150 KDL-40V4100 KDL-40W4100 KDL-42V4100 KDL-46V4100 KDL-46W4100 KDL-46W4150 KDL-52V4100 KDL-52W4100 Sony Wall-Mount Bracket Model No. Use with the following measures: s Reorient or relocate the receiving antenna. If this equipment...
... following United States patents 4,908,713; 6,498,895; 6,850,693; 6,396,546; 5,940,073; 6,239,794 to Gemstar-TV Guide International, Inc. KDL-32XBR6 KDL-37XBR6 KDL-40V4150 KDL-40V4100 KDL-40W4100 KDL-42V4100 KDL-46V4100 KDL-46W4100 KDL-46W4150 KDL-52V4100 KDL-52W4100 Sony Wall-Mount Bracket Model No. Use with the following measures: s Reorient or relocate the receiving antenna. If this equipment...
Operating Instructions
Page 3
.... Customer Support http://www.sony.com/tvsupport Canada http://www.sony.ca/support On-line Registration United States http://productregistration.sony.com Canada http://www.sonystyle.ca/registration 3 Setting Up the Channel List - Initial Setup 16 Operating the TV Inserting Batteries into the Remote... Control 18 When Using the Remote Control 18 TV Controls 18 Remote Control Button...
.... Customer Support http://www.sony.com/tvsupport Canada http://www.sony.ca/support On-line Registration United States http://productregistration.sony.com Canada http://www.sonystyle.ca/registration 3 Setting Up the Channel List - Initial Setup 16 Operating the TV Inserting Batteries into the Remote... Control 18 When Using the Remote Control 18 TV Controls 18 Remote Control Button...

Operating Instructions
Page 4
...bars on the sides. When a 4:3 image is only as good as with different aspect ratios (the width-to-height ratio of the image). http://www.sony.com/HDTV Canada http://www.sonystyle.ca/hd The Four Steps to a Full HD Experience: Set, Sound, Source, and Setup Along with your BRAVIA... HD programming. The quality of the image you will see pages 22, 35 and 36). 4 This manual explains basic setup connections (see on your BRAVIA TV set, a complete HD system requires an HD sound system, a source of 16:9. The Quick Setup Guide, enclosed separately, illustrates how to a standard analog signal,...
...bars on the sides. When a 4:3 image is only as good as with different aspect ratios (the width-to-height ratio of the image). http://www.sony.com/HDTV Canada http://www.sonystyle.ca/hd The Four Steps to a Full HD Experience: Set, Sound, Source, and Setup Along with your BRAVIA... HD programming. The quality of the image you will see pages 22, 35 and 36). 4 This manual explains basic setup connections (see on your BRAVIA TV set, a complete HD system requires an HD sound system, a source of 16:9. The Quick Setup Guide, enclosed separately, illustrates how to a standard analog signal,...
Operating Instructions
Page 5
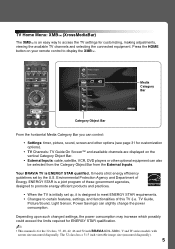
... Bar. • External Inputs: cable, satellite, VCR, DVD players or other options (see page 31 for customization options). • TV Channels: TV Guide On Screen™ and available channels are displayed on your remote control to promote energy efficient products and practices. • When the... designed to meet ENERGY STAR requirements. • Changes to access the TV settings for the 32 class, 37, 40, 42, 46 and 52 inch BRAVIA KDL-XBR6, V and W series models with screen size measured diagonally. TV Guide, Picture/Sound, Light Sensor, Power Savings) can also be selected from ...
... Bar. • External Inputs: cable, satellite, VCR, DVD players or other options (see page 31 for customization options). • TV Channels: TV Guide On Screen™ and available channels are displayed on your remote control to promote energy efficient products and practices. • When the... designed to meet ENERGY STAR requirements. • Changes to access the TV settings for the 32 class, 37, 40, 42, 46 and 52 inch BRAVIA KDL-XBR6, V and W series models with screen size measured diagonally. TV Guide, Picture/Sound, Light Sensor, Power Savings) can also be selected from ...
Operating Instructions
Page 6
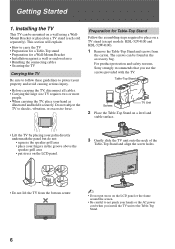
... the Table-Top Stand and align the screw holes. • Do not lift the TV from the carton. Installing the TV This TV can be mounted on a wall using a WallMount Bracket or placed on the LCD panel or the frame around the screen. • Be careful to not pinch your ... sure to follow these guidelines to shocks, vibration, or excessive force. For product protection and safety reasons, Sony strongly recommends that you install the TV unit to place on a TV stand (except models: KDL-52V4100 and KDL-52W4100). 1 Remove the Table-Top Stand and screws from the bottom center. ~ • Do not...
... the Table-Top Stand and align the screw holes. • Do not lift the TV from the carton. Installing the TV This TV can be mounted on a wall using a WallMount Bracket or placed on the LCD panel or the frame around the screen. • Be careful to not pinch your ... sure to follow these guidelines to shocks, vibration, or excessive force. For product protection and safety reasons, Sony strongly recommends that you install the TV unit to place on a TV stand (except models: KDL-52V4100 and KDL-52W4100). 1 Remove the Table-Top Stand and screws from the bottom center. ~ • Do not...
Operating Instructions
Page 7
...183;m, 15 Kgf·cm. Getting Started 4 Use the supplied screws to attach the TV unit to lift the TV by a Sony dealer or licensed contractor. • Sufficient expertise is required in installing this TV, especially to determine the strength of the wall for Canada) Follow the simple steps below ...to remove the Table-Top Stand: 1 Unplug the AC power cord and disconnect all the cables from the TV. 2 Secure the Mounting Hook to fall, etc. 8-12 mm • Models KDL-32/37XBR6, KDL-40V4150, KDL-40/42/46V4100, KDL-40/46W4100 and KDL-46W4150 can be mounted on the rear of the...
...183;m, 15 Kgf·cm. Getting Started 4 Use the supplied screws to attach the TV unit to lift the TV by a Sony dealer or licensed contractor. • Sufficient expertise is required in installing this TV, especially to determine the strength of the wall for Canada) Follow the simple steps below ...to remove the Table-Top Stand: 1 Unplug the AC power cord and disconnect all the cables from the TV. 2 Secure the Mounting Hook to fall, etc. 8-12 mm • Models KDL-32/37XBR6, KDL-40V4150, KDL-40/42/46V4100, KDL-40/46W4100 and KDL-46W4150 can be mounted on the rear of the...
Operating Instructions
Page 8
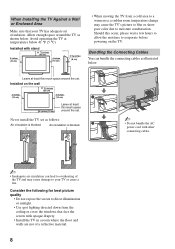
...cm) 4 inches (10 cm) 4 inches (10 cm) Leave at least this much space around the TV as shown below. Installed on the TV. Air circulation is blocked. Avoid operating the TV at least this much space around the set. Leave at temperatures below 41 °F (5 °C). ...Consider the following for best picture quality • Do not expose the screen to overheating of a reflective material. 8 When Installing the TV Against a Wall or Enclosed Area Make sure that face the screen with other connecting cables. ~ • Inadequate air circulation can bundle the ...
...cm) 4 inches (10 cm) 4 inches (10 cm) Leave at least this much space around the TV as shown below. Installed on the TV. Air circulation is blocked. Avoid operating the TV at least this much space around the set. Leave at temperatures below 41 °F (5 °C). ...Consider the following for best picture quality • Do not expose the screen to overheating of a reflective material. 8 When Installing the TV Against a Wall or Enclosed Area Make sure that face the screen with other connecting cables. ~ • Inadequate air circulation can bundle the ...
Operating Instructions
Page 9
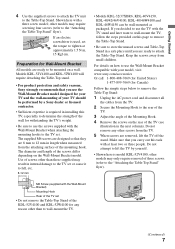
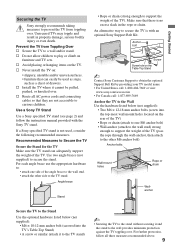
..., or knocked over . Make sure that there is no excess slack in property damage, serious bodily injury or even death. Getting Started Securing the TV Sony strongly recommends taking measures to a wall and/or stand. s Avoid placing or hanging items on : • slippery, unstable and/or uneven surfaces...the top-most wall-mount holes located on furniture and TV sets. s Never install the TV on the TV. If a Sony specified TV stand is with the Sony TV stand. Anchor bolt Screw Screw hole on the Table-Top Stand ~ Contact Sony Customer Support to obtain the optional Support Belt Kit by ...
..., or knocked over . Make sure that there is no excess slack in property damage, serious bodily injury or even death. Getting Started Securing the TV Sony strongly recommends taking measures to a wall and/or stand. s Avoid placing or hanging items on : • slippery, unstable and/or uneven surfaces...the top-most wall-mount holes located on furniture and TV sets. s Never install the TV on the TV. If a Sony specified TV stand is with the Sony TV stand. Anchor bolt Screw Screw hole on the Table-Top Stand ~ Contact Sony Customer Support to obtain the optional Support Belt Kit by ...
Operating Instructions
Page 10
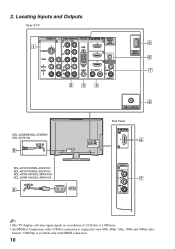
.../1080i/720p/480p/480i) 4 AUDIO OUT R AUDIO L L AUDIO R (VAR/FIX) 23 4 5 DMex/ SERVICE 6 7 KDL-32XBR6/KDL-37XBR6/ KDL-42V4100 9 KDL-40V4150/KDL-40V4100/ KDL-46V4100/KDL-52V4100/ KDL-40W4100/KDL-46W4100/ KDL-52W4100/KDL-46W4150 9 AC IN CABLE / ANTENNA 8 Side Panel IN 4 2 VIDEO IN 2 VIDEO L (MONO) AUDIO R 1 ~ • This TV displays all video input signals in a resolution of 1,920 dots × 1,080 lines...
.../1080i/720p/480p/480i) 4 AUDIO OUT R AUDIO L L AUDIO R (VAR/FIX) 23 4 5 DMex/ SERVICE 6 7 KDL-32XBR6/KDL-37XBR6/ KDL-42V4100 9 KDL-40V4150/KDL-40V4100/ KDL-46V4100/KDL-52V4100/ KDL-40W4100/KDL-46W4100/ KDL-52W4100/KDL-46W4150 9 AC IN CABLE / ANTENNA 8 Side Panel IN 4 2 VIDEO IN 2 VIDEO L (MONO) AUDIO R 1 ~ • This TV displays all video input signals in a resolution of 1,920 dots × 1,080 lines...
Operating Instructions
Page 11
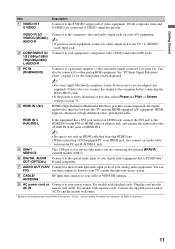
...enhanced, or high-definition video, plus digital audio. You can be displayed. ~ • For some Apple Macintosh computers, it may be connected to the TV's L (MONO) audio input jack. For models with DVI-to-HDMI cable or adapter) jack, and connect the audio jack to the AUDIO IN (L/R) ... HDMI IN 4. ~ 5 DMex/ SERVICE • Be sure to AC IN and the nearest wall outlet. * Manufactured under license from Dolby Laboratories. If this TV and any HDMI-equipped A/V equipment. HDMI IN 4 R-AUDIO-L If the equipment has a DVI jack and not an HDMI jack, connect the DVI jack to the...
...enhanced, or high-definition video, plus digital audio. You can be displayed. ~ • For some Apple Macintosh computers, it may be connected to the TV's L (MONO) audio input jack. For models with DVI-to-HDMI cable or adapter) jack, and connect the audio jack to the AUDIO IN (L/R) ... HDMI IN 4. ~ 5 DMex/ SERVICE • Be sure to AC IN and the nearest wall outlet. * Manufactured under license from Dolby Laboratories. If this TV and any HDMI-equipped A/V equipment. HDMI IN 4 R-AUDIO-L If the equipment has a DVI jack and not an HDMI jack, connect the DVI jack to the...
Operating Instructions
Page 12
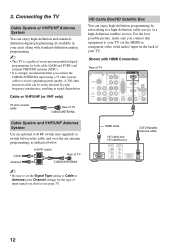
... you choose (see page 37). Shown with standard-definition analog programming. ~ • This TV is strongly recommended that you connect this equipment to receive optimum picture quality. Connecting the TV Cable System or VHF/UHF Antenna System You can enjoy high-definition and standarddefinition digital programming ...). • It is capable of receiving unscrambled digital programming for the type of your area) along with HDMI Connection Rear of TV CABLE/ANTENNA HD Cable Box/HD Satellite Box You can be easily affected by subscribing to switch between the cable and over-the-...
... you choose (see page 37). Shown with standard-definition analog programming. ~ • This TV is strongly recommended that you connect this equipment to receive optimum picture quality. Connecting the TV Cable System or VHF/UHF Antenna System You can enjoy high-definition and standarddefinition digital programming ...). • It is capable of receiving unscrambled digital programming for the type of your area) along with HDMI Connection Rear of TV CABLE/ANTENNA HD Cable Box/HD Satellite Box You can be easily affected by subscribing to switch between the cable and over-the-...
Operating Instructions
Page 13
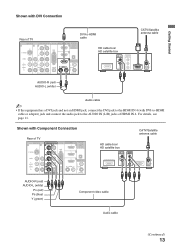
... jack to the HDMI IN 4 (with Component Connection Rear of HDMI IN 4. For details, see page 11. Getting Started Shown with DVI Connection Rear of TV VIDEO IN 1 3 S VIDEO VIDEO L (MONO) AUDIO R DVI-to-HDMI cable COMPONENT IN PC IN 1 2 Y RGB PB IN DIGITAL 1 AUDIO OUT (OPTICAL) 3 PR L... cable Audio cable ~ • If the equipment has a DVI jack and not an HDMI jack, connect the DVI jack to the AUDIO IN (L/R) jacks of TV VIDEO IN 1 3 S VIDEO VIDEO L (MONO) AUDIO R COMPONENT IN PC IN 1 2 Y RGB PB IN DIGITAL 1 AUDIO OUT (OPTICAL) 3 PR L AUDIO R AUDIO ...
... jack to the HDMI IN 4 (with Component Connection Rear of HDMI IN 4. For details, see page 11. Getting Started Shown with DVI Connection Rear of TV VIDEO IN 1 3 S VIDEO VIDEO L (MONO) AUDIO R DVI-to-HDMI cable COMPONENT IN PC IN 1 2 Y RGB PB IN DIGITAL 1 AUDIO OUT (OPTICAL) 3 PR L... cable Audio cable ~ • If the equipment has a DVI jack and not an HDMI jack, connect the DVI jack to the AUDIO IN (L/R) jacks of TV VIDEO IN 1 3 S VIDEO VIDEO L (MONO) AUDIO R COMPONENT IN PC IN 1 2 Y RGB PB IN DIGITAL 1 AUDIO OUT (OPTICAL) 3 PR L AUDIO R AUDIO ...
Operating Instructions
Page 14
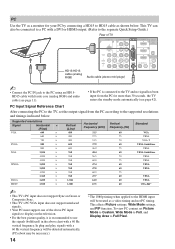
...an HD15HD15 cable with ferrite core (analog RGB) and audio cable (see page 42). This affects Picture settings, Wide Mode settings, and PIP function. This TV can also be connected to a PC with a DVI or HDMI output. (Refer to the separate Quick Setup Guide.) Rear of the above PC input ...according to Full Pixel. In plug and play, signals with a 60 Hz vertical frequency. PC Input Signal Reference Chart After connecting the PC to the TV, set Picture Mode to Custom, Wide Mode to Full, and Display Area to the supported resolutions and timings indicated below . To view PC content set...
...an HD15HD15 cable with ferrite core (analog RGB) and audio cable (see page 42). This affects Picture settings, Wide Mode settings, and PIP function. This TV can also be connected to a PC with a DVI or HDMI output. (Refer to the separate Quick Setup Guide.) Rear of the above PC input ...according to Full Pixel. In plug and play, signals with a 60 Hz vertical frequency. PC Input Signal Reference Chart After connecting the PC to the TV, set Picture Mode to Custom, Wide Mode to Full, and Display Area to the supported resolutions and timings indicated below . To view PC content set...

Operating Instructions
Page 15
Getting Started Other Equipment Personal computer Blu-ray Disc Player/ "PS3" Digital DVD satellite player receiver Digital cable box Audio system Rear of TV VIDEO IN 1 3 S VIDEO VIDEO L (MONO) AUDIO R COMPONENT IN PC IN 1 2 Y RGB PB IN DIGITAL 1 AUDIO OUT (OPTICAL) 3 PR L AUDIO R AUDIO (1080p/1080i/720p/480p/480i) 4 ... Digital recorder Analog Digital audio audio equipment equipment (A/V Receiver/Home Theater) ~ • Refer to the Quick Setup Guide (supplied) when connecting other equipment to your TV. Camcorder 15
Getting Started Other Equipment Personal computer Blu-ray Disc Player/ "PS3" Digital DVD satellite player receiver Digital cable box Audio system Rear of TV VIDEO IN 1 3 S VIDEO VIDEO L (MONO) AUDIO R COMPONENT IN PC IN 1 2 Y RGB PB IN DIGITAL 1 AUDIO OUT (OPTICAL) 3 PR L AUDIO R AUDIO (1080p/1080i/720p/480p/480i) 4 ... Digital recorder Analog Digital audio audio equipment equipment (A/V Receiver/Home Theater) ~ • Refer to the Quick Setup Guide (supplied) when connecting other equipment to your TV. Camcorder 15
Operating Instructions
Page 16
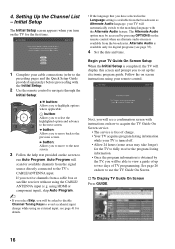
...up to two days of up the electronic program guide. Auto Program will automatically switch to run Auto Program. Begin your TV is complete. s To Display TV Guide On Screen Press GUIDE. 16 Language settings will apply to on the screen to the matching language with the Alternate ... instructions on the remote control when an alternate audio stream is available only for available channels from a cable box or satellite receiver without using your TV will scan for digital programs (see page 35). 4 Set the date and time. using HDMI or component input), skip Auto Program. ~ •...
...up to two days of up the electronic program guide. Auto Program will automatically switch to run Auto Program. Begin your TV is complete. s To Display TV Guide On Screen Press GUIDE. 16 Language settings will apply to on the screen to the matching language with the Alternate ... instructions on the remote control when an alternate audio stream is available only for available channels from a cable box or satellite receiver without using your TV will scan for digital programs (see page 35). 4 Set the date and time. using HDMI or component input), skip Auto Program. ~ •...
Operating Instructions
Page 17
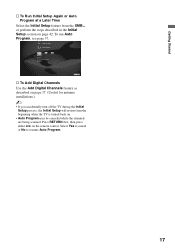
... Auto Program may be canceled while the channels are being scanned. To run Auto Program, see page 37. HDMI Settings General Setup Settings Initial Setup TV s To Add Digital Channels Use the Add Digital Channels feature as described on page 37. (Useful for antenna installations.) ~ • If you ...accidentally turn off the TV during the Initial Setup process, the Initial Setup will restart from the XMB™ or perform the steps described in the Initial Setup section on...
... Auto Program may be canceled while the channels are being scanned. To run Auto Program, see page 37. HDMI Settings General Setup Settings Initial Setup TV s To Add Digital Channels Use the Add Digital Channels feature as described on page 37. (Useful for antenna installations.) ~ • If you ...accidentally turn off the TV during the Initial Setup process, the Initial Setup will restart from the XMB™ or perform the steps described in the Initial Setup section on...

Operating Instructions
Page 18
... the remote control, reinsert or replace your remote control; Push to the diagram inside the battery compartment of the TV operate the same as the corresponding buttons on the remote control. Operating the TV Inserting Batteries into the Remote Control Insert two size AA batteries (supplied) by matching e and E on the batteries... to open When Using the Remote Control Follow the guidelines below • Point your remote control directly at the IR sensor located on your TV. • Make sure that they are blocking the path between the remote control and the IR sensor on your...
... the remote control, reinsert or replace your remote control; Push to the diagram inside the battery compartment of the TV operate the same as the corresponding buttons on the remote control. Operating the TV Inserting Batteries into the Remote Control Insert two size AA batteries (supplied) by matching e and E on the batteries... to open When Using the Remote Control Follow the guidelines below • Point your remote control directly at the IR sensor located on your TV. • Make sure that they are blocking the path between the remote control and the IR sensor on your...
Operating Instructions
Page 19
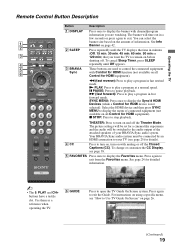
...on all Control for HDMI equipment). The picture settings will be connected by an HDMI connection to your BRAVIA Sync audio system. Operating the TV Remote Control Button Description Button Description 1 DISPLAY Press once to display the banner with channel/program information you want the... the connected equipment 6 Sync with muting or off the Closed Captions (CC). SYNC MENU: Press once to turn on, turn on the amount of your TV (see page 25 for details). 4 CC Press to display the Sync'd HDMI Devices (while a Control for detailed information. ~ • The 5, PLAY and CH+ ...
...on all Control for HDMI equipment). The picture settings will be connected by an HDMI connection to your BRAVIA Sync audio system. Operating the TV Remote Control Button Description Button Description 1 DISPLAY Press once to display the banner with channel/program information you want the... the connected equipment 6 Sync with muting or off the Closed Captions (CC). SYNC MENU: Press once to turn on, turn on the amount of your TV (see page 25 for details). 4 CC Press to display the Sync'd HDMI Devices (while a Control for detailed information. ~ • The 5, PLAY and CH+ ...

Operating Instructions
Page 20
... the volume. Press to select a channel; Press repeatedly to change channels immediately. 8 qa Use with the frozen image. See your dealer or www.sony.com/bravia for more information. Press ENT to toggle through the inputs. ~ • See page 41 on the screen. ~ qh INPUT •..., to display the list of External Inputs and TV mode. Product Support Clock/Timers Settings Sound Screen qg Channel TV qh 9 DMex Press to select digital channels. qd MUTING Press to access the TV Home Menu items such as the TV Settings, TV channels and External Inputs list (see pages 5...
... the volume. Press to select a channel; Press repeatedly to change channels immediately. 8 qa Use with the frozen image. See your dealer or www.sony.com/bravia for more information. Press ENT to toggle through the inputs. ~ • See page 41 on the screen. ~ qh INPUT •..., to display the list of External Inputs and TV mode. Product Support Clock/Timers Settings Sound Screen qg Channel TV qh 9 DMex Press to select digital channels. qd MUTING Press to access the TV Home Menu items such as the TV Settings, TV channels and External Inputs list (see pages 5...


