Operating Instructions
Page 1
Please Do Not Return the Product to resolve your questions more quickly than your retailer. Operating Instructions LCD Digital Color TV KDL-52S5100 KDL-46S5100 KDL-40S5100 KDL-32S5100 © 2009 Sony Corporation Sony Customer Support U.S.A.: www.sony.com/tvsupport Canada: www.sony.ca/support United States 1.800.222.SONY Canada 1.877.899.SONY Sony will work to the Store
Please Do Not Return the Product to resolve your questions more quickly than your retailer. Operating Instructions LCD Digital Color TV KDL-52S5100 KDL-46S5100 KDL-40S5100 KDL-32S5100 © 2009 Sony Corporation Sony Customer Support U.S.A.: www.sony.com/tvsupport Canada: www.sony.ca/support United States 1.800.222.SONY Canada 1.877.899.SONY Sony will work to the Store
Operating Instructions
Page 2
... regulations, you call upon your Sony dealer regarding this product contains mercury. Pursuant to radio communications. Note This television includes a QAM demodulator which the receiver is connected. ❑ Consult the dealer or an experienced radio/TV technician for help. This equipment ...of the TV. For Customers in the United States The lamp in a residential installation. Disposal of the FCC rules. Refer to them whenever you are designed to Part 15 of Conformity Trade Name: SONY Model: KDL-32S5100/KDL-40S5100/ KDL-46S5100/KDL-52S5100 Responsible Party: Sony Electronics Inc....
... regulations, you call upon your Sony dealer regarding this product contains mercury. Pursuant to radio communications. Note This television includes a QAM demodulator which the receiver is connected. ❑ Consult the dealer or an experienced radio/TV technician for help. This equipment ...of the TV. For Customers in the United States The lamp in a residential installation. Disposal of the FCC rules. Refer to them whenever you are designed to Part 15 of Conformity Trade Name: SONY Model: KDL-32S5100/KDL-40S5100/ KDL-46S5100/KDL-52S5100 Responsible Party: Sony Electronics Inc....
Operating Instructions
Page 3
KDL32S5100 40S5100 46S5100 52S5100 Sony Wall-Mount Bracket Model No. SU-WL500 Use with your TV model. and other WALL-MOUNT BRACKETS may increase which possibly could result in property damages or injury. HDMI, the HDMI logo and... ENERGY STAR® qualified in the U.S. Picture/Sound, Light Sensor, Power Savings) can slightly change the power consumption. s When the TV is initially set by the U.S. Your BRAVIA TV is a joint program of Energy. KDL- Fergason Patent Properties, LLC: U.S. Sony TV Model No. Dolby and the double-D symbol are trademarks of this...
KDL32S5100 40S5100 46S5100 52S5100 Sony Wall-Mount Bracket Model No. SU-WL500 Use with your TV model. and other WALL-MOUNT BRACKETS may increase which possibly could result in property damages or injury. HDMI, the HDMI logo and... ENERGY STAR® qualified in the U.S. Picture/Sound, Light Sensor, Power Savings) can slightly change the power consumption. s When the TV is initially set by the U.S. Your BRAVIA TV is a joint program of Energy. KDL- Fergason Patent Properties, LLC: U.S. Sony TV Model No. Dolby and the double-D symbol are trademarks of this...
Operating Instructions
Page 4
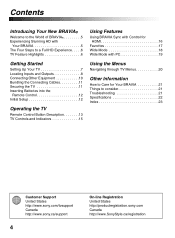
...HD Experience. . . . .6 TV Feature Highlights 6 Getting Started Setting Up Your TV 7 Locating Inputs and Outputs 8 Connecting Other Equipment 10 Bundling the Connecting Cables 11 Securing the TV 11 Inserting Batteries into the Remote ...Control 12 Initial Setup 12 Operating the TV Remote Control Button Description 13 TV Controls and Indicators 15 Using ...17 Wide Mode 18 Wide Mode with PC 19 Using the Menus Navigating through TV Menus 20 Other Information How to Care for Your BRAVIA 21 Things to consider...
...HD Experience. . . . .6 TV Feature Highlights 6 Getting Started Setting Up Your TV 7 Locating Inputs and Outputs 8 Connecting Other Equipment 10 Bundling the Connecting Cables 11 Securing the TV 11 Inserting Batteries into the Remote ...Control 12 Initial Setup 12 Operating the TV Remote Control Button Description 13 TV Controls and Indicators 15 Using ...17 Wide Mode 18 Wide Mode with PC 19 Using the Menus Navigating through TV Menus 20 Other Information How to Care for Your BRAVIA 21 Things to consider...
Operating Instructions
Page 5
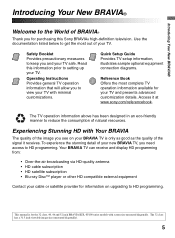
.... This manual is for the 32 class, 40, 46 and 52 inch BRAVIA KDL-S5100 series models with Your BRAVIA The quality of the image you see on upgrading to get the most complete TV operation information available for your TV and presents advanced customization details. Experiencing Stunning HD... player or other HD compatible external equipment Contact your cable or satellite provider for information on your BRAVIA TV is only as good as the quality of the signal it at www.sony.com/referencebook. The 32 class has a 31.5 inch viewable image size (measured diagonally). 5 Introducing ...
.... This manual is for the 32 class, 40, 46 and 52 inch BRAVIA KDL-S5100 series models with Your BRAVIA The quality of the image you see on upgrading to get the most complete TV operation information available for your TV and presents advanced customization details. Experiencing Stunning HD... player or other HD compatible external equipment Contact your cable or satellite provider for information on your BRAVIA TV is only as good as the quality of the signal it at www.sony.com/referencebook. The 32 class has a 31.5 inch viewable image size (measured diagonally). 5 Introducing ...
Operating Instructions
Page 6
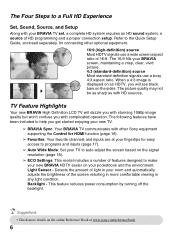
... will dazzle you with stunning 1080p image quality but won't confuse you get started enjoying your new TV. ➢ BRAVIA Sync: Your BRAVIA TV communicates with other Sony equipment supporting the Control for connecting other optional equipment. 16:9 (high-definition) source Most HDTV signals... use a boxy 4:3 aspect ratio. Light Sensor - TV Feature Highlights Your new BRAVIA High Definition LCD TV will see black bars...
... will dazzle you with stunning 1080p image quality but won't confuse you get started enjoying your new TV. ➢ BRAVIA Sync: Your BRAVIA TV communicates with other Sony equipment supporting the Control for connecting other optional equipment. 16:9 (high-definition) source Most HDTV signals... use a boxy 4:3 aspect ratio. Light Sensor - TV Feature Highlights Your new BRAVIA High Definition LCD TV will see black bars...
Operating Instructions
Page 7
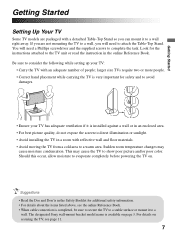
...so you will need to attach the Table-Top Stand. Be sure to a warm area. Getting Started Getting Started Setting Up Your TV Some TV models are not mounting the TV to a wall, you can mount it is installed against a wall or in an enclosed area. • For best picture quality... with an adequate number of people; This may cause moisture condensation. The designated Sony wall-mount bracket model name is available on securing the TV, see the online Reference Book. • When cable connection is completed, be sure to secure the TV to a stable surface or mount it to a wall.
...so you will need to attach the Table-Top Stand. Be sure to a warm area. Getting Started Getting Started Setting Up Your TV Some TV models are not mounting the TV to a wall, you can mount it is installed against a wall or in an enclosed area. • For best picture quality... with an adequate number of people; This may cause moisture condensation. The designated Sony wall-mount bracket model name is available on securing the TV, see the online Reference Book. • When cable connection is completed, be sure to secure the TV to a stable surface or mount it to a wall.
Operating Instructions
Page 8
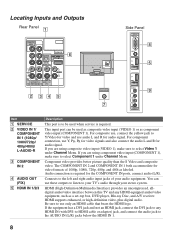
...required for audio signal. For composite use, connect the yellow jack to Y/Video for video and use these outputs to listen to your TV's audio through your audio equipment. If you are using component video input (COMPONENT 1), make sure to any HDMI-equipped audio/video equipment...the AUDIO IN (L/R) jacks below the HDMI IN 1. 8 HDMI (High-Definition Multimedia Interface) provides an uncompressed, alldigital audio/video interface between this TV and any HDMI IN (with DVI-to-HDMI cable or adapter) jack, and connect the audio jack to select Component 1 under Channel Menu. ...
...required for audio signal. For composite use, connect the yellow jack to Y/Video for video and use these outputs to listen to your TV's audio through your audio equipment. If you are using component video input (COMPONENT 1), make sure to any HDMI-equipped audio/video equipment...the AUDIO IN (L/R) jacks below the HDMI IN 1. 8 HDMI (High-Definition Multimedia Interface) provides an uncompressed, alldigital audio/video interface between this TV and any HDMI IN (with DVI-to-HDMI cable or adapter) jack, and connect the audio jack to select Component 1 under Channel Menu. ...
Operating Instructions
Page 9
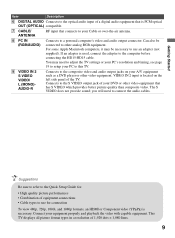
... To view 480p, 720p, 1080i, and 1080p formats, an HDMI or Component video (YPBPR) is necessary. you will need to adjust the TV settings or your PC's resolution and timing, see page 19 to setup your equipment properly and playback the video with capable equipment. Can also ... for : • High quality picture performances • Combination of equipment connections • Cable types to the computer before connecting the HD15-HD15 cable. This TV displays all picture format types in a resolution of 1,920 dots × 1,080 lines. 9 Connects to the S VIDEO output jack of your DVD or...
... To view 480p, 720p, 1080i, and 1080p formats, an HDMI or Component video (YPBPR) is necessary. you will need to adjust the TV settings or your PC's resolution and timing, see page 19 to setup your equipment properly and playback the video with capable equipment. Can also ... for : • High quality picture performances • Combination of equipment connections • Cable types to the computer before connecting the HD15-HD15 cable. This TV displays all picture format types in a resolution of 1,920 dots × 1,080 lines. 9 Connects to the S VIDEO output jack of your DVD or...
Operating Instructions
Page 10
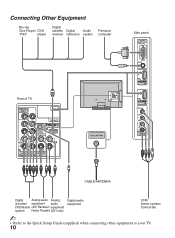
Connecting Other Equipment Blu-ray Disc Player/ DVD "PS3" player Digital satellite Digital Audio receiver cable box system Personal computer Rear of TV VIDEO IN VIDEO Y SERVICE PB IN (OPTICAL) PR 1 DIGITAL AUDIO OUT L AUDIO R 1 2 AUDIO COMPONENT IN AUDIO OUT (1080p/1080i/720p/480p/480i) (FIX) L AUDIO R CABLE/... Home Theater) (DVI only) Digital audio equipment VCR/ Game system/ Camcorder ~ • Refer to the Quick Setup Guide (supplied) when connecting other equipment to your TV. 10
Connecting Other Equipment Blu-ray Disc Player/ DVD "PS3" player Digital satellite Digital Audio receiver cable box system Personal computer Rear of TV VIDEO IN VIDEO Y SERVICE PB IN (OPTICAL) PR 1 DIGITAL AUDIO OUT L AUDIO R 1 2 AUDIO COMPONENT IN AUDIO OUT (1080p/1080i/720p/480p/480i) (FIX) L AUDIO R CABLE/... Home Theater) (DVI only) Digital audio equipment VCR/ Game system/ Camcorder ~ • Refer to the Quick Setup Guide (supplied) when connecting other equipment to your TV. 10
Operating Instructions
Page 11
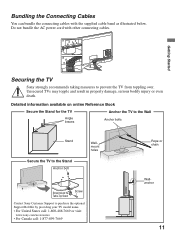
...supplied cable band as illustrated below. Getting Started Securing the TV Sony strongly recommends taking measures to purchase the optional Support Belt Kit by providing your TV model name. • For United States call: 1-800-488-7669 or visit: www.sony.com/accessories • For Canada call: 1-877-899...Book Secure the Stand for the TV Anchor the TV to the Wall Angle braces Anchor bolts Stand Secure the TV to the Stand Anchor bolt Wallmount holes Screw hole on the Table-Top Stand Screw Contact Sony Customer Support to prevent the TV from toppling over. Bundling the Connecting...
...supplied cable band as illustrated below. Getting Started Securing the TV Sony strongly recommends taking measures to purchase the optional Support Belt Kit by providing your TV model name. • For United States call: 1-800-488-7669 or visit: www.sony.com/accessories • For Canada call: 1-877-899...Book Secure the Stand for the TV Anchor the TV to the Wall Angle braces Anchor bolts Stand Secure the TV to the Stand Anchor bolt Wallmount holes Screw hole on the Table-Top Stand Screw Contact Sony Customer Support to prevent the TV from toppling over. Bundling the Connecting...

Operating Instructions
Page 12
... before completion some channels may not be available. 4 Auto Program will scan for available channels from the signal source directly connected to the TV's CABLE/ANTENNA input and may take sometime to complete the process. Initial Setup Please select your preferred aspect ratio for the first time. ...under the Screen menu. • To change the clock, press MENU and go to run Auto Program. Follow the help text provided on the TV for the screen display. If you can perform the following: 1 Select the language for store display. "Retail" optimizes the picture for the on...
... before completion some channels may not be available. 4 Auto Program will scan for available channels from the signal source directly connected to the TV's CABLE/ANTENNA input and may take sometime to complete the process. Initial Setup Please select your preferred aspect ratio for the first time. ...under the Screen menu. • To change the clock, press MENU and go to run Auto Program. Follow the help text provided on the TV for the screen display. If you can perform the following: 1 Select the language for store display. "Retail" optimizes the picture for the on...

Operating Instructions
Page 13
... change or customize the CC display, see page 16 for a cinemalike experience and the audio will be set Info Banner to On or Off. ~ The TV will disappear in fast rewind mode. m (fast reverse): Press to pause playback. X PAUSE: Press to play a program in fast forward mode. The ...back to the previous screen or exit from the Favorites menu. M (fast forward): Press to the audio output of the attached speakers of your TV (see the online Reference Book for more details. 3 BRAVIA Sync These buttons are used to display information about channel/program or input you are ...
... change or customize the CC display, see page 16 for a cinemalike experience and the audio will be set Info Banner to On or Off. ~ The TV will disappear in fast rewind mode. m (fast reverse): Press to pause playback. X PAUSE: Press to play a program in fast forward mode. The ...back to the previous screen or exit from the Favorites menu. M (fast forward): Press to the audio output of the attached speakers of your TV (see the online Reference Book for more details. 3 BRAVIA Sync These buttons are used to display information about channel/program or input you are ...
Operating Instructions
Page 14
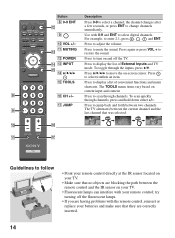
...lamps. • If you are correctly inserted. 14 Press to mute the sound. Use with the remote control, reinsert or replace your TV. • Make sure that no objects are blocking the path between the current channel and the last channel that they are having problems with...1 and ENT. To toggle through channels, press and hold down either +/-. Press to scan through channels. Press to display a list of External Inputs and TV mode. To scan quickly through the inputs, press V/v. JUMP JUMP qa qj Guidelines to follow • Point your remote control directly at the IR sensor...
...lamps. • If you are correctly inserted. 14 Press to mute the sound. Use with the remote control, reinsert or replace your TV. • Make sure that no objects are blocking the path between the current channel and the last channel that they are having problems with...1 and ENT. To toggle through channels, press and hold down either +/-. Press to scan through channels. Press to display a list of External Inputs and TV mode. To scan quickly through the inputs, press V/v. JUMP JUMP qa qj Guidelines to follow • Point your remote control directly at the IR sensor...
Operating Instructions
Page 15
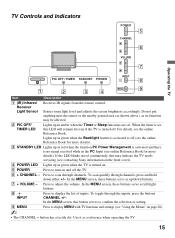
...is activated to display MENU with TV functions and settings (see the online Reference Book for more details). Press to adjust the volume. To toggle through channels, press and hold down buttons. 7 + VOLUME - When the timer is set . For details, see contacting Sony information on the front cover). ... Press to off (see "Using the Menus" on and off . In the MENU screen, these buttons serve as its function may indicate the TV needs servicing (see the online Reference Book. In the MENU screen, this may be affected. 2 PIC OFF/ TIMER LED Lights up in green...
...is activated to display MENU with TV functions and settings (see the online Reference Book for more details). Press to adjust the volume. To toggle through channels, press and hold down buttons. 7 + VOLUME - When the timer is set . For details, see contacting Sony information on the front cover). ... Press to off (see "Using the Menus" on and off . In the MENU screen, these buttons serve as its function may indicate the TV needs servicing (see the online Reference Book. In the MENU screen, this may be affected. 2 PIC OFF/ TIMER LED Lights up in green...
Operating Instructions
Page 16
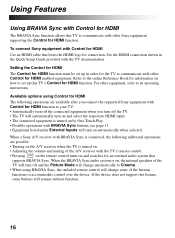
...BRAVIA Sync, the included remote control will remain without function. 16 See the HDMI connection shown in order for the TV to communicate with other Sony equipment supporting the Control for HDMI function. Refer to the online Reference Book for information on automatically when selected. If ...Cinema. • When using Control for HDMI The following additional operations are available after you connect the supported Sony equipment with Control for HDMI function to your TV: • Automatically turn off the connected equipment when you turn off and the Picture Mode will change ...
...BRAVIA Sync, the included remote control will remain without function. 16 See the HDMI connection shown in order for the TV to communicate with other Sony equipment supporting the Control for HDMI function. Refer to the online Reference Book for information on automatically when selected. If ...Cinema. • When using Control for HDMI The following additional operations are available after you connect the supported Sony equipment with Control for HDMI function to your TV: • Automatically turn off the connected equipment when you turn off and the Picture Mode will change ...

Operating Instructions
Page 17
... to an item, highlight its icon and press . Displaying Favorites Press FAVORITES on the remote control. Using Features Favorites With Favorites, you can manage your TV channels from Favorites (see page 12). 17 Adding to Favorites 1 Press TOOLS to add the current channel or input while you are highlighted, press V/v to... in a carousel-like fashion. 2 When the recently viewed items are watching it . 2 Highlight Remove from Favorites and press . • Auto Program will clear your preferred TV channels and External Inputs.
... to an item, highlight its icon and press . Displaying Favorites Press FAVORITES on the remote control. Using Features Favorites With Favorites, you can manage your TV channels from Favorites (see page 12). 17 Adding to Favorites 1 Press TOOLS to add the current channel or input while you are highlighted, press V/v to... in a carousel-like fashion. 2 When the recently viewed items are watching it . 2 Highlight Remove from Favorites and press . • Auto Program will clear your preferred TV channels and External Inputs.

Operating Instructions
Page 18
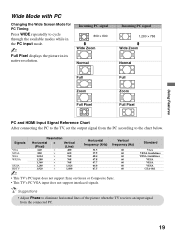
Based on your preference. You can manually change the Wide Mode setting while watching TV by pressing the WIDE button on the original source, a black frame or black bars may surround the picture. Select Auto Wide and set to Auto ... 480i or 480p sources only as they are standard-definition and not from high-definition source such as component video input, HDMI input and digital TV. • Full Pixel is not available. How to set to the Screen menu. Changing the Wide Screen Mode Press WIDE repeatedly to cycle through the...
Based on your preference. You can manually change the Wide Mode setting while watching TV by pressing the WIDE button on the original source, a black frame or black bars may surround the picture. Select Auto Wide and set to Auto ... 480i or 480p sources only as they are standard-definition and not from high-definition source such as component video input, HDMI input and digital TV. • Full Pixel is not available. How to set to the Screen menu. Changing the Wide Screen Mode Press WIDE repeatedly to cycle through the...
Operating Instructions
Page 19
...768 m Wide Zoom Normal Full Zoom Full Pixel Full Zoom Full Pixel PC and HDMI Input Signal Reference Chart After connecting the PC to the TV, set the output signal from the connected PC. 19 Using Features Wide Mode with PC Changing the Wide Screen Mode for PC Timing Press WIDE...interlaced signals. Standard VGA VESA Guidelines VESA Guidelines VESA VESA VESA CEA-861 • Adjust Phase to eliminate horizontal lines of the picture when the TV receives an input signal from the PC according to cycle through the available modes while in the PC input mode. ~ Full Pixel displays the ...
...768 m Wide Zoom Normal Full Zoom Full Pixel Full Zoom Full Pixel PC and HDMI Input Signal Reference Chart After connecting the PC to the TV, set the output signal from the connected PC. 19 Using Features Wide Mode with PC Changing the Wide Screen Mode for PC Timing Press WIDE...interlaced signals. Standard VGA VESA Guidelines VESA Guidelines VESA VESA VESA CEA-861 • Adjust Phase to eliminate horizontal lines of the picture when the TV receives an input signal from the PC according to cycle through the available modes while in the PC input mode. ~ Full Pixel displays the ...

Operating Instructions
Page 20
... on the screen or can be smaller, looking like screen size. You can adjust the picture you to customize for the signals your TV. Parental Lock Menu allows you to customize the settings. Depending on the remote control to quickly access convenient functions. 20 The screen settings... allow you see to fit your TV receives, the images on the screen can fill the screen from your connected audio system. Setup Menu allows you to move back to...
... on the screen or can be smaller, looking like screen size. You can adjust the picture you to customize for the signals your TV. Parental Lock Menu allows you to customize the settings. Depending on the remote control to quickly access convenient functions. 20 The screen settings... allow you see to fit your TV receives, the images on the screen can fill the screen from your connected audio system. Setup Menu allows you to move back to...


