Operating Instructions
Page 2
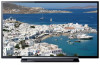
...with a cloth slightly moistened with an extension cord, receptacle or other countries. Refer to certain features, settings, and functionalities of Sony Computer Entertainment Inc. Blu-ray Disc is ENERGY STAR® qualified in these settings for additional information. "PlayStation" is a registered...Patent Properties, LLC: U.S. "BRAVIA" and , BRAVIA Sync, and are trademarks or registered trademarks of electric shock. • Wipe the LCD screen gently with a soft cloth. • Stubborn stains may exceed the limits required for the input signal selected. The 32 class has a ...
...with a cloth slightly moistened with an extension cord, receptacle or other countries. Refer to certain features, settings, and functionalities of Sony Computer Entertainment Inc. Blu-ray Disc is ENERGY STAR® qualified in these settings for additional information. "PlayStation" is a registered...Patent Properties, LLC: U.S. "BRAVIA" and , BRAVIA Sync, and are trademarks or registered trademarks of electric shock. • Wipe the LCD screen gently with a soft cloth. • Stubborn stains may exceed the limits required for the input signal selected. The 32 class has a ...
Operating Instructions
Page 3
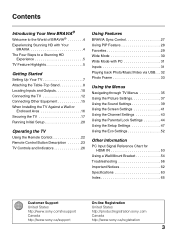
... USB. . . 32 Photo Frame 33 Using the Menus Navigating through TV Menus 35 Using the Picture Settings 37 Using the Sound Settings 39 Using the Screen Settings 41 Using the Channel Settings 43 Using the Parental Lock Settings 44 Using the Setup Settings 47 Using the Eco Settings 52 Other Information... Chart for HDMI IN 53 Using a Wall-Mount Bracket 54 Troubleshooting 56 Important Notices 62 Specifications 63 Index 65 Customer Support United States http://www.sony.com/tvsupport Canada http://www.sony.ca/support On-line Registration United States http://productregistration...
... USB. . . 32 Photo Frame 33 Using the Menus Navigating through TV Menus 35 Using the Picture Settings 37 Using the Sound Settings 39 Using the Screen Settings 41 Using the Channel Settings 43 Using the Parental Lock Settings 44 Using the Setup Settings 47 Using the Eco Settings 52 Other Information... Chart for HDMI IN 53 Using a Wall-Mount Bracket 54 Troubleshooting 56 Important Notices 62 Specifications 63 Index 65 Customer Support United States http://www.sony.com/tvsupport Canada http://www.sony.ca/support On-line Registration United States http://productregistration...

Operating Instructions
Page 5
... connected equipment (page 31). (Continued) 5 When you compare a high-definition signal to a standard analog signal, you to automatically adjust the screen based on the signal resolution (page 30). ➢ Input Selection: Allows you will notice a big difference in Picture): You can enjoy crisp..., clear images, smooth movement, and high-impact visuals from Sony USB equipment (page 32). ➢ PIP (Picture in picture quality. TV Feature Highlights Your BRAVIA comes with many convenient features, such ...
... connected equipment (page 31). (Continued) 5 When you compare a high-definition signal to a standard analog signal, you to automatically adjust the screen based on the signal resolution (page 30). ➢ Input Selection: Allows you will notice a big difference in Picture): You can enjoy crisp..., clear images, smooth movement, and high-impact visuals from Sony USB equipment (page 32). ➢ PIP (Picture in picture quality. TV Feature Highlights Your BRAVIA comes with many convenient features, such ...
Operating Instructions
Page 7
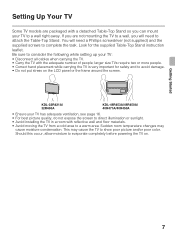
... may cause the TV to show poor picture and/or poor color. KDL-32R421A/ 32R400A KDL-46R453A/46R450A/ 40R471A/40R450A • Ensure your TV has adequate ventilation, see page 16. • For best picture quality, do not expose the screen to direct illumination or sunlight. • Avoid installing the TV in ...number of people; Should this occur, allow moisture to evaporate completely before powering the TV on the LCD panel or the frame around the screen. If you are packaged with a detached Table-Top Stand so you will need to attach the Table-Top Stand. Getting Started Getting ...
... may cause the TV to show poor picture and/or poor color. KDL-32R421A/ 32R400A KDL-46R453A/46R450A/ 40R471A/40R450A • Ensure your TV has adequate ventilation, see page 16. • For best picture quality, do not expose the screen to direct illumination or sunlight. • Avoid installing the TV in ...number of people; Should this occur, allow moisture to evaporate completely before powering the TV on the LCD panel or the frame around the screen. If you are packaged with a detached Table-Top Stand so you will need to attach the Table-Top Stand. Getting Started Getting ...

Operating Instructions
Page 8
Attaching the Table-Top Stand • Refer to the supplied Table-Top Stand instruction leaflet for proper attachment. • For best picture quality, do not expose the screen to direct illumination or sunlight. 1 Place the TV with its screen facing down on a level and stable surface covered with a thick and soft cloth. 2 Fix the TV to hit the TableTop Stand against the edge of the surface when attaching it. 8 Thick and soft cloth Screw (+PSW 5 x 16) (Supplied) * Be careful not to the Table-Top Stand using the supplied screws.
Attaching the Table-Top Stand • Refer to the supplied Table-Top Stand instruction leaflet for proper attachment. • For best picture quality, do not expose the screen to direct illumination or sunlight. 1 Place the TV with its screen facing down on a level and stable surface covered with a thick and soft cloth. 2 Fix the TV to hit the TableTop Stand against the edge of the surface when attaching it. 8 Thick and soft cloth Screw (+PSW 5 x 16) (Supplied) * Be careful not to the Table-Top Stand using the supplied screws.

Operating Instructions
Page 20
... • Set the current date and time after Auto Program. button: Allows you to select the highlighted option and advance to the next screen. 3 Auto Program will appear. 2 Use the remote control buttons described below to the TV's CABLE/ANTENNA input. The Initial Setup... the help text provided on the TV. Running Initial Setup During initial setup, you will perform the following: • Set the language for the On Screen Display (OSD) text • Choose your cable connections before beginning the Initial Setup. Refer to the Quick Setup Guide (supplied) for sample connection diagrams....
... • Set the current date and time after Auto Program. button: Allows you to select the highlighted option and advance to the next screen. 3 Auto Program will appear. 2 Use the remote control buttons described below to the TV's CABLE/ANTENNA input. The Initial Setup... the help text provided on the TV. Running Initial Setup During initial setup, you will perform the following: • Set the language for the On Screen Display (OSD) text • Choose your cable connections before beginning the Initial Setup. Refer to the Quick Setup Guide (supplied) for sample connection diagrams....

Operating Instructions
Page 23
... buttons 7 SLEEP 8 V/v/B/b 9 RETURN 0 HOME qa VOL +/- Press repeatedly to display the BRAVIA Sync Menu and then select connected HDMI/MHL equipment from the screen when displaying menu items and settings. Press to display the menu with 0-9 to remain on before shutting off , and sound remains on. See "Using the... Menus" on the screen. Press to select/confirm an item. Press to the previous screen or exit from Device Selection. Press to go back to adjust the volume. • The 5, N and CH +...
... buttons 7 SLEEP 8 V/v/B/b 9 RETURN 0 HOME qa VOL +/- Press repeatedly to display the BRAVIA Sync Menu and then select connected HDMI/MHL equipment from the screen when displaying menu items and settings. Press to display the menu with 0-9 to remain on before shutting off , and sound remains on. See "Using the... Menus" on the screen. Press to select/confirm an item. Press to the previous screen or exit from Device Selection. Press to go back to adjust the volume. • The 5, N and CH +...
Operating Instructions
Page 26
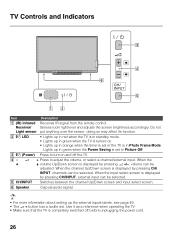
...completely switched off the TV. 4- 2 + Press to turn on . • Lights up in Photo Frame Mode. Receiver/ Senses room light level and adjusts the screen brightness accordingly. Lights up the external inputs labels, see page 49. • The 2 + button has a tactile dot. Use it as a reference when operating...cord. 26 TV Controls and Indicators Item Description 1 (IR) Infrared Receives IR signal from the remote control. When the channel Up/Down screen is in orange when the timer is set to Picture Off. 3 "/1 (Power) Press to adjust the volume, or select a channel/external input....
...completely switched off the TV. 4- 2 + Press to turn on . • Lights up in Photo Frame Mode. Receiver/ Senses room light level and adjusts the screen brightness accordingly. Lights up the external inputs labels, see page 49. • The 2 + button has a tactile dot. Use it as a reference when operating...cord. 26 TV Controls and Indicators Item Description 1 (IR) Infrared Receives IR signal from the remote control. When the channel Up/Down screen is in orange when the timer is set to Picture Off. 3 "/1 (Power) Press to adjust the volume, or select a channel/external input....
Operating Instructions
Page 28
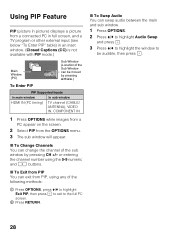
...You can exit from PIP, using the 0-9 numeric and buttons. Using PIP Feature PIP (picture in picture) displays a picture from a connected PC in full screen, and a TV program or other external input (see below "To Enter PIP" table) in an inset window. (Closed Captions (CC) is not available with... In sub window HDMI IN (PC timing) TV channel (CABLE/ ANTENNA), VIDEO IN, COMPONENT IN 1 Press OPTIONS while images from a PC appear on the screen. 2 Select PIP from the OPTIONS menu. 3 The sub window will appear. x To Swap Audio You can change the channel of the following methods: 1 ...
...You can exit from PIP, using the 0-9 numeric and buttons. Using PIP Feature PIP (picture in picture) displays a picture from a connected PC in full screen, and a TV program or other external input (see below "To Enter PIP" table) in an inset window. (Closed Captions (CC) is not available with... In sub window HDMI IN (PC timing) TV channel (CABLE/ ANTENNA), VIDEO IN, COMPONENT IN 1 Press OPTIONS while images from a PC appear on the screen. 2 Select PIP from the OPTIONS menu. 3 The sub window will appear. x To Swap Audio You can change the channel of the following methods: 1 ...

Operating Instructions
Page 30
... on the original signal source, you may see the picture filled the full screen. x To set your remote control or you can set Auto Wide Press HOME and select Settings, then select ...the Screen settings. m Wide Zoom m Wide Zoom Normal Full Normal This mode is available with 480i...Auto Wide and set to the signals your preference. x To change the Wide Screen Mode Press WIDE repeatedly to select the screen display of the screen. Full 30 Sometimes you will see black bars around the picture or just on...
... on the original signal source, you may see the picture filled the full screen. x To set your remote control or you can set Auto Wide Press HOME and select Settings, then select ...the Screen settings. m Wide Zoom m Wide Zoom Normal Full Normal This mode is available with 480i...Auto Wide and set to the signals your preference. x To change the Wide Screen Mode Press WIDE repeatedly to select the screen display of the screen. Full 30 Sometimes you will see black bars around the picture or just on...

Operating Instructions
Page 31
...them easily. press to select the input of your external inputs to your video signal for the PC settings. You can change the Wide Screen Mode for PC Timing Press WIDE repeatedly to cycle through the external inputs to which you can label your choice. x To change the PC... Screen settings. Press V/v to highlight the video input (HDMI 1-2, Video, Component) to select your connected equipment, then press . The selected input will be listed always....
...them easily. press to select the input of your external inputs to your video signal for the PC settings. You can change the Wide Screen Mode for PC Timing Press WIDE repeatedly to cycle through the external inputs to which you can label your choice. x To change the PC... Screen settings. Press V/v to highlight the video input (HDMI 1-2, Video, Component) to select your connected equipment, then press . The selected input will be listed always....

Operating Instructions
Page 33
... playing back a photo, press OPTIONS > Photo Frame Mode to music, or seeing the clock and calendar, at the same time. image and clock, full screen image or full screen clock. For more details, see page 47. Photo Frame You can switch the frame, e.g. Press to select the file from thumbnail view. 2 In...
... playing back a photo, press OPTIONS > Photo Frame Mode to music, or seeing the clock and calendar, at the same time. image and clock, full screen image or full screen clock. For more details, see page 47. Photo Frame You can switch the frame, e.g. Press to select the file from thumbnail view. 2 In...

Operating Instructions
Page 34
When the Display Mode setting is set to Full Screen Clock, you can set to Calendar, Analog Clock or Digital Clock. When the Display Mode setting is set to Image and Clock, you can set ... can change the photo frame display by selecting Display Mode (page 47). • Image and Clock • Full Screen Image x To select Clock Display mode There are switched automatically every hour. • Full Screen Clock 34 To avoid panel burn-in . Press to select the file from thumbnail view. 3 Press HOME, and...
When the Display Mode setting is set to Full Screen Clock, you can set to Calendar, Analog Clock or Digital Clock. When the Display Mode setting is set to Image and Clock, you can set ... can change the photo frame display by selecting Display Mode (page 47). • Image and Clock • Full Screen Image x To select Clock Display mode There are switched automatically every hour. • Full Screen Clock 34 To avoid panel burn-in . Press to select the file from thumbnail view. 3 Press HOME, and...

Operating Instructions
Page 36
... type, as well as autoprogram channels. Channel: navigate your audio preference. You can select may vary. Setup: modify and customize a variety of general setting options. Screen: adjust the size and shape of the images you see on rating levels. You can also change the settings to output the sound to your... options you can also customize the channels you see and the labels assigned to them. Eco: changes the settings related to programming based on the screen. Parental Lock: set the password and limit access to power consumption. 36
... type, as well as autoprogram channels. Channel: navigate your audio preference. You can select may vary. Setup: modify and customize a variety of general setting options. Screen: adjust the size and shape of the images you see on rating levels. You can also change the settings to output the sound to your... options you can also customize the channels you see and the labels assigned to them. Eco: changes the settings related to programming based on the screen. Parental Lock: set the password and limit access to power consumption. 36

Operating Instructions
Page 38
Live Color Makes colors more vivid. Select from the brightness of the screen. LED Motion Lights up the backlight adequately, reducing blur in movies, Mode but the brightness decreases. • Available Picture options, including options in Advanced Settings ...
Live Color Makes colors more vivid. Select from the brightness of the screen. LED Motion Lights up the backlight adequately, reducing blur in movies, Mode but the brightness decreases. • Available Picture options, including options in Advanced Settings ...

Operating Instructions
Page 41
...use for Digital TV and HDMI/MHL input signals (non 1080i and 1080p video formats). Full Select to enlarge the picture horizontally to fill the screen when the original source is set 4:3 Default to Off. • 4:3 Default is not available if Auto Wide is 16:9 (High-definition source... On to automatically change channels (or inputs), Wide Mode is set to display 4:3 picture in its original size. Select to fill the 16:9 screen, displaying as possible. This option is only available for 4:3 sources Normal Off Select to display the 4:3 picture in original size when the original ...
...use for Digital TV and HDMI/MHL input signals (non 1080i and 1080p video formats). Full Select to enlarge the picture horizontally to fill the screen when the original source is set 4:3 Default to Off. • 4:3 Default is not available if Auto Wide is 16:9 (High-definition source... On to automatically change channels (or inputs), Wide Mode is set to display 4:3 picture in its original size. Select to fill the 16:9 screen, displaying as possible. This option is only available for 4:3 sources Normal Off Select to display the 4:3 picture in original size when the original ...

Operating Instructions
Page 42
... Full 2 Select to enlarge the picture to display in Wide Zoom and Zoom.) When a PC is connected to the TV, the PC settings screen appears instead of the Screen settings. Wide Mode Normal Select to fill the display area. Reset Resets all PC settings to fill the display area, keeping its original...
... Full 2 Select to enlarge the picture to display in Wide Zoom and Zoom.) When a PC is connected to the TV, the PC settings screen appears instead of the Screen settings. Wide Mode Normal Select to fill the display area. Reset Resets all PC settings to fill the display area, keeping its original...

Operating Instructions
Page 47
... the display mode. Select from Calendar, Analog Clock, Digital Clock, Calendar and Clock or Clock. Select from Image and Clock, Full Screen Image or Full Screen Clock. Audio Application Music Off You can play a slideshow of the week on and a digital still camera or other device containing photo..., music or video files is Full Screen Clock. Slideshow Setting Slideshow You can enjoy music with this function. Image Selection Select image. Single Track Set to listen to the USB...
... the display mode. Select from Calendar, Analog Clock, Digital Clock, Calendar and Clock or Clock. Select from Image and Clock, Full Screen Image or Full Screen Clock. Audio Application Music Off You can play a slideshow of the week on and a digital still camera or other device containing photo..., music or video files is Full Screen Clock. Slideshow Setting Slideshow You can enjoy music with this function. Image Selection Select image. Single Track Set to listen to the USB...

Operating Instructions
Page 48
...) of a program. (Should be set to CC1 for most programs.) Text1, Text2, Displays network/station information presented Text3, Text4 using either half or the whole screen (if available). Option Closed Captions (CC) Audio Description Description Allows you to make additional settings for digital closed caption options. On when Muting Closed Captions...
...) of a program. (Should be set to CC1 for most programs.) Text1, Text2, Displays network/station information presented Text3, Text4 using either half or the whole screen (if available). Option Closed Captions (CC) Audio Description Description Allows you to make additional settings for digital closed caption options. On when Muting Closed Captions...
Operating Instructions
Page 49
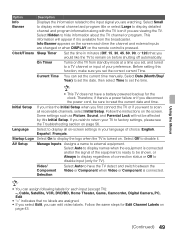
...program title or select Large to display detailed channel and program information along with the TV icon if you want to scan all on the screen. Some settings such as Picture, Sound, and Parental Lock will appear if it . Select Auto to display names when the equipment is.... • You can assign following labels for the clock. Select Off to hide information about the TV channel or program. Info Banner appears on the screen each input (except TV): -, Cable, Satellite, VCR, DVD/BD, Home Theater, Game, Camcorder, Digital Camera, PC, Edit • "-" indicates that you set ,...
...program title or select Large to display detailed channel and program information along with the TV icon if you want to scan all on the screen. Some settings such as Picture, Sound, and Parental Lock will appear if it . Select Auto to display names when the equipment is.... • You can assign following labels for the clock. Select Off to hide information about the TV channel or program. Info Banner appears on the screen each input (except TV): -, Cable, Satellite, VCR, DVD/BD, Home Theater, Game, Camcorder, Digital Camera, PC, Edit • "-" indicates that you set ,...


