Operating Instructions
Page 2
... The model and serial numbers are trademarks or registered marks of Sony Corporation. HDMI, the HDMI logo, and High-Definition Multimedia Interface are trademarks of Sony Computer Entertainment Inc. Patent No. 6,816,141 Manufactured under license... from Dolby Laboratories. Blu-ray Disc is ENERGY STAR® qualified in the "Home" mode. ENERGY STAR is a trademark of Dolby Laboratories. Record these government agencies, designed to avoid any chance of electric shock. • Wipe the LCD screen...
... The model and serial numbers are trademarks or registered marks of Sony Corporation. HDMI, the HDMI logo, and High-Definition Multimedia Interface are trademarks of Sony Computer Entertainment Inc. Patent No. 6,816,141 Manufactured under license... from Dolby Laboratories. Blu-ray Disc is ENERGY STAR® qualified in the "Home" mode. ENERGY STAR is a trademark of Dolby Laboratories. Record these government agencies, designed to avoid any chance of electric shock. • Wipe the LCD screen...
Operating Instructions
Page 3
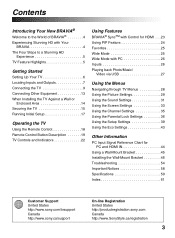
.../Music/ Video via USB 27 Using the Menus Navigating through TV Menus 28 Using the Picture Settings 29 Using the Sound Settings 31 Using the Screen Settings 33 Using the Channel Settings 35 Using the Parental Lock Settings 36 Using the Setup Settings 39 Using the Eco Settings 43 Other Information... a Wall-Mount Bracket 45 Installing the Wall-Mount Bracket 46 Troubleshooting 54 Important Notices 58 Specifications 59 Index 61 Customer Support United States http://www.sony.com/tvsupport Canada http://www.sony.ca/support On-line Registration United States http://productregistration...
.../Music/ Video via USB 27 Using the Menus Navigating through TV Menus 28 Using the Picture Settings 29 Using the Sound Settings 31 Using the Screen Settings 33 Using the Channel Settings 35 Using the Parental Lock Settings 36 Using the Setup Settings 39 Using the Eco Settings 43 Other Information... a Wall-Mount Bracket 45 Installing the Wall-Mount Bracket 46 Troubleshooting 54 Important Notices 58 Specifications 59 Index 61 Customer Support United States http://www.sony.com/tvsupport Canada http://www.sony.ca/support On-line Registration United States http://productregistration...

Operating Instructions
Page 5
...smooth movement, and high-impact visuals from 1080 HD signals as : ➢ BRAVIA® SyncTM: Allows your BRAVIA TV to communicate with other Sony equipment supporting the Control for HDMI function (page 23). ➢ Digital Media Accessibility: Use the Photo, Music, and Video icons to access photo... to the Quick Setup Guide, enclosed separately, for easy access (page 25). ➢ Auto Wide Mode: Set your TV to automatically adjust the screen based on the signal resolution (page 25). ➢ Input Selection: Allows you to easily switch between the connected equipment (page 26). ➢...
...smooth movement, and high-impact visuals from 1080 HD signals as : ➢ BRAVIA® SyncTM: Allows your BRAVIA TV to communicate with other Sony equipment supporting the Control for HDMI function (page 23). ➢ Digital Media Accessibility: Use the Photo, Music, and Video icons to access photo... to the Quick Setup Guide, enclosed separately, for easy access (page 25). ➢ Auto Wide Mode: Set your TV to automatically adjust the screen based on the signal resolution (page 25). ➢ Input Selection: Allows you to easily switch between the connected equipment (page 26). ➢...
Operating Instructions
Page 6
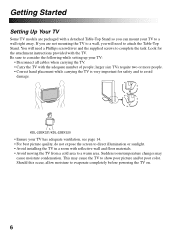
KDL-22BX321/KDL-22BX320 • Ensure your TV has adequate ventilation, see page 14. • For best picture quality, do not expose the screen to direct illumination or sunlight. • Avoid installing the TV in a room with a detached Table-Top Stand so you will need to attach the Table-...
KDL-22BX321/KDL-22BX320 • Ensure your TV has adequate ventilation, see page 14. • For best picture quality, do not expose the screen to direct illumination or sunlight. • Avoid installing the TV in a room with a detached Table-Top Stand so you will need to attach the Table-...
Operating Instructions
Page 17
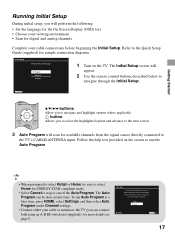
...use for this TV. button: Allows you to select the highlighted option and advance to the next screen. 3 Auto Program will perform the following: • Set the language for the On Screen Display (OSD) text • Choose your viewing environment • Scan for digital and analog channels...initial setup, you will scan for available channels from the signal source directly connected to the TV's CABLE/ANTENNA input. The Initial Setup screen will appear. 2 Use the remote control buttons described below to navigate and highlight options where applicable. for store display. Refer to the...
...use for this TV. button: Allows you to select the highlighted option and advance to the next screen. 3 Auto Program will perform the following: • Set the language for the On Screen Display (OSD) text • Choose your viewing environment • Scan for digital and analog channels...initial setup, you will scan for available channels from the signal source directly connected to the TV's CABLE/ANTENNA input. The Initial Setup screen will appear. 2 Use the remote control buttons described below to navigate and highlight options where applicable. for store display. Refer to the...
Operating Instructions
Page 20
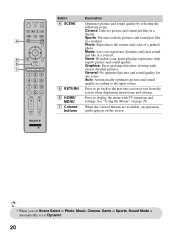
See "Using the Menus" on page 28. 7 Colored buttons When the colored buttons are available, an operation guide appears on the screen. • When you experience dynamic and clear sound just like at a concert. 5 Game: Broadens your game-playing experience with 6 superb ...scene. Auto: Automatically optimizes picture and sound quality according to the input source. 5 RETURN Press to go back to the previous screen or exit from the screen when displaying menu items and settings. 6 HOME/ MENU Press to Dynamic. 20 Graphics: Eases prolonged monitor viewing with TV functions ...
See "Using the Menus" on page 28. 7 Colored buttons When the colored buttons are available, an operation guide appears on the screen. • When you experience dynamic and clear sound just like at a concert. 5 Game: Broadens your game-playing experience with 6 superb ...scene. Auto: Automatically optimizes picture and sound quality according to the input source. 5 RETURN Press to go back to the previous screen or exit from the screen when displaying menu items and settings. 6 HOME/ MENU Press to Dynamic. 20 Graphics: Eases prolonged monitor viewing with TV functions ...
Operating Instructions
Page 22
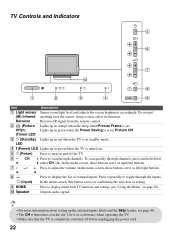
...either CH -/+. Press to Picture Off. (Timer) LED 3 1 (Standby) Lights up in standby mode. To scan quickly through the inputs. In the menu screen, this button serves as up the external inputs labels and the Skip feature, see "Using the Menus" on and off before unplugging the power cord.... 22 In the menu screen, these buttons serve as confirming the selection or setting. Use it as left/right buttons. 8 t (Input) 9 HOME 0 Speaker Press to adjust the ...
...either CH -/+. Press to Picture Off. (Timer) LED 3 1 (Standby) Lights up in standby mode. To scan quickly through the inputs. In the menu screen, this button serves as up the external inputs labels and the Skip feature, see "Using the Menus" on and off before unplugging the power cord.... 22 In the menu screen, these buttons serve as confirming the selection or setting. Use it as left/right buttons. 8 t (Input) 9 HOME 0 Speaker Press to adjust the ...
Operating Instructions
Page 24
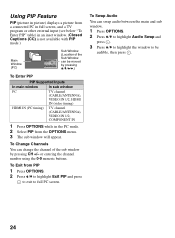
... main and sub window. 1 Press OPTIONS. 2 Press V/v to highlight Audio Swap and press . 3 Press V/v to highlight the window to full PC screen. To Swap Audio You can be audible, then press . 24 or entering the channel number using the 0-9 numeric buttons. Using PIP Feature PIP (picture ...in picture) displays a picture from a connected PC in full screen, and a TV program or other external input (see below "To Enter PIP" table) in the PC mode. 2 Select PIP from PIP 1 Press OPTIONS. ...
... main and sub window. 1 Press OPTIONS. 2 Press V/v to highlight Audio Swap and press . 3 Press V/v to highlight the window to full PC screen. To Swap Audio You can be audible, then press . 24 or entering the channel number using the 0-9 numeric buttons. Using PIP Feature PIP (picture ...in picture) displays a picture from a connected PC in full screen, and a TV program or other external input (see below "To Enter PIP" table) in the PC mode. 2 Select PIP from PIP 1 Press OPTIONS. ...

Operating Instructions
Page 25
This is available with 480i or 480p sources only. 25 To set Auto Wide Press HOME and select Settings, then select the Screen settings. Zoom Zoom Normal is due to the signals your TV receives. Select Auto Wide and set to Favorites, then press . Your newly added item ... TV by pressing the HOME button once they are added to the list. 1 Press HOME. 2 Press V/v to select Favorites, then press . To change the Wide Screen Mode Press WIDE repeatedly to display the list. Adding to Favorites While tuned to the channel you continue to add items beyond the 10th item...
This is available with 480i or 480p sources only. 25 To set Auto Wide Press HOME and select Settings, then select the Screen settings. Zoom Zoom Normal is due to the signals your TV receives. Select Auto Wide and set to Favorites, then press . Your newly added item ... TV by pressing the HOME button once they are added to the list. 1 Press HOME. 2 Press V/v to select Favorites, then press . To change the Wide Screen Mode Press WIDE repeatedly to display the list. Adding to Favorites While tuned to the channel you continue to add items beyond the 10th item...

Operating Instructions
Page 26
.... Wide Mode with PC Wide Mode is grayed out in the input list. Screen PC PC Settings Wide Mode Reset Auto Adjustment Phase Pitch Horizontal Center Vertical Center Normal 0 0 0 0 ...Set To change the PC Screen settings. Select the Label Video Inputs option in the PC input mode. press to select the ... select your external inputs to your TV will skip over this input when you can change the Wide Screen Mode for viewing including the TV mode. To Label an Input 1 Press HOME and select Settings, then...
.... Wide Mode with PC Wide Mode is grayed out in the input list. Screen PC PC Settings Wide Mode Reset Auto Adjustment Phase Pitch Horizontal Center Vertical Center Normal 0 0 0 0 ...Set To change the PC Screen settings. Select the Label Video Inputs option in the PC input mode. press to select the ... select your external inputs to your TV will skip over this input when you can change the Wide Screen Mode for viewing including the TV mode. To Label an Input 1 Press HOME and select Settings, then...
Operating Instructions
Page 27
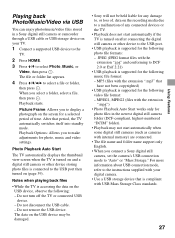
... storage device that period, the TV automatically switches itself into standby mode. Photo Playback Auto Start The TV automatically displays the thumbnail view screen when the TV is turned on and a digital still camera or other device to the USB port. • USB playback is compliant... with internal memory) are connected. • The file name and folder name support only English. • When you connect a Sony digital still camera, set the camera's USB connection mode to display a photograph on the USB device, observe the following video file format: - Notes...
... storage device that period, the TV automatically switches itself into standby mode. Photo Playback Auto Start The TV automatically displays the thumbnail view screen when the TV is turned on and a digital still camera or other device to the USB port. • USB playback is compliant... with internal memory) are connected. • The file name and folder name support only English. • When you connect a Sony digital still camera, set the camera's USB connection mode to display a photograph on the USB device, observe the following video file format: - Notes...
Operating Instructions
Page 28
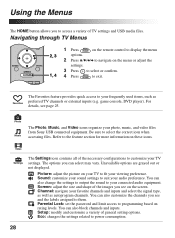
...to programming based on these icons. Using the Menus The HOME button allows you to access a variety of the images you see on the screen. Unavailable options are grayed out or not displayed. Eco: changes the settings related to select the correct icon when Music accessing files. game console...the remote control to display the menu 2, 3 options. 2 Press V/v/B/b to navigate on your TV to suit your photo, music, and video files from Sony USB connected equipment. Sound: customize your sound settings to fit your TV settings. You can also block channels and inputs.
...to programming based on these icons. Using the Menus The HOME button allows you to access a variety of the images you see on the screen. Unavailable options are grayed out or not displayed. Eco: changes the settings related to select the correct icon when Music accessing files. game console...the remote control to display the menu 2, 3 options. 2 Press V/v/B/b to navigate on your TV to suit your photo, music, and video files from Sony USB connected equipment. Sound: customize your sound settings to fit your TV settings. You can also block channels and inputs.
Operating Instructions
Page 30
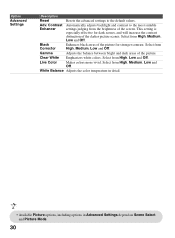
... for dark scenes, and will increase the contrast distinction of the darker picture scenes. Gamma Adjusts the balance between bright and dark areas of the screen. This setting is especially effective for stronger contrast. Adv. Select from High, Low and Off. Clear White Emphasizes white colors. White Balance Adjusts the color...
... for dark scenes, and will increase the contrast distinction of the darker picture scenes. Gamma Adjusts the balance between bright and dark areas of the screen. This setting is especially effective for stronger contrast. Adv. Select from High, Low and Off. Clear White Emphasizes white colors. White Balance Adjusts the color...
Operating Instructions
Page 33
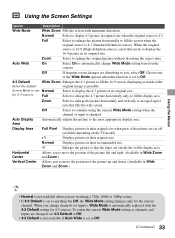
...the Menus • Normal is 4:3 (Standard definition source). Auto Wide On Select On to fill the screen when the original source is not available when you are changed . Screen Mode to use Normal for 4:3 sources Full Select to anything but Off, the Wide Mode setting changes ... for 4:3 sources. Area Display Area Full Pixel Displays pictures in their recommended size. -1 Enlarges the picture so that fills the wide screen. Horizontal Allows you to move the position of the picture left and right. (Available in Wide Zoom Center and Zoom.) Vertical Center ...
...the Menus • Normal is 4:3 (Standard definition source). Auto Wide On Select On to fill the screen when the original source is not available when you are changed . Screen Mode to use Normal for 4:3 sources Full Select to anything but Off, the Wide Mode setting changes ... for 4:3 sources. Area Display Area Full Pixel Displays pictures in their recommended size. -1 Enlarges the picture so that fills the wide screen. Horizontal Allows you to move the position of the picture left and right. (Available in Wide Zoom Center and Zoom.) Vertical Center ...
Operating Instructions
Page 34
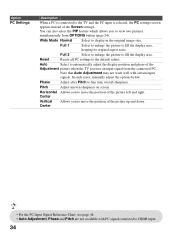
... to fill the display area. Option PC Settings Description When a PC is connected to the TV and the PC input is selected, the PC settings screen appears instead of the picture up and down. Full 2 Select to enlarge the picture to fill the display area, keeping its original aspect ratio. Auto... Adjustment picture when the TV receives an input signal from OPTIONS button (page 24). Reset Resets all PC settings to move the position of the Screen settings. Pitch Adjust uneven sharpness on screen. Horizontal Allows you to HDMI input. 34
... to fill the display area. Option PC Settings Description When a PC is connected to the TV and the PC input is selected, the PC settings screen appears instead of the picture up and down. Full 2 Select to enlarge the picture to fill the display area, keeping its original aspect ratio. Auto... Adjustment picture when the TV receives an input signal from OPTIONS button (page 24). Reset Resets all PC settings to move the position of the Screen settings. Pitch Adjust uneven sharpness on screen. Horizontal Allows you to HDMI input. 34

Operating Instructions
Page 39
... CC When the digital closed caption modes (for most programs.) Text1, Text2, Displays network/station information presented using Text3, Text4 either half or the whole screen (if available).
... CC When the digital closed caption modes (for most programs.) Text1, Text2, Displays network/station information presented using Text3, Text4 either half or the whole screen (if available).

Operating Instructions
Page 40
... the broadcaster. Select to assign a label. Then when you press INPUT to change inputs, the video label you assigned to that input appears on screen. 1 Press V/v to highlight the video input (HDMI, Video 1-2, Component, PC) to which no labels are assigned. • If you select.../ Select Auto to select the label. Info Banner appears on before shutting off automatically. Then press to have a DVD player connected to remain on the screen each input: -, Cable, Receiver, Satellite, VCR, DVD/BD, DVR, Audio System, Home Theater, Game, Camcorder, Digital Camera, PC, Edit, Skip (...
... the broadcaster. Select to assign a label. Then when you press INPUT to change inputs, the video label you assigned to that input appears on screen. 1 Press V/v to highlight the video input (HDMI, Video 1-2, Component, PC) to which no labels are assigned. • If you select.../ Select Auto to select the label. Info Banner appears on before shutting off automatically. Then press to have a DVD player connected to remain on the screen each input: -, Cable, Receiver, Satellite, VCR, DVD/BD, DVR, Audio System, Home Theater, Game, Camcorder, Digital Camera, PC, Edit, Skip (...
Operating Instructions
Page 41
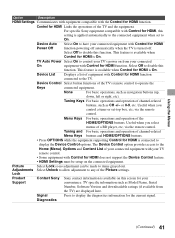
... on this setting is turned off automatically when the TV is applied automatically to display the Device Control options. Lock Product Contact Sony Sony contact information is connected to the connected equipment when set -top box, etc; This feature is available when Control for HDMI ...to the Home (Menu), Options and Content List of your connected equipment with your connected On equipment with Control for HDMI, this screen for your connected equipment with Control for HDMI is On. The Device Control option provides access to have your Support convenience. Using...
... on this setting is turned off automatically when the TV is applied automatically to display the Device Control options. Lock Product Contact Sony Sony contact information is connected to the connected equipment when set -top box, etc; This feature is available when Control for HDMI ...to the Home (Menu), Options and Content List of your connected equipment with your connected On equipment with Control for HDMI, this screen for your connected equipment with Control for HDMI is On. The Device Control option provides access to have your Support convenience. Using...

Operating Instructions
Page 42
Select On to play sound when the TV is turned on the screen. Follow the instructions on . Select Off to disable it. • Favorite channel list will not be cleared each time you run the Initial Setup. 42 ...
Select On to play sound when the TV is turned on the screen. Follow the instructions on . Select Off to disable it. • Favorite channel list will not be cleared each time you run the Initial Setup. 42 ...
Operating Instructions
Page 47
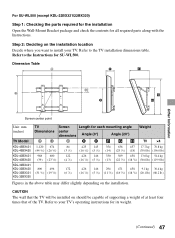
... install your TV's operating instructions for SU-WL500. Step 2: Deciding on the installation. Dimension Table Other Information Screen center point Unit: mm (inches) TV Model KDL-46BX421 KDL-46BX420 KDL-40BX421 KDL-40BX420 KDL-32BX421 KDL-32BX420 KDL-32BX321 KDL-32BX320 TV Screen Length for all required parts along with the Instructions. CAUTION The wall that the TV will be installed...
... install your TV's operating instructions for SU-WL500. Step 2: Deciding on the installation. Dimension Table Other Information Screen center point Unit: mm (inches) TV Model KDL-46BX421 KDL-46BX420 KDL-40BX421 KDL-40BX420 KDL-32BX421 KDL-32BX420 KDL-32BX321 KDL-32BX320 TV Screen Length for all required parts along with the Instructions. CAUTION The wall that the TV will be installed...


