Operation Guide
Page 1
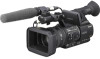
Printed in Japan GB Digital HD Video Camera Recorder 4-114-858-11(1) Digital HD Video Camera Recorder Operating Guide Before operating the unit, please read this manual thoroughly, and retain it for future reference HVR-Z5E/Z5P © 2008 Sony Corporation http://www.sony.net/ Printed on 70% or more recycled paper using VOC (Volatile Organic Compound) -free vegetable oil based ink.
Printed in Japan GB Digital HD Video Camera Recorder 4-114-858-11(1) Digital HD Video Camera Recorder Operating Guide Before operating the unit, please read this manual thoroughly, and retain it for future reference HVR-Z5E/Z5P © 2008 Sony Corporation http://www.sony.net/ Printed on 70% or more recycled paper using VOC (Volatile Organic Compound) -free vegetable oil based ink.

Operation Guide
Page 2
... format cassette. • HDV signals are compressed in MPEG2 format, which is capable of cassette you use mini DVCAM cassettes. When recording in DVCAM format, Sony recommends that you can be used only with "Memory Stick PRO" compatible equipment. • Do not attach a label or the like on a "Memory Stick ... and played back on use Types of recording in HDV, DVCAM and DV formats. Read this first Before operating this unit, please read this manual thoroughly, and retain it in your camcorder.) b Notes • You cannot use any "Memory Stick" that has the following markings.
... format cassette. • HDV signals are compressed in MPEG2 format, which is capable of cassette you use mini DVCAM cassettes. When recording in DVCAM format, Sony recommends that you can be used only with "Memory Stick PRO" compatible equipment. • Do not attach a label or the like on a "Memory Stick ... and played back on use Types of recording in HDV, DVCAM and DV formats. Read this first Before operating this unit, please read this manual thoroughly, and retain it in your camcorder.) b Notes • You cannot use any "Memory Stick" that has the following markings.
Operation Guide
Page 4
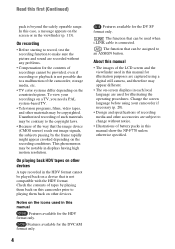
Notes on the icons used in displays having high motion resolution. In this case, a message appears on the screen or in this manual Features available for the HDV format only. Features available for the DVCAM format only. 4 Features available for the contents of the LCD ... the HDV format cannot be provided, even if recording or playback is beyond the safely operable range. This phenomenon may be notable in this manual for illustrating the operating procedures. On recording • Before starting to record, test the recording function to make sure the picture and sound ...
Notes on the icons used in displays having high motion resolution. In this case, a message appears on the screen or in this manual Features available for the HDV format only. Features available for the DVCAM format only. 4 Features available for the contents of the LCD ... the HDV format cannot be provided, even if recording or playback is beyond the safely operable range. This phenomenon may be notable in this manual for illustrating the operating procedures. On recording • Before starting to record, test the recording function to make sure the picture and sound ...
Operation Guide
Page 5
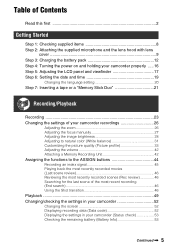
... a tape or a "Memory Stick Duo 21 Recording/Playback Recording 23 Changing the settings of your camcorder recordings 26 Adjusting the zoom 26 Adjusting the focus manually 27 Adjusting the image brightness 28 Adjusting to natural color (White balance 31 Customizing the picture quality (Picture profile 33 Adjusting the volume 42 Attaching...
... a tape or a "Memory Stick Duo 21 Recording/Playback Recording 23 Changing the settings of your camcorder recordings 26 Adjusting the zoom 26 Adjusting the focus manually 27 Adjusting the image brightness 28 Adjusting to natural color (White balance 31 Customizing the picture quality (Picture profile 33 Adjusting the volume 42 Attaching...
Operation Guide
Page 8
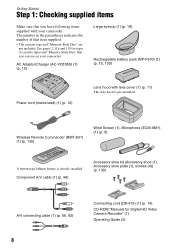
... camcorder. Component A/V cable (1) (p. 56) Accessory shoe kit (Accessory shoe (1), Accessory shoe plate (1), screws (4)) (p. 130) A/V connecting cable (1) (p. 56, 93) 8 Connecting cord (DK-415) (1) (p. 14) CD-ROM "Manuals for types of that you have following items supplied with lens cover (1) (p. 11) This lens hood is already installed. The number in the parentheses indicates...
... camcorder. Component A/V cable (1) (p. 56) Accessory shoe kit (Accessory shoe (1), Accessory shoe plate (1), screws (4)) (p. 130) A/V connecting cable (1) (p. 56, 93) 8 Connecting cord (DK-415) (1) (p. 14) CD-ROM "Manuals for types of that you have following items supplied with lens cover (1) (p. 11) This lens hood is already installed. The number in the parentheses indicates...
Operation Guide
Page 27
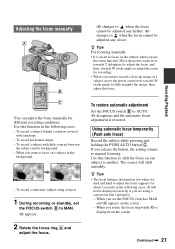
...subject when you are using a tripod. 1 During recording or standby, set the FOCUS switch to MAN and 9 appears on the screen. z Tips For focusing manually • It is restored. To record a stationary subject using a conversion lens (optional)). - If you want to record a close-up image of a subject,... hard to adjust the focus) appears for when it is displayed on the screen - When you release the button, the setting returns to manual focusing. The scenes will not be adjusted any farther. 9 changes to when the focus cannot be displayed correctly if you use the zoom ...
...subject when you are using a tripod. 1 During recording or standby, set the FOCUS switch to MAN and 9 appears on the screen. z Tips For focusing manually • It is restored. To record a stationary subject using a conversion lens (optional)). - If you want to record a close-up image of a subject,... hard to adjust the focus) appears for when it is displayed on the screen - When you release the button, the setting returns to manual focusing. The scenes will not be adjusted any farther. 9 changes to when the focus cannot be displayed correctly if you use the zoom ...
Operation Guide
Page 28
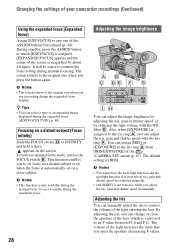
...as an F value between F1.6 and F11. The screen returns to the original size when you adjust the iris, gain and shutter speed all manually. b Notes • This function is not available during the automatic focus. 28 Adjusting the image brightness You can adjust the image brightness by ...select a type of the lens, which [EXP.FOCUS] is assigned. [EXPANDED FOCUS] appears and the center of iris, gain and shutter speed are adjusted manually. • [AE SHIFT] is assigned to the iris ring A, you start recording during the expanded focus ([EXP.FOCUS TYPE], p. 80). Changing the settings...
...as an F value between F1.6 and F11. The screen returns to the original size when you adjust the iris, gain and shutter speed all manually. b Notes • This function is not available during the automatic focus. 28 Adjusting the image brightness You can adjust the image brightness by ...select a type of the lens, which [EXP.FOCUS] is assigned. [EXPANDED FOCUS] appears and the center of iris, gain and shutter speed are adjusted manually. • [AE SHIFT] is assigned to the iris ring A, you start recording during the expanded focus ([EXP.FOCUS TYPE], p. 80). Changing the settings...
Operation Guide
Page 29
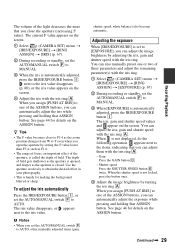
...1 Select (CAMERA SET) menu t [IRIS/EXPOSURE] t [RING ASSIGN] t [IRIS] (p. 67). 2 During recording or standby, set the AUTO/MANUAL switch F to MANUAL. 3 When the iris is set to [EXPOSURE], you can automatically adjust the iris while pressing and holding that ASSIGN button. See page 44 for...1 Select (CAMERA SET) menu t [IRIS/EXPOSURE] t [RING ASSIGN] t [EXPOSURE] (p. 67) 2 During recording or standby, set the AUTO/MANUAL switch F to MANUAL. 3 When [EXPOSURE] is closed. See page 44 for making the background blurred or sharp. next to the iris value disappears (p. 80), or the ...
...1 Select (CAMERA SET) menu t [IRIS/EXPOSURE] t [RING ASSIGN] t [IRIS] (p. 67). 2 During recording or standby, set the AUTO/MANUAL switch F to MANUAL. 3 When the iris is set to [EXPOSURE], you can automatically adjust the iris while pressing and holding that ASSIGN button. See page 44 for...1 Select (CAMERA SET) menu t [IRIS/EXPOSURE] t [RING ASSIGN] t [EXPOSURE] (p. 67) 2 During recording or standby, set the AUTO/MANUAL switch F to MANUAL. 3 When [EXPOSURE] is closed. See page 44 for making the background blurred or sharp. next to the iris value disappears (p. 80), or the ...

Operation Guide
Page 30
... speed value, disappears and you can adjust the shutter speed with the iris ring A. Adjusting the gain You can adjust the gain manually when you can adjust the gain manually. The gain value disappears, or appears next to H, M or L. b Notes • When you record a movie with the gain set to [-6dB... back with the iris ring A. To readjust the shutter speed, do not want to use the AGC (automatic gain control). 1 Set the AUTO/MANUAL switch F to MANUAL during recording or standby. 2 When the gain is highlighted. 3 Change the shutter speed displayed on how to 4. The gain value set AUTO...
... speed value, disappears and you can adjust the shutter speed with the iris ring A. Adjusting the gain You can adjust the gain manually when you can adjust the gain manually. The gain value disappears, or appears next to H, M or L. b Notes • When you record a movie with the gain set to [-6dB... back with the iris ring A. To readjust the shutter speed, do not want to use the AGC (automatic gain control). 1 Set the AUTO/MANUAL switch F to MANUAL during recording or standby. 2 When the gain is highlighted. 3 Change the shutter speed displayed on how to 4. The gain value set AUTO...
Operation Guide
Page 31
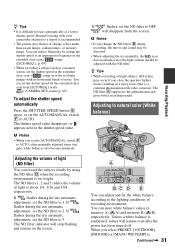
...in the extended clear scan ( ) range ([ECS FREQ.], p. 69). • When recording a subject such as a monitor screen, set the AUTO/MANUAL switch F to AUTO. You can adjust and fix the white balance according to 2. z Tips • It is too bright. Adjusting the volume of ...light to the shutter speed value. If flashes, set the AUTO/MANUAL switch F to AUTO, other manually adjusted items (iris, gain, white balance) also become automatic. . The ND filter indicator will disappear from [ECS FREQ.] in the...
...in the extended clear scan ( ) range ([ECS FREQ.], p. 69). • When recording a subject such as a monitor screen, set the AUTO/MANUAL switch F to AUTO. You can adjust and fix the white balance according to 2. z Tips • It is too bright. Adjusting the volume of ...light to the shutter speed value. If flashes, set the AUTO/MANUAL switch F to AUTO, other manually adjusted items (iris, gain, white balance) also become automatic. . The ND filter indicator will disappear from [ECS FREQ.] in the...
Operation Guide
Page 32
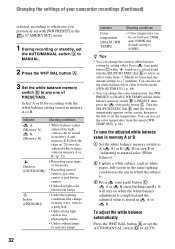
... balance value in memory A or B 1 Set the white balance memory switch to A ( A) or B ( B) in A or B. You can also set the AUTO/MANUAL switch D to set between 2300K and 15000K (the default setting is stored in step 3 of PRESET/A/B. Set [WB PRESET] to [MANU WB TEMP] and the...color temperature from -7 (bluish) to 0 (normal, the default setting) to PRESET, then press the (one push) button C. You can also set the AUTO/MANUAL switch D to MANUAL. 2 Press the WHT BAL button A. 3 Set the white balance memory switch B to any one of "Adjusting to natural color (White balance)." 2 Capture a...
... balance value in memory A or B 1 Set the white balance memory switch to A ( A) or B ( B) in A or B. You can also set the AUTO/MANUAL switch D to set between 2300K and 15000K (the default setting is stored in step 3 of PRESET/A/B. Set [WB PRESET] to [MANU WB TEMP] and the...color temperature from -7 (bluish) to 0 (normal, the default setting) to PRESET, then press the (one push) button C. You can also set the AUTO/MANUAL switch D to MANUAL. 2 Press the WHT BAL button A. 3 Set the white balance memory switch B to any one of "Adjusting to natural color (White balance)." 2 Capture a...

Operation Guide
Page 33
b Notes • When you set the AUTO/MANUAL switch D to AUTO, other manual adjustments (iris, gain, and shutter speed) also become automatic. Picture quality settings for different recording conditions are stored in step 2 with the SEL/PUSH EXEC ...
b Notes • When you set the AUTO/MANUAL switch D to AUTO, other manual adjustments (iris, gain, and shutter speed) also become automatic. Picture quality settings for different recording conditions are stored in step 2 with the SEL/PUSH EXEC ...
Operation Guide
Page 36
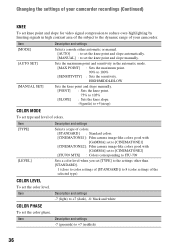
...] : Sets the knee slope. -5(gentle) to 8 (color settings of the selected type) COLOR LEVEL To set the knee point and slope manually. Item [TYPE] [LEVEL] Description and settings Selects a type of colors. [STANDARD] : Standard colors [CINEMATONE1] : Film camera image-like colors...greenish) to 100% [SENSITIVITY] : Sets the sensitivity. Item [MODE] [AUTO SET] [MANUAL SET] Description and settings Selects a mode either automatic or manual. [AUTO] : to set the knee point and slope automatically. [MANUAL] : to the dynamic range of colors. Item Description and settings -7 (light) to +7...
...] : Sets the knee slope. -5(gentle) to 8 (color settings of the selected type) COLOR LEVEL To set the knee point and slope manually. Item [TYPE] [LEVEL] Description and settings Selects a type of colors. [STANDARD] : Standard colors [CINEMATONE1] : Film camera image-like colors...greenish) to 100% [SENSITIVITY] : Sets the sensitivity. Item [MODE] [AUTO SET] [MANUAL SET] Description and settings Selects a mode either automatic or manual. [AUTO] : to set the knee point and slope automatically. [MANUAL] : to the dynamic range of colors. Item Description and settings -7 (light) to +7...
Operation Guide
Page 38
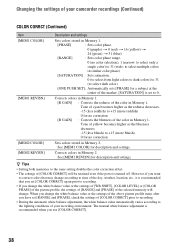
... recommended when you want to correct colors that may change . Changing the settings of your recording environment. See [MEM1 REVISN] for description and settings. The manual white balance adjustment is recommended that you have set to +15 (more bluish) 0 for no correction Sets colors stored in Memory 2. Corrects colors in Memory...
... recommended when you want to correct colors that may change . Changing the settings of your recording environment. See [MEM1 REVISN] for description and settings. The manual white balance adjustment is recommended that you have set to +15 (more bluish) 0 for no correction Sets colors stored in Memory 2. Corrects colors in Memory...
Operation Guide
Page 39
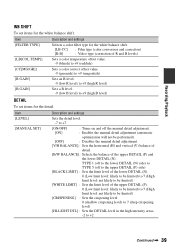
Item [LEVEL] [MANUAL SET] Description and settings Sets the detail level. -7 to +2 Continued , 39 TYPE 1 (off to the lower DETAIL (N) side) to TYPE 5 (off to the upper DETAIL (P) ...] : Sets the DETAIL level in the high intensity areas. -2 to +7 [ON/OFF] : Turns on and off the manual detail adjustment. [ON] : Enables the manual detail adjustment (automatic optimization will not be performed). [OFF] : Disables the manual detail adjustment. [V/H BALANCE] : Sets the horizontal (H) and vertical (V) balance of detail. [B/W BALANCE]: Selects the balance of R and...
Item [LEVEL] [MANUAL SET] Description and settings Sets the detail level. -7 to +2 Continued , 39 TYPE 1 (off to the lower DETAIL (N) side) to TYPE 5 (off to the upper DETAIL (P) ...] : Sets the DETAIL level in the high intensity areas. -2 to +7 [ON/OFF] : Turns on and off the manual detail adjustment. [ON] : Enables the manual detail adjustment (automatic optimization will not be performed). [OFF] : Disables the manual detail adjustment. [V/H BALANCE] : Sets the horizontal (H) and vertical (V) balance of detail. [B/W BALANCE]: Selects the balance of R and...
Operation Guide
Page 42
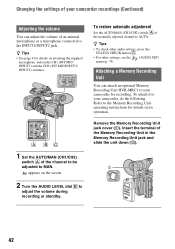
... the Memory Recording Unit jack cover (1). Changing the settings of your camcorder recordings (Continued) Adjusting the volume You can attach an optional Memory Recording Unit HVR-MRC1 to your camcorder, do the following. z Tips • To check other audio settings, press the STATUS CHECK button C. • For other settings,... for recording. To attach it to your camcorder for details on attaching the supplied microphone, and on its operation. Insert the terminal of the manually adjusted channel to the INPUT1/INPUT2 jack. Refer to adjust the volume during recording or standby.
... the Memory Recording Unit jack cover (1). Changing the settings of your camcorder recordings (Continued) Adjusting the volume You can attach an optional Memory Recording Unit HVR-MRC1 to your camcorder, do the following. z Tips • To check other audio settings, press the STATUS CHECK button C. • For other settings,... for recording. To attach it to your camcorder for details on attaching the supplied microphone, and on its operation. Insert the terminal of the manually adjusted channel to the INPUT1/INPUT2 jack. Refer to adjust the volume during recording or standby.
Operation Guide
Page 47
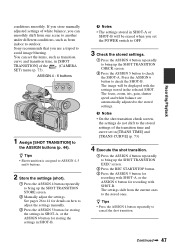
...repeatedly to cancel the shot transition. z Tips • Press the ASSIGN 4 button repeatedly to bring up the SHOT TRANSITION STORE screen. 2 Manually adjust the settings. Sony recommends that you use a tripod to the stored settings. Continued , 47 The focus, zoom, iris, gain, shutter speed and white balance... 41 for recording with SHOT-A, or the ASSIGN 6 button for details on how to outdoor. Recording/Playback conditions smoothly. If you store manually adjusted settings of the transition time and curve set the POWER switch to OFF. 3 Check the stored settings. 1 Press the ASSIGN 4...
...repeatedly to cancel the shot transition. z Tips • Press the ASSIGN 4 button repeatedly to bring up the SHOT TRANSITION STORE screen. 2 Manually adjust the settings. Sony recommends that you use a tripod to the stored settings. Continued , 47 The focus, zoom, iris, gain, shutter speed and white balance... 41 for recording with SHOT-A, or the ASSIGN 6 button for details on how to outdoor. Recording/Playback conditions smoothly. If you store manually adjusted settings of the transition time and curve set the POWER switch to OFF. 3 Check the stored settings. 1 Press the ASSIGN 4...
Operation Guide
Page 52
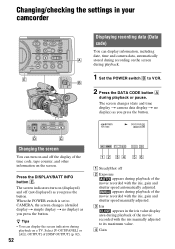
...z Tips • You can turn on and off B Exposure appears during playback of the movie recorded with the iris, gain and shutter speed manually adjusted. The screen indicators turn on (displayed) and off (not displayed) as you press the button. When the POWER switch is set to ...screen during playback. 1 Set the POWER switch B to VCR. 2 Press the DATA CODE button A during playback of the movie recorded with the iris manually adjusted to CAMERA, the screen changes (detailed display t simple display t no display) as you press the button. C Iris appears in your camcorder ...
...z Tips • You can turn on and off B Exposure appears during playback of the movie recorded with the iris, gain and shutter speed manually adjusted. The screen indicators turn on (displayed) and off (not displayed) as you press the button. When the POWER switch is set to ...screen during playback. 1 Set the POWER switch B to VCR. 2 Press the DATA CODE button A during playback of the movie recorded with the iris manually adjusted to CAMERA, the screen changes (detailed display t simple display t no display) as you press the button. C Iris appears in your camcorder ...
Operation Guide
Page 56
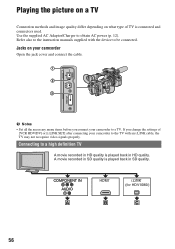
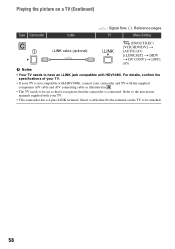
... obtain AC power (p. 12). Refer also to a high definition TV A movie recorded in HD quality is played back in HD quality. Connecting to the instruction manuals supplied with an i.LINK cable, the TV may not recognize video signals properly. Jacks on what type of [VCR HDV/DV] or [i.LINK SET] after...
... obtain AC power (p. 12). Refer also to a high definition TV A movie recorded in HD quality is played back in HD quality. Connecting to the instruction manuals supplied with an i.LINK cable, the TV may not recognize video signals properly. Jacks on what type of [VCR HDV/DV] or [i.LINK SET] after...
Operation Guide
Page 58
... TV. • If your camcorder and TV with the supplied component A/V cable and A/V connecting cable as illustrated in . • The TV needs to the instruction manuals supplied with HDV1080i.
... TV. • If your camcorder and TV with the supplied component A/V cable and A/V connecting cable as illustrated in . • The TV needs to the instruction manuals supplied with HDV1080i.


