Operating Instructions
Page 1
HVR-Z1U/Z1N © 2005 Sony Corporation HVR-Z1U/Z1N Digital HD Video Camera Recorder 2-514-606-11(1) Digital HD Video Camera Recorder Operating Instructions Before operating the unit, please read this manual thoroughly, and retain it for future reference.
HVR-Z1U/Z1N © 2005 Sony Corporation HVR-Z1U/Z1N Digital HD Video Camera Recorder 2-514-606-11(1) Digital HD Video Camera Recorder Operating Instructions Before operating the unit, please read this manual thoroughly, and retain it for future reference.
Operating Instructions
Page 4
...back HDV tapes on a device that is set to 60i. Connecting other devices Before connecting your camcorder (p. 19). 4 If you see. • The illustrations of the screen are captured using a digital still camera, and thus may appear different from what you insert the connector plug forcibly in the wrong .... Doing so might cause your camcorder. Using this may cause a malfunction of when [50i/ 60i SEL] on the (OTHERS) menu is not compatible with an i.LINK cable, be played back on other device such as at the sun. Be careful when placing the camera near a window or outdoors. ...
...back HDV tapes on a device that is set to 60i. Connecting other devices Before connecting your camcorder (p. 19). 4 If you see. • The illustrations of the screen are captured using a digital still camera, and thus may appear different from what you insert the connector plug forcibly in the wrong .... Doing so might cause your camcorder. Using this may cause a malfunction of when [50i/ 60i SEL] on the (OTHERS) menu is not compatible with an i.LINK cable, be played back on other device such as at the sun. Be careful when placing the camera near a window or outdoors. ...
Operating Instructions
Page 6
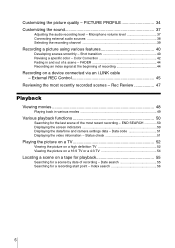
... recording channel 39 Recording a picture using various features 40 Developing scenes smoothly - END SEARCH 50 Displaying the screen indicators 50 Displaying the date/time and camera settings data - Status check 51 Playing the picture on a TV 52 Viewing the picture on a high definition TV 52 Viewing the picture on a 16:9 TV...
... recording channel 39 Recording a picture using various features 40 Developing scenes smoothly - END SEARCH 50 Displaying the screen indicators 50 Displaying the date/time and camera settings data - Status check 51 Playing the picture on a TV 52 Viewing the picture on a high definition TV 52 Viewing the picture on a 16:9 TV...
Operating Instructions
Page 7
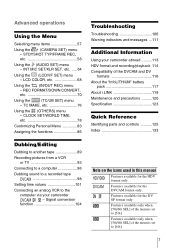
...86 Troubleshooting Troubleshooting 106 Warning indicators and messages ...111 Additional Information Using your camcorder - Features available only when [50i/60i SEL] of the menu is set to the computer via your camcorder abroad ..........113 HDV format and recording/playback 114 Compatibility of the DVCAM ...the DVCAM format only. Features available for the DV SP format only. Advanced operations Using the Menu Selecting menu items 57 Using the (CAMERA SET) menu - STDYSHOT TYP/FRAME REC, etc 58 Using the (AUDIO SET) menu - Features available only when [50i/60i SEL]...
...86 Troubleshooting Troubleshooting 106 Warning indicators and messages ...111 Additional Information Using your camcorder - Features available only when [50i/60i SEL] of the menu is set to the computer via your camcorder abroad ..........113 HDV format and recording/playback 114 Compatibility of the DVCAM ...the DVCAM format only. Features available for the DV SP format only. Advanced operations Using the Menu Selecting menu items 57 Using the (CAMERA SET) menu - STDYSHOT TYP/FRAME REC, etc 58 Using the (AUDIO SET) menu - Features available only when [50i/60i SEL]...
Operating Instructions
Page 9
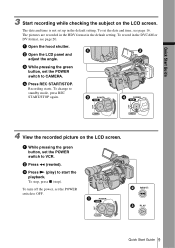
... mode, press REC START/STOP again. 4 View the recorded picture on the LCD screen. The date and time is not set the POWER switch to CAMERA. To stop, press x (stop). a Open the hood shutter. To record in the DVCAM or DV format, see page 16. To change to start the playback...
... mode, press REC START/STOP again. 4 View the recorded picture on the LCD screen. The date and time is not set the POWER switch to CAMERA. To stop, press x (stop). a Open the hood shutter. To record in the DVCAM or DV format, see page 16. To change to start the playback...
Operating Instructions
Page 14
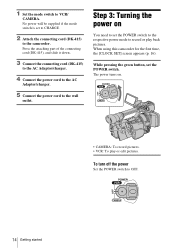
... turn off the power Set the POWER switch to VCR/ CAMERA. 1 Set the mode switch to OFF. 14 Getting started While pressing the green button, set the POWER switch to the respective power mode to set the POWER switch. When using this camcorder for the first time, the [CLOCK SET] screen appears... the connecting cord (DK-415) to the AC Adaptor/charger. 4 Connect the power cord to the AC Adaptor/charger. 5 Connect the power cord to the camcorder. The power turns on You need to record or play or edit pictures. No power will be supplied if the mode switch is set to...
... turn off the power Set the POWER switch to VCR/ CAMERA. 1 Set the mode switch to OFF. 14 Getting started While pressing the green button, set the POWER switch to the respective power mode to set the POWER switch. When using this camcorder for the first time, the [CLOCK SET] screen appears... the connecting cord (DK-415) to the AC Adaptor/charger. 4 Connect the power cord to the AC Adaptor/charger. 5 Connect the power cord to the camcorder. The power turns on You need to record or play or edit pictures. No power will be supplied if the mode switch is set to...
Operating Instructions
Page 17
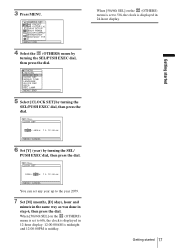
... in 24-hour display. Getting started 17 Getting started When [50i/60i SEL] on the (OTHERS) menu is set to 50i, the clock is midday. CAMERA SET WB PRESET WB OUTDR LV L GA I CK REC BEEP REC LAMP [ MENU ] : END 5 Select [CLOCK SET] by turning the SEL/PUSH EXEC dial, then...
... in 24-hour display. Getting started 17 Getting started When [50i/60i SEL] on the (OTHERS) menu is set to 50i, the clock is midday. CAMERA SET WB PRESET WB OUTDR LV L GA I CK REC BEEP REC LAMP [ MENU ] : END 5 Select [CLOCK SET] by turning the SEL/PUSH EXEC dial, then...
Operating Instructions
Page 20
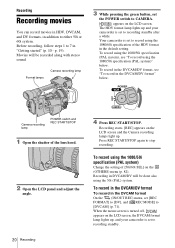
... 19). appears on the LCD screen and the Camera recording lamps light up. The HDV format lamp lights up , and your camcorder is set to either 50i or 60i system.... You can record movies in HDV, DVCAM, and DV formats, in "Getting started" (p. 10 - Your camcorder is set to recording standby after a while. Recording in the DVCAM/DV format, see "To record using ... on the LCD screen, the DVCAM format lamp lights up and your camcorder is turned off, appears on the (OTHERS) menu (p. 82). Format lamps Camera recording lamp 3 While pressing the green button, set [REC FORMAT] to...
... 19). appears on the LCD screen and the Camera recording lamps light up. The HDV format lamp lights up , and your camcorder is set to either 50i or 60i system.... You can record movies in HDV, DVCAM, and DV formats, in "Getting started" (p. 10 - Your camcorder is set to recording standby after a while. Recording in the DVCAM/DV format, see "To record using ... on the LCD screen, the DVCAM format lamp lights up and your camcorder is turned off, appears on the (OTHERS) menu (p. 82). Format lamps Camera recording lamp 3 While pressing the green button, set [REC FORMAT] to...
Operating Instructions
Page 21
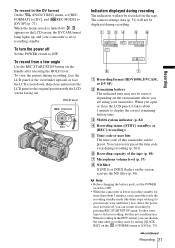
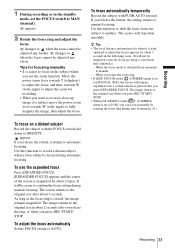
...) menu to display the correct remaining battery time. The camera settings data (p. 51) will not be preset. When recording in the HDV format, you are using your camcorder is set the POWER switch to OFF. • When the camcorder is turned off , you open or close and restore ... 21 Recording To turn off , appears on the tape. b Note • Before changing the battery pack, set to restart recording, but this camcorder can reset or preset the time code even during recording The indicators will not be displayed during recording, face the LCD panel or the viewfinder...
...) menu to display the correct remaining battery time. The camera settings data (p. 51) will not be preset. When recording in the HDV format, you are using your camcorder is set the POWER switch to OFF. • When the camcorder is turned off , you open or close and restore ... 21 Recording To turn off , appears on the tape. b Note • Before changing the battery pack, set to restart recording, but this camcorder can reset or preset the time code even during recording The indicators will not be displayed during recording, face the LCD panel or the viewfinder...
Operating Instructions
Page 22
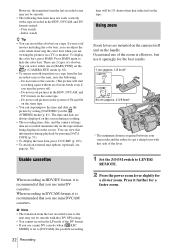
... zoom lever slightly for a faster zoom. If you record movies including the color bars, you can select either one in [BARS TYPE] on the (CAMERA SET) menu (p. 62). • To ensure smooth transition on the screen. Do not record pictures in the HDV, DVCAM, and DV formats on ... HDV/DV format, it sparingly for the best results. 1 cm (approx. 1/2 inch)* 80 cm (approx. 2 5/8 feet)* * The minimum distance required between your camcorder and the subject to hide the color bars. Press it is recommended that side of the zoom is effective, but use mini DVCAM cassettes. However...
... zoom lever slightly for a faster zoom. If you record movies including the color bars, you can select either one in [BARS TYPE] on the (CAMERA SET) menu (p. 62). • To ensure smooth transition on the screen. Do not record pictures in the HDV, DVCAM, and DV formats on ... HDV/DV format, it sparingly for the best results. 1 cm (approx. 1/2 inch)* 80 cm (approx. 2 5/8 feet)* * The minimum distance required between your camcorder and the subject to hide the color bars. Press it is recommended that side of the zoom is effective, but use mini DVCAM cassettes. However...
Operating Instructions
Page 23
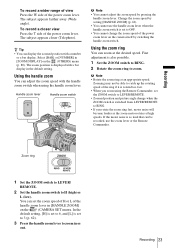
... in or out. Fine adjustment is also possible. 1 Set the ZOOM switch to RING. 2 Rotate the zoom ring to zoom in [HANDLE ZOOM] on the camera itself by pressing the handle zoom lever. If the motor noise is rotated too fast. • When you rotate the zoom ring fast, motor noise... 1 Set the ZOOM switch to LEVER/ REMOTE. 2 Set the handle zoom switch to catch up the rotating speed of the power zoom lever on the (CAMERA SET) menu. To record a wider range of view Press the W side of the power zoom lever. Change the zoom speed by setting [HANDLE ZOOM] (p. 62...
... in or out. Fine adjustment is also possible. 1 Set the ZOOM switch to RING. 2 Rotate the zoom ring to zoom in [HANDLE ZOOM] on the camera itself by pressing the handle zoom lever. If the motor noise is rotated too fast. • When you rotate the zoom ring fast, motor noise... 1 Set the ZOOM switch to LEVER/ REMOTE. 2 Set the handle zoom switch to catch up the rotating speed of the power zoom lever on the (CAMERA SET) menu. To record a wider range of view Press the W side of the power zoom lever. Change the zoom speed by setting [HANDLE ZOOM] (p. 62...
Operating Instructions
Page 24
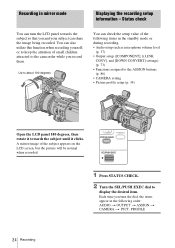
... volume level (p. 37) • Output setup ([COMPONENT], [i.LINK CONV], and [DOWN CONVERT] settings) (p. 73) • Functions assigned to the camcorder while you and your subject can also utilize this function when recording yourself, or to keep the attention of small children attracted to the ASSIGN... buttons (p. 86) • CAMERA setting • Picture profile setup (p. 34) Open the LCD panel 180 degrees, then rotate it towards the subject until it clicks. A...
... volume level (p. 37) • Output setup ([COMPONENT], [i.LINK CONV], and [DOWN CONVERT] settings) (p. 73) • Functions assigned to the camcorder while you and your subject can also utilize this function when recording yourself, or to keep the attention of small children attracted to the ASSIGN... buttons (p. 86) • CAMERA setting • Picture profile setup (p. 34) Open the LCD panel 180 degrees, then rotate it towards the subject until it clicks. A...
Operating Instructions
Page 27
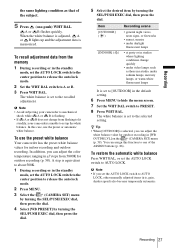
... preset or automatic white balance. You can assign this case, use the preset white balance Your camcorder has the preset white balance values for outdoor recording in [WB OUTDR LVL] on the (CAMERA SET) menu (p. 58). Recording 27 The white balance is equivalent to about 500K. 1 During...where lighting conditions change from 5800K for outdoor recording (p. 58). In this function to the recalled adjustment. b Note • Avoid subjecting your camcorder to PRESET. 8 Press WHT BAL. The white balance is unable to set to [OUTDOOR] in the default setting. 6 Press MENU to hide...
... preset or automatic white balance. You can assign this case, use the preset white balance Your camcorder has the preset white balance values for outdoor recording in [WB OUTDR LVL] on the (CAMERA SET) menu (p. 58). Recording 27 The white balance is equivalent to about 500K. 1 During...where lighting conditions change from 5800K for outdoor recording (p. 58). In this function to the recalled adjustment. b Note • Avoid subjecting your camcorder to PRESET. 8 Press WHT BAL. The white balance is unable to set to [OUTDOOR] in the default setting. 6 Press MENU to hide...
Operating Instructions
Page 29
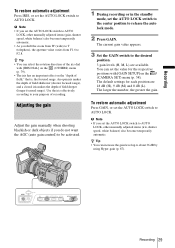
... SETUP] on the "depth of the iris dial with [IRIS DIAL] on the (OTHERS) menu (p. 79). • The iris has an important effect on the (CAMERA SET) menu (p. 58). To restore automatic adjustment Press GAIN, or set the AUTO LOCK switch to AUTO LOCK. Use the iris effectively according to about...
... SETUP] on the "depth of the iris dial with [IRIS DIAL] on the (OTHERS) menu (p. 79). • The iris has an important effect on the (CAMERA SET) menu (p. 58). To restore automatic adjustment Press GAIN, or set the AUTO LOCK switch to AUTO LOCK. Use the iris effectively according to about...
Operating Instructions
Page 31
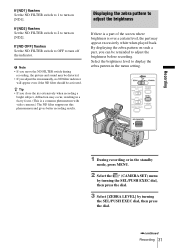
...Set the ND FILTER switch to OFF to adjust the brightness If there is a part of the screen where brightness is a common phenomenon with video cameras.) The ND filter suppresses this phenomenon and gives better recording results. Displaying the zebra pattern to turn off the indicator. If [ND2] flashes Set ... filter indicator will appear even if the ND filter should be reminded to display the zebra pattern in the standby mode, press MENU. 2 Select the (CAMERA SET) menu by turning the SEL/PUSH EXEC dial, then press the dial. 3 Select [ZEBRA LEVEL] by turning the SEL/PUSH EXEC dial, then...
...Set the ND FILTER switch to OFF to adjust the brightness If there is a part of the screen where brightness is a common phenomenon with video cameras.) The ND filter suppresses this phenomenon and gives better recording results. Displaying the zebra pattern to turn off the indicator. If [ND2] flashes Set ... filter indicator will appear even if the ND filter should be reminded to display the zebra pattern in the standby mode, press MENU. 2 Select the (CAMERA SET) menu by turning the SEL/PUSH EXEC dial, then press the dial. 3 Select [ZEBRA LEVEL] by turning the SEL/PUSH EXEC dial, then...
Operating Instructions
Page 33
... subject with the FOCUS switch slid down to [ON], you can focus manually by about 5 seconds. When you press REC START/ STOP. FOCUS] on the (CAMERA) menu is switched from one subject to automatic focusing. appears. Recording 33 When the focus mode is set to INFINITY. z Tip • The focal distance...
... subject with the FOCUS switch slid down to [ON], you can focus manually by about 5 seconds. When you press REC START/ STOP. FOCUS] on the (CAMERA) menu is switched from one subject to automatic focusing. appears. Recording 33 When the focus mode is set to INFINITY. z Tip • The focal distance...
Operating Instructions
Page 34
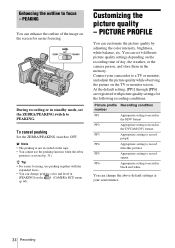
...You cannot use peaking together with picture quality settings for easier focusing. PEAKING You can enhance the outline of day, the weather, or the camera person, and store them in the memory. z Tip • For easier focusing, use the peaking function when the zebra pattern is not..., and adjust the picture quality while observing the picture on the TV or monitor screen. You can change the above default settings at your camcorder to focus - Connect your convenience. 34 Recording At the default setting, [PP1] through [PP6] are registered with the expanded focus. &#...
...You cannot use peaking together with picture quality settings for easier focusing. PEAKING You can enhance the outline of day, the weather, or the camera person, and store them in the memory. z Tip • For easier focusing, use the peaking function when the zebra pattern is not..., and adjust the picture quality while observing the picture on the TV or monitor screen. You can change the above default settings at your camcorder to focus - Connect your convenience. 34 Recording At the default setting, [PP1] through [PP6] are registered with the expanded focus. &#...
Operating Instructions
Page 40
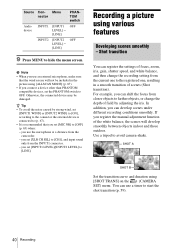
... of scenes (Shot transition). SHOT A SHOT B Set the transition curve and duration using various features Developing scenes smoothly - you can shift the focus from the camcorder. - Recording a picture using [SHOT TRANS] on the (CAMERA SET) menu. Use a tripod to avoid...
... of scenes (Shot transition). SHOT A SHOT B Set the transition curve and duration using various features Developing scenes smoothly - you can shift the focus from the camcorder. - Recording a picture using [SHOT TRANS] on the (CAMERA SET) menu. Use a tripod to avoid...
Operating Instructions
Page 41
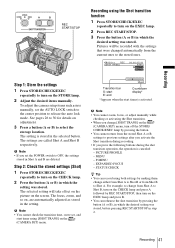
...lamp. 2 Press REC START/STOP. 3 Press the button (A or B) in the setting. The setting is canceled: - MENU - To adjust the camera setup items such as stored in which the desired setting was stored. PICTURE PROFILE - Recording 41 STATUS CHECK z Tip • You can rehearse the ...Appears when the start timer using the Shot transition function 1 Press STORE/CHECK/EXEC repeatedly to change [SHOT TRANS] on the (CAMERA SET) menu, turn on the (CAMERA SET) menu. b Note • If you press the following buttons during the shot transition operation, the operation is stored ...
...lamp. 2 Press REC START/STOP. 3 Press the button (A or B) in the setting. The setting is canceled: - MENU - To adjust the camera setup items such as stored in which the desired setting was stored. PICTURE PROFILE - Recording 41 STATUS CHECK z Tip • You can rehearse the ...Appears when the start timer using the Shot transition function 1 Press STORE/CHECK/EXEC repeatedly to change [SHOT TRANS] on the (CAMERA SET) menu, turn on the (CAMERA SET) menu. b Note • If you press the following buttons during the shot transition operation, the operation is stored ...
Operating Instructions
Page 42
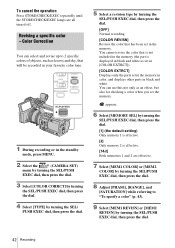
.... [COLOR REVISN] Revises the color that will be recorded in your favorite color tone. 1 During recording or in the standby mode, press MENU. 2 Select the (CAMERA SET) menu by turning the SEL/PUSH EXEC dial, then press the dial. 3 Select [COLOR CORRCT] by turning the SEL/PUSH EXEC dial, then press...
.... [COLOR REVISN] Revises the color that will be recorded in your favorite color tone. 1 During recording or in the standby mode, press MENU. 2 Select the (CAMERA SET) menu by turning the SEL/PUSH EXEC dial, then press the dial. 3 Select [COLOR CORRCT] by turning the SEL/PUSH EXEC dial, then press...


