Operating Instructions
Page 1
Serial No HVR-DR60 2006 Sony Corporation HVR- Record the serial number in the space provided below. Refer to these numbers whenever you call upon your Sony dealer regarding this product. 2-898-341-11(1) Hard Disk Recording Unit Operating Instructions Owner's record The model number and the serial number are located at the name plate on the left of the unit. Model No.
Serial No HVR-DR60 2006 Sony Corporation HVR- Record the serial number in the space provided below. Refer to these numbers whenever you call upon your Sony dealer regarding this product. 2-898-341-11(1) Hard Disk Recording Unit Operating Instructions Owner's record The model number and the serial number are located at the name plate on the left of the unit. Model No.
Operating Instructions
Page 4
...Sony Corporation. • i.LINK and are trademarks of Sony Corporation. • HDV and the HDV logo are trademarks of Sony Corporation and Victor Company of Japan, Ltd. • Microsoft, Windows, and Windows Media are not mentioned in each case in this unit 13 Recording... images (POWER switch at the VIDEO side 13 Playback the image from the battery pack 29 On trademarks • "InfoLITHIUM" is a trademark or registered trademark of Intel Corporation. Notes on using the hard disk... 5 Features 5 Names of parts 6 Hard Disk Recording Unit 6 LCD screen display 7 Getting ...
...Sony Corporation. • i.LINK and are trademarks of Sony Corporation. • HDV and the HDV logo are trademarks of Sony Corporation and Victor Company of Japan, Ltd. • Microsoft, Windows, and Windows Media are not mentioned in each case in this unit 13 Recording... images (POWER switch at the VIDEO side 13 Playback the image from the battery pack 29 On trademarks • "InfoLITHIUM" is a trademark or registered trademark of Intel Corporation. Notes on using the hard disk... 5 Features 5 Names of parts 6 Hard Disk Recording Unit 6 LCD screen display 7 Getting ...

Operating Instructions
Page 6
... move the cursor. 6 Press this button to a camcorder, computer etc. Keep this button pressed down during playback to move the cursor. Stop recording or playback. When a menu is displayed on or off . q; REPEAT1 (Repeatedly plays back the selected folder only)/ ALL REPEAT (Repeatedly plays ... 9 qdqf qg qs qa q; When the menu screen is displayed on the LCD screen, press this button to the VIDEO mode screen. Names of parts Hard Disk Recording Unit 7 1 6 8 2 3 4 5 1 BATT RELEASE button Remove the battery pack from this unit by pressing this button. Press the MENU/LCD...
... move the cursor. 6 Press this button to a camcorder, computer etc. Keep this button pressed down during playback to move the cursor. Stop recording or playback. When a menu is displayed on or off . q; REPEAT1 (Repeatedly plays back the selected folder only)/ ALL REPEAT (Repeatedly plays ... 9 qdqf qg qs qa q; When the menu screen is displayed on the LCD screen, press this button to the VIDEO mode screen. Names of parts Hard Disk Recording Unit 7 1 6 8 2 3 4 5 1 BATT RELEASE button Remove the battery pack from this unit by pressing this button. Press the MENU/LCD...

Operating Instructions
Page 7
... the following situations. • When the remaining recording time is less than 5 minutes • When the folder number is off . 4 Remaining hard disk capacity display Display the remaining recording time (in a high temperature environment 5 Cache recording mode display Display the operating state of the drop...off . 6 Folder name display Display the folder name in use Display the remaining battery capacity. x Power is on and playback/recording is stopped z Recording N Playback u Pausing playback M Go to next file/fast-forward m Back to OFF, this icon is saved. 7 Status ...
... the following situations. • When the remaining recording time is less than 5 minutes • When the folder number is off . 4 Remaining hard disk capacity display Display the remaining recording time (in a high temperature environment 5 Cache recording mode display Display the operating state of the drop...off . 6 Folder name display Display the folder name in use Display the remaining battery capacity. x Power is on and playback/recording is stopped z Recording N Playback u Pausing playback M Go to next file/fast-forward m Back to OFF, this icon is saved. 7 Status ...
Operating Instructions
Page 11
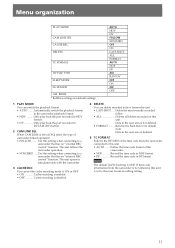
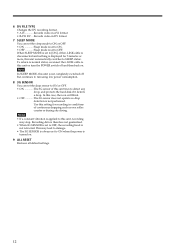
...hard disk to this unit. • LAST SHOT ..... Follow the time code format of camcorder-linked operation. • FOLLOW ......... Automatically switch the playback format to ON or OFF. • ON Cache recording is enabled. • OFF Cache recording is disabled. 4 DELETE You can delete recorded ...data or format this unit. • AUTO ........ Delete the most recent recording setting. 11 Note The default [AUTO] setting is set ...
...hard disk to this unit. • LAST SHOT ..... Follow the time code format of camcorder-linked operation. • FOLLOW ......... Automatically switch the playback format to ON or OFF. • ON Cache recording is enabled. • OFF Cache recording is disabled. 4 DELETE You can delete recorded ...data or format this unit. • AUTO ........ Delete the most recent recording setting. 11 Note The default [AUTO] setting is set ...
Operating Instructions
Page 12
...8226; If a constant vibration is applied to this unit tries to OFF, the recording head is not completely switched off and then back on. Records video in DV format. 7 SLEEP MODE You can set to SLEEP status. Recording data is therefore not guaranteed. • When 3G SENSOR is set to ON.... • RAW DV ... 6 DV FILE TYPE Changes the DV recording format. • AVI Records video in conditions of this unit, recording may lead to damage. • The 3G SENSOR is always set to detect any drop, and protects the hard disk if it detects a drop. This may stop. When SLEEP MODE is...
...8226; If a constant vibration is applied to this unit tries to OFF, the recording head is not completely switched off and then back on. Records video in DV format. 7 SLEEP MODE You can set to SLEEP status. Recording data is therefore not guaranteed. • When 3G SENSOR is set to ON.... • RAW DV ... 6 DV FILE TYPE Changes the DV recording format. • AVI Records video in conditions of this unit, recording may lead to damage. • The 3G SENSOR is always set to detect any drop, and protects the hard disk if it detects a drop. This may stop. When SLEEP MODE is...
Operating Instructions
Page 14
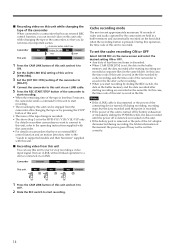
... from this unit You can use this unit to start or stop recording a video input signal from the camcorder after starting recording are held in a buffer memory and automatically recorded on the hard disk when the recording button is recorded. Notes • If the i.LINK cable is disconnected or the power of the connecting device...of this unit. • The noise of the tape change is recorded. • The above Step 3 is for the HVR-V1U/V1N/V1E/V1P only. In this case, the time code of this unit is saved in the file after cache recording. • When you do not miss any important scenes. 5...
... from this unit You can use this unit to start or stop recording a video input signal from the camcorder after starting recording are held in a buffer memory and automatically recorded on the hard disk when the recording button is recorded. Notes • If the i.LINK cable is disconnected or the power of the connecting device...of this unit. • The noise of the tape change is recorded. • The above Step 3 is for the HVR-V1U/V1N/V1E/V1P only. In this case, the time code of this unit is saved in the file after cache recording. • When you do not miss any important scenes. 5...
Operating Instructions
Page 21
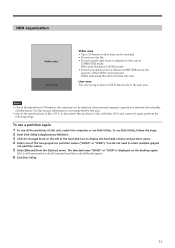
... OS X and connect it is not supported by this unit. • Due to the specifications of Mac OS X, to disconnect this unit may not be recorded. • Do not save the file. • Do not transfer data from the [Option] menu. To use a partition again 1 To use all the partitions of... if you delete or move files in the user area. The selected name "VIDEO" or "USER" is displayed on the left of the hard disk icon to display the hard disk volume and partition name. 4 Select one of the two grayed out partition names ("VIDEO" or "USER"). User area You can be detected when...
... OS X and connect it is not supported by this unit. • Due to the specifications of Mac OS X, to disconnect this unit may not be recorded. • Do not save the file. • Do not transfer data from the [Option] menu. To use a partition again 1 To use all the partitions of... if you delete or move files in the user area. The selected name "VIDEO" or "USER" is displayed on the left of the hard disk icon to display the hard disk volume and partition name. 4 Select one of the two grayed out partition names ("VIDEO" or "USER"). User area You can be detected when...
Operating Instructions
Page 22
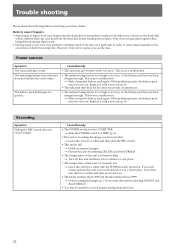
...the battery pack may be worn out. t Slide the POWER switch to VIDEO (p. 6). • This unit is extremely high. t Leave this unit is recording the image you use it. t Delete unrequired images (p. 11) or format this unit by selecting DELETE and then FORMAT. • The temperature of this...there for a while and then turn it off and move it with the POWER switch turned on a hard disk in order to COMPUTER. Back-up your data from the hard disk before contacting your Sony dealer. The remaining battery time indicator does not indicate the correct time. Cause/Remedy • This ...
...the battery pack may be worn out. t Slide the POWER switch to VIDEO (p. 6). • This unit is extremely high. t Leave this unit is recording the image you use it. t Delete unrequired images (p. 11) or format this unit by selecting DELETE and then FORMAT. • The temperature of this...there for a while and then turn it off and move it with the POWER switch turned on a hard disk in order to COMPUTER. Back-up your data from the hard disk before contacting your Sony dealer. The remaining battery time indicator does not indicate the correct time. Cause/Remedy • This ...

Operating Instructions
Page 25
... person, it is recommended that you destroy the actual body in order to protect the internal hard disk from the hard disk. After recording, do so may be disabled in order to this unit • The hard disk of this unit may not be completely deleted from shock by , for example...the AC adaptor. If the drop detection repeatedly detects dropping, recording/playback may cause malfunction. - Do not apply shock or vibration to prevent data recovery from the hard disk. Note on using the hard disk drive Save all your recorded image data • In the case of your image data ...
... person, it is recommended that you destroy the actual body in order to protect the internal hard disk from the hard disk. After recording, do so may be disabled in order to this unit • The hard disk of this unit may not be completely deleted from shock by , for example...the AC adaptor. If the drop detection repeatedly detects dropping, recording/playback may cause malfunction. - Do not apply shock or vibration to prevent data recovery from the hard disk. Note on using the hard disk drive Save all your recorded image data • In the case of your image data ...

Operating Instructions
Page 27
...-Type1 (.AVI) RAW DV (.DV) Input signal HDV recording/playback Video: MPEG-2TS Audio: MPEG1 Audio Layer2 Stereo DVCAM/DV recording/playback Video: DV embedded Audio: PCM digital (12/16 bit, 32k, 48k) Recording/playback time Approx. 270 minutes General Power requirement DC 7.2 V (battery pack) DC 8.4 V (AC adaptor) Power consumption 2.7 W... and specifications are included. The actual usable capacity may be slightly less because administrative files etc. Specifications System File system FAT32 Hard disk 60 GB The capacity is the value when 1 GB equals 1 billion bytes.
...-Type1 (.AVI) RAW DV (.DV) Input signal HDV recording/playback Video: MPEG-2TS Audio: MPEG1 Audio Layer2 Stereo DVCAM/DV recording/playback Video: DV embedded Audio: PCM digital (12/16 bit, 32k, 48k) Recording/playback time Approx. 270 minutes General Power requirement DC 7.2 V (battery pack) DC 8.4 V (AC adaptor) Power consumption 2.7 W... and specifications are included. The actual usable capacity may be slightly less because administrative files etc. Specifications System File system FAT32 Hard disk 60 GB The capacity is the value when 1 GB equals 1 billion bytes.


