Operating Instructions
Page 1
Serial No HVR-DR60 2006 Sony Corporation Model No. Record the serial number in the space provided below. Refer to these numbers whenever you call upon your Sony dealer regarding this product. HVR- 2-898-341-11(1) Hard Disk Recording Unit Operating Instructions Owner's record The model number and the serial number are located at the name plate on the left of the unit.
Serial No HVR-DR60 2006 Sony Corporation Model No. Record the serial number in the space provided below. Refer to these numbers whenever you call upon your Sony dealer regarding this product. HVR- 2-898-341-11(1) Hard Disk Recording Unit Operating Instructions Owner's record The model number and the serial number are located at the name plate on the left of the unit.
Operating Instructions
Page 2
... (servicing) instructions in the literature accompanying the appliance. Consult the dealer or an experienced radio/TV technician for a digital device pursuant to radio communications. Otherwise, fire or injury may cause undesired operation. For the customers in this unit is turned off and on a circuit different from that interference will not occur in order to comply with the limits for help. Address: 16530...
... (servicing) instructions in the literature accompanying the appliance. Consult the dealer or an experienced radio/TV technician for a digital device pursuant to radio communications. Otherwise, fire or injury may cause undesired operation. For the customers in this unit is turned off and on a circuit different from that interference will not occur in order to comply with the limits for help. Address: 16530...
Operating Instructions
Page 4
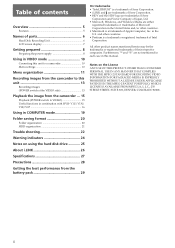
... parts 6 Hard Disk Recording Unit 6 LCD screen display 7 Getting prepared 8 Preparing the power supply 8 Using in VIDEO mode 10 Connecting this manual. in COMPUTER mode 19 Folder saving format 20 Folder organization 20 HDD organization 21 Trouble shooting 22 Warning indicators 24 Notes on the License ANY USE OF THIS PRODUCT OTHER THAN CONSUMER PERSONAL USE IN ANY MANNER THAT COMPLIES WITH THE MPEG-2 STANDARD FOR ENCODING VIDEO INFORMATION FOR PACKAGED MEDIA...
... parts 6 Hard Disk Recording Unit 6 LCD screen display 7 Getting prepared 8 Preparing the power supply 8 Using in VIDEO mode 10 Connecting this manual. in COMPUTER mode 19 Folder saving format 20 Folder organization 20 HDD organization 21 Trouble shooting 22 Warning indicators 24 Notes on the License ANY USE OF THIS PRODUCT OTHER THAN CONSUMER PERSONAL USE IN ANY MANNER THAT COMPLIES WITH THE MPEG-2 STANDARD FOR ENCODING VIDEO INFORMATION FOR PACKAGED MEDIA...

Operating Instructions
Page 5
... HVR-V1U/ V1N/V1E/V1P. When connecting to supported models and their functions." 5 Displaying the operational status of this unit and the HVR-V1U/V1N/ V1E/V1P offers more on the LCD screen of supported models, refer to the supplied "Guide to a camcorder that has an external REC control function, you are shooting. Using high capacity InfoLITHIUM L series battery packs, the HVR-DR60 operating time for up to a computer via the i.LINK...
... HVR-V1U/ V1N/V1E/V1P. When connecting to supported models and their functions." 5 Displaying the operational status of this unit and the HVR-V1U/V1N/ V1E/V1P offers more on the LCD screen of supported models, refer to the supplied "Guide to a camcorder that has an external REC control function, you are shooting. Using high capacity InfoLITHIUM L series battery packs, the HVR-DR60 operating time for up to a computer via the i.LINK...

Operating Instructions
Page 6
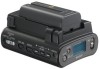
... a camcorder, computer etc. REC lamp/Access lamp blinks while accessing the computer in VIDEO mode. using the i.LINK cable. 7 Battery slot 8 DC IN jack Connect the power supply from an AC adaptor, etc. 9 Screw holes You can use the supplied shoe adaptor to attach this unit to play the current file forwards at triple the normal speed. Names of parts Hard Disk Recording Unit 7 1 6 8 2 3 4 5 1 BATT RELEASE button Remove the battery pack from...
... a camcorder, computer etc. REC lamp/Access lamp blinks while accessing the computer in VIDEO mode. using the i.LINK cable. 7 Battery slot 8 DC IN jack Connect the power supply from an AC adaptor, etc. 9 Screw holes You can use the supplied shoe adaptor to attach this unit to play the current file forwards at triple the normal speed. Names of parts Hard Disk Recording Unit 7 1 6 8 2 3 4 5 1 BATT RELEASE button Remove the battery pack from...

Operating Instructions
Page 7
...mode display Display the operating state of the drop detection. 3G sensor ON No icon Drop detection is set to the previous file/rewind 8 TC (time code) display Display the time code. 9 Repeat mode display Display the repeat status during recording. When the CAM LINK is set to ON, this icon is on . AC adapter connected 2 Drop detection mode display (3G sensor) Display the operating state of the cache recording mode during playback. LCD screen display VIDEO mode During recording 12 3 4 During playback 5 6 9 7 8 1 Power supply display Display the power supply...
...mode display Display the operating state of the drop detection. 3G sensor ON No icon Drop detection is set to the previous file/rewind 8 TC (time code) display Display the time code. 9 Repeat mode display Display the repeat status during recording. When the CAM LINK is set to ON, this icon is on . AC adapter connected 2 Drop detection mode display (3G sensor) Display the operating state of the cache recording mode during playback. LCD screen display VIDEO mode During recording 12 3 4 During playback 5 6 9 7 8 1 Power supply display Display the power supply...
Operating Instructions
Page 8
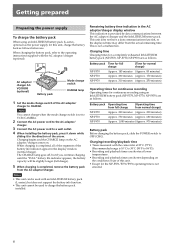
..., refer to the operating instructions supplied with an InfoLITHIUM battery pack (L-series), but if you continue charging until the "FULL" battery life indicator appears, the battery capacity will be used with the AC adaptor/charger (optional). 2 AC adaptor/ charger ACVQ1050B (optional) 3 4 1 Battery pack Mode change switch CHARGE lamp 1 Set the mode change switch is set to VCR/CAMERA. 2 Connect the AC power cord to the AC...
..., refer to the operating instructions supplied with an InfoLITHIUM battery pack (L-series), but if you continue charging until the "FULL" battery life indicator appears, the battery capacity will be used with the AC adaptor/charger (optional). 2 AC adaptor/ charger ACVQ1050B (optional) 3 4 1 Battery pack Mode change switch CHARGE lamp 1 Set the mode change switch is set to VCR/CAMERA. 2 Connect the AC power cord to the AC...
Operating Instructions
Page 11
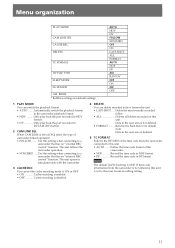
... hard disk to a camcorder that has an "external REC control" function. Data in DVCAM (DV) format. 2 CAM LINK SEL When CAM LINK is set to the most recently recorded folder. • ALL Deletes all folders recorded on this setting when connecting to its default state. If time code information from the camcorder connected to this setting when connecting to the camcorder playback format. • HDV Only play back the part recorded in HDV format. • DV Only play back the part recorded...
... hard disk to a camcorder that has an "external REC control" function. Data in DVCAM (DV) format. 2 CAM LINK SEL When CAM LINK is set to the most recently recorded folder. • ALL Deletes all folders recorded on this setting when connecting to its default state. If time code information from the camcorder connected to this setting when connecting to the camcorder playback format. • HDV Only play back the part recorded in HDV format. • DV Only play back the part recorded...
Operating Instructions
Page 12
... run using low power consumption. 8 3G SENSOR You can set the sleep mode to ON or OFF. • ON Sleep mode is set to OFF. 6 DV FILE TYPE Changes the DV recording format. • AVI Records video in DV format. 7 SLEEP MODE You can set the drop sensor to SLEEP status. Notes • If a constant vibration is applied to detect any drop, and protects the hard disk...
... run using low power consumption. 8 3G SENSOR You can set the sleep mode to ON or OFF. • ON Sleep mode is set to OFF. 6 DV FILE TYPE Changes the DV recording format. • AVI Records video in DV format. 7 SLEEP MODE You can set the drop sensor to SLEEP status. Notes • If a constant vibration is applied to detect any drop, and protects the hard disk...
Operating Instructions
Page 13
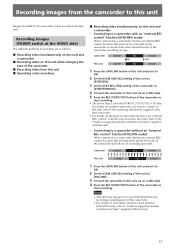
... Images recorded by the camcorder to record video data simultaneously to the camcorder recording on camcorders that has an external REC control function, this unit can be controlled by the camcorder can be recorded onto this unit. Recording images from this unit x Operating cache recording x Recording video simultaneously on motion detection, refer to the "Guide to supported models and their functions" supplied with this unit. - Connecting to a camcorder without an "external REC control" function (FOLLOW mode...
... Images recorded by the camcorder to record video data simultaneously to the camcorder recording on camcorders that has an external REC control function, this unit can be controlled by the camcorder can be recorded onto this unit. Recording images from this unit x Operating cache recording x Recording video simultaneously on motion detection, refer to the "Guide to supported models and their functions" supplied with this unit. - Connecting to a camcorder without an "external REC control" function (FOLLOW mode...
Operating Instructions
Page 14
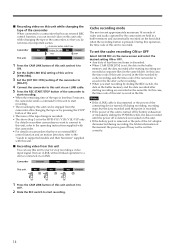
In this case, the time code of this unit to start or stop recording a video input signal from an i.LINK without linked operation to a device connected via an i.LINK cable. 5 Press the REC START/STOP button of the camcorder to start recording. • When the remaining time of the tape is less than one frame is discarded. • When CAM LINK [ON] is set, the data in the buffer memory...
In this case, the time code of this unit to start or stop recording a video input signal from an i.LINK without linked operation to a device connected via an i.LINK cable. 5 Press the REC START/STOP button of the camcorder to start recording. • When the remaining time of the tape is less than one frame is discarded. • When CAM LINK [ON] is set, the data in the buffer memory...

Operating Instructions
Page 15
... recorded images in this unit to a playback device via an i.LINK cable. To select the playback format Select PLAY MODE on selecting the menu, see page 10. - or > button during playback. - Repeat playback This unit can automatically repeat playback of file. AUTO Automatically switch the HDV/DV format signal during playback. Playback (POWER switch to VIDEO) The playback method is as follows. • Standard playback • Trick playback • Repeat playback Trick playback When the playback file is output to i.LINK...
... recorded images in this unit to a playback device via an i.LINK cable. To select the playback format Select PLAY MODE on selecting the menu, see page 10. - or > button during playback. - Repeat playback This unit can automatically repeat playback of file. AUTO Automatically switch the HDV/DV format signal during playback. Playback (POWER switch to VIDEO) The playback method is as follows. • Standard playback • Trick playback • Repeat playback Trick playback When the playback file is output to i.LINK...
Operating Instructions
Page 16
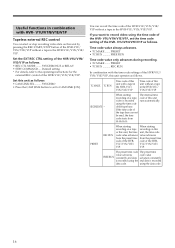
... record video using the time code of the HVR- using the time code of the HVR- You can start or stop recording video data on a tape, code of this unit video is recorded data code. V1U/V1N/V1E/V1P, set to CAM LINK [ON]. PRESET • TC RUN FREE RUN Time code value only advances during recording. • TC MAKE ........ V1U/V1N/V1E/ V1U/V1N/V1E/ V1P. V1U/V1N/V1E/V1P Tapeless external REC control You can record the time code...
... record video using the time code of the HVR- using the time code of the HVR- You can start or stop recording video data on a tape, code of this unit video is recorded data code. V1U/V1N/V1E/V1P, set to CAM LINK [ON]. PRESET • TC RUN FREE RUN Time code value only advances during recording. • TC MAKE ........ V1U/V1N/V1E/ V1U/V1N/V1E/ V1P. V1U/V1N/V1E/V1P Tapeless external REC control You can record the time code...
Operating Instructions
Page 17
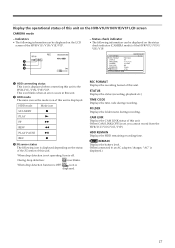
.... When drop detection is not operating: Icon is displayed. When drop detection function is OFF: icon is off. REC FORMAT Displays the recording format of this unit is displayed. CAM LINK Displays the CAM LINK status of this unit. STATUS Displays the status (recording, playback etc.) TIME CODE Displays the time code during recording. FOLDER Displays the folder name during recording. REMAIN Displays the battery level. (When connected to the HVR-V1U/V1N/V1E/V1P. Indicators •...
.... When drop detection is not operating: Icon is displayed. When drop detection function is OFF: icon is off. REC FORMAT Displays the recording format of this unit is displayed. CAM LINK Displays the CAM LINK status of this unit. STATUS Displays the status (recording, playback etc.) TIME CODE Displays the time code during recording. FOLDER Displays the folder name during recording. REMAIN Displays the battery level. (When connected to the HVR-V1U/V1N/V1E/V1P. Indicators •...
Operating Instructions
Page 18
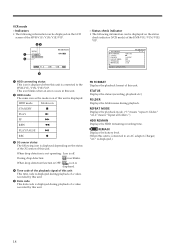
... the status of the 3G sensor of the HVR-V1U/V1N/V1E/ V1P. 1 4 5 1 HDD connecting status This icon is connected to an AC adaptor/charger, "AC" is displayed. When drop detection function is OFF: icon is displayed. 4 Time code of the playback signal of this unit This time code is displayed during playback of this unit. PB FORMAT Displays the playback format of a video recorded by this unit. 5 Data code This data code is off. VCR mode -
... the status of the 3G sensor of the HVR-V1U/V1N/V1E/ V1P. 1 4 5 1 HDD connecting status This icon is connected to an AC adaptor/charger, "AC" is displayed. When drop detection function is OFF: icon is displayed. 4 Time code of the playback signal of this unit This time code is displayed during playback of this unit. PB FORMAT Displays the playback format of a video recorded by this unit. 5 Data code This data code is off. VCR mode -
Operating Instructions
Page 21
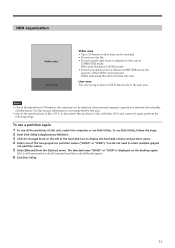
.... Delete data using this unit or format this unit. • Due to the specifications of Mac OS X, to the limitations of the two grayed out partition names ("VIDEO" or "USER"). HDD organization Video area User area Video area • Up to 4.5 hours of video data can use up to display the hard disk volume and partition name. 4 Select one of Windows, this unit from the [Option] menu. To use a partition...
.... Delete data using this unit or format this unit. • Due to the specifications of Mac OS X, to the limitations of the two grayed out partition names ("VIDEO" or "USER"). HDD organization Video area User area Video area • Up to 4.5 hours of video data can use up to display the hard disk volume and partition name. 4 Select one of Windows, this unit from the [Option] menu. To use a partition...
Operating Instructions
Page 22
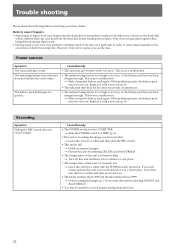
... this unit there for repairs. t Turn off and move it with a new one (p. 8). • The indicated time may not be correct in case of repairs • Some kinds of repair work , Sony may be worn out. t Leave this unit and leave it . Back-up your data from the hard disk before contacting your Sony dealer. t Delete unrequired images (p. 11) or format this unit is extremely...
... this unit there for repairs. t Turn off and move it with a new one (p. 8). • The indicated time may not be correct in case of repairs • Some kinds of repair work , Sony may be worn out. t Leave this unit and leave it . Back-up your data from the hard disk before contacting your Sony dealer. t Delete unrequired images (p. 11) or format this unit is extremely...

Operating Instructions
Page 25
... so may not be recorded. Note on disposal/transfer Even if you cannot record or play back images, format this unit (FORMAT) Repeated recording and deleting of images over a long period of time can cause file fragmentation leading to prevent data recovery from the hard disk. If the unit is recommended that you save all your recorded image data • In the case of images. 25 Removing the AC adaptor...
... so may not be recorded. Note on disposal/transfer Even if you cannot record or play back images, format this unit (FORMAT) Repeated recording and deleting of images over a long period of time can cause file fragmentation leading to prevent data recovery from the hard disk. If the unit is recommended that you save all your recorded image data • In the case of images. 25 Removing the AC adaptor...
Operating Instructions
Page 26
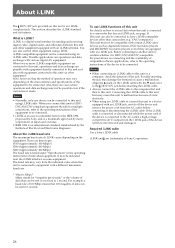
...," or the volume of data that 100 megabits of data can be connected to this unit is connected to be connected using an i.LINK cable to connect this unit is Mbps? Align the v mark on some equipment. You can be compatible with certain i.LINK video devices such as digital televisions, DVD recorders/players and MICROMV recorders/players even if they are possible with equipment directly connected to this unit and also...
...," or the volume of data that 100 megabits of data can be connected to this unit is connected to be connected using an i.LINK cable to connect this unit is Mbps? Align the v mark on some equipment. You can be compatible with certain i.LINK video devices such as digital televisions, DVD recorders/players and MICROMV recorders/players even if they are possible with equipment directly connected to this unit and also...

Operating Instructions
Page 27
.... 230 g (8 oz.) Input/output jack i.LINK (IEEE1394 6-pin connector S400) Included items Optional accessories i.LINK cable (6-pin - 4-pin) 70 cm (1) Operating Instructions (1) Guide to change without notice. 27 are subject to supported models and their functions(1) CD-ROM manual (1) Shoe adaptor (1) AC adaptor/charger AC-VQ1050B Battery pack NP-F570/F770/F970 Design and specifications are included. Specifications System File system FAT32 Hard disk 60 GB The...
.... 230 g (8 oz.) Input/output jack i.LINK (IEEE1394 6-pin connector S400) Included items Optional accessories i.LINK cable (6-pin - 4-pin) 70 cm (1) Operating Instructions (1) Guide to change without notice. 27 are subject to supported models and their functions(1) CD-ROM manual (1) Shoe adaptor (1) AC adaptor/charger AC-VQ1050B Battery pack NP-F570/F770/F970 Design and specifications are included. Specifications System File system FAT32 Hard disk 60 GB The...


