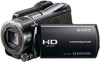
Handycam® Handbook
Page 4
... hard disk (HDRXR550/XR550V) of your camcorder and accessories are as follows. Confirm the model name of the camcorder and the memory card are captured using a digital still camera, and therefore may not operate correctly. When connecting the camcorder to another device with high definition image quality (HD) is a difference in this manual for understandability. In this manual...
... hard disk (HDRXR550/XR550V) of your camcorder and accessories are as follows. Confirm the model name of the camcorder and the memory card are captured using a digital still camera, and therefore may not operate correctly. When connecting the camcorder to another device with high definition image quality (HD) is a difference in this manual for understandability. In this manual...
Handycam® Handbook
Page 9
...Shooting photos 24 Useful functions for recording movies and photos 26 Zooming 26 Recording better images automatically (INTELLIGENT AUTO 26 Selecting high definition image quality (HD) or standard image quality (STD 27 Selecting the recording mode 28 Prioritizing the subject 28 Capturing smiles ...(5.1ch surround recording 29 Recording high quality photos during movie recording (Dual Rec 30 Recording in dark places (NightShot 30 Recording in mirror mode 31 Controlling the image settings manually with the MANUAL dial 31 Playback on the camcorder 33 Useful functions for playing movies...
...Shooting photos 24 Useful functions for recording movies and photos 26 Zooming 26 Recording better images automatically (INTELLIGENT AUTO 26 Selecting high definition image quality (HD) or standard image quality (STD 27 Selecting the recording mode 28 Prioritizing the subject 28 Capturing smiles ...(5.1ch surround recording 29 Recording high quality photos during movie recording (Dual Rec 30 Recording in dark places (NightShot 30 Recording in mirror mode 31 Controlling the image settings manually with the MANUAL dial 31 Playback on the camcorder 33 Useful functions for playing movies...

Handycam® Handbook
Page 11
Table of contents Menu lists 69 MANUAL SETTINGS (Items to adjust for scene condition 71 SHOOTING SET (Items for customized shooting 76 PHOTO SETTINGS (Items for recording photos 80 PLAYBACK (Items for ... each battery pack 103 Expected recording time of movies 104 Expected number of recordable photos 105 Using your camcorder abroad 107 Maintenance and precautions 109 About the AVCHD format 109 About GPS (HDR-CX550V/XR550V 109 About the "Memory Stick" media 111 About the "InfoLITHIUM" battery pack 112 About x.v.Color 114 About handling...
Table of contents Menu lists 69 MANUAL SETTINGS (Items to adjust for scene condition 71 SHOOTING SET (Items for customized shooting 76 PHOTO SETTINGS (Items for recording photos 80 PLAYBACK (Items for ... each battery pack 103 Expected recording time of movies 104 Expected number of recordable photos 105 Using your camcorder abroad 107 Maintenance and precautions 109 About the AVCHD format 109 About GPS (HDR-CX550V/XR550V 109 About the "Memory Stick" media 111 About the "InfoLITHIUM" battery pack 112 About x.v.Color 114 About handling...
Handycam® Handbook
Page 19
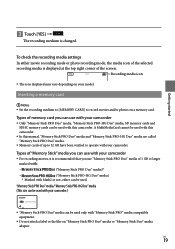
...; Do not attach a label or the like on a memory card. US 19 To check the recording media settings In either can be used with your camcorder Only "Memory Stick PRO Duo" media, "Memory Stick PRO-HG Duo" media, SD memory cards and SDHC memory cards can be used . A ...MultiMediaCard cannot be used with this camcorder. In this camcorder. Types of memory card you use with this manual, "Memory Stick PRO Duo" media and "Memory Stick PRO-HG Duo" media are called "Memory Stick PRO Duo" media...
...; Do not attach a label or the like on a memory card. US 19 To check the recording media settings In either can be used with your camcorder Only "Memory Stick PRO Duo" media, "Memory Stick PRO-HG Duo" media, SD memory cards and SDHC memory cards can be used . A ...MultiMediaCard cannot be used with this camcorder. In this camcorder. Types of memory card you use with this manual, "Memory Stick PRO Duo" media and "Memory Stick PRO-HG Duo" media are called "Memory Stick PRO Duo" media...

Handycam® Handbook
Page 30
...sound, you need an AVCHD format device compatible with 5.1ch surround. When you connect your camcorder with your camcorder, on a computer using the supplied software "PMB." The sound of high definition image quality (HD) movies recorded in 5.1ch sound is automatically output in the same way as ... places. Therefore, do not cover the infrared port with an HDMI cable (sold separately). Adjust the focus manually ([FOCUS], p. 74) when it is hard to focus automatically. Do not use the flash during recording standby in 5.1ch sound. US 30 Infrared port...
...sound, you need an AVCHD format device compatible with 5.1ch surround. When you connect your camcorder with your camcorder, on a computer using the supplied software "PMB." The sound of high definition image quality (HD) movies recorded in 5.1ch sound is automatically output in the same way as ... places. Therefore, do not cover the infrared port with an HDMI cable (sold separately). Adjust the focus manually ([FOCUS], p. 74) when it is hard to focus automatically. Do not use the flash during recording standby in 5.1ch sound. US 30 Infrared port...
Handycam® Handbook
Page 31
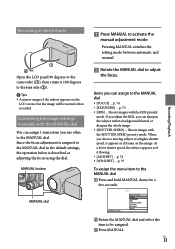
... the LCD panel 90 degrees to the camcorder (), then rotate it 180 degrees to the MANUAL dial. MANUAL button Press MANUAL to the MANUAL dial Press and hold MANUAL down for a few seconds. Pressing MANUAL switches the setting mode between automatic and manual. Rotate the MANUAL dial to the MANUAL dial [FOCUS] ... Items you shoot...
... the LCD panel 90 degrees to the camcorder (), then rotate it 180 degrees to the MANUAL dial. MANUAL button Press MANUAL to the MANUAL dial Press and hold MANUAL down for a few seconds. Pressing MANUAL switches the setting mode between automatic and manual. Rotate the MANUAL dial to the MANUAL dial [FOCUS] ... Items you shoot...

Handycam® Handbook
Page 32
...) side, the IRIS is changed. When you open the IRIS wider (a smaller F-stop ), the in your region. You can also assign menu items to the MANUAL dial by touching (MENU) [Show others] [OTHER REC SET] (under [SHOOTING SET] category) [DIAL SETTING]. Even ...zoom lever to the T (Telephoto) side. If you adjust the IRIS, the in-focus range in step , all the items adjusted manually are canceled. If you record images under a fluorescent lamp, sodium lamp, or mercury lamp, horizontal stripes may appear, flicker may occur, or...
...) side, the IRIS is changed. When you open the IRIS wider (a smaller F-stop ), the in your region. You can also assign menu items to the MANUAL dial by touching (MENU) [Show others] [OTHER REC SET] (under [SHOOTING SET] category) [DIAL SETTING]. Even ...zoom lever to the T (Telephoto) side. If you adjust the IRIS, the in-focus range in step , all the items adjusted manually are canceled. If you record images under a fluorescent lamp, sodium lamp, or mercury lamp, horizontal stripes may appear, flicker may occur, or...
Handycam® Handbook
Page 41
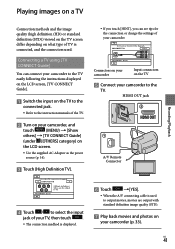
...screen. Use the supplied AC Adaptor as the power source (p. 14). Touch [High Definition TV]. If you touch [HINT], you can connect your camcorder to the TV easily following the instructions displayed on the LCD screen, [TV CONNECT Guide]. ... jack. Refer to the instruction manuals of the TV. Turn on your camcorder (p. 33). Connectors on your camcorder Input connectors on the TV Connect your camcorder to output movies, movies are output with standard definition image quality (STD). Play back...
...screen. Use the supplied AC Adaptor as the power source (p. 14). Touch [High Definition TV]. If you touch [HINT], you can connect your camcorder to the TV easily following the instructions displayed on the LCD screen, [TV CONNECT Guide]. ... jack. Refer to the instruction manuals of the TV. Turn on your camcorder (p. 33). Connectors on your camcorder Input connectors on the TV Connect your camcorder to output movies, movies are output with standard definition image quality (STD). Play back...
Handycam® Handbook
Page 43
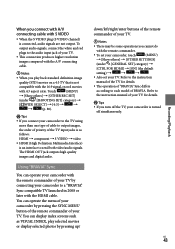
...according to send both video/audio signals. Refer to the instruction manual of the TV for details. Tips If you turn off simultaneously. Using "BRAVIA" Sync You can operate your camcorder with the remote commander of your TV by pressing the SYNC... menu of your camcorder by connecting your camcorder is not compatible with the 16:9 signal, record movies with 4:3 aspect ratio. US 43 Recording/Playback You can display index screens such as follows: HDMI component S VIDEO video HDMI (High Definition Multimedia Interface) is...
...according to send both video/audio signals. Refer to the instruction manual of the TV for details. Tips If you turn off simultaneously. Using "BRAVIA" Sync You can operate your camcorder with the remote commander of your TV by pressing the SYNC... menu of your camcorder by connecting your camcorder is not compatible with the 16:9 signal, record movies with 4:3 aspect ratio. US 43 Recording/Playback You can display index screens such as follows: HDMI component S VIDEO video HDMI (High Definition Multimedia Interface) is...

Handycam® Handbook
Page 57
...AC adaptor (p. 14). Refer to the (USB) jack of your camcorder and the wall outlet (wall socket). 4 Connect the USB Adaptor Cable to the instruction manual supplied with an external device US 57 Saving images with an external device Saving images in ...the Sony support website in some countries/regions. You cannot use the following devices as an external media. media with a capacity exceeding 2 TB ordinary disc drive such as an external hard disk drive. The format screen appears when the external media is connected to your camcorder. ...
...AC adaptor (p. 14). Refer to the (USB) jack of your camcorder and the wall outlet (wall socket). 4 Connect the USB Adaptor Cable to the instruction manual supplied with an external device US 57 Saving images with an external device Saving images in ...the Sony support website in some countries/regions. You cannot use the following devices as an external media. media with a capacity exceeding 2 TB ordinary disc drive such as an external hard disk drive. The format screen appears when the external media is connected to your camcorder. ...

Handycam® Handbook
Page 60
...some countries/regions. Delete the demonstration movie when dubbing or creating discs. Refer also to the instruction manual supplied with the DVD writer. Notes Connect your camcorder to eject the disc. You cannot create an AVCHD disc from a movie recorded with the USB ...writer, DVDirect Express (p. 60) DVD writer, other than DVDirect Express (p. 63) Disc recorder, etc. (p. 64) Disc type Standard definition image quality (STD) disc Notes Always maintain your camcorder with [HD FX] mode of the DVD writer.
...some countries/regions. Delete the demonstration movie when dubbing or creating discs. Refer also to the instruction manual supplied with the DVD writer. Notes Connect your camcorder to eject the disc. You cannot create an AVCHD disc from a movie recorded with the USB ...writer, DVDirect Express (p. 60) DVD writer, other than DVDirect Express (p. 63) Disc recorder, etc. (p. 64) Disc type Standard definition image quality (STD) disc Notes Always maintain your camcorder with [HD FX] mode of the DVD writer.
Handycam® Handbook
Page 63
...hard disk [ USB CONNECT]: Memory card The displayed recording media differ depending on the model. Record movies on the connected device. For details, refer to the instruction manuals supplied with DISC BURN OPTION." Tips If you cannot play back created standard definition...images with high definition image quality (HD) movies, such as a Sony DVD writer. For details, see the following website. Creating a high definition image quality (HD) disc with a DVD writer, etc., other than DVDirect Express Use USB cable to connect your camcorder to be ...
...hard disk [ USB CONNECT]: Memory card The displayed recording media differ depending on the model. Record movies on the connected device. For details, refer to the instruction manuals supplied with DISC BURN OPTION." Tips If you cannot play back created standard definition...images with high definition image quality (HD) movies, such as a Sony DVD writer. For details, see the following website. Creating a high definition image quality (HD) disc with a DVD writer, etc., other than DVDirect Express Use USB cable to connect your camcorder to be ...
Handycam® Handbook
Page 64
... AC Adaptor for this operation (p. 14). Sony DVD writer may not be available in some countries/regions. High definition image quality (HD) movies will hear no sound. Refer also to the instruction manuals supplied with the devices to be connected. Notes Connect your camcorder to the wall outlet (wall socket) using...
... AC Adaptor for this operation (p. 14). Sony DVD writer may not be available in some countries/regions. High definition image quality (HD) movies will hear no sound. Refer also to the instruction manuals supplied with the devices to be connected. Notes Connect your camcorder to the wall outlet (wall socket) using...
Handycam® Handbook
Page 65
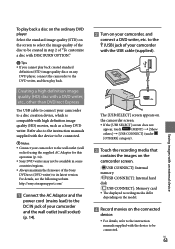
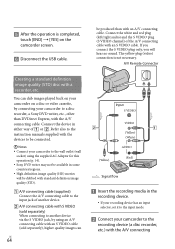
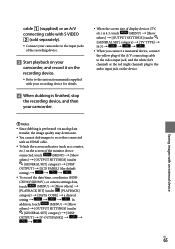
...quality may deteriorate. You cannot dub images to the instruction manuals supplied with your recording device for details. When dubbing is finished, stop the recording device, and then your camcorder. When the screen size of the monitor device connected, ... To record the date/time, coordinates (HDR- cable (supplied) or an A/V connecting cable with S VIDEO (sold separately). Connect your camcorder to the input jacks of the recording device. Start playback on your camcorder, and record it on the recording device. &#...
...quality may deteriorate. You cannot dub images to the instruction manuals supplied with your recording device for details. When dubbing is finished, stop the recording device, and then your camcorder. When the screen size of the monitor device connected, ... To record the date/time, coordinates (HDR- cable (supplied) or an A/V connecting cable with S VIDEO (sold separately). Connect your camcorder to the input jacks of the recording device. Start playback on your camcorder, and record it on the recording device. &#...
Handycam® Handbook
Page 66
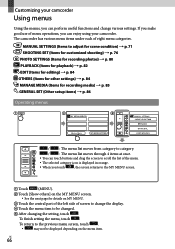
...58320; The selected category icon is displayed in orange. When you can enjoy using your camcorder. To finish setting the menu, touch . To return to change various settings. The camcorder has various menu items under each of screen to the previous menu screen, touch . ...may not be changed. After changing the setting, touch . US 66 MANUAL SETTINGS (Items to be displayed depending on MY MENU. ...
...58320; The selected category icon is displayed in orange. When you can enjoy using your camcorder. To finish setting the menu, touch . To return to change various settings. The camcorder has various menu items under each of screen to the previous menu screen, touch . ...may not be changed. After changing the setting, touch . US 66 MANUAL SETTINGS (Items to be displayed depending on MY MENU. ...
Handycam® Handbook
Page 67
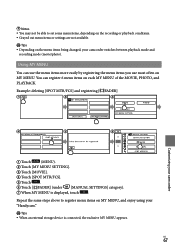
... Tips Depending on MY MENU, and enjoy using your "Handycam." Tips When an external storage device is displayed, touch . Example: deleting [SPOT MTR/FCS] and registering [ FADER] Customizing your camcorder Touch (MENU). Touch [MY MENU SETTING].... Touch [MOVIE]. Touch [SPOT MTR/FCS]. Touch . Touch [ FADER] (under [MANUAL SETTINGS] category). When MY MENU is connected...
... Tips Depending on MY MENU, and enjoy using your "Handycam." Tips When an external storage device is displayed, touch . Example: deleting [SPOT MTR/FCS] and registering [ FADER] Customizing your camcorder Touch (MENU). Touch [MY MENU SETTING].... Touch [MOVIE]. Touch [SPOT MTR/FCS]. Touch . Touch [ FADER] (under [MANUAL SETTINGS] category). When MY MENU is connected...
Handycam® Handbook
Page 69
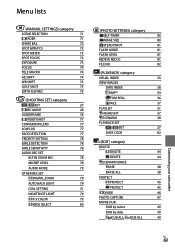
Menu lists (MANUAL SETTINGS) category SCENE SELECTION 71 FADER 71 WHITE BAL. 72 SPOT MTR/FCS 73 SPOT METER 73 SPOT FOCUS 73 EXPOSURE 73 FOCUS 74 TELE ... 45 PROTECT 45 DIVIDE 46 PHOTO CAPTURE 47 MOVIE DUB DUB by select 49 DUB by date 49 DUB ALL/ DUB ALL 49 Customizing your camcorder US 69
Menu lists (MANUAL SETTINGS) category SCENE SELECTION 71 FADER 71 WHITE BAL. 72 SPOT MTR/FCS 73 SPOT METER 73 SPOT FOCUS 73 EXPOSURE 73 FOCUS 74 TELE ... 45 PROTECT 45 DIVIDE 46 PHOTO CAPTURE 47 MOVIE DUB DUB by select 49 DUB by date 49 DUB ALL/ DUB ALL 49 Customizing your camcorder US 69

Handycam® Handbook
Page 71
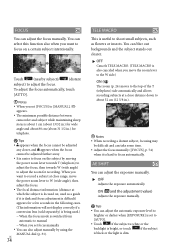
... ocean or a lake. SUNRISE&SUNSET* ( ) Reproduces the atmosphere of people and background using a flash. This setting also prevents your camcorder US 71 MANUAL SETTINGS (Items to fading out) mode. OFF Does not use an effect. SPOTLIGHT**( ) Prevents people's faces from focusing on... scenes. TWILIGHT PORT. ( ) Enables to the interval between the camcorder and the subject. PORTRAIT (Soft portrait) () Brings out the subject such as sunsets or sunrises. Customizing your camcorder from appearing excessively white when subjects are marked with the following effects ...
... ocean or a lake. SUNRISE&SUNSET* ( ) Reproduces the atmosphere of people and background using a flash. This setting also prevents your camcorder US 71 MANUAL SETTINGS (Items to fading out) mode. OFF Does not use an effect. SPOTLIGHT**( ) Prevents people's faces from focusing on... scenes. TWILIGHT PORT. ( ) Enables to the interval between the camcorder and the subject. PORTRAIT (Soft portrait) () Brings out the subject such as sunsets or sunrises. Customizing your camcorder from appearing excessively white when subjects are marked with the following effects ...
Handycam® Handbook
Page 73
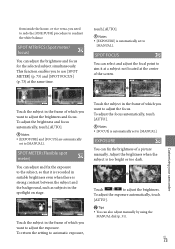
... brightness and focus for the selected subject simultaneously. Adjust the brightness when the subject is automatically set to adjust the focus. Customizing your camcorder Touch the subject in the spotlight on stage. from inside the house, or vice versa, you need to redo the [ONE PUSH]... brightness. US 73 This function enables you want to adjust the brightness and focus. SPOT METER (Flexible spot meter) You can also adjust manually by using the MANUAL dial (p. 31). To adjust the focus automatically, touch [AUTO]. Notes [FOCUS] is too bright or too dark....
... brightness and focus for the selected subject simultaneously. Adjust the brightness when the subject is automatically set to adjust the focus. Customizing your camcorder Touch the subject in the spotlight on stage. from inside the house, or vice versa, you need to redo the [ONE PUSH]... brightness. US 73 This function enables you want to adjust the brightness and focus. SPOT METER (Flexible spot meter) You can also adjust manually by using the MANUAL dial (p. 31). To adjust the focus automatically, touch [AUTO]. Notes [FOCUS] is too bright or too dark....
Handycam® Handbook
Page 74
...correctly if a conversion lens (sold separately) is being used as flowers or insects. ON ( and the adjustment value) Adjusts the exposure manually. Tips You can adjust the automatic exposure level to brighter or darker when [EXPOSURE] is set [FOCUS] to ... and allows recording subjects at which the subject is hard to adjust the focus. To adjust the focus automatically, touch [AUTO]. Notes When you want to [MANUAL], appears. The minimum possible distance between camcorder and subject while maintaining sharp focus is about 1 cm...
...correctly if a conversion lens (sold separately) is being used as flowers or insects. ON ( and the adjustment value) Adjusts the exposure manually. Tips You can adjust the automatic exposure level to brighter or darker when [EXPOSURE] is set [FOCUS] to ... and allows recording subjects at which the subject is hard to adjust the focus. To adjust the focus automatically, touch [AUTO]. Notes When you want to [MANUAL], appears. The minimum possible distance between camcorder and subject while maintaining sharp focus is about 1 cm...


