Instruction Manual
Page 7
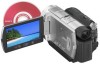
... The LCD screen and the viewfinder are manufactured using a "Memory Stick Duo" with an HDMI cable, a component video cable, or a USB cable, be used only with your camcorder.) • You cannot use any type of memory card except "Memory Stick Duo." • "Memory Stick PRO" and "Memory Stick PRO... extremely highprecision technology, so over 99.99% of the pixels are operational for effective use. However, there may result in a malfunction of your camcorder You can use "Memory Stick Duo" marked with or (p. 107). "Memory Stick Duo" (This size can be sure to remove the battery ...
... The LCD screen and the viewfinder are manufactured using a "Memory Stick Duo" with an HDMI cable, a component video cable, or a USB cable, be used only with your camcorder.) • You cannot use any type of memory card except "Memory Stick Duo." • "Memory Stick PRO" and "Memory Stick PRO... extremely highprecision technology, so over 99.99% of the pixels are operational for effective use. However, there may result in a malfunction of your camcorder You can use "Memory Stick Duo" marked with or (p. 107). "Memory Stick Duo" (This size can be sure to remove the battery ...
Instruction Manual
Page 20
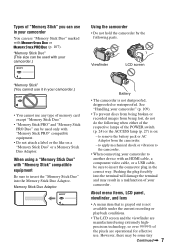
... of that you have the following items supplied with your camcorder. Getting Started Step 1: Checking supplied items Make sure that item supplied. AC Adaptor (1) (p. 21) Rechargeable battery pack NP-FH60 (HDR-UX5), NP-FH70 (HDR-UX7) (1) (p. 21) Power cord (1) (p. 21) CD...-ROM "Handycam Application Software" (1) (p. 86) Operating Guide (This manual) (1) Component video cable (1) (p. 44) A/V connecting cable (1) (p. 44, 53) USB cable (1) (p. 54) Wireless Remote Commander (1) ...
... of that you have the following items supplied with your camcorder. Getting Started Step 1: Checking supplied items Make sure that item supplied. AC Adaptor (1) (p. 21) Rechargeable battery pack NP-FH60 (HDR-UX5), NP-FH70 (HDR-UX7) (1) (p. 21) Power cord (1) (p. 21) CD...-ROM "Handycam Application Software" (1) (p. 86) Operating Guide (This manual) (1) Component video cable (1) (p. 44) A/V connecting cable (1) (p. 44, 53) USB cable (1) (p. 54) Wireless Remote Commander (1) ...

Instruction Manual
Page 54
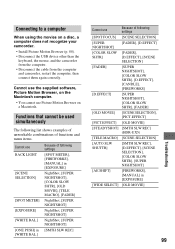
... the still images stored on the printer. Dubbing to VCR or DVD/HDD recorders (Continued) 1 Insert the recorded disc into your camcorder, and turn on the "Memory Stick Duo" will be displayed. Connecting your camcorder to the printer 1 Turn on your camcorder. 2 Connect the (USB) jack of the recording device. 5 Start the playback on your...
... the still images stored on the printer. Dubbing to VCR or DVD/HDD recorders (Continued) 1 Insert the recorded disc into your camcorder, and turn on the "Memory Stick Duo" will be displayed. Connecting your camcorder to the printer 1 Turn on your camcorder. 2 Connect the (USB) jack of the recording device. 5 Start the playback on your...
Instruction Manual
Page 55
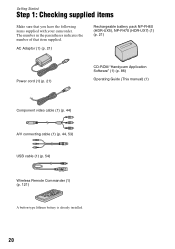
Touch to return to the previous screen. 2 Touch (OPTION), set up to your camcorder • If the printer stops working, disconnect the USB cable, turn the printer off and on the LCD screen to step 3. 3 Touch [EXEC] t [YES] t . The image selection screen appears again. To operate...may not support the date printing function. b Notes • Refer also to the instruction manual of a still image to be printed. To disconnect the USB cable from your printer's instruction manual for details. • The following operations when is marked with . To remove the "Memory Stick Duo" from the...
Touch to return to the previous screen. 2 Touch (OPTION), set up to your camcorder • If the printer stops working, disconnect the USB cable, turn the printer off and on the LCD screen to step 3. 3 Touch [EXEC] t [YES] t . The image selection screen appears again. To operate...may not support the date printing function. b Notes • Refer also to the instruction manual of a still image to be printed. To disconnect the USB cable from your printer's instruction manual for details. • The following operations when is marked with . To remove the "Memory Stick Duo" from the...
Instruction Manual
Page 87
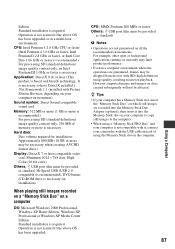
...and images on discs created subsequently will not be provided as standard, Hi-Speed USB (USB 2.0 compatible) is recommended), DVD burner (CD-ROM drive is necessary for installation) When playing still images recorded ...be necessary when creating AVCHD format discs.) Display: DirectX 7 or later-compatible video card, Minimum 1024 × 768 dots, High Color (16 bit color) Others: USB port (this must... images are not guaranteed on your camcorder with HD (high definition) image quality, resulting in uneven playback. CPU: MMX Pentium 200 MHz or faster Others: USB port (this must be provided as...
...and images on discs created subsequently will not be provided as standard, Hi-Speed USB (USB 2.0 compatible) is recommended), DVD burner (CD-ROM drive is necessary for installation) When playing still images recorded ...be necessary when creating AVCHD format discs.) Display: DirectX 7 or later-compatible video card, Minimum 1024 × 768 dots, High Color (16 bit color) Others: USB port (this must... images are not guaranteed on your camcorder with HD (high definition) image quality, resulting in uneven playback. CPU: MMX Pentium 200 MHz or faster Others: USB port (this must be provided as...

Instruction Manual
Page 89
... desktop. Software required to recognize an AVCHD format mode discs Windows Media Format 9 Series Runtime (Windows 2000 only) Software required to create DVD video discs Microsoft .NET Framework 1.1 Software required to complete the installation. http://www.sony.net/registration/di/ 89 The following ... on the website, you agree, then click [Next]. 6 Connect your camcorder to install the software. In this time. z Tips • See "First Step Guide" on the screen to your computer via a USB cable, then click [Next] on the connection confirmation screen. Sonic UDF Reader...
... desktop. Software required to recognize an AVCHD format mode discs Windows Media Format 9 Series Runtime (Windows 2000 only) Software required to create DVD video discs Microsoft .NET Framework 1.1 Software required to complete the installation. http://www.sony.net/registration/di/ 89 The following ... on the website, you agree, then click [Next]. 6 Connect your camcorder to install the software. In this time. z Tips • See "First Step Guide" on the screen to your computer via a USB cable, then click [Next] on the connection confirmation screen. Sonic UDF Reader...
Instruction Manual
Page 90
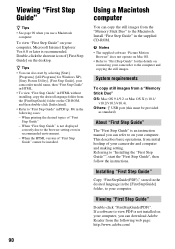
...your computer, Microsoft Internet Explorer Ver.6.0 or later is not displayed correctly due to the computer and copying the still images. Others: USB port (this must be installed. Using a Macintosh computer You can download Adobe Reader from initial hookup of "First Step Guide" ...computer. To view "First Step Guide" on connecting your computer. Referring to "First Step Guide" for Windows XP), [Sony Picture Utility], [First Step Guide], your camcorder and computer and making setting. Double-click the shortcut icon of "First Step Guide" - System requirements To copy still ...
...your computer, Microsoft Internet Explorer Ver.6.0 or later is not displayed correctly due to the computer and copying the still images. Others: USB port (this must be installed. Using a Macintosh computer You can download Adobe Reader from initial hookup of "First Step Guide" ...computer. To view "First Step Guide" on connecting your computer. Referring to "First Step Guide" for Windows XP), [Sony Picture Utility], [First Step Guide], your camcorder and computer and making setting. Double-click the shortcut icon of "First Step Guide" - System requirements To copy still ...
Instruction Manual
Page 99
... computer does not recognize your camcorder. • Install Picture Motion Browser (p. 88). • Disconnect the USB device other than the keyboard, the mouse, and the camcorder from the computer. • Disconnect the cable from the computer and camcorder, restart the computer, then ...] [SUPER NIGHTSHOT], [COLOR SLOW SHTR], [FADER] [OLD MOVIE] [SCENE SELECTION], [PICT.EFFECT] [PICT.EFFECT] [OLD MOVIE] [STEADYSHOT] [SMTH SLW REC] (HDR-UX5) [TELE MACRO] [SCENE SELECTION] [AUTO SLW SHUTTR] [SMTH SLW REC], [D.EFFECT], [SCENE SELECTION], [COLOR SLOW SHTR], [SUPER NIGHTSHOT] [AE SHIFT] [...
... computer does not recognize your camcorder. • Install Picture Motion Browser (p. 88). • Disconnect the USB device other than the keyboard, the mouse, and the camcorder from the computer. • Disconnect the cable from the computer and camcorder, restart the computer, then ...] [SUPER NIGHTSHOT], [COLOR SLOW SHTR], [FADER] [OLD MOVIE] [SCENE SELECTION], [PICT.EFFECT] [PICT.EFFECT] [OLD MOVIE] [STEADYSHOT] [SMTH SLW REC] (HDR-UX5) [TELE MACRO] [SCENE SELECTION] [AUTO SLW SHUTTR] [SMTH SLW REC], [D.EFFECT], [SCENE SELECTION], [COLOR SLOW SHTR], [SUPER NIGHTSHOT] [AE SHIFT] [...

Instruction Manual
Page 102
...then format the "Memory Stick Duo" with your camcorder (DVD-RW/DVD+RW only) (p. 62). Cannot divide. • You cannot divided a movie that is possible. • You can select up to 100 images at one time to: - Turn on the camcorder and leave it . Warning indicators and messages (...on disc. • Writing data to PictBridge compatible printer. • Switch off the printer and switch it on again, then disconnect the USB cable and reconnect it for about 10 minutes, preventing vibration. Try with another "Memory Stick Duo." x PictBridge compliant printer Not connected to...
...then format the "Memory Stick Duo" with your camcorder (DVD-RW/DVD+RW only) (p. 62). Cannot divide. • You cannot divided a movie that is possible. • You can select up to 100 images at one time to: - Turn on the camcorder and leave it . Warning indicators and messages (...on disc. • Writing data to PictBridge compatible printer. • Switch off the printer and switch it on again, then disconnect the USB cable and reconnect it for about 10 minutes, preventing vibration. Try with another "Memory Stick Duo." x PictBridge compliant printer Not connected to...
Instruction Manual
Page 114
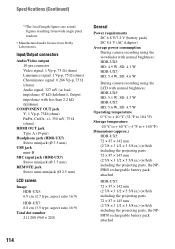
...pin) Headphone jack (HDR-UX7) Stereo minijack (Ø 3.5 mm) USB jack mini-B MIC input jack (HDR-UX7) Stereo minijack (Ø 3.5 mm) REMOTE jack Stereo mini-minijack (Ø 2.5 mm) LCD screen Image HDR-UX5: 6.9 cm (2.7 type, aspect ratio 16:9) HDR-UX7: 8.8 cm (3.5 ... including the projecting parts 72 × 87 × 145 mm (2 7/8 × 3 1/2 × 5 5/8 in.) (w/h/d) including the projecting parts, the NPFH60 rechargeable battery pack attached HDR-UX7: 72 × 87 × 142 mm (2 7/8 × 3 1/2 × 5 5/8 in.) (w/h/d) including the projecting parts 72 × 87 × 145 mm (2 7/8 ...
...pin) Headphone jack (HDR-UX7) Stereo minijack (Ø 3.5 mm) USB jack mini-B MIC input jack (HDR-UX7) Stereo minijack (Ø 3.5 mm) REMOTE jack Stereo mini-minijack (Ø 2.5 mm) LCD screen Image HDR-UX5: 6.9 cm (2.7 type, aspect ratio 16:9) HDR-UX7: 8.8 cm (3.5 ... including the projecting parts 72 × 87 × 145 mm (2 7/8 × 3 1/2 × 5 5/8 in.) (w/h/d) including the projecting parts, the NPFH60 rechargeable battery pack attached HDR-UX7: 72 × 87 × 142 mm (2 7/8 × 3 1/2 × 5 5/8 in.) (w/h/d) including the projecting parts 72 × 87 × 145 mm (2 7/8 ...

Instruction Manual
Page 118
...Disc cover (27) J (Movie)/ (Still) mode lamps (24) K START/STOP button (34) L Grip belt (33) M Hooks for fixing the installed accessory securely. E (USB) jack (54) F A/V OUT jack (46) G DC IN jack (21) H Active Interface Shoe (35) The Active Interface Shoe supplies power to the end, and then tighten... noise being recorded. • You cannot use an external flash (optional) and the built-in ( ) are recording movies with your camcorder. To remove an accessory, loosen the screw, and then press down and push it takes precedence over the internal microphone (p. 35). Quick...
...Disc cover (27) J (Movie)/ (Still) mode lamps (24) K START/STOP button (34) L Grip belt (33) M Hooks for fixing the installed accessory securely. E (USB) jack (54) F A/V OUT jack (46) G DC IN jack (21) H Active Interface Shoe (35) The Active Interface Shoe supplies power to the end, and then tighten... noise being recorded. • You cannot use an external flash (optional) and the built-in ( ) are recording movies with your camcorder. To remove an accessory, loosen the screw, and then press down and push it takes precedence over the internal microphone (p. 35). Quick...

Instruction Manual
Page 128
... T TELE MACRO 81, 99 Tripod 120 TV color system 103 TV CONNECT Guide ..........43 TV TYPE 76 TWILIGHT 82 TWILIGHT PORT 82 U Unfinalizing 64, 99 USB 2.0 87 USB cable 20 Using abroad 103 V VBR 16 VF B.LIGHT (Viewfinder brightness 75 VIDEO mode 28 VIEW IMAGES SET ...........73 Viewfinder 26 Viewing pictures on...
... T TELE MACRO 81, 99 Tripod 120 TV color system 103 TV CONNECT Guide ..........43 TV TYPE 76 TWILIGHT 82 TWILIGHT PORT 82 U Unfinalizing 64, 99 USB 2.0 87 USB cable 20 Using abroad 103 V VBR 16 VF B.LIGHT (Viewfinder brightness 75 VIDEO mode 28 VIEW IMAGES SET ...........73 Viewfinder 26 Viewing pictures on...


