
Operating Guide
Page 3
... fall, causing serious injury to a child or an adult, and serious damage to the operating instructions. for future reference. Use Power Sources This set from battery power, or other materials. - Polarization This set may touch dangerous voltage points or short out parts that it . Use a cloth lightly dampened with a cloth or...
... fall, causing serious injury to a child or an adult, and serious damage to the operating instructions. for future reference. Use Power Sources This set from battery power, or other materials. - Polarization This set may touch dangerous voltage points or short out parts that it . Use a cloth lightly dampened with a cloth or...

Operating Guide
Page 5
...Model No. The number below . Operation is for future reference. Read this before operating your camcorder Before operating the unit, please read this manual thoroughly, and retain it for the FCC ...batteries, call : Sony Customer Information Center 1-800222-SONY (7669). Replace the battery with the specified type only. Address: 16530 Via Esprillo, San Diego, CA 92127 U.S.A. Use of controls or adjustments or performance of the FCC Rules. You can help preserve our environment by returning your Sony dealer regarding recycling of Conformity Trade Name: SONY Model No.: HDR-UX1...
...Model No. The number below . Operation is for future reference. Read this before operating your camcorder Before operating the unit, please read this manual thoroughly, and retain it for the FCC ...batteries, call : Sony Customer Information Center 1-800222-SONY (7669). Replace the battery with the specified type only. Address: 16530 Via Esprillo, San Diego, CA 92127 U.S.A. Use of controls or adjustments or performance of the FCC Rules. You can help preserve our environment by returning your Sony dealer regarding recycling of Conformity Trade Name: SONY Model No.: HDR-UX1...
Operating Guide
Page 7
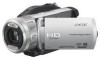
... Stick PRO" and "Memory Stick PRO Duo" can be sure to remove the battery pack or AC Adaptor from being broken or recorded images from the camcorder. - to apply mechanical shock or vibration to the camcorder. • When connecting your camcorder to another device with an HDMI cable, a component video cable, or a USB cable... the plug forcibly into the Memory Stick Duo Adaptor. "Memory Stick Duo" (This size can be used only with or (p. 132). Memory Stick Duo Adaptor Battery • The camcorder is on: - Types of "Memory Stick" you can use in your...
... Stick PRO" and "Memory Stick PRO Duo" can be sure to remove the battery pack or AC Adaptor from being broken or recorded images from the camcorder. - to apply mechanical shock or vibration to the camcorder. • When connecting your camcorder to another device with an HDMI cable, a component video cable, or a USB cable... the plug forcibly into the Memory Stick Duo Adaptor. "Memory Stick Duo" (This size can be used only with or (p. 132). Memory Stick Duo Adaptor Battery • The camcorder is on: - Types of "Memory Stick" you can use in your...
Operating Guide
Page 10
...(high definition) images 18 Selecting the right disc 20 " HOME" and " OPTION" - Read this before operating your camcorder 5 Subject examples and solutions 14 Enjoying your camcorder Operation flow 16 Experience the beauty of Contents Read This First (supplied) Provides features and information about the camcorder ...you should know before using it. Taking advantage of two types of menus 22 Getting Started Step 1: Checking supplied items 29 Step 2: Charging the battery pack 30 Step 3: Turning the power on 33...
...(high definition) images 18 Selecting the right disc 20 " HOME" and " OPTION" - Read this before operating your camcorder 5 Subject examples and solutions 14 Enjoying your camcorder Operation flow 16 Experience the beauty of Contents Read This First (supplied) Provides features and information about the camcorder ...you should know before using it. Taking advantage of two types of menus 22 Getting Started Step 1: Checking supplied items 29 Step 2: Charging the battery pack 30 Step 3: Turning the power on 33...

Operating Guide
Page 13
Troubleshooting Troubleshooting 107 Warning indicators and messages 122 Additional Information Using your camcorder abroad 127 About the Disc 129 About the AVCHD format 131 About the "Memory Stick 132 About the "InfoLITHIUM" battery pack 134 Maintenance and precautions 135 Specifications 138 Quick Reference Identifying parts and controls 142 Indicators displayed during recording/playback 147 Glossary 150 Index ...152 13
Troubleshooting Troubleshooting 107 Warning indicators and messages 122 Additional Information Using your camcorder abroad 127 About the Disc 129 About the AVCHD format 131 About the "Memory Stick 132 About the "InfoLITHIUM" battery pack 134 Maintenance and precautions 135 Specifications 138 Quick Reference Identifying parts and controls 142 Indicators displayed during recording/playback 147 Glossary 150 Index ...152 13

Operating Guide
Page 29
...66) USB cable (1) (p. 67) Wireless Remote Commander (1) (p. 146) A button-type lithium battery is already installed. 29 AC Adaptor (1) (p. 30) Rechargeable battery pack NP-FM50 (1) (p. 30, 134) Power cord (1) (p. 30) CD-ROM "Handycam ...Application Software" (1) (p. 100) Read This First (1) Operating Guide (This manual) (1) b Notes • Discs and "Memory Stick Duo" are not included. The number in the parentheses indicates the number of that you have the following items supplied with your camcorder...
...66) USB cable (1) (p. 67) Wireless Remote Commander (1) (p. 146) A button-type lithium battery is already installed. 29 AC Adaptor (1) (p. 30) Rechargeable battery pack NP-FM50 (1) (p. 30, 134) Power cord (1) (p. 30) CD-ROM "Handycam ...Application Software" (1) (p. 100) Read This First (1) Operating Guide (This manual) (1) b Notes • Discs and "Memory Stick Duo" are not included. The number in the parentheses indicates the number of that you have the following items supplied with your camcorder...

Operating Guide
Page 30
... the DC plug, match it clicks. 5 Disconnect the AC Adaptor from the DC IN jack holding both the camcorder and the DC plug. 30 Step 2: Charging the battery pack You can charge the "InfoLITHIUM" battery pack (M series) (p. 134) after attaching it to the AC Adaptor and the wall outlet. The CHG (charge) lamp... default setting). 3 Connect the AC Adaptor to the DC IN jack of the AC Adaptor. DC IN jack POWER switch DC plug CHG (charge) lamp Battery Jack cover Power cord To the wall outlet AC Adaptor 1 Slide the POWER switch in the direction of the arrow until it with the v mark...
... the DC plug, match it clicks. 5 Disconnect the AC Adaptor from the DC IN jack holding both the camcorder and the DC plug. 30 Step 2: Charging the battery pack You can charge the "InfoLITHIUM" battery pack (M series) (p. 134) after attaching it to the AC Adaptor and the wall outlet. The CHG (charge) lamp... default setting). 3 Connect the AC Adaptor to the DC IN jack of the AC Adaptor. DC IN jack POWER switch DC plug CHG (charge) lamp Battery Jack cover Power cord To the wall outlet AC Adaptor 1 Slide the POWER switch in the direction of the arrow until it with the v mark...

Operating Guide
Page 31
... a fully discharged battery pack. Slide the BATT (battery release) lever and remove the battery pack. When storing the battery pack Fully discharge the battery before storing it for an extended period (see page 134 for about 7 seconds. HD (high definition) image quality Battery pack NP-FM50 ... information is displayed. To check the remaining battery (Battery Info) Set the POWER switch to OFF (CHG), your camcorder turns on, then off . Remaining battery (approx.) Getting Started BATT (battery release) lever b Notes • When you remove the battery pack, make sure that the (Movie)...
... a fully discharged battery pack. Slide the BATT (battery release) lever and remove the battery pack. When storing the battery pack Fully discharge the battery before storing it for an extended period (see page 134 for about 7 seconds. HD (high definition) image quality Battery pack NP-FM50 ... information is displayed. To check the remaining battery (Battery Info) Set the POWER switch to OFF (CHG), your camcorder turns on, then off . Remaining battery (approx.) Getting Started BATT (battery release) lever b Notes • When you remove the battery pack, make sure that the (Movie)...

Operating Guide
Page 32
... time shows the time when you use a fully charged battery pack. Playing time Approximate time (min.) available when you repeat recording start/stop, turning the power on . The battery pack is on /off and zooming. HD (high definition) image quality Battery pack NP-FM50 (supplied) NP-QM71D NP-QM91D LCD ...: Recording time when recording with recording mode [SP] under which only allows short recording and playback times, with your camcorder. The battery pack is closed 140 335 340 505 520 * When the LCD backlight is not attached correctly. - Middle: When the LCD ...
... time shows the time when you use a fully charged battery pack. Playing time Approximate time (min.) available when you repeat recording start/stop, turning the power on . The battery pack is on /off and zooming. HD (high definition) image quality Battery pack NP-FM50 (supplied) NP-QM71D NP-QM91D LCD ...: Recording time when recording with recording mode [SP] under which only allows short recording and playback times, with your camcorder. The battery pack is closed 140 335 340 505 520 * When the LCD backlight is not attached correctly. - Middle: When the LCD ...
Operating Guide
Page 33
... turn on the power. This may cause a malfunction. PRECAUTION • Even if your camcorder. • Do not use the AC Adaptor placed in the direction of the AC Adaptor or battery terminal with any malfunction occurs while using your camcorder is turned off, AC power (house current) is still supplied to it for...
... turn on the power. This may cause a malfunction. PRECAUTION • Even if your camcorder. • Do not use the AC Adaptor placed in the direction of the AC Adaptor or battery terminal with any malfunction occurs while using your camcorder is turned off, AC power (house current) is still supplied to it for...

Operating Guide
Page 34
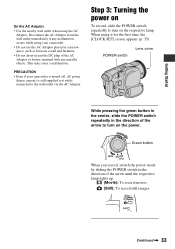
...open or adjust the LCD panel. 34 Step 4: Adjusting the LCD panel and viewfinder LCD panel Open the LCD panel 90 degrees to the camcorder (1), then rotate it to the best angle to record or play (2). 290 degrees (max.) DISP/BATT INFO 2180 degrees (max.) 190 degrees to... to OFF (CHG). Step 3: Turning the power on (Continued) To turn off the LCD backlight to make the battery last longer Press and hold DISP/ BATT INFO for a few seconds for your camcorder without any operation attempted for a few seconds until disappears. b Notes • It takes a few seconds until appears...
...open or adjust the LCD panel. 34 Step 4: Adjusting the LCD panel and viewfinder LCD panel Open the LCD panel 90 degrees to the camcorder (1), then rotate it to the best angle to record or play (2). 290 degrees (max.) DISP/BATT INFO 2180 degrees (max.) 190 degrees to... to OFF (CHG). Step 3: Turning the power on (Continued) To turn off the LCD backlight to make the battery last longer Press and hold DISP/ BATT INFO for a few seconds for your camcorder without any operation attempted for a few seconds until disappears. b Notes • It takes a few seconds until appears...

Operating Guide
Page 35
... the HOME MENU. 2 Touch (SETTINGS). In that case, charge the built-in rechargeable battery gets discharged and the date and time settings may be cleared from the memory. If you do not use your camcorder or change the POWER switch position. b Notes • If you do not set the...the date and time Set the date and time when using the viewfinder to avoid wearing down the battery, or when the image seen on your camcorder for about 4 months, the built-in rechargeable battery and then set the date and time again (p. 137). (HOME) B POWER switch Viewfinder lens adjustment...
... the HOME MENU. 2 Touch (SETTINGS). In that case, charge the built-in rechargeable battery gets discharged and the date and time settings may be cleared from the memory. If you do not use your camcorder or change the POWER switch position. b Notes • If you do not set the...the date and time Set the date and time when using the viewfinder to avoid wearing down the battery, or when the image seen on your camcorder for about 4 months, the built-in rechargeable battery and then set the date and time again (p. 137). (HOME) B POWER switch Viewfinder lens adjustment...
Operating Guide
Page 39
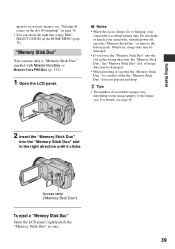
b Notes • When the access lamp is lit or flashing, your camcorder, turn the power off, eject the "Memory Stick Duo," or remove the battery pack. For details, see "Deleting all scenes on the disc (Formatting)" on page 76. • You can use only a "Memory Stick Duo" marked with or (p. ..." slot, or image data may be careful so that the "Memory Stick Duo" does not pop out and drop. Do not shake or knock your camcorder is reading/writing data. "Memory Stick Duo" You can check the right disc using [DISC SELECT GUIDE] on the image quality or the image size...
b Notes • When the access lamp is lit or flashing, your camcorder, turn the power off, eject the "Memory Stick Duo," or remove the battery pack. For details, see "Deleting all scenes on the disc (Formatting)" on page 76. • You can use only a "Memory Stick Duo" marked with or (p. ..." slot, or image data may be careful so that the "Memory Stick Duo" does not pop out and drop. Do not shake or knock your camcorder is reading/writing data. "Memory Stick Duo" You can check the right disc using [DISC SELECT GUIDE] on the image quality or the image size...
Operating Guide
Page 40
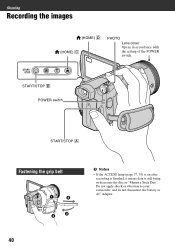
Shooting Recording the images (HOME) D (HOME) C PHOTO Lens cover Opens in accordance with the setting of the POWER switch. START/STOP B POWER switch START/STOP A Fastening the grip belt b Notes • If the ACCESS lamp (page 37, 39) is on after recording is finished, it means data is still being written onto the disc or "Memory Stick Duo." Do not apply shock or vibration to your camcorder, and do not disconnect the battery or AC Adaptor. 40
Shooting Recording the images (HOME) D (HOME) C PHOTO Lens cover Opens in accordance with the setting of the POWER switch. START/STOP B POWER switch START/STOP A Fastening the grip belt b Notes • If the ACCESS lamp (page 37, 39) is on after recording is finished, it means data is still being written onto the disc or "Memory Stick Duo." Do not apply shock or vibration to your camcorder, and do not disconnect the battery or AC Adaptor. 40
Operating Guide
Page 44
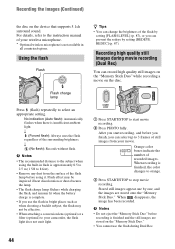
...8226; The flash charge lamp flickers while charging the flash, and remains lit when the battery charge is finished and the still images are stored onto the "Memory Stick Duo." When... microphone is approximately 0.5 to 2.5 m (1 5/8 to 8 feet). • Remove any dust from your camcorder, the flash light does not emit light. 1 Press START/STOP to start recording, and before using the ... setting [FLASH LEVEL] (p. 87), or you start movie recording. 2 Press PHOTO fully. Recording high quality still images during Dual Rec. 44 b Notes • The recommended distance to stop movie ...
...8226; The flash charge lamp flickers while charging the flash, and remains lit when the battery charge is finished and the still images are stored onto the "Memory Stick Duo." When... microphone is approximately 0.5 to 2.5 m (1 5/8 to 8 feet). • Remove any dust from your camcorder, the flash light does not emit light. 1 Press START/STOP to start recording, and before using the ... setting [FLASH LEVEL] (p. 87), or you start movie recording. 2 Press PHOTO fully. Recording high quality still images during Dual Rec. 44 b Notes • The recommended distance to stop movie ...

Operating Guide
Page 59
...may not increase as much as you delete unnecessary images from your camcorder, then press (HOME). 3 Touch [ DELETE]. 4 Touch [ DELETE]. 5 Touch the still image to be restored once they are deleted. • Do not remove the battery pack or the AC Adaptor from the disc, the remaining disc ...59 Touch to return to the previous screen. 6 Touch t [YES] t . z Tips • You can do this operation only with DVD-RW (VR mode) for the SD (standard definition) image quality. • If the deleted movie is included in the Playlist (p. 61), the movie is marked with . Press and hold the...
...may not increase as much as you delete unnecessary images from your camcorder, then press (HOME). 3 Touch [ DELETE]. 4 Touch [ DELETE]. 5 Touch the still image to be restored once they are deleted. • Do not remove the battery pack or the AC Adaptor from the disc, the remaining disc ...59 Touch to return to the previous screen. 6 Touch t [YES] t . z Tips • You can do this operation only with DVD-RW (VR mode) for the SD (standard definition) image quality. • If the deleted movie is included in the Playlist (p. 61), the movie is marked with . Press and hold the...

Operating Guide
Page 61
...Touch (OTHERS) t [PLAYLIST EDIT]. The original scenes are divided. • Do not remove the battery pack or the AC Adaptor from the point where you touch and the actual dividing point, as your camcorder while editing images. Editing 3 Touch [ ADD]. 4 Touch the scene to be restored once they... are not changed even though you have selected. b Notes • You can do this operation only with DVD-RW (VR mode) for the SD (standard definition) image quality. •...
...Touch (OTHERS) t [PLAYLIST EDIT]. The original scenes are divided. • Do not remove the battery pack or the AC Adaptor from the point where you touch and the actual dividing point, as your camcorder while editing images. Editing 3 Touch [ ADD]. 4 Touch the scene to be restored once they... are not changed even though you have selected. b Notes • You can do this operation only with DVD-RW (VR mode) for the SD (standard definition) image quality. •...
Operating Guide
Page 62
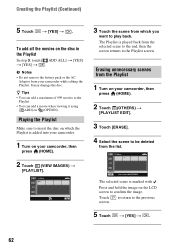
.... to return to be deleted from which the Playlist is marked with . The Playlist is played back from your camcorder while editing the Playlist. b Notes • Do not remove the battery pack or the AC Adaptor from the selected scene to the end, then the screen returns to confirm the image.... z Tips • You can add a maximum of 999 movies to play back. Erasing unnecessary scenes from the Playlist 1 Turn on your camcorder, then press (HOME). 2 ...
.... to return to be deleted from which the Playlist is marked with . The Playlist is played back from your camcorder while editing the Playlist. b Notes • Do not remove the battery pack or the AC Adaptor from the selected scene to the end, then the screen returns to confirm the image.... z Tips • You can add a maximum of 999 movies to play back. Erasing unnecessary scenes from the Playlist 1 Turn on your camcorder, then press (HOME). 2 ...

Operating Guide
Page 89
... of the LCD screen with / . BEEP B ON A melody sounds when you select [BRIGHT], battery life is slightly reduced during recording. • If you select [BRIGHT], battery life is not on the screen, touch v/V to outside power sources, [BRIGHT] is automatically selected for...camcorder body, the setting becomes [NORMAL] automatically. VF B.LIGHT You can adjust the brightness of the viewfinder. BRIGHT Brightens the LCD screen. If the item is slightly reduced during recording. z Tips • This adjustment does not affect the recorded images in any way. Low intensity High...
... of the LCD screen with / . BEEP B ON A melody sounds when you select [BRIGHT], battery life is slightly reduced during recording. • If you select [BRIGHT], battery life is not on the screen, touch v/V to outside power sources, [BRIGHT] is automatically selected for...camcorder body, the setting becomes [NORMAL] automatically. VF B.LIGHT You can adjust the brightness of the viewfinder. BRIGHT Brightens the LCD screen. If the item is slightly reduced during recording. z Tips • This adjustment does not affect the recorded images in any way. Low intensity High...
Operating Guide
Page 96
... ( ) The white balance will shoot the subject. 3 Touch [ ]. appears on subjects farther away. • The setting returns to [AUTO] when you changed the battery pack, or moved your camcorder to or from inside the house, or vice versa. • Set [WHITE BAL.] to [AUTO] or adjust the color in a studio, or under...
... ( ) The white balance will shoot the subject. 3 Touch [ ]. appears on subjects farther away. • The setting returns to [AUTO] when you changed the battery pack, or moved your camcorder to or from inside the house, or vice versa. • Set [WHITE BAL.] to [AUTO] or adjust the color in a studio, or under...


