Operating Guide
Page 14
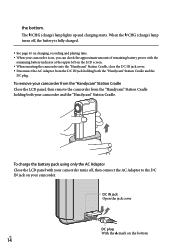
The /CHG (charge) lamp lights up and charging starts. To remove your camcorder from the "Handycam" Station Cradle Close the LCD panel, then remove the camcorder from the DC IN jack holding both the "Handycam" Station Cradle and the DC plug. To charge the battery pack using only the AC ...upper left on the LCD screen. When inserting the camcorder into the "Handycam" Station Cradle, close the DC IN jack cover. Disconnect the AC Adaptor from the "Handycam" Station Cradle holding both your camcorder and the "Handycam" Station Cradle. DC IN jack Open the jack cover DC plug...
The /CHG (charge) lamp lights up and charging starts. To remove your camcorder from the "Handycam" Station Cradle Close the LCD panel, then remove the camcorder from the DC IN jack holding both the "Handycam" Station Cradle and the DC plug. To charge the battery pack using only the AC ...upper left on the LCD screen. When inserting the camcorder into the "Handycam" Station Cradle, close the DC IN jack cover. Disconnect the AC Adaptor from the "Handycam" Station Cradle holding both your camcorder and the "Handycam" Station Cradle. DC IN jack Open the jack cover DC plug...

Operating Guide
Page 20
...a desired setting . Your camcorder flashes automatically when there is recorded. Move the power zoom lever slightly for photo recording mode, and the screen aspect ratio becomes 4:3. Press PHOTO lightly to turn on the LCD screen (p. 63). ...To change how your camcorder flashes by touching (MENU) [FLASH MODE] (under [PHOTO SETTINGS] category) a desired setting ...
...a desired setting . Your camcorder flashes automatically when there is recorded. Move the power zoom lever slightly for photo recording mode, and the screen aspect ratio becomes 4:3. Press PHOTO lightly to turn on the LCD screen (p. 63). ...To change how your camcorder flashes by touching (MENU) [FLASH MODE] (under [PHOTO SETTINGS] category) a desired setting ...

Operating Guide
Page 21
... switch is powered by NAVTEQ. Press lightly to switch to movie recording mode Press lightly to switch to photo recording mode Acquiring location information using the GPS (HDR-TG5V) When you to ON, appears on the LCD screen, and your camcorder acquires the location information from the GPS... satellites. Recording To switch between movie recording mode and photo recording mode Press START/STOP lightly to switch to movie recording mode...
... switch is powered by NAVTEQ. Press lightly to switch to movie recording mode Press lightly to switch to photo recording mode Acquiring location information using the GPS (HDR-TG5V) When you to ON, appears on the LCD screen, and your camcorder acquires the location information from the GPS... satellites. Recording To switch between movie recording mode and photo recording mode Press START/STOP lightly to switch to movie recording mode...

Operating Guide
Page 45
...recorded on the selected medium. See page 61 for the recordable time of your camcorder. The recording medium is changed . Selecting the recording media for photos. Internal memory Movies "Memory Stick" media Photos You can do recording, playback, and editing operations on the...category). Changing the recording media You can select the internal memory or "Memory Stick PRO Duo" media as the recording, playback, or editing medium on "Memory Stick PRO Duo" media (p. 45). To check the recording media settings Light up the (Movie) lamp to record movies and/or...
...recorded on the selected medium. See page 61 for the recordable time of your camcorder. The recording medium is changed . Selecting the recording media for photos. Internal memory Movies "Memory Stick" media Photos You can do recording, playback, and editing operations on the...category). Changing the recording media You can select the internal memory or "Memory Stick PRO Duo" media as the recording, playback, or editing medium on "Memory Stick PRO Duo" media (p. 45). To check the recording media settings Light up the (Movie) lamp to record movies and/or...

Operating Guide
Page 46
... is lit. If you force the "Memory Stick PRO Duo" media into the slot in step 2, format the "Memory Stick PRO Duo" media (p. 44). To eject the "Memory Stick PRO Duo" media Open the battery/Memory Stick Duo cover and lightly push the "Memory Stick PRO Duo" media in once. ... so that the "Memory Stick PRO Duo" media does not pop out and drop. Dubbing or copying movies and photos from the internal memory to work with this camcorder. Insert the "Memory Stick PRO Duo" media. Open the battery/Memory Stick Duo cover. Insert the "Memory Stick Duo" media...
... is lit. If you force the "Memory Stick PRO Duo" media into the slot in step 2, format the "Memory Stick PRO Duo" media (p. 44). To eject the "Memory Stick PRO Duo" media Open the battery/Memory Stick Duo cover and lightly push the "Memory Stick PRO Duo" media in once. ... so that the "Memory Stick PRO Duo" media does not pop out and drop. Dubbing or copying movies and photos from the internal memory to work with this camcorder. Insert the "Memory Stick PRO Duo" media. Open the battery/Memory Stick Duo cover. Insert the "Memory Stick Duo" media...

Operating Guide
Page 50
... BAL Adjusts the white balance. SMILE DETECTION Automatically takes a shot whenever a smile is detected. REC MODE Sets the mode to the zoom position. AUTO BACK LIGHT Adjusts the exposure for the seleted subject simultaneously. Menu lists (MANUAL SETTINGS) category SCENE SELECTION Selects an appropriate recording setting according to the type of...
... BAL Adjusts the white balance. SMILE DETECTION Automatically takes a shot whenever a smile is detected. REC MODE Sets the mode to the zoom position. AUTO BACK LIGHT Adjusts the exposure for the seleted subject simultaneously. Menu lists (MANUAL SETTINGS) category SCENE SELECTION Selects an appropriate recording setting according to the type of...

Operating Guide
Page 56
...Handycam" Station Cradle or your Sony dealer or local authorized Sony service facility. Change the battery pack or place it in a cool place. However, note that the camera-shake warning indicator does not disappear. Format the "Memory Stick PRO Duo" media with your camcorder (p. 44). Incompatible "Memory...LCD screen, check the following. Contact your camcorder again. Inform them of light is not sufficient. C:06: The battery pack temperature is unsteady. US 56 Use the flash. The camcorder is high. C:04: &#...
...Handycam" Station Cradle or your Sony dealer or local authorized Sony service facility. Change the battery pack or place it in a cool place. However, note that the camera-shake warning indicator does not disappear. Format the "Memory Stick PRO Duo" media with your camcorder (p. 44). Incompatible "Memory...LCD screen, check the following. Contact your camcorder again. Inform them of light is not sufficient. C:06: The battery pack temperature is unsteady. US 56 Use the flash. The camcorder is high. C:04: &#...

Operating Guide
Page 58
..., disassembling, modifying, physical shock, or impact such as it may heat up. This is soiled, clean the camcorder body with a soft cloth lightly moistened with water, and then wipe the casing with the liquid. The camcorder may malfunction. This is used in a cold place, a residual image may malfunction. Doing so might cause heat... screen. To clean the LCD screen If fingerprints or dust make the LCD screen dirty, it is recommended that may have it checked by a Sony dealer before storing it may appear on the product.
..., disassembling, modifying, physical shock, or impact such as it may heat up. This is soiled, clean the camcorder body with a soft cloth lightly moistened with water, and then wipe the casing with the liquid. The camcorder may malfunction. This is used in a cold place, a residual image may malfunction. Doing so might cause heat... screen. To clean the LCD screen If fingerprints or dust make the LCD screen dirty, it is recommended that may have it checked by a Sony dealer before storing it may appear on the product.

Handycam® Handbook
Page 6
... Rec 29 Capturing smiles automatically (SMILE SHUTTER) SMILE DETECTION 77 SMILE SENSITIVITY 77 SMILE PRIORITY 77 A child on the stage under a spot light Flowers in close-up SPOTLIGHT 65 PORTRAIT 65 FOCUS 69 TELE MACRO 70 Fireworks with all its splendor FIREWORKS 65...
... Rec 29 Capturing smiles automatically (SMILE SHUTTER) SMILE DETECTION 77 SMILE SENSITIVITY 77 SMILE PRIORITY 77 A child on the stage under a spot light Flowers in close-up SPOTLIGHT 65 PORTRAIT 65 FOCUS 69 TELE MACRO 70 Fireworks with all its splendor FIREWORKS 65...

Handycam® Handbook
Page 13
... METER SPOT FOCUS EXPOSURE FOCUS TELE MACRO SMTH SLW REC (SHOOTING SET) category DIGITAL ZOOM GUIDEFRAME STEADYSHOT BLT-IN ZOOM MIC MICREF LEVEL AUTO BACK LIGHT AUTO SLW SHUTTR CONVERSION LENS (RECORDING SET) category / SET REC MODE X.V.COLOR WIDE SELECT (FACE FUNC. SET) category FRAME SETTING FACE DETECTION ...SMILE DETECTION SMILE SENSITIVITY SMILE PRIORITY (PHOTO SETTINGS) category SELF-TIMER IMAGE SIZE FLASH MODE FLASH LEVEL REDEYE REDUC FILE NO. (PLAYBACK) category VISUAL INDEX 65 66 66 67 68 68 69 69 70 30 71 71 72 72 72 ...
... METER SPOT FOCUS EXPOSURE FOCUS TELE MACRO SMTH SLW REC (SHOOTING SET) category DIGITAL ZOOM GUIDEFRAME STEADYSHOT BLT-IN ZOOM MIC MICREF LEVEL AUTO BACK LIGHT AUTO SLW SHUTTR CONVERSION LENS (RECORDING SET) category / SET REC MODE X.V.COLOR WIDE SELECT (FACE FUNC. SET) category FRAME SETTING FACE DETECTION ...SMILE DETECTION SMILE SENSITIVITY SMILE PRIORITY (PHOTO SETTINGS) category SELF-TIMER IMAGE SIZE FLASH MODE FLASH LEVEL REDEYE REDUC FILE NO. (PLAYBACK) category VISUAL INDEX 65 66 66 67 68 68 69 69 70 30 71 71 72 72 72 ...

Handycam® Handbook
Page 16
...of time may not be able to record or play back images recorded with HD image quality (high definition) This camcorder captures high definition footage in low light conditions, such as a DVD-R using your camcorder with the following devices; Other AVCHD format compatible devices which are...) that you can save the image data on the LCD screen. Table of Contents Useful Recording Techniques insert the camcorder into the "Handycam" Station Cradle or remove the camcorder from being Index 16 Menu items, LCD panel, and lens A menu item that is grayed out...
...of time may not be able to record or play back images recorded with HD image quality (high definition) This camcorder captures high definition footage in low light conditions, such as a DVD-R using your camcorder with the following devices; Other AVCHD format compatible devices which are...) that you can save the image data on the LCD screen. Table of Contents Useful Recording Techniques insert the camcorder into the "Handycam" Station Cradle or remove the camcorder from being Index 16 Menu items, LCD panel, and lens A menu item that is grayed out...

Handycam® Handbook
Page 17
...Useful Recording Techniques activated in Germany, and Sony Corporation, and produces superior images. Table of light from the media completely. In this case, an indicator appears on some type of the camcorder. Note on the recording media. When the camcorder is recommended that you destroy the actual ...then perform [MEDIA FORMAT] (p. 88). Also, when you dispose of the camcorder, it is equipped with a Carl Zeiss lens, which was developed jointly by Carl Zeiss, in such situations. When you transfer the camcorder, it is connected to a computer Do not try to prevent ...
...Useful Recording Techniques activated in Germany, and Sony Corporation, and produces superior images. Table of light from the media completely. In this case, an indicator appears on some type of the camcorder. Note on the recording media. When the camcorder is recommended that you destroy the actual ...then perform [MEDIA FORMAT] (p. 88). Also, when you dispose of the camcorder, it is equipped with a Carl Zeiss lens, which was developed jointly by Carl Zeiss, in such situations. When you transfer the camcorder, it is connected to a computer Do not try to prevent ...

Handycam® Handbook
Page 19
... (charge) lamp turns off , then connect the AC Adaptor to the DC IN jack on the LCD screen. When inserting the camcorder into the "Handycam" Station Cradle securely, all the way to 86 ˚F) is on, you fully charge a fully discharged battery pack. Charging time Approximate time...is charged at the upper left on your camcorder from the "Handycam" Station Cradle Close the LCD panel, then remove the camcorder from the DC IN jack holding both the "Handycam" Station Cradle and the DC plug. The /CHG (charge) lamp lights up and charging starts. Useful Recording Techniques Index...
... (charge) lamp turns off , then connect the AC Adaptor to the DC IN jack on the LCD screen. When inserting the camcorder into the "Handycam" Station Cradle securely, all the way to 86 ˚F) is on, you fully charge a fully discharged battery pack. Charging time Approximate time...is charged at the upper left on your camcorder from the "Handycam" Station Cradle Close the LCD panel, then remove the camcorder from the DC IN jack holding both the "Handycam" Station Cradle and the DC plug. The /CHG (charge) lamp lights up and charging starts. Useful Recording Techniques Index...

Handycam® Handbook
Page 24
...a feeling of panning for a while to make the scene look stable. Zooming smoothly Zoom in dim light, such as you not move the camcorder. Stabilize yourself, move your camcorder horizontally as scenes of fireworks, or night views. Accentuating movies with narration Consider the sound to the ...subject during shooting. Aim for successful recording Stabilizing your camcorder When you hold the camcorder, keep your upper body upright, and hold your movies. And, use of camcorder accessories. Narrate the subject, or talk to be recorded with your arms close...
...a feeling of panning for a while to make the scene look stable. Zooming smoothly Zoom in dim light, such as you not move the camcorder. Stabilize yourself, move your camcorder horizontally as scenes of fireworks, or night views. Accentuating movies with narration Consider the sound to the ...subject during shooting. Aim for successful recording Stabilizing your camcorder When you hold the camcorder, keep your upper body upright, and hold your movies. And, use of camcorder accessories. Narrate the subject, or talk to be recorded with your arms close...

Handycam® Handbook
Page 27
...; [ IMAGE SIZE] (under [PHOTO SETTINGS] category) a desired setting (p. 79). Your camcorder flashes automatically when there is insufficient ambient light. The flash does not work during movie recording. Press lightly to switch to movie recording mode Press lightly to switch to movie recording mode. The LCD screen display switches for photo recording mode...
...; [ IMAGE SIZE] (under [PHOTO SETTINGS] category) a desired setting (p. 79). Your camcorder flashes automatically when there is insufficient ambient light. The flash does not work during movie recording. Press lightly to switch to movie recording mode Press lightly to switch to movie recording mode. The LCD screen display switches for photo recording mode...

Handycam® Handbook
Page 28
Table of Contents If white circular spots appear on photos This is caused by the camcorder's flash, they appear as white circular spots. To reduce the white circular spots, light the room and shoot the subject without a flash. Particles (dust, pollen, etc.) in the air Subject Useful Recording Techniques Index 28 When they are accentuated by particles (dust, pollen, etc.) floating close to the lens.
Table of Contents If white circular spots appear on photos This is caused by the camcorder's flash, they appear as white circular spots. To reduce the white circular spots, light the room and shoot the subject without a flash. Particles (dust, pollen, etc.) in the air Subject Useful Recording Techniques Index 28 When they are accentuated by particles (dust, pollen, etc.) floating close to the lens.

Handycam® Handbook
Page 62
...62). To check the recording media settings Light up the (Movie) lamp to check the recording medium used for movies and photos separately. Types of "Memory Stick" media you can use with : PRO Duo" media)* ("Memory Stick ("Memory Stick Index 62 The recording medium is ...recommended that you use "Memory Stick PRO Duo" media of 1 GB or larger marked with your camcorder. The recording medium is displayed at the top right corner of the screen. : Internal memory : "Memory Stick PRO Duo" media Inserting "Memory Stick PRO Duo" media ...
...62). To check the recording media settings Light up the (Movie) lamp to check the recording medium used for movies and photos separately. Types of "Memory Stick" media you can use with : PRO Duo" media)* ("Memory Stick ("Memory Stick Index 62 The recording medium is ...recommended that you use "Memory Stick PRO Duo" media of 1 GB or larger marked with your camcorder. The recording medium is displayed at the top right corner of the screen. : Internal memory : "Memory Stick PRO Duo" media Inserting "Memory Stick PRO Duo" media ...

Handycam® Handbook
Page 63
... PRO Duo" media Open the battery/Memory Stick Duo cover and lightly push the "Memory Stick PRO Duo" media in your camcorder.) "Memory Stick"media (You cannot use it clicks. Close the battery/Memory Stick Duo cover. Access lamp The [Create a new Image Database File.] screen appears if you forcibly insert the...
... PRO Duo" media Open the battery/Memory Stick Duo cover and lightly push the "Memory Stick PRO Duo" media in your camcorder.) "Memory Stick"media (You cannot use it clicks. Close the battery/Memory Stick Duo cover. Access lamp The [Create a new Image Database File.] screen appears if you forcibly insert the...

Handycam® Handbook
Page 65
... flowers while creating a soft background. TWILIGHT PORT. ( ) Enables to adjust for scene condition) The default settings are lit by strong light. LANDSCAPE*( ) PORTRAIT (Soft portrait) ( ) Shoots distant subjects clearly. SPOTLIGHT**( ) Prevents people's faces from focusing on glass or metal.... SCENE SELECTION You can record images effectively in windows between the camcorder and the subject. This setting also prevents your camcorder MANUAL SETTINGS (Items to take photos of people and background using a flash. BEACH** ( ) Takes the vivid blue of fireworks. Index ...
... flowers while creating a soft background. TWILIGHT PORT. ( ) Enables to adjust for scene condition) The default settings are lit by strong light. LANDSCAPE*( ) PORTRAIT (Soft portrait) ( ) Shoots distant subjects clearly. SPOTLIGHT**( ) Prevents people's faces from focusing on glass or metal.... SCENE SELECTION You can record images effectively in windows between the camcorder and the subject. This setting also prevents your camcorder MANUAL SETTINGS (Items to take photos of people and background using a flash. BEACH** ( ) Takes the vivid blue of fireworks. Index ...

Handycam® Handbook
Page 67
...to redo the [ONE PUSH] procedure to readjust the white balance. Index 67 When the white balance has been adjusted and stored in the memory, the indicator stops flashing. Notes Set [WHITE BAL.] to [AUTO] or adjust the color in a studio, or under sodium lamps or ...selected, if keeps flashing after touching , set [WHITE BAL.] to use (or vice versa), select [AUTO] and aim your camcorder at the same time. This function enables you to [AUTO]. If you set [WHITE BAL.], [SCENE SELECTION] is set with [ONE PUSH], if the lighting conditions changed the battery...
...to redo the [ONE PUSH] procedure to readjust the white balance. Index 67 When the white balance has been adjusted and stored in the memory, the indicator stops flashing. Notes Set [WHITE BAL.] to [AUTO] or adjust the color in a studio, or under sodium lamps or ...selected, if keeps flashing after touching , set [WHITE BAL.] to use (or vice versa), select [AUTO] and aim your camcorder at the same time. This function enables you to [AUTO]. If you set [WHITE BAL.], [SCENE SELECTION] is set with [ONE PUSH], if the lighting conditions changed the battery...


