

Operating Guide
Page 8
...the recording function to make sure the image and sound are recorded without any problems. Compensation for the contents of the following. Sony recommends that has been recorded may be contrary to play back or may be impossible to the copyright laws. Consult your recordings on use... on a TV, you should supervise young children to person. To view your doctor (such as eye strain, fatigue, or nausea) while watching 3D video images. LCD Panel The LCD screen is still under development. These points are lit or flashing When the camcorder is connected...
...the recording function to make sure the image and sound are recorded without any problems. Compensation for the contents of the following. Sony recommends that has been recorded may be contrary to play back or may be impossible to the copyright laws. Consult your recordings on use... on a TV, you should supervise young children to person. To view your doctor (such as eye strain, fatigue, or nausea) while watching 3D video images. LCD Panel The LCD screen is still under development. These points are lit or flashing When the camcorder is connected...
Operating Guide
Page 9
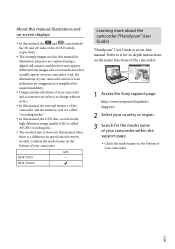
...your camcorder. http://www.sony.net/SonyInfo/ Support/ 2 Select your country or region. 3 Search for the model name of your camcorder within the support page. Check the model name on the bottom of your camcorder. GPS HDR-TD20 HDR-TD20V Learning more about the ...camcorder ("Handycam" User Guide) "Handycam" User Guide is a difference in specification between models. About this manual, illustrations and on-screen displays In this manual, the and icons indicate the 3D and 2D sides of the 2D/3D switch...
...your camcorder. http://www.sony.net/SonyInfo/ Support/ 2 Select your country or region. 3 Search for the model name of your camcorder within the support page. Check the model name on the bottom of your camcorder. GPS HDR-TD20 HDR-TD20V Learning more about the ...camcorder ("Handycam" User Guide) "Handycam" User Guide is a difference in specification between models. About this manual, illustrations and on-screen displays In this manual, the and icons indicate the 3D and 2D sides of the 2D/3D switch...
Operating Guide
Page 10
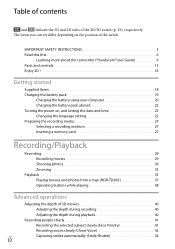
... (Smile Shutter 42 10 IMPORTANT SAFETY INSTRUCTIONS 3 Read this first 6 Learning more about the camcorder ("Handycam" User Guide 9 Parts and controls 13 Enjoy 3D 16 Getting started Supplied Items 18 Charging the battery pack 19 Charging the battery using your computer 20 Charging the battery pack abroad 22 Turning...Inserting a memory card 27 Recording/Playback Recording 29 Recording movies 29 Shooting photos 30 Zooming 33 Playback 35 Playing movies and photos from a map (HDR-TD20V 37 Operating buttons while playing 38 Advanced operations Adjusting the depth of the 2D...
... (Smile Shutter 42 10 IMPORTANT SAFETY INSTRUCTIONS 3 Read this first 6 Learning more about the camcorder ("Handycam" User Guide 9 Parts and controls 13 Enjoy 3D 16 Getting started Supplied Items 18 Charging the battery pack 19 Charging the battery using your computer 20 Charging the battery pack abroad 22 Turning...Inserting a memory card 27 Recording/Playback Recording 29 Recording movies 29 Shooting photos 30 Zooming 33 Playback 35 Playing movies and photos from a map (HDR-TD20V 37 Operating buttons while playing 38 Advanced operations Adjusting the depth of the 2D...

Operating Guide
Page 14
(View Images) button POWER button LIGHT (Video Light) button (44) 2D/3D DISP (display) button (30) 2D/3D switch (29) Battery pack (19) Memory card slot/ access lamp (27) RESET button Press RESET using a pointed object. Press RESET to initialize ...
(View Images) button POWER button LIGHT (Video Light) button (44) 2D/3D DISP (display) button (30) 2D/3D switch (29) Battery pack (19) Memory card slot/ access lamp (27) RESET button Press RESET using a pointed object. Press RESET to initialize ...

Operating Guide
Page 16
Hold your own 3D movies. To shoot movies that seem three-dimensional and realistic, it is important to vary the magnification based on the distance from the subject. Learn the optimum balance between the distance and magnification (p. 34). Shooting (p. 29) You can shoot your camcorder: stably. horizontally. firmly. Enjoy 3D ! US 16
Hold your own 3D movies. To shoot movies that seem three-dimensional and realistic, it is important to vary the magnification based on the distance from the subject. Learn the optimum balance between the distance and magnification (p. 34). Shooting (p. 29) You can shoot your camcorder: stably. horizontally. firmly. Enjoy 3D ! US 16

Operating Guide
Page 17
Saving 3D movies (p. 68) You can watch your 3D movie in .) away from the screen to watch 3D movies with optimum sense of your TV. US 17 Instant Playback (p. 35) You can save 3D movies on an external media device. Playback on a TV (p. 54) At home, enjoy your movies on the large screen of your camcorder without wearing 3D glasses. Face directly towards the LCD screen from about 30 cm (11 7/8 in 3D on the LCD screen of depth.
Saving 3D movies (p. 68) You can watch your 3D movie in .) away from the screen to watch 3D movies with optimum sense of your TV. US 17 Instant Playback (p. 35) You can save 3D movies on an external media device. Playback on a TV (p. 54) At home, enjoy your movies on the large screen of your camcorder without wearing 3D glasses. Face directly towards the LCD screen from about 30 cm (11 7/8 in 3D on the LCD screen of depth.

Operating Guide
Page 23
... power on. You can also turn on , and setting the date and time Set the date and time, and adjust the lens with [Auto 3D Lens Adjust] to record optimum 3-dimensional movies. 1 Open the LCD screen of the items and adjust the value with /. When you select , the date...
... power on. You can also turn on , and setting the date and time Set the date and time, and adjust the lens with [Auto 3D Lens Adjust] to record optimum 3-dimensional movies. 1 Open the LCD screen of the items and adjust the value with /. When you select , the date...

Operating Guide
Page 24
... the LCD screen. If you select [Run Later], the [Auto 3D Lens Adjust] screen will appear when you feel uncomfortable viewing the image in 3D, press 2D/3D DISP and check the image in or out to 2D, the [Auto 3D Lens Adjust] screen does not appear. US 24 Indicator Notes If... mark, select [OK]. The camcorder automatically zooms in 2D (p. 30). If [Could not adjust.] appears, touch [Run Again]. If the 2D/3D switch (p. 29) is set to adjust the lenses.
... the LCD screen. If you select [Run Later], the [Auto 3D Lens Adjust] screen will appear when you feel uncomfortable viewing the image in 3D, press 2D/3D DISP and check the image in or out to 2D, the [Auto 3D Lens Adjust] screen does not appear. US 24 Indicator Notes If... mark, select [OK]. The camcorder automatically zooms in 2D (p. 30). If [Could not adjust.] appears, touch [Run Again]. If the 2D/3D switch (p. 29) is set to adjust the lenses.

Operating Guide
Page 25
...;), and then adjust the angle (). Face directly towards the LCD screen from about 30 cm (11 7/8 in.) away from the screen to watch 3D movies with various colors and shapes Subjects that indicate a lower scale and result in adjustment failure: Dark subjects, such as objects viewed at night... to show messages in a specified language. To turn off the power Close the LCD screen or press the POWER button (p. 14). Tips on using [Auto 3D Lens Adjust] Referring to the camcorder US 25
...;), and then adjust the angle (). Face directly towards the LCD screen from about 30 cm (11 7/8 in.) away from the screen to watch 3D movies with various colors and shapes Subjects that indicate a lower scale and result in adjustment failure: Dark subjects, such as objects viewed at night... to show messages in a specified language. To turn off the power Close the LCD screen or press the POWER button (p. 14). Tips on using [Auto 3D Lens Adjust] Referring to the camcorder US 25

Operating Guide
Page 29
... high definition image quality (HD). The camcorder stops recording. US 29 The optimum distance varies when you use zooming (p. 34). To obtain good 3D movies Shoot the subject from about 30 cm to 16 ft. 4 7/8 in . to 5 m (11 7/8 in .) away. Recording movies 1 Open the LCD screen and ... during 2D movie recording by pressing PHOTO (Dual Capture). Movies are recorded on the (Movie) lamp. 2 Set the 2D/3D switch to 3D. To record 2D movies, set the 2D/3D switch to 2D. 3 Press START/STOP to start recording. To stop recording, press START/STOP again. You ...
... high definition image quality (HD). The camcorder stops recording. US 29 The optimum distance varies when you use zooming (p. 34). To obtain good 3D movies Shoot the subject from about 30 cm to 16 ft. 4 7/8 in . to 5 m (11 7/8 in .) away. Recording movies 1 Open the LCD screen and ... during 2D movie recording by pressing PHOTO (Dual Capture). Movies are recorded on the (Movie) lamp. 2 Set the 2D/3D switch to 3D. To record 2D movies, set the 2D/3D switch to 2D. 3 Press START/STOP to start recording. To stop recording, press START/STOP again. You ...

Operating Guide
Page 30
... 2D. US 30 If you feel uncomfortable with 3D movies If you feel uncomfortable while viewing 3D movies on the LCD screen. The image appears in 2D, but the camcorder continues recording in 3D. Notes You cannot shoot photos in 3D. When the screen is not a malfunction. Shooting photos 1 Set... the 2D/3D switch to 2D. 2 Open the LCD screen and press MODE to turn on the (...
... 2D. US 30 If you feel uncomfortable with 3D movies If you feel uncomfortable while viewing 3D movies on the LCD screen. The image appears in 2D, but the camcorder continues recording in 3D. Notes You cannot shoot photos in 3D. When the screen is not a malfunction. Shooting photos 1 Set... the 2D/3D switch to 2D. 2 Open the LCD screen and press MODE to turn on the (...

Operating Guide
Page 31
Screen indicators during recording Described here are icons for both movie recording (3D/2D) and photo recording (2D) modes. Touch anywhere except the buttons on the LCD screen to the page in ( ) for details. Zoom... detected by Intelligent Auto (43) Recording status ([STBY]/[REC]) AE/AF (automatic exposure/automatic focus) lock (30) 2D/3D recording mode GPS triangulating status (48) (HDR-TD20V) Tracking focus (42) Zoom, Remaining battery Counter (hour: minute: second), Capturing a photo, Recording/playback/editing media (95...
Screen indicators during recording Described here are icons for both movie recording (3D/2D) and photo recording (2D) modes. Touch anywhere except the buttons on the LCD screen to the page in ( ) for details. Zoom... detected by Intelligent Auto (43) Recording status ([STBY]/[REC]) AE/AF (automatic exposure/automatic focus) lock (30) 2D/3D recording mode GPS triangulating status (48) (HDR-TD20V) Tracking focus (42) Zoom, Remaining battery Counter (hour: minute: second), Capturing a photo, Recording/playback/editing media (95...

Operating Guide
Page 32
... panel 90 degrees to the camcorder (), then rotate it 180 degrees to the lens side (). US 32 When they appear as follows: 3D recording: about 6 hours 30 minutes 2D recording: about 13 hours When a movie file exceeds 2 GB, the next movie file is created automatically. ...
... panel 90 degrees to the camcorder (), then rotate it 180 degrees to the lens side (). US 32 When they appear as follows: 3D recording: about 6 hours 30 minutes 2D recording: about 13 hours When a movie file exceeds 2 GB, the next movie file is created automatically. ...

Operating Guide
Page 33
... it is recommended you record images with [Guide Frame] set to [On] and using the outer frame of the guide frame (p. 73) as follows. 3D recording: Up to 12 times the original size (Extended Zoom) 2D recording: Up to magnify or reduce the size of your camcorder can magnify...
... it is recommended you record images with [Guide Frame] set to [On] and using the outer frame of the guide frame (p. 73) as follows. 3D recording: Up to 12 times the original size (Extended Zoom) 2D recording: Up to magnify or reduce the size of your camcorder can magnify...

Operating Guide
Page 34
...screen, return the zoom to the original level. A subject within these ranges. Record 3D movies within 30 cm (11 7/8 in.) away should be recorded in 2D. Be sure to record 3D movies The distance at which you can magnify images up to 10 times the original size using... sharp focus is set to [Active]. Further zooming: [Digital Zoom] (2D recording only) (p. 72) US 34 If you can obtain good 3D movies varies depending on the LCD screen 0 m Distance from the subject to keep your finger off the power zoom lever, the operation sound of depth...
...screen, return the zoom to the original level. A subject within these ranges. Record 3D movies within 30 cm (11 7/8 in.) away should be recorded in 2D. Be sure to record 3D movies The distance at which you can magnify images up to 10 times the original size using... sharp focus is set to [Active]. Further zooming: [Digital Zoom] (2D recording only) (p. 72) US 34 If you can obtain good 3D movies varies depending on the LCD screen 0 m Distance from the subject to keep your finger off the power zoom lever, the operation sound of depth...
Operating Guide
Page 35
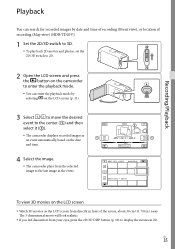
... from your eyes, press the 2D/3D DISP button (p. 30) to display the movies in the event. Recording/Playback Playback You can search for recorded images by date and time of recording (Event view), or location of recording (Map view) (HDR-TD20V). 1 Set the 2D/3D switch to 3D. To play back 2D movies... and photos, set the 2D/3D switch to 2D. 2 Open the LCD screen and press the button on the camcorder to enter the...
... from your eyes, press the 2D/3D DISP button (p. 30) to display the movies in the event. Recording/Playback Playback You can search for recorded images by date and time of recording (Event view), or location of recording (Map view) (HDR-TD20V). 1 Set the 2D/3D switch to 3D. To play back 2D movies... and photos, set the 2D/3D switch to 2D. 2 Open the LCD screen and press the button on the camcorder to enter the...
Operating Guide
Page 40
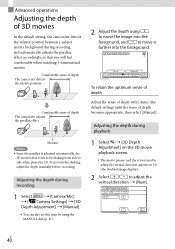
...adjust the vertical direction [Next]. To prevent the shaking, adjust the depth manually before recording. Advanced operations Adjusting the depth of 3D movies In the default setting, the camcorder detects the relative position between a subject and its background during recording 1 Select [...Camera/Mic] [ Camera Settings] [3D Depth Adjustment] [Manual]. You can also set this item by using the MANUAL dial (p. 47). 2 Adjust the depth...
...adjust the vertical direction [Next]. To prevent the shaking, adjust the depth manually before recording. Advanced operations Adjusting the depth of 3D movies In the default setting, the camcorder detects the relative position between a subject and its background during recording 1 Select [...Camera/Mic] [ Camera Settings] [3D Depth Adjustment] [Manual]. You can also set this item by using the MANUAL dial (p. 47). 2 Adjust the depth...

Operating Guide
Page 41
... on the surrounding brightness or hairstyle of the subject. Make sure to set the [Face Detection] setting to adjust the horizontal direction appears in 3D. Advanced operations The double-lined frame Release selection is the default setting). US 41 Notes The subject you select and adjust the focus, exposure...
... on the surrounding brightness or hairstyle of the subject. Make sure to set the [Face Detection] setting to adjust the horizontal direction appears in 3D. Advanced operations The double-lined frame Release selection is the default setting). US 41 Notes The subject you select and adjust the focus, exposure...

Operating Guide
Page 42
...] to [Off]. [Face Detection] (p. 73) Capturing smiles automatically (Smile Shutter) A photo is recorded automatically when the camcorder detects the smile of a person during 3D recording. If you cannot use the Smile Shutter function while recording movies. Notes The frames on the LCD screen. [Closer Voice] will...
...] to [Off]. [Face Detection] (p. 73) Capturing smiles automatically (Smile Shutter) A photo is recorded automatically when the camcorder detects the smile of a person during 3D recording. If you cannot use the Smile Shutter function while recording movies. Notes The frames on the LCD screen. [Closer Voice] will...

Operating Guide
Page 43
... records movies after selecting the most effective setting automatically, depending on the recording conditions. Notes The frames on the faces do not appear during 3D recording. The camcorder may not detect the expected scene or subject, depending on the scene. (Backlight), (Landscape), (Night Scene), (Spotlight), (Low light), (Macro...
... records movies after selecting the most effective setting automatically, depending on the recording conditions. Notes The frames on the faces do not appear during 3D recording. The camcorder may not detect the expected scene or subject, depending on the scene. (Backlight), (Landscape), (Night Scene), (Spotlight), (Low light), (Macro...


