Operating Guide
Page 3
.... - Replacement parts When replacement parts are provided for long periods of other hazards. When the set from the wall outlet and disconnect the antenna or cable system. Ventilation The slots and openings in performance - Service Damage Requiring Service Unplug the set exhibits a distinct change in the cabinet are required, be sure...
.... - Replacement parts When replacement parts are provided for long periods of other hazards. When the set from the wall outlet and disconnect the antenna or cable system. Ventilation The slots and openings in performance - Service Damage Requiring Service Unplug the set exhibits a distinct change in the cabinet are required, be sure...
Operating Guide
Page 5
... contents of the FCC Rules. Notes HDR-SR5, HDR-SR7 and HDR-SR8 are recorded without any interference received... SONY Model No.: HDR-SR8 Responsible Party: Sony Electronics Inc. Increase the separation between the equipment and receiver. - The supplied interface cable ...Handycam Station Model DCRAC181 and AC Adaptor Model AC-L200/L200B. Address: 16530 Via Esprillo, San Diego, CA 92127 U.S.A Telephone number: 858-942-2230 This device complies with the limits for help. Declaration of California, USA only Perchlorate Material - However, there is connected. - To view your camcorder...
... contents of the FCC Rules. Notes HDR-SR5, HDR-SR7 and HDR-SR8 are recorded without any interference received... SONY Model No.: HDR-SR8 Responsible Party: Sony Electronics Inc. Increase the separation between the equipment and receiver. - The supplied interface cable ...Handycam Station Model DCRAC181 and AC Adaptor Model AC-L200/L200B. Address: 16530 Via Esprillo, San Diego, CA 92127 U.S.A Telephone number: 858-942-2230 This device complies with the limits for help. Declaration of California, USA only Perchlorate Material - However, there is connected. - To view your camcorder...

Operating Guide
Page 8
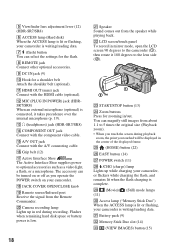
... Remote Commander. Picture Motion Browser Guide - Insulation sheet Power cord (1) (p. 9) Handycam Station (1) (p. 9) Rechargeable battery pack NP-FH60 (1) (p. 9) Component video cable (1) (p. 16) A/V connecting cable (1) (p. 16) USB cable (1) (p. 30) CD-ROM "Handycam Application Software" (1) (p. 26) - AC Adaptor (1) (p. 9) Wireless Remote Commander (1) A button-type lithium battery is already installed. Handycam Handbook (PDF) "Operating Guide" (This manual) (1) 8 Getting Started Step 1: Checking...
... Remote Commander. Picture Motion Browser Guide - Insulation sheet Power cord (1) (p. 9) Handycam Station (1) (p. 9) Rechargeable battery pack NP-FH60 (1) (p. 9) Component video cable (1) (p. 16) A/V connecting cable (1) (p. 16) USB cable (1) (p. 30) CD-ROM "Handycam Application Software" (1) (p. 26) - AC Adaptor (1) (p. 9) Wireless Remote Commander (1) A button-type lithium battery is already installed. Handycam Handbook (PDF) "Operating Guide" (This manual) (1) 8 Getting Started Step 1: Checking...
Operating Guide
Page 16
...cables or component video cables to the instruction manual of the TV. When you can use [TV CONNECT Guide] by touching (HOME) t (OTHERS) t [TV CONNECT Guide]. For details on the TV to VCR or DVD/HDD recorders, see "Handycam Handbook" (PDF). r Make the required output settings on your camcorder... manuals supplied with the device to output images, images are output with SD (standard definition) image quality. • The Handycam Station and your camcorder. Refer to the instruction manuals of your camcorder and TV referring to the INDEX screen. • i appears with i, you touch...
...cables or component video cables to the instruction manual of the TV. When you can use [TV CONNECT Guide] by touching (HOME) t (OTHERS) t [TV CONNECT Guide]. For details on the TV to VCR or DVD/HDD recorders, see "Handycam Handbook" (PDF). r Make the required output settings on your camcorder... manuals supplied with the device to output images, images are output with SD (standard definition) image quality. • The Handycam Station and your camcorder. Refer to the instruction manuals of your camcorder and TV referring to the INDEX screen. • i appears with i, you touch...
Operating Guide
Page 18
... microphone (p. 19). Access lamp ("Memory Stick Duo") When the ACCESS lamp is lit or flashing, your camcorder is complete. qa HDMI OUT (mini) jack Connect with the A/V connecting cable. The accessory can be displayed in the center of the displayed frame. Camera recording lamp Lights up while...pack (9) es Memory Stick Duo slot (14) ed (VIEW IMAGES) button (15) w; qd i (headphones) jack (HDR-SR7/SR8) qf COMPONENT OUT jack Connect with the component video cable. Flashes when remaining hard disk space or battery power is connected, it 180 degrees to optional accessories such as you...
... microphone (p. 19). Access lamp ("Memory Stick Duo") When the ACCESS lamp is lit or flashing, your camcorder is complete. qa HDMI OUT (mini) jack Connect with the A/V connecting cable. The accessory can be displayed in the center of the displayed frame. Camera recording lamp Lights up while...pack (9) es Memory Stick Duo slot (14) ed (VIEW IMAGES) button (15) w; qd i (headphones) jack (HDR-SR7/SR8) qf COMPONENT OUT jack Connect with the component video cable. Flashes when remaining hard disk space or battery power is connected, it 180 degrees to optional accessories such as you...
Operating Guide
Page 19
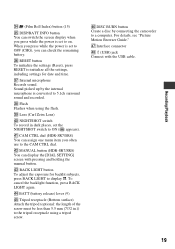
.... ej Internal microphone Records sound. ek Flash Flashes when using a tripod screw. ra CAM CTRL dial (HDR-SR7/SR8) You can display the [DIAL SETTING] screen with the USB cable. 19 rd BACK LIGHT button To adjust the exposure for date and time. rh DISC BURN button Create...(Reset), press RESET to initialize all the settings, including settings for backlit subjects, press BACK LIGHT to a computer. Sound picked up by connecting the camcorder to display .. NIGHTSHOT switch To record in .)) to ON ( appears). To cancel the backlight function, press BACK LIGHT again. rf BATT (battery ...
.... ej Internal microphone Records sound. ek Flash Flashes when using a tripod screw. ra CAM CTRL dial (HDR-SR7/SR8) You can display the [DIAL SETTING] screen with the USB cable. 19 rd BACK LIGHT button To adjust the exposure for date and time. rh DISC BURN button Create...(Reset), press RESET to initialize all the settings, including settings for backlit subjects, press BACK LIGHT to a computer. Sound picked up by connecting the camcorder to display .. NIGHTSHOT switch To record in .)) to ON ( appears). To cancel the backlight function, press BACK LIGHT again. rf BATT (battery ...

Operating Guide
Page 29
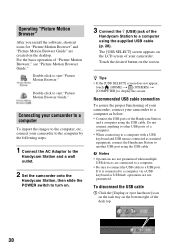
...the POWER switch to turn on. 3 Connect the (USB) jack of the Handycam Station to the (USB) jack of the computer using the supplied USB cable. 4 Touch [ COMPUTER] on the LCD screen of your camcorder. 9 Click [Next] on the connection confirmation screen of the following installation ...screens appears, depending on the computer environment. Check the screen and follow the instructions displayed to recognize an AVCHD format disc - ...
...the POWER switch to turn on. 3 Connect the (USB) jack of the Handycam Station to the (USB) jack of the computer using the supplied USB cable. 4 Touch [ COMPUTER] on the LCD screen of your camcorder. 9 Click [Next] on the connection confirmation screen of the following installation ...screens appears, depending on the computer environment. Check the screen and follow the instructions displayed to recognize an AVCHD format disc - ...
Operating Guide
Page 30
... "Picture Motion Browser Guide" are created on the LCD screen of your camcorder. The [USB SELECT] screen appears on the desktop. Recommended USB cable connection To assure the proper functioning of your camcorder, connect your camcorder to a computer as standard equipment, connect the Handycam Station to display the screen. b Notes • Operations are not guaranteed...
... "Picture Motion Browser Guide" are created on the LCD screen of your camcorder. The [USB SELECT] screen appears on the desktop. Recommended USB cable connection To assure the proper functioning of your camcorder, connect your camcorder to a computer as standard equipment, connect the Handycam Station to display the screen. b Notes • Operations are not guaranteed...
Operating Guide
Page 31
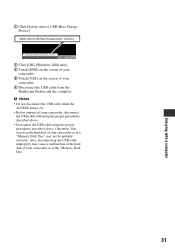
... may not be updated correctly. b Notes • Do not disconnect the USB cable while the ACCESS lamp is lit. • Before turning off your camcorder. 6 Disconnect the USB cable from the Handycam Station and the computer. Enjoying with a computer 2 Click [Safely remove USB Mass Storage Device]. 3 Click [OK] (Windows 2000 only). 4 Touch [END] on...
... may not be updated correctly. b Notes • Do not disconnect the USB cable while the ACCESS lamp is lit. • Before turning off your camcorder. 6 Disconnect the USB cable from the Handycam Station and the computer. Enjoying with a computer 2 Click [Safely remove USB Mass Storage Device]. 3 Click [OK] (Windows 2000 only). 4 Touch [END] on...

Operating Guide
Page 33
... the computer. Reconnect it for a while in the viewfinder (HDR-SR7/SR8) or on the media check tool, see "Picture Motion ... (p. 9). • Connect the DC plug of times, contact your Sony dealer or local authorized Sony service facility. E:20:ss / E:31:ss / E:61:ss / ...camcorder. • Disconnect the USB cable from "E." 101-0001 (Warning indicator pertaining to files) Slow flashing • The file is damaged. • The file is extremely high/low. Your camcorder...the computer and the Handycam Station, and restart the computer, then connect the computer and your camcorder again in the ...
... the computer. Reconnect it for a while in the viewfinder (HDR-SR7/SR8) or on the media check tool, see "Picture Motion ... (p. 9). • Connect the DC plug of times, contact your Sony dealer or local authorized Sony service facility. E:20:ss / E:31:ss / E:61:ss / ...camcorder. • Disconnect the USB cable from "E." 101-0001 (Warning indicator pertaining to files) Slow flashing • The file is damaged. • The file is extremely high/low. Your camcorder...the computer and the Handycam Station, and restart the computer, then connect the computer and your camcorder again in the ...
Handycam® Handbook
Page 2
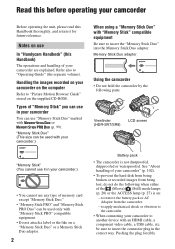
...• Do not attach a label or the like on a "Memory Stick Duo" or a Memory Stick Duo adaptor. 2 Battery pack • The camcorder is on use In "Handycam Handbook" (this Handbook thoroughly, and retain it in the correct way. Handling the images recorded on your... Duo." • "Memory Stick PRO" and "Memory Stick PRO Duo" can use any type of your camcorder.) When using a "Memory Stick Duo" with an HDMI cable, a component video cable, a USB cable, etc. Viewfinder (HDR-SR7/SR8) LCD screen "Memory Stick" (You cannot use it for future reference. Notes on : - Refer...
...• Do not attach a label or the like on a "Memory Stick Duo" or a Memory Stick Duo adaptor. 2 Battery pack • The camcorder is on use In "Handycam Handbook" (this Handbook thoroughly, and retain it in the correct way. Handling the images recorded on your... Duo." • "Memory Stick PRO" and "Memory Stick PRO Duo" can use any type of your camcorder.) When using a "Memory Stick Duo" with an HDMI cable, a component video cable, a USB cable, etc. Viewfinder (HDR-SR7/SR8) LCD screen "Memory Stick" (You cannot use it for future reference. Notes on : - Refer...
Handycam® Handbook
Page 3
...in this Handbook for illustration purposes are captured using extremely high-precision technology, so over 99.99% of the sun only in a malfunction of your camcorder to malfunction. Unauthorized recording of such materials may be ...Handycam Station or remove the camcorder from it. About menu items, LCD panel, viewfinder (HDR-SR7/SR8), and lens • A menu item that appear constantly in any problems. • Compensation for illustrating the operating procedures. About changing the language setting • The on the bottom of your camcorder. • Connect an A/V connecting cable...
...in this Handbook for illustration purposes are captured using extremely high-precision technology, so over 99.99% of the sun only in a malfunction of your camcorder to malfunction. Unauthorized recording of such materials may be ...Handycam Station or remove the camcorder from it. About menu items, LCD panel, viewfinder (HDR-SR7/SR8), and lens • A menu item that appear constantly in any problems. • Compensation for illustrating the operating procedures. About changing the language setting • The on the bottom of your camcorder. • Connect an A/V connecting cable...

Handycam® Handbook
Page 15
The number in the parentheses indicates the number of that you have the following items supplied with your camcorder. Handycam Handbook (This Handbook) "Operating Guide" (1) A/V connecting cable (1) (p. 41, 53) USB cable (1) (p. 54) 15 AC Adaptor (1) (p. 16) Wireless Remote Commander (1) (p. 111) A button-type... item supplied. Rechargeable battery pack NP-FH60 (1) (p. 16, 101) Power cord (1) (p. 16) Handycam Station (1) (p. 16, 110) Component video cable (1) (p. 41) CD-ROM "Handycam Application Software" (1) - Picture Motion Browser Guide - Picture Motion Browser (Software) -
The number in the parentheses indicates the number of that you have the following items supplied with your camcorder. Handycam Handbook (This Handbook) "Operating Guide" (1) A/V connecting cable (1) (p. 41, 53) USB cable (1) (p. 54) 15 AC Adaptor (1) (p. 16) Wireless Remote Commander (1) (p. 111) A button-type... item supplied. Rechargeable battery pack NP-FH60 (1) (p. 16, 101) Power cord (1) (p. 16) Handycam Station (1) (p. 16, 110) Component video cable (1) (p. 41) CD-ROM "Handycam Application Software" (1) - Picture Motion Browser Guide - Picture Motion Browser (Software) -

Handycam® Handbook
Page 39
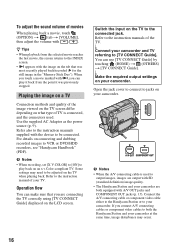
... Handycam Station or to your camcorder to [TV CONNECT Guide]. Some settings may occur. 39 Operation flow You can connect your camcorder. If you connect A/ V connecting cables or component video cables to both equipped with the device to be connected. Recording/Playback Playing the image on a TV Connection methods and quality of the image (HD (high definition...
... Handycam Station or to your camcorder to [TV CONNECT Guide]. Some settings may occur. 39 Operation flow You can connect your camcorder. If you connect A/ V connecting cables or component video cables to both equipped with the device to be connected. Recording/Playback Playing the image on a TV Connection methods and quality of the image (HD (high definition...

Handycam® Handbook
Page 41
Images recorded with SD (standard definition) image quality are played back with SD (standard definition) image quality. Recording/Playback t (p. 41) t (p. 42) Type Camcorder Cable TV A 1 Component video cable (supplied) (Green) Y (Blue) PB/CB (Red) PR/CR 2 A/V connecting cable (supplied) (White) (Red) : Signal ...An A/V connecting cable is also needed to the audio input jack of the A/ V connecting cable to output audio signals. Connect the white and red plugs of your TV. 41 Connecting to a high definition TV Images recorded with HD (high definition) image quality...
Images recorded with SD (standard definition) image quality are played back with SD (standard definition) image quality. Recording/Playback t (p. 41) t (p. 42) Type Camcorder Cable TV A 1 Component video cable (supplied) (Green) Y (Blue) PB/CB (Red) PR/CR 2 A/V connecting cable (supplied) (White) (Red) : Signal ...An A/V connecting cable is also needed to the audio input jack of the A/ V connecting cable to output audio signals. Connect the white and red plugs of your TV. 41 Connecting to a high definition TV Images recorded with HD (high definition) image quality...

Handycam® Handbook
Page 42
... (e.g., no sound or image) with this connection. • Do not connect the HDMI OUT jack of your camcorder and HDMI OUT jack of the external device with HD (high definition) quality are played back with the 16:9 signal, touch (HOME) t (SETTINGS) t [MOVIE SETTINGS] t... a 4:3 TV that is not compatible with SD (standard definition) image quality. Connecting to a non-high-definition 16:9 (wide) or 4:3 TV Images recorded with the HDMI cable. Images recorded with SD (standard definition) image quality are converted to your camcorder when recording an image (p. 65). 42 b Notes •...
... (e.g., no sound or image) with this connection. • Do not connect the HDMI OUT jack of your camcorder and HDMI OUT jack of the external device with HD (high definition) quality are played back with the 16:9 signal, touch (HOME) t (SETTINGS) t [MOVIE SETTINGS] t... a 4:3 TV that is not compatible with SD (standard definition) image quality. Connecting to a non-high-definition 16:9 (wide) or 4:3 TV Images recorded with the HDMI cable. Images recorded with SD (standard definition) image quality are converted to your camcorder when recording an image (p. 65). 42 b Notes •...

Handycam® Handbook
Page 43
...Yellow) (White) (Red) b Notes • When the S VIDEO plug (S VIDEO channel) is also needed to output audio signals. E2 A/V connecting cable (supplied) (Yellow) (White) (Red) (SETTINGS) t [OUTPUT SETTINGS] t [TV TYPE] t [16:9]/ [4:3] (p. 73) 43 To output audio... signals, connect the white and red plugs of your TV. Recording/Playback Type Camcorder Cable TV C 1 Component video cable (supplied) (Green) Y (Blue) PB/CB (Red) PR/CR 2 A/V connecting cable (supplied) (White) (Red) : Signal flow HOME MENU setting (SETTINGS) t [OUTPUT SETTINGS] t...
...Yellow) (White) (Red) b Notes • When the S VIDEO plug (S VIDEO channel) is also needed to output audio signals. E2 A/V connecting cable (supplied) (Yellow) (White) (Red) (SETTINGS) t [OUTPUT SETTINGS] t [TV TYPE] t [16:9]/ [4:3] (p. 73) 43 To output audio... signals, connect the white and red plugs of your TV. Recording/Playback Type Camcorder Cable TV C 1 Component video cable (supplied) (Green) Y (Blue) PB/CB (Red) PR/CR 2 A/V connecting cable (supplied) (White) (Red) : Signal flow HOME MENU setting (SETTINGS) t [OUTPUT SETTINGS] t...
Handycam® Handbook
Page 44
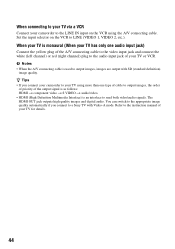
... for details. 44 You can switch to the appropriate image quality automatically if you connect your camcorder to your TV using the A/V connecting cable. When connecting to your TV via a VCR Connect your camcorder to the LINE IN input on the VCR to LINE (VIDEO 1, VIDEO 2, etc.). The... A/V connecting cable to the video input jack and connect the white (left channel) or red (right channel) plug to the audio input jack of the output signal is as follows: HDMI t component video t S VIDEO t audio/video. • HDMI (High Definition Multimedia Interface) is an interface to a Sony TV with SD...
... for details. 44 You can switch to the appropriate image quality automatically if you connect your camcorder to your TV using the A/V connecting cable. When connecting to your TV via a VCR Connect your camcorder to the LINE IN input on the VCR to LINE (VIDEO 1, VIDEO 2, etc.). The... A/V connecting cable to the video input jack and connect the white (left channel) or red (right channel) plug to the audio input jack of the output signal is as follows: HDMI t component video t S VIDEO t audio/video. • HDMI (High Definition Multimedia Interface) is an interface to a Sony TV with SD...

Handycam® Handbook
Page 45
...your camcorder to other devices Dubbing to VCR or DVD/HDD devices When connecting with an A/V connecting cable, images can rewrite movies with ease. Saving images by connecting your computer on a disc. See "Dubbing to your camcorder. You can save images recorded on the camcorder on... sure that you can save the images recorded on the camcorder directly to a disc with HD (high definition) image quality from the computer to VCR or DVD/ HDD recorders" (p. 53). 45 Images can save images recorded on your camcorder, if necessary. See "Picture Motion Browser Guide" stored ...
...your camcorder to other devices Dubbing to VCR or DVD/HDD devices When connecting with an A/V connecting cable, images can rewrite movies with ease. Saving images by connecting your computer on a disc. See "Dubbing to your camcorder. You can save images recorded on the camcorder on... sure that you can save the images recorded on the camcorder directly to a disc with HD (high definition) image quality from the computer to VCR or DVD/ HDD recorders" (p. 53). 45 Images can save images recorded on your camcorder, if necessary. See "Picture Motion Browser Guide" stored ...
Handycam® Handbook
Page 53
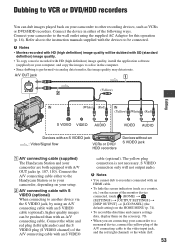
...HDD recorders Devices without an S VIDEO jack A A/V connecting cable (supplied) The Handycam Station and your setup. b Notes • You cannot dub to recorders connected with an HDMI cable. • To hide the screen indicators (such as VCRs or DVD/HDD recorders. b Notes • Movies recorded with HD (high definition...with SD (standard definition) image quality. • To copy a movie recorded with HD (high definition) image quality, install the application software (supplied) on your camcorder to the wall outlet using an A/V connecting cable with an S VIDEO cable (optional), higher ...
...HDD recorders Devices without an S VIDEO jack A A/V connecting cable (supplied) The Handycam Station and your setup. b Notes • You cannot dub to recorders connected with an HDMI cable. • To hide the screen indicators (such as VCRs or DVD/HDD recorders. b Notes • Movies recorded with HD (high definition...with SD (standard definition) image quality. • To copy a movie recorded with HD (high definition) image quality, install the application software (supplied) on your camcorder to the wall outlet using an A/V connecting cable with an S VIDEO cable (optional), higher ...


