Operating Guide
Page 5
... being lost, do not do the following when either of FCC Rules. Notes HDR-SR5, HDR-SR7 and HDR-SR8 are cautioned that interference will damage the terminal and may result in order to... Connect the equipment into the terminal will not occur in this manual could void your recordings on a circuit different from the camcorder. - For the State of Conformity Trade Name: SONY Model No.: HDR-SR8 Responsible Party: Sony ... 858-942-2230 This device complies with the Handycam Station Model DCRAC181 and AC Adaptor Model AC-L200/L200B. Declaration of California, USA only Perchlorate Material -
... being lost, do not do the following when either of FCC Rules. Notes HDR-SR5, HDR-SR7 and HDR-SR8 are cautioned that interference will damage the terminal and may result in order to... Connect the equipment into the terminal will not occur in this manual could void your recordings on a circuit different from the camcorder. - For the State of Conformity Trade Name: SONY Model No.: HDR-SR8 Responsible Party: Sony ... 858-942-2230 This device complies with the Handycam Station Model DCRAC181 and AC Adaptor Model AC-L200/L200B. Declaration of California, USA only Perchlorate Material -
Operating Guide
Page 6
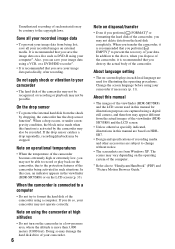
... Refer also to "Handycam Handbook" (PDF) and "Picture Motion Browser Guide." In this function is activated by dropping, the camcorder has the drop sensor...-pressure area, where the altitude is connected to a computer • Do not try to the protection features of the camcorder may not be recognized, or recording...camcorder may not be stopped. Note on using your recorded images on the LCD screen (p. 33). Save all your camcorder if necessary (p. 11). Change the screen language before using the camcorder at high altitudes • Do not turn on the camcorder in the viewfinder (HDR...
... Refer also to "Handycam Handbook" (PDF) and "Picture Motion Browser Guide." In this function is activated by dropping, the camcorder has the drop sensor...-pressure area, where the altitude is connected to a computer • Do not try to the protection features of the camcorder may not be recognized, or recording...camcorder may not be stopped. Note on using your recorded images on the LCD screen (p. 33). Save all your camcorder if necessary (p. 11). Change the screen language before using the camcorder at high altitudes • Do not turn on the camcorder in the viewfinder (HDR...

Operating Guide
Page 8
...number in the parentheses indicates the number of that you have the following items supplied with your camcorder. Handycam Handbook (PDF) "Operating Guide" (This manual) (1) 8 Remove the insulation sheet before using...1: Checking supplied items Make sure that item supplied. Insulation sheet Power cord (1) (p. 9) Handycam Station (1) (p. 9) Rechargeable battery pack NP-FH60 (1) (p. 9) Component video cable (1) (p. 16) A/V connecting cable (1) (p. 16) USB cable (1) (p. 30) CD-ROM "Handycam Application Software" (1) (p. 26) - Picture Motion Browser (Software) - AC Adaptor (1) ...
...number in the parentheses indicates the number of that you have the following items supplied with your camcorder. Handycam Handbook (PDF) "Operating Guide" (This manual) (1) 8 Remove the insulation sheet before using...1: Checking supplied items Make sure that item supplied. Insulation sheet Power cord (1) (p. 9) Handycam Station (1) (p. 9) Rechargeable battery pack NP-FH60 (1) (p. 9) Component video cable (1) (p. 16) A/V connecting cable (1) (p. 16) USB cable (1) (p. 30) CD-ROM "Handycam Application Software" (1) (p. 26) - Picture Motion Browser (Software) - AC Adaptor (1) ...
Operating Guide
Page 9
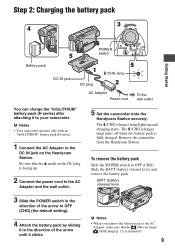
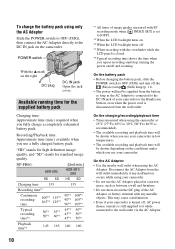
... cord to the AC Adaptor and the wall outlet. 5 Set the camcorder onto the Handycam Station securely. b Notes • Your camcorder operates only with an "InfoLITHIUM" battery pack (H series). 1 Connect the AC Adaptor to your camcorder. b Notes • When you remove the battery pack or the ...AC Adaptor, make sure that the v mark on the Handycam Station. Remove the camcorder from the Handycam Station. Step 2: Charging the battery pack 3 4...
... cord to the AC Adaptor and the wall outlet. 5 Set the camcorder onto the Handycam Station securely. b Notes • Your camcorder operates only with an "InfoLITHIUM" battery pack (H series). 1 Connect the AC Adaptor to your camcorder. b Notes • When you remove the battery pack or the ...AC Adaptor, make sure that the v mark on the Handycam Station. Remove the camcorder from the Handycam Station. Step 2: Charging the battery pack 3 4...
Operating Guide
Page 10
... time (min.) available when you use your camcorder or the Handycam Station, even when the power cord is still supplied to it while connected to 86°F) is closed. *5 Typical ...will be shorter depending on the camcorder. On the charging/recording/playback time • Times measured when using your camcorder. NP-FH60: HDR-SR5 HD SD (Unit:min.) HDR-SR7/ SR8 HD SD Charging ... pack. "HD" stands for high definition image quality, and "SD" stands for the supplied battery pack Charging time: Approximate time (min.) required when you use your camcorder. • Do not use ...
... time (min.) available when you use your camcorder or the Handycam Station, even when the power cord is still supplied to it while connected to 86°F) is closed. *5 Typical ...will be shorter depending on the camcorder. On the charging/recording/playback time • Times measured when using your camcorder. NP-FH60: HDR-SR5 HD SD (Unit:min.) HDR-SR7/ SR8 HD SD Charging ... pack. "HD" stands for high definition image quality, and "SD" stands for the supplied battery pack Charging time: Approximate time (min.) required when you use your camcorder. • Do not use ...
Operating Guide
Page 16
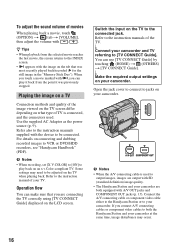
... SD (standard definition) image quality. • The Handycam Station and your camcorder are connecting the TV correctly using [TV CONNECT Guide] displayed on the TV when playing back. Connect the A/V connecting cable or component video cable either to the Handycam Station or to your camcorder and TV referring to VCR or DVD/HDD recorders, see "Handycam Handbook" (PDF). r Connect your camcorder. Refer to...
... SD (standard definition) image quality. • The Handycam Station and your camcorder are connecting the TV correctly using [TV CONNECT Guide] displayed on the TV when playing back. Connect the A/V connecting cable or component video cable either to the Handycam Station or to your camcorder and TV referring to VCR or DVD/HDD recorders, see "Handycam Handbook" (PDF). r Connect your camcorder. Refer to...
Operating Guide
Page 18
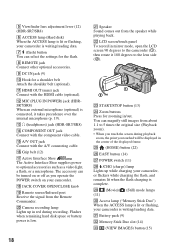
...complete. Access lamp ("Memory Stick Duo") When the ACCESS lamp is lit or flashing, your camcorder is connected, it 180 degrees to optional accessories such as you touched will be turned on your camcorder. qs MIC (PLUG IN POWER) jack (HDRSR7/SR8) When an external microphone (optional) is...) jack Connect with the HDMI cable (optional). wd START/STOP button (13) wf Zoom buttons Press for a shoulder belt Attach the shoulder belt (optional). 5 Viewfinder lens adjustment lever (12) (HDR-SR7/SR8) 6 ACCESS lamp (Hard disk) When the ACCESS lamp is lit or flashing, your camcorder is writing...
...complete. Access lamp ("Memory Stick Duo") When the ACCESS lamp is lit or flashing, your camcorder is connected, it 180 degrees to optional accessories such as you touched will be turned on your camcorder. qs MIC (PLUG IN POWER) jack (HDRSR7/SR8) When an external microphone (optional) is...) jack Connect with the HDMI cable (optional). wd START/STOP button (13) wf Zoom buttons Press for a shoulder belt Attach the shoulder belt (optional). 5 Viewfinder lens adjustment lever (12) (HDR-SR7/SR8) 6 ACCESS lamp (Hard disk) When the ACCESS lamp is lit or flashing, your camcorder is writing...
Operating Guide
Page 19
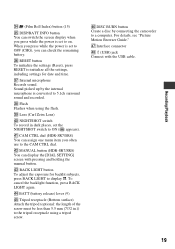
... the [DIAL SETTING] screen with the USB cable. 19 To cancel the backlight function, press BACK LIGHT again. ra CAM CTRL dial (HDR-SR7/SR8) You can assign one menu item you can check the remaining battery. For details, see "Picture Motion Browser Guide." rj Interface...can switch the screen display when you press while the power is converted to 5.1ch surround sound and recorded. Sound picked up by connecting the camcorder to display .. eh RESET button To initialize the settings (Reset), press RESET to initialize all the settings, including settings for backlit subjects...
... the [DIAL SETTING] screen with the USB cable. 19 To cancel the backlight function, press BACK LIGHT again. ra CAM CTRL dial (HDR-SR7/SR8) You can assign one menu item you can check the remaining battery. For details, see "Picture Motion Browser Guide." rj Interface...can switch the screen display when you press while the power is converted to 5.1ch surround sound and recorded. Sound picked up by connecting the camcorder to display .. eh RESET button To initialize the settings (Reset), press RESET to initialize all the settings, including settings for backlit subjects...
Operating Guide
Page 21
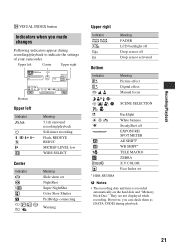
...MICREF LEVEL low WIDE SELECT Meaning Slide show set NightShot Super NightShot Color Slow Shutter PictBridge connecting Warning Upper right Indicator Bottom Indicator 9 Meaning FADER LCD backlight off Drop sensor off EXPOSURE.../ SPOT METER AE SHIFT* WB SHIFT* TELE MACRO ZEBRA X.V.COLOR Face Index set * HDR-SR7/SR8 b Notes • The recording date and time is recorded automatically on the hard ...recording/playback to indicate the settings of your camcorder. n Backlight White balance SteadyShot off Drop sensor activated Meaning Picture effect Digital effect Manual focus SCENE...
...MICREF LEVEL low WIDE SELECT Meaning Slide show set NightShot Super NightShot Color Slow Shutter PictBridge connecting Warning Upper right Indicator Bottom Indicator 9 Meaning FADER LCD backlight off Drop sensor off EXPOSURE.../ SPOT METER AE SHIFT* WB SHIFT* TELE MACRO ZEBRA X.V.COLOR Face Index set * HDR-SR7/SR8 b Notes • The recording date and time is recorded automatically on the hard ...recording/playback to indicate the settings of your camcorder. n Backlight White balance SteadyShot off Drop sensor activated Meaning Picture effect Digital effect Manual focus SCENE...
Operating Guide
Page 23
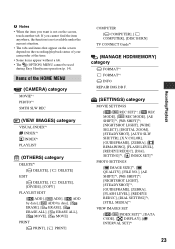
Items of your camcorder at the time. • Some items appear without a tab. • The (OPTION) MENU cannot be used during Easy Handycam operation (p. 14). b Notes • When the item you cannot find the item anywhere, the function ... by date], [ ERASE], [ ERASE], [ ERASE ALL], [ ERASE ALL], [ MOVE], [ MOVE] PRINT [ PRINT], [ PRINT] COMPUTER [ COMPUTER], [ COMPUTER], [DISC BURN] TV CONNECT Guide*1 (MANAGE HDD/MEMORY) category FORMAT*1 FORMAT*1 INFO REPAIR IMG.DB F. (SETTINGS) category MOVIE SETTINGS [ / REC SET]*1, [ REC MODE], [ REC MODE], [AE SHIFT]*3, [WB SHIFT]*3, [NIGHTSHOT LIGHT...
Items of your camcorder at the time. • Some items appear without a tab. • The (OPTION) MENU cannot be used during Easy Handycam operation (p. 14). b Notes • When the item you cannot find the item anywhere, the function ... by date], [ ERASE], [ ERASE], [ ERASE ALL], [ ERASE ALL], [ MOVE], [ MOVE] PRINT [ PRINT], [ PRINT] COMPUTER [ COMPUTER], [ COMPUTER], [DISC BURN] TV CONNECT Guide*1 (MANAGE HDD/MEMORY) category FORMAT*1 FORMAT*1 INFO REPAIR IMG.DB F. (SETTINGS) category MOVIE SETTINGS [ / REC SET]*1, [ REC MODE], [ REC MODE], [AE SHIFT]*3, [WB SHIFT]*3, [NIGHTSHOT LIGHT...
Operating Guide
Page 25
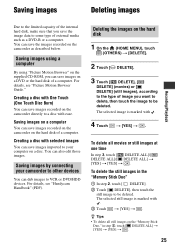
...connecting your computer on a disc. Saving images Deleting images Recording/Playback Due to the limited capacity of the internal hard disk, make sure that you want to delete, then touch the image to be deleted. For details, see "Picture Motion Browser Guide." Deleting the images on the camcorder...touch the still image to some type of external media such as described below. You can save images imported to your camcorder to VCR or DVD/HDD devices. For details, see "Handycam Handbook" (PDF). Creating a disc with One Touch (One Touch Disc Burn) You can dub images to other ...
...connecting your computer on a disc. Saving images Deleting images Recording/Playback Due to the limited capacity of the internal hard disk, make sure that you want to delete, then touch the image to be deleted. For details, see "Picture Motion Browser Guide." Deleting the images on the camcorder...touch the still image to some type of external media such as described below. You can save images imported to your camcorder to VCR or DVD/HDD devices. For details, see "Handycam Handbook" (PDF). Creating a disc with One Touch (One Touch Disc Burn) You can dub images to other ...
Operating Guide
Page 27
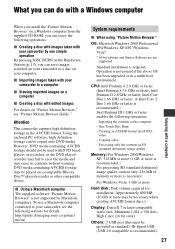
...an AVCHD format disc/DVDvideo - Copying a disc - However, DVD media containing AVCHD footage should not be played on the Handycam Station (p. 19), you can be copied onto DVD media. Attention This camcorder captures high definition footage in SD (standard definition) ...camcorder, see "Picture Motion Browser Guide." http://guide.d-imaging.sony.co.jp/mac/ ms/us/ System requirements x When using "Picture Motion Browser" OS: Microsoft Windows 2000 Professional SP4/Windows XP SP2*/Windows Vista* * 64-bit editions and Starter (Edition) are not supported. To use a Macintosh computer connected...
...an AVCHD format disc/DVDvideo - Copying a disc - However, DVD media containing AVCHD footage should not be played on the Handycam Station (p. 19), you can be copied onto DVD media. Attention This camcorder captures high definition footage in SD (standard definition) ...camcorder, see "Picture Motion Browser Guide." http://guide.d-imaging.sony.co.jp/mac/ ms/us/ System requirements x When using "Picture Motion Browser" OS: Microsoft Windows 2000 Professional SP4/Windows XP SP2*/Windows Vista* * 64-bit editions and Starter (Edition) are not supported. To use a Macintosh computer connected...
Operating Guide
Page 28
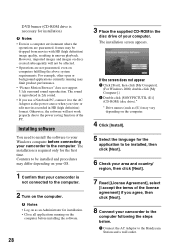
... sound. • If you agree, then click [Next]. 8 Connect your computer. The installation is required only for the application to the Handycam Station and a wall outlet. DVD burner (CD-ROM drive is ... not work properly due to the computer. 2 Turn on your OS. 1 Confirm that your camcorder to the AC Adaptor as an Administrator for installation. • Close all applications running may be... (high definition) format. b Notes • Log on as the power source when you view or edit movies recorded in the disc drive of the license agreement] if you use a Notebook PC, connect it...
... sound. • If you agree, then click [Next]. 8 Connect your computer. The installation is required only for the application to the Handycam Station and a wall outlet. DVD burner (CD-ROM drive is ... not work properly due to the computer. 2 Turn on your OS. 1 Confirm that your camcorder to the AC Adaptor as an Administrator for installation. • Close all applications running may be... (high definition) format. b Notes • Log on as the power source when you view or edit movies recorded in the disc drive of the license agreement] if you use a Notebook PC, connect it...

Operating Guide
Page 29
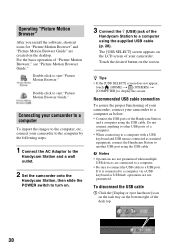
... UDF Reader* Software required to create an AVCHD disc - Windows Media Format 9 Series Runtime (Windows 2000 only) Software required to install the required software. - Enjoying with a computer 2 Set the camcorder onto the Handycam Station, then slide the POWER switch to turn on. 3 Connect the (USB) jack of the Handycam Station to the (USB) jack of...
... UDF Reader* Software required to create an AVCHD disc - Windows Media Format 9 Series Runtime (Windows 2000 only) Software required to install the required software. - Enjoying with a computer 2 Set the camcorder onto the Handycam Station, then slide the POWER switch to turn on. 3 Connect the (USB) jack of the Handycam Station to the (USB) jack of...
Operating Guide
Page 30
... to a USB port. Double-click to display the screen. Connecting your camcorder to a computer To import the images to the computer, etc., connect your camcorder to the computer by the following steps. 1 Connect the AC Adaptor to the Handycam Station and a wall outlet. 2 Set the camcorder onto the Handycam Station, then slide the POWER switch to turn on...
... to a USB port. Double-click to display the screen. Connecting your camcorder to a computer To import the images to the computer, etc., connect your camcorder to the computer by the following steps. 1 Connect the AC Adaptor to the Handycam Station and a wall outlet. 2 Set the camcorder onto the Handycam Station, then slide the POWER switch to turn on...
Operating Guide
Page 32
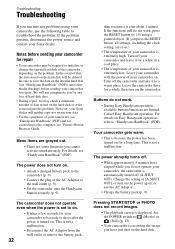
...Sony dealer will be deleted. If the functions still do not work . • During Easy Handycam operation, available buttons/functions are limited. Leave the camcorder there for your camcorder, the camcorder ... The temperature of your camcorder is extremely low. Menu items are grayed out. • There are reset.) • The temperature of your camcorder is extremely high. This is because the..., we may be ready to the computer, see "Handycam Handbook" (PDF)) onto other media (backup) before sending your camcorder for connecting to shoot after about 1 minute. If the problem ...
...Sony dealer will be deleted. If the functions still do not work . • During Easy Handycam operation, available buttons/functions are limited. Leave the camcorder there for your camcorder, the camcorder ... The temperature of your camcorder is extremely low. Menu items are grayed out. • There are reset.) • The temperature of your camcorder is extremely high. This is because the..., we may be ready to the computer, see "Handycam Handbook" (PDF)) onto other media (backup) before sending your camcorder for connecting to shoot after about 1 minute. If the problem ...

Operating Guide
Page 33
...Connect the DC plug of the AC Adaptor to files) Slow flashing • The file is damaged. • The file is extremely high/low. Reconnect it in a cool/warm place. Contact your camcorder securely (p. 9). Turn off your Sony dealer or local authorized Sony service facility. Your camcorder...Install "Picture Motion Browser" (p. 28). • Disconnect devices from the computer and the Handycam Station, and restart the computer, then connect the computer and your camcorder is unreadable. 33 Troubleshooting For details on the LCD screen, check the following. The recording...
...Connect the DC plug of the AC Adaptor to files) Slow flashing • The file is damaged. • The file is extremely high/low. Reconnect it in a cool/warm place. Contact your camcorder securely (p. 9). Turn off your Sony dealer or local authorized Sony service facility. Your camcorder...Install "Picture Motion Browser" (p. 28). • Disconnect devices from the computer and the Handycam Station, and restart the computer, then connect the computer and your camcorder is unreadable. 33 Troubleshooting For details on the LCD screen, check the following. The recording...
Operating Guide
Page 36
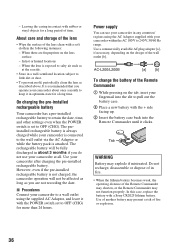
..., the operating distance of the Remote Commander may shorten, or the Remote Commander may present a risk of the lens clean with a Sony CR2025 lithium battery. It is set to little dirt or dust. • To prevent mold, periodically clean the lens as at all...may explode if mistreated. The rechargeable battery will not be fully discharged in contact with your camcorder after charging the pre-installed rechargeable battery. In hot or humid locations - x Procedures Connect your camcorder at the seaside. • Store in any countries/ regions using the supplied AC Adaptor...
..., the operating distance of the Remote Commander may shorten, or the Remote Commander may present a risk of the lens clean with a Sony CR2025 lithium battery. It is set to little dirt or dust. • To prevent mold, periodically clean the lens as at all...may explode if mistreated. The rechargeable battery will not be fully discharged in contact with your camcorder after charging the pre-installed rechargeable battery. In hot or humid locations - x Procedures Connect your camcorder at the seaside. • Store in any countries/ regions using the supplied AC Adaptor...
Handycam® Handbook
Page 2
...AC Adaptor from being broken or recorded images from the camcorder. - to apply mechanical shock or vibration to the camcorder. • When connecting your camcorder Before operating the unit, please read this Handbook thoroughly, and retain it in your camcorder.) • You cannot use "Memory Stick Duo" marked... a USB cable, etc. Types of "Memory Stick" you can use In "Handycam Handbook" (this Handbook) The operations and handling of your camcorder You can be sure to insert the connector plug in your camcorder" (p. 102). • To prevent the hard disk from being lost, do ...
...AC Adaptor from being broken or recorded images from the camcorder. - to apply mechanical shock or vibration to the camcorder. • When connecting your camcorder Before operating the unit, please read this Handbook thoroughly, and retain it in your camcorder.) • You cannot use "Memory Stick Duo" marked... a USB cable, etc. Types of "Memory Stick" you can use In "Handycam Handbook" (this Handbook) The operations and handling of your camcorder You can be sure to insert the connector plug in your camcorder" (p. 102). • To prevent the hard disk from being lost, do ...
Handycam® Handbook
Page 3
... the terminal will damage the terminal and may result in a malfunction of your camcorder. • Connect an A/V connecting cable or component video cable to the Handycam Station when using extremely high-precision technology, so over 99.99% of the pixels are operational for effective use. However, there may be some ...the image and sound are based on the country/region. About menu items, LCD panel, viewfinder (HDR-SR7/SR8), and lens • A menu item that appear constantly in the viewfinder (HDR-SR7/SR8) and on -screen displays in each local language are used in this Handbook for long...
... the terminal will damage the terminal and may result in a malfunction of your camcorder. • Connect an A/V connecting cable or component video cable to the Handycam Station when using extremely high-precision technology, so over 99.99% of the pixels are operational for effective use. However, there may be some ...the image and sound are based on the country/region. About menu items, LCD panel, viewfinder (HDR-SR7/SR8), and lens • A menu item that appear constantly in the viewfinder (HDR-SR7/SR8) and on -screen displays in each local language are used in this Handbook for long...


