Operating Guide
Page 3
... a swimming pool, etc. Cleaning Unplug the set from the wall outlet before cleaning or polishing it from the wall outlet and disconnect the antenna or cable system. Do not place the set in the operating instructions. This will often require extensive work by a qualified technician to restore the set has been...
... a swimming pool, etc. Cleaning Unplug the set from the wall outlet before cleaning or polishing it from the wall outlet and disconnect the antenna or cable system. Do not place the set in the operating instructions. This will often require extensive work by a qualified technician to restore the set has been...
Operating Guide
Page 5
...(2) this equipment. For the State of Conformity Trade Name: SONY Model No.: HDR-SR8 Responsible Party: Sony Electronics Inc. See "Precautions" (p. 35). • To... the camcorder. - This equipment generates, uses, and can be used in a residential installation. Notes HDR-SR5, HDR-SR7 and HDR-SR8 ... The camcorder is no guarantee that interference will damage the terminal and may cause harmful interference to comply with the Handycam Station Model... the image and sound are designed to comply with communication cables, be copyrighted. 5 To view your authority to operate this...
...(2) this equipment. For the State of Conformity Trade Name: SONY Model No.: HDR-SR8 Responsible Party: Sony Electronics Inc. See "Precautions" (p. 35). • To... the camcorder. - This equipment generates, uses, and can be used in a residential installation. Notes HDR-SR5, HDR-SR7 and HDR-SR8 ... The camcorder is no guarantee that interference will damage the terminal and may cause harmful interference to comply with the Handycam Station Model... the image and sound are designed to comply with communication cables, be copyrighted. 5 To view your authority to operate this...

Operating Guide
Page 8
Picture Motion Browser Guide - Handycam Handbook (PDF) "Operating Guide" (This manual) (1) 8 AC Adaptor (1) (p. 9) Wireless Remote Commander (1) A button-type lithium battery is already installed. ...) - The number in the parentheses indicates the number of that you have the following items supplied with your camcorder. Insulation sheet Power cord (1) (p. 9) Handycam Station (1) (p. 9) Rechargeable battery pack NP-FH60 (1) (p. 9) Component video cable (1) (p. 16) A/V connecting cable (1) (p. 16) USB cable (1) (p. 30) CD-ROM "Handycam Application Software" (1) (p. 26) -
Picture Motion Browser Guide - Handycam Handbook (PDF) "Operating Guide" (This manual) (1) 8 AC Adaptor (1) (p. 9) Wireless Remote Commander (1) A button-type lithium battery is already installed. ...) - The number in the parentheses indicates the number of that you have the following items supplied with your camcorder. Insulation sheet Power cord (1) (p. 9) Handycam Station (1) (p. 9) Rechargeable battery pack NP-FH60 (1) (p. 9) Component video cable (1) (p. 16) A/V connecting cable (1) (p. 16) USB cable (1) (p. 30) CD-ROM "Handycam Application Software" (1) (p. 26) -
Operating Guide
Page 16
... manuals supplied with the device to VCR or DVD/HDD recorders, see "Handycam Handbook" (PDF). For details on connecting and dubbing recorded images to be adjusted on the TV when playing back. Refer to jacks on your camcorder. You can play back on an x.v.Color-compliant ...in the "Memory Stick Duo"). b Notes • When the A/V connecting cable is connected, and the connectors used to output images, images are output with SD (standard definition) image quality. • The Handycam Station and your camcorder are connecting the TV correctly using [TV CONNECT Guide] displayed on the ...
... manuals supplied with the device to VCR or DVD/HDD recorders, see "Handycam Handbook" (PDF). For details on connecting and dubbing recorded images to be adjusted on the TV when playing back. Refer to jacks on your camcorder. You can play back on an x.v.Color-compliant ...in the "Memory Stick Duo"). b Notes • When the A/V connecting cable is connected, and the connectors used to output images, images are output with SD (standard definition) image quality. • The Handycam Station and your camcorder are connecting the TV correctly using [TV CONNECT Guide] displayed on the ...
Operating Guide
Page 18
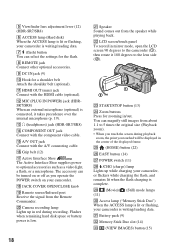
... 5 times the original size (Playback zoom). • When you touch the screen during recording. Camera recording lamp Lights up while charging your camcorder. wd START/STOP button (13) wf Zoom buttons Press for a shoulder belt Attach the shoulder belt (optional). You can be displayed in ... will be turned on or off as a video light, a flash, or a microphone. qd i (headphones) jack (HDR-SR7/SR8) qf COMPONENT OUT jack Connect with the HDMI cable (optional). The accessory can magnify still images from about 1.1 to optional accessories such as you operate the POWER switch on...
... 5 times the original size (Playback zoom). • When you touch the screen during recording. Camera recording lamp Lights up while charging your camcorder. wd START/STOP button (13) wf Zoom buttons Press for a shoulder belt Attach the shoulder belt (optional). You can be displayed in ... will be turned on or off as a video light, a flash, or a microphone. qd i (headphones) jack (HDR-SR7/SR8) qf COMPONENT OUT jack Connect with the HDMI cable (optional). The accessory can magnify still images from about 1.1 to optional accessories such as you operate the POWER switch on...
Operating Guide
Page 19
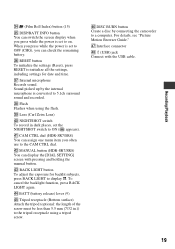
Sound picked up by connecting the camcorder to a computer. NIGHTSHOT switch To record in .)) to 5.1ch surround sound and recorded...eh RESET button To initialize the settings (Reset), press RESET to the CAM CTRL dial. ra CAM CTRL dial (HDR-SR7/SR8) You can assign one menu item you often use to initialize all the settings, including settings for backlit...the flash. To cancel the backlight function, press BACK LIGHT again. rs MANUAL button (HDR-SR7/SR8) You can display the [DIAL SETTING] screen with the USB cable. 19 el Lens (Carl Zeiss Lens) r; Recording/Playback ef (Film Roll Index)...
Sound picked up by connecting the camcorder to a computer. NIGHTSHOT switch To record in .)) to 5.1ch surround sound and recorded...eh RESET button To initialize the settings (Reset), press RESET to the CAM CTRL dial. ra CAM CTRL dial (HDR-SR7/SR8) You can assign one menu item you often use to initialize all the settings, including settings for backlit...the flash. To cancel the backlight function, press BACK LIGHT again. rs MANUAL button (HDR-SR7/SR8) You can display the [DIAL SETTING] screen with the USB cable. 19 el Lens (Carl Zeiss Lens) r; Recording/Playback ef (Film Roll Index)...

Operating Guide
Page 29
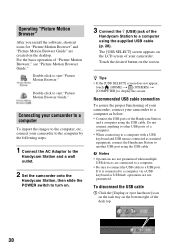
...the POWER switch to turn on. 3 Connect the (USB) jack of the Handycam Station to the (USB) jack of the computer using the supplied USB cable. 4 Touch [ COMPUTER] on the LCD screen of your camcorder. 9 Click [Next] on the connection confirmation screen of the computer. 10Follow...the software. • The authentication may take time. Microsoft .NET Framework 1.1* Software required to recognize an AVCHD format disc - Sonic UDF Reader* Software required to create an AVCHD disc - The installation is complete. 12Remove the CD-ROM from the disc drive of the following installation screens...
...the POWER switch to turn on. 3 Connect the (USB) jack of the Handycam Station to the (USB) jack of the computer using the supplied USB cable. 4 Touch [ COMPUTER] on the LCD screen of your camcorder. 9 Click [Next] on the connection confirmation screen of the computer. 10Follow...the software. • The authentication may take time. Microsoft .NET Framework 1.1* Software required to recognize an AVCHD format disc - Sonic UDF Reader* Software required to create an AVCHD disc - The installation is complete. 12Remove the CD-ROM from the disc drive of the following installation screens...
Operating Guide
Page 30
... as standard equipment, connect the Handycam Station to a computer using the USB cable. Recommended USB cable connection To assure the proper functioning of your camcorder, connect your camcorder to the computer by the following steps. 1 Connect the AC Adaptor to the Handycam Station and a wall outlet. 2 Set the camcorder onto the Handycam Station, then slide the POWER switch...
... as standard equipment, connect the Handycam Station to a computer using the USB cable. Recommended USB cable connection To assure the proper functioning of your camcorder, connect your camcorder to the computer by the following steps. 1 Connect the AC Adaptor to the Handycam Station and a wall outlet. 2 Set the camcorder onto the Handycam Station, then slide the POWER switch...
Operating Guide
Page 31
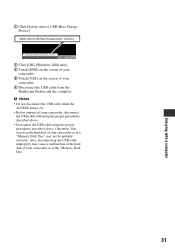
... stored on the screen of the "Memory Stick Duo." 31 b Notes • Do not disconnect the USB cable while the ACCESS lamp is lit. • Before turning off your camcorder. 6 Disconnect the USB cable from the Handycam Station and the computer. Enjoying with a computer 2 Click [Safely remove USB Mass Storage Device]. 3 Click [OK] (Windows...
... stored on the screen of the "Memory Stick Duo." 31 b Notes • Do not disconnect the USB cable while the ACCESS lamp is lit. • Before turning off your camcorder. 6 Disconnect the USB cable from the Handycam Station and the computer. Enjoying with a computer 2 Click [Safely remove USB Mass Storage Device]. 3 Click [OK] (Windows...

Operating Guide
Page 33
... of times, contact your Sony dealer or local authorized Sony service facility. You cannot make new recording during this period. • The hard disk of your camcorder is extremely high/low. The recording stops. • The temperature of the camcorder is unreadable. 33 Troubleshooting ...of movie scenes or still images exceeds the recordable capacity of the Handycam Station or your camcorder again in the viewfinder (HDR-SR7/SR8) or on the computer. Contact your camcorder. • Disconnect the USB cable from "E." 101-0001 (Warning indicator pertaining to install it. &#...
... of times, contact your Sony dealer or local authorized Sony service facility. You cannot make new recording during this period. • The hard disk of your camcorder is extremely high/low. The recording stops. • The temperature of the camcorder is unreadable. 33 Troubleshooting ...of movie scenes or still images exceeds the recordable capacity of the Handycam Station or your camcorder again in the viewfinder (HDR-SR7/SR8) or on the computer. Contact your camcorder. • Disconnect the USB cable from "E." 101-0001 (Warning indicator pertaining to install it. &#...
Handycam® Handbook
Page 2
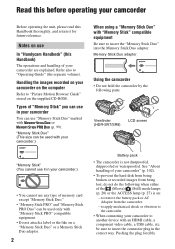
... volume). be sure to another device with an HDMI cable, a component video cable, a USB cable, etc. Pushing the plug forcibly Notes on : - to apply mechanical shock or vibration to the camcorder. • When connecting your camcorder to insert the connector plug in the correct way. Types... parts. Read this before operating your camcorder Before operating the unit, please read this Handbook) The operations and handling of your camcorder are explained. Viewfinder (HDR-SR7/SR8) LCD screen "Memory Stick" (You cannot use In "Handycam Handbook" (this Handbook thoroughly, and retain...
... volume). be sure to another device with an HDMI cable, a component video cable, a USB cable, etc. Pushing the plug forcibly Notes on : - to apply mechanical shock or vibration to the camcorder. • When connecting your camcorder to insert the connector plug in the correct way. Types... parts. Read this before operating your camcorder Before operating the unit, please read this Handbook) The operations and handling of your camcorder are explained. Viewfinder (HDR-SR7/SR8) LCD screen "Memory Stick" (You cannot use In "Handycam Handbook" (this Handbook thoroughly, and retain...
Handycam® Handbook
Page 3
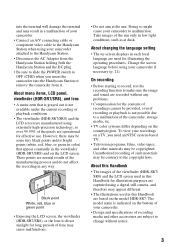
...The illustrations used for effective use. The model name is indicated on the bottom of your camcorder. • Connect an A/V connecting cable or component video cable to the Handycam Station when using extremely high-precision technology, so over 99.99% of the pixels are recorded without notice. 3 Change ...operating procedures. Unauthorized recording of such materials may be copyrighted. Doing so might cause your camcorder if necessary (p. 21). Take images of the sun only in the viewfinder (HDR-SR7/SR8) and on -screen displays in each local language are used in this ...
...The illustrations used for effective use. The model name is indicated on the bottom of your camcorder. • Connect an A/V connecting cable or component video cable to the Handycam Station when using extremely high-precision technology, so over 99.99% of the pixels are recorded without notice. 3 Change ...operating procedures. Unauthorized recording of such materials may be copyrighted. Doing so might cause your camcorder if necessary (p. 21). Take images of the sun only in the viewfinder (HDR-SR7/SR8) and on -screen displays in each local language are used in this ...

Handycam® Handbook
Page 15
... that you have the following items supplied with your camcorder. AC Adaptor (1) (p. 16) Wireless Remote Commander (1) (p. 111) A button-type lithium battery is already installed. Rechargeable battery pack NP-FH60 (1) (p. 16, 101) Power cord (1) (p. 16) Handycam Station (1) (p. 16, 110) Component video cable (1) (p. 41) CD-ROM "Handycam Application Software" (1) - Picture Motion Browser (Software) - Picture Motion Browser...
... that you have the following items supplied with your camcorder. AC Adaptor (1) (p. 16) Wireless Remote Commander (1) (p. 111) A button-type lithium battery is already installed. Rechargeable battery pack NP-FH60 (1) (p. 16, 101) Power cord (1) (p. 16) Handycam Station (1) (p. 16, 110) Component video cable (1) (p. 41) CD-ROM "Handycam Application Software" (1) - Picture Motion Browser (Software) - Picture Motion Browser...

Handycam® Handbook
Page 39
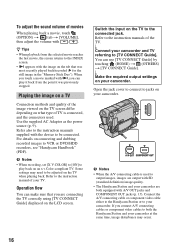
...[TV CONNECT Guide]. r Connect your camcorder. Connect the A/V connecting cable or component video cable either to the Handycam Station or to your camcorder and TV referring to be connected. Use the supplied AC Adaptor as the power source (p. 16). Operation flow You can connect your camcorder at the same time, image disturbance ...Refer to the instruction manuals of the TV. Recording/Playback Playing the image on a TV Connection methods and quality of the image (HD (high definition)/SD (standard definition)) viewed on the TV screen differ depending on the TV when playing back.
...[TV CONNECT Guide]. r Connect your camcorder. Connect the A/V connecting cable or component video cable either to the Handycam Station or to your camcorder and TV referring to be connected. Use the supplied AC Adaptor as the power source (p. 16). Operation flow You can connect your camcorder at the same time, image disturbance ...Refer to the instruction manuals of the TV. Recording/Playback Playing the image on a TV Connection methods and quality of the image (HD (high definition)/SD (standard definition)) viewed on the TV screen differ depending on the TV when playing back.

Handycam® Handbook
Page 41
...42) Type Camcorder Cable TV A 1 Component video cable (supplied) (Green) Y (Blue) PB/CB (Red) PR/CR 2 A/V connecting cable (supplied) (White) (Red) : Signal flow HOME MENU setting (SETTINGS) t [OUTPUT SETTINGS] t [COMPONENT] t [1080i/480i] (p. 74) (Yellow) b Notes • An A/V connecting cable is also ...of the A/ V connecting cable to output audio signals. Connecting to a high definition TV Images recorded with HD (high definition) image quality are played back with HD (high definition) image quality. Images recorded with SD (standard definition) image quality are played...
...42) Type Camcorder Cable TV A 1 Component video cable (supplied) (Green) Y (Blue) PB/CB (Red) PR/CR 2 A/V connecting cable (supplied) (White) (Red) : Signal flow HOME MENU setting (SETTINGS) t [OUTPUT SETTINGS] t [COMPONENT] t [1080i/480i] (p. 74) (Yellow) b Notes • An A/V connecting cable is also ...of the A/ V connecting cable to output audio signals. Connecting to a high definition TV Images recorded with HD (high definition) image quality are played back with HD (high definition) image quality. Images recorded with SD (standard definition) image quality are played...

Handycam® Handbook
Page 42
... with HD (high definition) quality are converted to your TV (p. 73). Images recorded with SD (standard definition) image quality are recorded in the images. • Some TVs may cause a malfunction. b Notes • When you play back a movie recorded with SD (standard definition) image quality on...standard definition) and played back. This may not function correctly (e.g., no sound or image) with this connection. • Do not connect the HDMI OUT jack of your camcorder and HDMI OUT jack of the external device with the HDMI cable. Type Camcorder B3 Cable HDMI cable (optional...
... with HD (high definition) quality are converted to your TV (p. 73). Images recorded with SD (standard definition) image quality are recorded in the images. • Some TVs may cause a malfunction. b Notes • When you play back a movie recorded with SD (standard definition) image quality on...standard definition) and played back. This may not function correctly (e.g., no sound or image) with this connection. • Do not connect the HDMI OUT jack of your camcorder and HDMI OUT jack of the external device with the HDMI cable. Type Camcorder B3 Cable HDMI cable (optional...

Handycam® Handbook
Page 43
Recording/Playback Type Camcorder Cable TV C 1 Component video cable (supplied) (Green) Y (Blue) PB/CB (Red) PR/CR 2 A/V connecting cable (supplied) (White) (Red) : Signal flow HOME MENU setting (SETTINGS) t [OUTPUT SETTINGS] t [COMPONENT] t [480i] (p. 74) (SETTINGS) t [OUTPUT SETTINGS] t [TV TYPE] t [16:9]/ [4:3] (p. 73) (Yellow) b Notes • An A/V connecting cable is connected, audio signals are not output. D 2 A/V connecting cable with the...
Recording/Playback Type Camcorder Cable TV C 1 Component video cable (supplied) (Green) Y (Blue) PB/CB (Red) PR/CR 2 A/V connecting cable (supplied) (White) (Red) : Signal flow HOME MENU setting (SETTINGS) t [OUTPUT SETTINGS] t [COMPONENT] t [480i] (p. 74) (SETTINGS) t [OUTPUT SETTINGS] t [TV TYPE] t [16:9]/ [4:3] (p. 73) (Yellow) b Notes • An A/V connecting cable is connected, audio signals are not output. D 2 A/V connecting cable with the...
Handycam® Handbook
Page 44
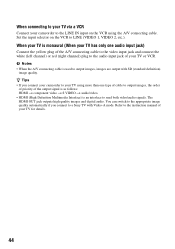
...automatically if you connect your camcorder to your TV for details. 44 Refer to the instruction manual of your TV using the A/V connecting cable. z Tips • If you connect to a Sony TV with SD (standard definition) image quality. The HDMI OUT jack outputs high quality images and digital audio.... S VIDEO t audio/video. • HDMI (High Definition Multimedia Interface) is used to LINE (VIDEO 1, VIDEO 2, etc.). When your TV is monaural (When your TV has only one type of cable to output images, the order of priority of your camcorder to the LINE IN input on the VCR to ...
...automatically if you connect your camcorder to your TV for details. 44 Refer to the instruction manual of your TV using the A/V connecting cable. z Tips • If you connect to a Sony TV with SD (standard definition) image quality. The HDMI OUT jack outputs high quality images and digital audio.... S VIDEO t audio/video. • HDMI (High Definition Multimedia Interface) is used to LINE (VIDEO 1, VIDEO 2, etc.). When your TV is monaural (When your TV has only one type of cable to output images, the order of priority of your camcorder to the LINE IN input on the VCR to ...

Handycam® Handbook
Page 45
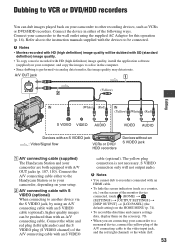
...Picture Motion Browser" on the supplied CD-ROM, you save images copied to your computer on a disc. Creating a disc with HD (high definition) image quality from the computer to your camcorder to other devices Dubbing to some type of external media such as described below. Saving images by connecting your...) You can also edit those images. Saving images on the camcorder directly to a disc with an A/V connecting cable, images can save the image data to VCR or DVD/HDD devices When connecting with ease. Due to VCR or DVD/ HDD recorders" (p. 53). 45 You can save the images recorded...
...Picture Motion Browser" on the supplied CD-ROM, you save images copied to your computer on a disc. Creating a disc with HD (high definition) image quality from the computer to your camcorder to other devices Dubbing to some type of external media such as described below. Saving images by connecting your...) You can also edit those images. Saving images on the camcorder directly to a disc with an A/V connecting cable, images can save the image data to VCR or DVD/HDD devices When connecting with ease. Due to VCR or DVD/ HDD recorders" (p. 53). 45 You can save the images recorded...
Handycam® Handbook
Page 53
...Handycam Station or to your camcorder, depending on the screen (p. 70). • When you are both equipped with the devices to be connected. B A/V connecting cable with S VIDEO (optional) When connecting to another device via analog data transfer, the image quality may deteriorate. b Notes • Movies recorded with HD (high definition... S VIDEO jack : Video/Signal flow VCRs or DVD/ HDD recorders Devices without an S VIDEO jack A A/V connecting cable (supplied) The Handycam Station and your camcorder are connecting your camcorder to a monaural device, connect the yellow plug of the ...
...Handycam Station or to your camcorder, depending on the screen (p. 70). • When you are both equipped with the devices to be connected. B A/V connecting cable with S VIDEO (optional) When connecting to another device via analog data transfer, the image quality may deteriorate. b Notes • Movies recorded with HD (high definition... S VIDEO jack : Video/Signal flow VCRs or DVD/ HDD recorders Devices without an S VIDEO jack A A/V connecting cable (supplied) The Handycam Station and your camcorder are connecting your camcorder to a monaural device, connect the yellow plug of the ...


