Operating Guide
Page 7
... camcorder. - Doing so might cause your camcorder. Battery • The camcorder is not dustproofed, dripproofed or waterproofed. Viewfinder LCD screen About menu items, LCD panel, viewfinder, and lens • A menu item that appear constantly on : - However, there may cause malfunctions. • Do not aim at dusk. See "Maintenance and precautions" (p. 119). • To prevent the hard disk...
... camcorder. - Doing so might cause your camcorder. Battery • The camcorder is not dustproofed, dripproofed or waterproofed. Viewfinder LCD screen About menu items, LCD panel, viewfinder, and lens • A menu item that appear constantly on : - However, there may cause malfunctions. • Do not aim at dusk. See "Maintenance and precautions" (p. 119). • To prevent the hard disk...
Operating Guide
Page 8
...and specifications of recording media and other materials may be copyrighted. Unauthorized recording of a Carl Zeiss lens. Also, the lens for your camcorder if necessary (p. 22). About this manual • The images of light from a subject coming into the lens. 8 The number ...value indicates the amount of the LCD screen and the viewfinder used for illustrating the operating procedures. Read this manual for illustration purposes are used in Germany, and Sony Corporation, and produces superior images.
...and specifications of recording media and other materials may be copyrighted. Unauthorized recording of a Carl Zeiss lens. Also, the lens for your camcorder if necessary (p. 22). About this manual • The images of light from a subject coming into the lens. 8 The number ...value indicates the amount of the LCD screen and the viewfinder used for illustrating the operating procedures. Read this manual for illustration purposes are used in Germany, and Sony Corporation, and produces superior images.
Operating Guide
Page 9
... erasing software, format the hard disk using [ FORMAT] first, record darkness on the entire hard disk by dropping, the camcorder has the drop sensor function (p. 80). Note on using the camcorder at high altitudes • Do not turn on the camcorder in such situations. on a computer, and then format the hard disk using [ FORMAT] on the LCD screen (p. 108). If you...
... erasing software, format the hard disk using [ FORMAT] first, record darkness on the entire hard disk by dropping, the camcorder has the drop sensor function (p. 80). Note on using the camcorder at high altitudes • Do not turn on the camcorder in such situations. on a computer, and then format the hard disk using [ FORMAT] on the LCD screen (p. 108). If you...
Operating Guide
Page 10
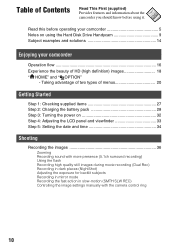
... before using the Hard Disk Drive Handycam 9 Subject examples and solutions 14 Enjoying your camcorder 5 Notes on 32 Step 4: Adjusting the LCD panel and viewfinder 33 Step 5: Setting the date and time 34 Shooting Recording the images 36 Zooming Recording sound with more presence (5.1ch surround recording) Using the flash Recording high quality still images during...
... before using the Hard Disk Drive Handycam 9 Subject examples and solutions 14 Enjoying your camcorder 5 Notes on 32 Step 4: Adjusting the LCD panel and viewfinder 33 Step 5: Setting the date and time 34 Shooting Recording the images 36 Zooming Recording sound with more presence (5.1ch surround recording) Using the flash Recording high quality still images during...
Operating Guide
Page 16
... hard disk or a "Memory Stick Duo." • You can consult the [TV CONNECT Guide] (p. 48) displayed on the screen on connecting your TV and camcorder. • Images recorded with the SD (standard definition) image quality cannot be converted to your TV is not a high definition TV, movies with HD (high definition) image quality will be displayed with HD (high definition...
... hard disk or a "Memory Stick Duo." • You can consult the [TV CONNECT Guide] (p. 48) displayed on the screen on connecting your TV and camcorder. • Images recorded with the SD (standard definition) image quality cannot be converted to your TV is not a high definition TV, movies with HD (high definition) image quality will be displayed with HD (high definition...
Operating Guide
Page 22
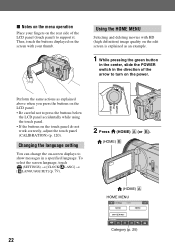
...below the LCD panel accidentally while using the touch panel. • If the buttons on the touch panel do not work correctly, adjust the touch panel (CALIBRATION) (p. 120). x Notes on the menu operation Place your thumb. Then, touch the buttons displayed on the screen with HD (high definition) image ...quality on the edit screen is explained as explained above when you press the buttons on the LCD panel. • Be careful not to turn on the power. To select the screen ...
...below the LCD panel accidentally while using the touch panel. • If the buttons on the touch panel do not work correctly, adjust the touch panel (CALIBRATION) (p. 120). x Notes on the menu operation Place your thumb. Then, touch the buttons displayed on the screen with HD (high definition) image ...quality on the edit screen is explained as explained above when you press the buttons on the LCD panel. • Be careful not to turn on the power. To select the screen ...
Operating Guide
Page 30
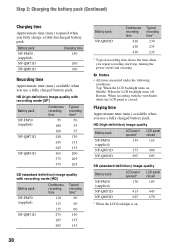
... closed . b Notes • All times measured under the following conditions: Top: When the LCD backlight turns on /off . Playing time Approximate time (min.) available when you repeat recording start/stop, turning the power on . HD (high definition) image quality with recording mode [SP] Battery pack NP-FM50 (supplied) NP-QM71D NP-QM91D Continuous...
... closed . b Notes • All times measured under the following conditions: Top: When the LCD backlight turns on /off . Playing time Approximate time (min.) available when you repeat recording start/stop, turning the power on . HD (high definition) image quality with recording mode [SP] Battery pack NP-FM50 (supplied) NP-QM71D NP-QM91D Continuous...
Operating Guide
Page 32
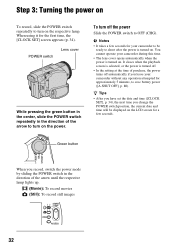
...mode by sliding the POWER switch in the direction of the arrow to OFF (CHG). b Notes • It takes a few seconds. You cannot operate your camcorder to be displayed on the respective lamp. z Tips • After you have set the date and time ([CLOCK SET], p. 34), the next time you ... any operation attempted for your camcorder during this time. • The lens cover opens automatically when the power is turned off the power Slide the POWER switch to turn on the LCD screen for the first time, the [CLOCK SET] screen appears (p. 34). To turn off . • In the setting at ...
...mode by sliding the POWER switch in the direction of the arrow to OFF (CHG). b Notes • It takes a few seconds. You cannot operate your camcorder to be displayed on the respective lamp. z Tips • After you have set the date and time ([CLOCK SET], p. 34), the next time you ... any operation attempted for your camcorder during this time. • The lens cover opens automatically when the power is turned off the power Slide the POWER switch to turn on the LCD screen for the first time, the [CLOCK SET] screen appears (p. 34). To turn off . • In the setting at ...
Operating Guide
Page 33
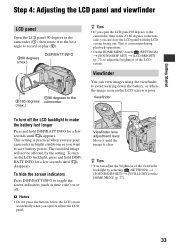
...it to the best angle to record or play (2). 290 degrees (max.) DISP/BATT INFO 190 degrees to the 2180 degrees camcorder (max.) z Tips • If you open or adjust the LCD panel. This is poor. The recorded image will not be affected by selecting (SETTINGS) t [SOUND/DISP SET] t [VF...On the HOME MENU, touch (SETTINGS) t [SOUND/DISP SET] t [LCD BRIGHT] (p. 77) to the lens side, you open the LCD panel 90 degrees to the camcorder, then rotate it until disappears. b Notes • Do not press the buttons below the LCD screen accidentally when you can view images using the viewfinder to...
...it to the best angle to record or play (2). 290 degrees (max.) DISP/BATT INFO 190 degrees to the 2180 degrees camcorder (max.) z Tips • If you open or adjust the LCD panel. This is poor. The recorded image will not be affected by selecting (SETTINGS) t [SOUND/DISP SET] t [VF...On the HOME MENU, touch (SETTINGS) t [SOUND/DISP SET] t [LCD BRIGHT] (p. 77) to the lens side, you open the LCD panel 90 degrees to the camcorder, then rotate it until disappears. b Notes • Do not press the buttons below the LCD screen accidentally when you can view images using the viewfinder to...
Operating Guide
Page 36
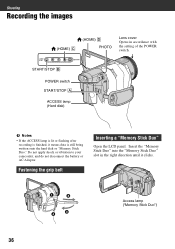
Access lamp ("Memory Stick Duo") 36 Do not apply shock or vibration to your camcorder, and do not disconnect the battery or AC Adaptor. START/STOP B POWER switch START/STOP A ACCESS lamp (Hard disk) b Notes • If the ACCESS lamp is lit or flashing after recording is finished, it clicks.... Fastening the grip belt Inserting a "Memory Stick Duo" Open the LCD panel. Insert the "Memory Stick Duo" into the "Memory Stick ...
Access lamp ("Memory Stick Duo") 36 Do not apply shock or vibration to your camcorder, and do not disconnect the battery or AC Adaptor. START/STOP B POWER switch START/STOP A ACCESS lamp (Hard disk) b Notes • If the ACCESS lamp is lit or flashing after recording is finished, it clicks.... Fastening the grip belt Inserting a "Memory Stick Duo" Open the LCD panel. Insert the "Memory Stick Duo" into the "Memory Stick ...

Operating Guide
Page 39
Shooting Recording the images To change the zoom speed with the power zoom lever or the zoom buttons below the LCD screen. • The minimum possible distance between camcorder and subject while maintaining sharp focus is about 1 cm (about 13/32 in.) for wide angle and about 80 cm (about 1.1 to... 10 times the original size with the zoom buttons below the LCD screen. Number of recordable images Wider range of ...
Shooting Recording the images To change the zoom speed with the power zoom lever or the zoom buttons below the LCD screen. • The minimum possible distance between camcorder and subject while maintaining sharp focus is about 1 cm (about 13/32 in.) for wide angle and about 80 cm (about 1.1 to... 10 times the original size with the zoom buttons below the LCD screen. Number of recordable images Wider range of ...

Operating Guide
Page 42
... When [Recording···] disappears, recording is useful to shoot fast actions such as a 12 second-slow-motion-movie. Open the LCD panel 90 degrees to the camcorder (1), then rotate it 180 degrees to display the HOME MENU. 3 Touch (CAMERA). 4 Touch [SMTH SLW REC]. Select one of the ...subject appears on the LCD screen, but the image will be shot in smooth moving subjects and actions, which cannot be captured under ...
... When [Recording···] disappears, recording is useful to shoot fast actions such as a 12 second-slow-motion-movie. Open the LCD panel 90 degrees to the camcorder (1), then rotate it 180 degrees to display the HOME MENU. 3 Touch (CAMERA). 4 Touch [SMTH SLW REC]. Select one of the ...subject appears on the LCD screen, but the image will be shot in smooth moving subjects and actions, which cannot be captured under ...
Operating Guide
Page 44
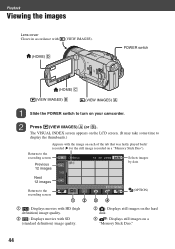
...LCD screen. (It may take some time to display the thumbnails.) Appears with (VIEW IMAGES). (HOME) D POWER switch (HOME) C (VIEW IMAGES) B (VIEW IMAGES) A Slide the POWER switch to the recording screen (OPTION) 1 : Displays movies with HD (high definition) image quality. 2 : Displays movies with SD (standard definition) image quality. 3 : Displays still images on the hard disk.... 4 : Displays still images on your camcorder. Press (VIEW...
...LCD screen. (It may take some time to display the thumbnails.) Appears with (VIEW IMAGES). (HOME) D POWER switch (HOME) C (VIEW IMAGES) B (VIEW IMAGES) A Slide the POWER switch to the recording screen (OPTION) 1 : Displays movies with HD (high definition) image quality. 2 : Displays movies with SD (standard definition) image quality. 3 : Displays still images on the hard disk.... 4 : Displays still images on your camcorder. Press (VIEW...

Operating Guide
Page 47
...; You cannot change the zoom speed with the power zoom lever or the zoom buttons below the LCD screen. Touch to 5 times the original size. Magnification can be adjusted with the zoom buttons below the LCD screen. z Tips • You can set continuous slide show ) 1 Play back the still images you want...
...; You cannot change the zoom speed with the power zoom lever or the zoom buttons below the LCD screen. Touch to 5 times the original size. Magnification can be adjusted with the zoom buttons below the LCD screen. z Tips • You can set continuous slide show ) 1 Play back the still images you want...
Operating Guide
Page 48
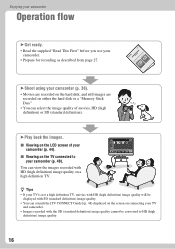
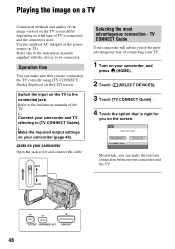
... required output settings on your camcorder and TV referring to the connected jack. Operation flow You can make sure that is connected, and the connectors used. Meanwhile, you are connecting the TV correctly using [TV CONNECT Guide] displayed on the LCD screen. Refer to be connected.... Jacks on your camcorder, and press (HOME). 2 Touch (SELECT DEVICES). 3 Touch [TV CONNECT Guide]. 4 Touch the option that you ...
... required output settings on your camcorder and TV referring to the connected jack. Operation flow You can make sure that is connected, and the connectors used. Meanwhile, you are connecting the TV correctly using [TV CONNECT Guide] displayed on the LCD screen. Refer to be connected.... Jacks on your camcorder, and press (HOME). 2 Touch (SELECT DEVICES). 3 Touch [TV CONNECT Guide]. 4 Touch the option that you ...

Operating Guide
Page 56
...] t [YES] t [YES] t . Deleting images (Continued) 5 Touch the image to confirm the still image. Press and hold the still image on your camcorder, then press (HOME). b Notes • Images cannot be restored once they are deleted. • If the deleted movie is included in the Playlist (p. 58),...deleted also from the Playlist. • To delete all images recorded in the "Memory Stick Duo" 1 Turn on the LCD screen to be deleted. Deleting the still images in the hard disk, and recover all images of hard disk, format the hard disk (p. 66). Touch to return to be deleted.
...] t [YES] t [YES] t . Deleting images (Continued) 5 Touch the image to confirm the still image. Press and hold the still image on your camcorder, then press (HOME). b Notes • Images cannot be restored once they are deleted. • If the deleted movie is included in the Playlist (p. 58),...deleted also from the Playlist. • To delete all images recorded in the "Memory Stick Duo" 1 Turn on the LCD screen to be deleted. Deleting the still images in the hard disk, and recover all images of hard disk, format the hard disk (p. 66). Touch to return to be deleted.

Operating Guide
Page 57
... to 100 still images at one time. • You can copy still images from the hard disk to a "Memory Stick Duo." Press and hold the image on your camcorder before the operation. 1 Turn on the LCD screen to the previous screen. 5 Touch t [YES]. To delete all images recorded on the... cannot restore still images once they are deleted. • You cannot delete still images when a "Memory Stick Duo" with . Insert a "Memory Stick Duo" in your camcorder, then press (HOME). 2 Touch (OTHERS) t [EDIT]. 3 Touch [ t COPY]. 4 Touch the still image to the write-protect position (p. 116), or when ...
... to 100 still images at one time. • You can copy still images from the hard disk to a "Memory Stick Duo." Press and hold the image on your camcorder before the operation. 1 Turn on the LCD screen to the previous screen. 5 Touch t [YES]. To delete all images recorded on the... cannot restore still images once they are deleted. • You cannot delete still images when a "Memory Stick Duo" with . Insert a "Memory Stick Duo" in your camcorder, then press (HOME). 2 Touch (OTHERS) t [EDIT]. 3 Touch [ t COPY]. 4 Touch the still image to the write-protect position (p. 116), or when ...
Operating Guide
Page 58
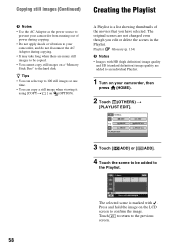
...individual Playlist. 1 Turn on (OPTION). Touch to return to confirm the image. A Playlist is marked with HD (high definition) image quality and SD (standard definition) image quality are added to the hard disk. Playlist Glossary (p. 134) b Notes • Images with . The selected scene is a list showing thumbnails of ...8226; Do not apply shock or vibration to your camcorder, then press (HOME). 2 Touch (OTHERS) t [PLAYLIST EDIT]. 3 Touch [ ADD] or [ ADD]. 4 Touch the scene to be copied. • You cannot copy still images on the LCD screen to the previous screen. 58 The original ...
...individual Playlist. 1 Turn on (OPTION). Touch to return to confirm the image. A Playlist is marked with HD (high definition) image quality and SD (standard definition) image quality are added to the hard disk. Playlist Glossary (p. 134) b Notes • Images with . The selected scene is a list showing thumbnails of ...8226; Do not apply shock or vibration to your camcorder, then press (HOME). 2 Touch (OTHERS) t [PLAYLIST EDIT]. 3 Touch [ ADD] or [ ADD]. 4 Touch the scene to be copied. • You cannot copy still images on the LCD screen to the previous screen. 58 The original ...
Operating Guide
Page 59
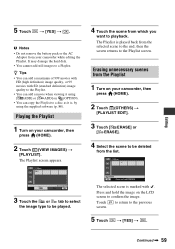
.... It may damage the hard disk. • You cannot add still images to the previous screen. 5 Touch t [YES] t . The selected scene is , by using [ ADD] or [ ADD] on your camcorder while editing the Playlist. z Tips • You can add a maximum of 999 movies with HD (high definition) image quality, or 99... Turn on the LCD screen to a disc as it is marked with . b Notes • Do not remove the battery pack or the AC Adaptor from the selected scene to the end, then the screen returns to playback. 5 Touch t [YES] t . The Playlist is played back from your camcorder, then press (...
.... It may damage the hard disk. • You cannot add still images to the previous screen. 5 Touch t [YES] t . The selected scene is , by using [ ADD] or [ ADD] on your camcorder while editing the Playlist. z Tips • You can add a maximum of 999 movies with HD (high definition) image quality, or 99... Turn on the LCD screen to a disc as it is marked with . b Notes • Do not remove the battery pack or the AC Adaptor from the selected scene to the end, then the screen returns to playback. 5 Touch t [YES] t . The Playlist is played back from your camcorder, then press (...

Operating Guide
Page 60
...scenes from the Playlist In step 3, touch [ ERASE ALL] or [ ERASE ALL]t [YES] t [YES] t . Changing the order within the Playlist 1 Turn on your camcorder, then press (HOME). 2 Touch (OTHERS) t [PLAYLIST EDIT]. 3 Touch [ MOVE] or [ MOVE]. 4 Select the scene to confirm the image. Creating the Playlist (...are moved following the order appeared in the Playlist. Destination bar Press and hold the image on the LCD screen to the previous screen. 5 Touch . 60 Press and hold the image on the LCD screen to be moved. 6 Select the destination with . The selected scene is marked with [T]/ ...
...scenes from the Playlist In step 3, touch [ ERASE ALL] or [ ERASE ALL]t [YES] t [YES] t . Changing the order within the Playlist 1 Turn on your camcorder, then press (HOME). 2 Touch (OTHERS) t [PLAYLIST EDIT]. 3 Touch [ MOVE] or [ MOVE]. 4 Select the scene to confirm the image. Creating the Playlist (...are moved following the order appeared in the Playlist. Destination bar Press and hold the image on the LCD screen to the previous screen. 5 Touch . 60 Press and hold the image on the LCD screen to be moved. 6 Select the destination with . The selected scene is marked with [T]/ ...


