
Operating Guide
Page 2
For Customers in the literature accompanying the appliance. 2 This symbol is intended to alert the user to the presence of uninsulated "dangerous voltage" within the product's enclosure that may be of sufficient magnitude to constitute a risk of important operating and maintenance (servicing) instructions in the U.S.A. This symbol is intended to alert the user to the presence of electric shock to rain or moisture. WARNING To reduce fire or shock hazard, do not expose the unit to persons.
For Customers in the literature accompanying the appliance. 2 This symbol is intended to alert the user to the presence of uninsulated "dangerous voltage" within the product's enclosure that may be of sufficient magnitude to constitute a risk of important operating and maintenance (servicing) instructions in the U.S.A. This symbol is intended to alert the user to the presence of electric shock to rain or moisture. WARNING To reduce fire or shock hazard, do not expose the unit to persons.
Operating Guide
Page 3
... could result in a fire or electric shock. Do not place the set may cause hazards. Carefully observe all warnings, precautions and instructions on the marking label. This plug will fit into the set , and to protect it . If you are unable to insert ... lightly dampened with water for future reference. for necessary ventilation. Continued , 3 For those sets designed to operate from overheating, these safety instructions completely before cleaning or polishing it from battery power, or other ). Attachments Do not use attachments not recommended by items placed upon or ...
... could result in a fire or electric shock. Do not place the set may cause hazards. Carefully observe all warnings, precautions and instructions on the marking label. This plug will fit into the set , and to protect it . If you are unable to insert ... lightly dampened with water for future reference. for necessary ventilation. Continued , 3 For those sets designed to operate from overheating, these safety instructions completely before cleaning or polishing it from battery power, or other ). Attachments Do not use attachments not recommended by items placed upon or ...
Operating Guide
Page 4
If the set has been exposed to qualified service personnel under the following the operating instructions. Adjust only those controls that the set has been subject to qualified service personnel. this set during a lightning storm, or when it from ... voltage or other hazards. If liquid has been spilled or objects have the same characteristics as opening or removing covers may result in the operating instructions. When the set . - IMPORTANT SAFEGUARDS (Continued) Lightning For added protection for this indicates a need for service. If the set , ask the service technician...
If the set has been exposed to qualified service personnel under the following the operating instructions. Adjust only those controls that the set has been subject to qualified service personnel. this set during a lightning storm, or when it from ... voltage or other hazards. If liquid has been spilled or objects have the same characteristics as opening or removing covers may result in the operating instructions. When the set . - IMPORTANT SAFEGUARDS (Continued) Lightning For added protection for this indicates a need for service. If the set , ask the service technician...
Operating Guide
Page 6
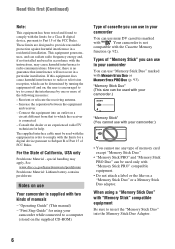
...Memory Stick PRO" and "Memory Stick PRO Duo" can be used with your camcorder.) "Memory Stick" (You cannot use with your camcorder You can use Your camcorder is not compatible with the instructions, may apply, See www.dtsc.ca.gov/hazardouswaste/perchlorate Perchlorate Material: Lithium ...battery contains perchlorate. Your camcorder is supplied with the limits for a digital device ...
...Memory Stick PRO" and "Memory Stick PRO Duo" can be used with your camcorder.) "Memory Stick" (You cannot use with your camcorder You can use Your camcorder is not compatible with the instructions, may apply, See www.dtsc.ca.gov/hazardouswaste/perchlorate Perchlorate Material: Lithium ...battery contains perchlorate. Your camcorder is supplied with the limits for a digital device ...
Operating Guide
Page 11
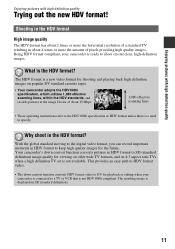
.... • Your camcorder adopts the HDV1080i specification, which utilizes 1,080 effective scanning lines, within the HDV standards, and records pictures at the image bit rate of about 25 Mbps. 1,080 effective scanning lines • These operating instructions refer to shoot crystal clear, high-definition images. Enjoying pictures with high definition quality Enjoying pictures with high definition quality Trying...
.... • Your camcorder adopts the HDV1080i specification, which utilizes 1,080 effective scanning lines, within the HDV standards, and records pictures at the image bit rate of about 25 Mbps. 1,080 effective scanning lines • These operating instructions refer to shoot crystal clear, high-definition images. Enjoying pictures with high definition quality Enjoying pictures with high definition quality Trying...

Operating Guide
Page 32
... GUIDE) You can easily select the desired setting screens by using the guide functions (USAGE GUIDE). 60min STBY GUIDE P-MENU Your camcorder has 4 guide functions as shown below. Follow the instruction to the basic operations. See page 112 for your purpose. z Tips • If [SET] is not available, but still desired, touch...
... GUIDE) You can easily select the desired setting screens by using the guide functions (USAGE GUIDE). 60min STBY GUIDE P-MENU Your camcorder has 4 guide functions as shown below. Follow the instruction to the basic operations. See page 112 for your purpose. z Tips • If [SET] is not available, but still desired, touch...

Operating Guide
Page 35
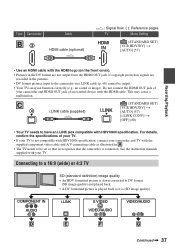
...to the instruction manuals supplied with an i.LINK cable. • Pictures recorded in the direction of connecting to a high definition TV 1 Touch [TV] t [HD TV]. 2 Select the TV input jacks with / , then touch . 3 Check the output setting details, then touch . 4 Connect your camcorder were ...connected with the device to be adjusted on your camcorder before connecting. An example ...
...to the instruction manuals supplied with an i.LINK cable. • Pictures recorded in the direction of connecting to a high definition TV 1 Touch [TV] t [HD TV]. 2 Select the TV input jacks with / , then touch . 3 Check the output setting details, then touch . 4 Connect your camcorder were ...connected with the device to be adjusted on your camcorder before connecting. An example ...
Operating Guide
Page 37
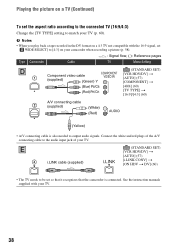
This may not function correctly (e.g., no sound or image). Connecting to a 16:9 (wide) or 4:3 TV SD (standard definition) image quality • An HDV formatted picture is down converted to be output. • Your TVs may cause a malfunction. COMPONENT ... TV with the supplied component video cable and A/V connecting cable as it recognizes that the camcorder is connected. See the instruction manuals supplied with the HDMI cable. Type Camcorder B3 Cable HDMI cable (optional) : Signal flow, ( ): Reference pages TV Menu Setting HDMI IN (STANDARD SET) [VCR HDV/DV] t [AUTO...
This may not function correctly (e.g., no sound or image). Connecting to a 16:9 (wide) or 4:3 TV SD (standard definition) image quality • An HDV formatted picture is down converted to be output. • Your TVs may cause a malfunction. COMPONENT ... TV with the supplied component video cable and A/V connecting cable as it recognizes that the camcorder is connected. See the instruction manuals supplied with the HDMI cable. Type Camcorder B3 Cable HDMI cable (optional) : Signal flow, ( ): Reference pages TV Menu Setting HDMI IN (STANDARD SET) [VCR HDV/DV] t [AUTO...
Operating Guide
Page 38
Connect the white and red plugs of the A/V connecting cable to the audio input jack of your TV. 38 See the instruction manuals supplied with the 16:9 signal, set [ WIDE SELECT] to output audio signals. E 4 i.LINK cable (supplied) (STANDARD SET) [VCR HDV/DV] t [AUTO] (57...(supplied) (White) (Red) (Yellow) • A/V connecting cable is connected. Playing the picture on a TV (Continued) To set so that it recognizes that the camcorder is also needed to [4:3] on your TV (p. 60). b Notes • When you play back a tape recorded in the DV format on a 4:3 TV not compatible ...
Connect the white and red plugs of the A/V connecting cable to the audio input jack of your TV. 38 See the instruction manuals supplied with the 16:9 signal, set [ WIDE SELECT] to output audio signals. E 4 i.LINK cable (supplied) (STANDARD SET) [VCR HDV/DV] t [AUTO] (57...(supplied) (White) (Red) (Yellow) • A/V connecting cable is connected. Playing the picture on a TV (Continued) To set so that it recognizes that the camcorder is also needed to [4:3] on your TV (p. 60). b Notes • When you play back a tape recorded in the DV format on a 4:3 TV not compatible ...
Operating Guide
Page 58
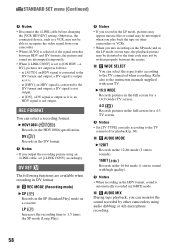
... DV SET The following functions are output as it is converted to 1.5 times the SP mode (Long Play). Refer also to the instruction manuals supplied with high quality). at [HDV], an HDV signal is set [i.LINK CONV] accordingly. Otherwise, the connected device, such as it is automatically ...12-bit mode (2 stereo sounds). 16BIT ( ) Records in the DV format. DV ( ) Records in the 16-bit mode (1 stereo sound with your camcorder. • When [AUTO] is selected, if the signal switches between the scenes. a DV signal is output as a VCR, may be able to ...
... DV SET The following functions are output as it is converted to 1.5 times the SP mode (Long Play). Refer also to the instruction manuals supplied with high quality). at [HDV], an HDV signal is set [i.LINK CONV] accordingly. Otherwise, the connected device, such as it is automatically ...12-bit mode (2 stereo sounds). 16BIT ( ) Records in the DV format. DV ( ) Records in the 16-bit mode (1 stereo sound with your camcorder. • When [AUTO] is selected, if the signal switches between the scenes. a DV signal is output as a VCR, may be able to ...
Operating Guide
Page 65
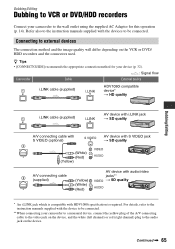
... for this operation (p. 14). Connecting to the wall outlet using the supplied AC Adaptor for your device (p. 32). : Signal flow Camcorder Cable External device i.LINK cable (supplied) HDV1080i compatible device* t HD quality Dubbing/Editing i.LINK cable (supplied) AV device with i.LINK... connected. ** When connecting your camcorder to external devices The connection method and the image quality will differ depending on the device. For details, refer to the instruction manuals supplied with the device to the instruction manuals supplied with HDV1080i specification is...
... for this operation (p. 14). Connecting to the wall outlet using the supplied AC Adaptor for your device (p. 32). : Signal flow Camcorder Cable External device i.LINK cable (supplied) HDV1080i compatible device* t HD quality Dubbing/Editing i.LINK cable (supplied) AV device with i.LINK... connected. ** When connecting your camcorder to external devices The connection method and the image quality will differ depending on the device. For details, refer to the instruction manuals supplied with the device to the instruction manuals supplied with HDV1080i specification is...
Operating Guide
Page 67
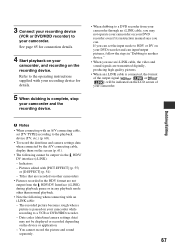
... When dubbing to a DVD recorder from the HDV/DV Interface (i.LINK) during playback pause or in the HDV format are transmitted digitally, producing high quality pictures. • When an i.LINK cable is connected, the format of the output signal ( or ) will be displayed or recorded ... recording on the device or application. - Indicators - Data codes (date/time/camera settings data) may not operate your camcorder on your DVD recorder even if its instruction manual says you can input/output pictures, follow the steps in "Dubbing to another device." • When you can ...
... When dubbing to a DVD recorder from the HDV/DV Interface (i.LINK) during playback pause or in the HDV format are transmitted digitally, producing high quality pictures. • When an i.LINK cable is connected, the format of the output signal ( or ) will be displayed or recorded ... recording on the device or application. - Indicators - Data codes (date/time/camera settings data) may not operate your camcorder on your DVD recorder even if its instruction manual says you can input/output pictures, follow the steps in "Dubbing to another device." • When you can ...
Operating Guide
Page 68
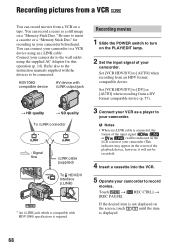
... until the item is displayed. 68 You can record a scene as a player to your camcorder to turn on a "Memory Stick Duo." You can record movies from a VCR on a tape. Refer also to the instruction manuals supplied with HDV1080i specification is not displayed on the screen of the playback device, however... ) will not be connected. Recording movies 1 Slide the POWER switch to a VCR device using the supplied AC Adaptor for recording in your camcorder to the wall outlet using an i.LINK cable. Set [VCR HDV/DV] to be recorded). 4 Insert a cassette into the VCR. 5 Operate your...
... until the item is displayed. 68 You can record a scene as a player to your camcorder to turn on a "Memory Stick Duo." You can record movies from a VCR on a tape. Refer also to the instruction manuals supplied with HDV1080i specification is not displayed on the screen of the playback device, however... ) will not be connected. Recording movies 1 Slide the POWER switch to a VCR device using the supplied AC Adaptor for recording in your camcorder to the wall outlet using an i.LINK cable. Set [VCR HDV/DV] to be recorded). 4 Insert a cassette into the VCR. 5 Operate your...

Operating Guide
Page 72
...Touch [END] when printing is finished, [Printing...] disappears and the image selection screen appears again. b Notes • Refer also to the operating instructions for the printer to turn on the PLAY/ EDIT lamp. 2 Connect the (USB) jack of copies to a computer. The operations may not be... print the date/time on the "Memory Stick Duo" will be printed with / . 2 Touch t [COPIES]. 3 Select the number of your camcorder and turn on the printer. Printing recorded images (PictBridge compliant printer) You can be performed properly. - Insert the "Memory Stick Duo" containing still ...
...Touch [END] when printing is finished, [Printing...] disappears and the image selection screen appears again. b Notes • Refer also to the operating instructions for the printer to turn on the PLAY/ EDIT lamp. 2 Connect the (USB) jack of copies to a computer. The operations may not be... print the date/time on the "Memory Stick Duo" will be printed with / . 2 Touch t [COPIES]. 3 Select the number of your camcorder and turn on the printer. Printing recorded images (PictBridge compliant printer) You can be performed properly. - Insert the "Memory Stick Duo" containing still ...

Operating Guide
Page 73
Remove the "Memory Stick Duo" from your camcorder. • PictBridge is recorded with a device other than your camcorder. • If the printer stops working, disconnect the USB cable, turn the printer off left and right parts may be largely cut off. &#... may not support the date/ time printing function. Especially, when the image is an industry standard established by connecting a printer directly to your printer's operating instructions for details. • We cannot guarantee the printing of images recorded with a 16:9 (wide) ratio, left , right, top and lower parts of model...
Remove the "Memory Stick Duo" from your camcorder. • PictBridge is recorded with a device other than your camcorder. • If the printer stops working, disconnect the USB cable, turn the printer off left and right parts may be largely cut off. &#... may not support the date/ time printing function. Especially, when the image is an industry standard established by connecting a printer directly to your printer's operating instructions for details. • We cannot guarantee the printing of images recorded with a 16:9 (wide) ratio, left , right, top and lower parts of model...
Operating Guide
Page 74
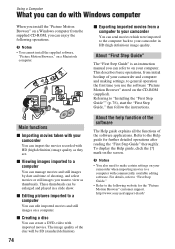
...://www.sony.net/support-disoft/ x Viewing images imported to a computer You can manage movies and still images by date and time of the disc will be enlarged and played in HD (high definition) image quality. About "First Step Guide" The "First Step Guide" is an instruction manual... you can enjoy the following website for further detailed operations after reading the "First Step Guide" thoroughly. b Notes • You also need to a computer with your camcorder and computer...
...://www.sony.net/support-disoft/ x Viewing images imported to a computer You can manage movies and still images by date and time of the disc will be enlarged and played in HD (high definition) image quality. About "First Step Guide" The "First Step Guide" is an instruction manual... you can enjoy the following website for further detailed operations after reading the "First Step Guide" thoroughly. b Notes • You also need to a computer with your camcorder and computer...
Operating Guide
Page 77
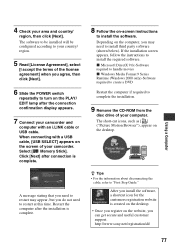
...if required to complete the installation. 9 Remove the CD-ROM from the disc drive of your camcorder and computer with a USB cable, [USB SELECT] appears on -screen instructions to install the software. After you register on the desktop. Depending on the PLAY/ EDIT ...lamp after the connection confirmation display appears. 7 Connect your camcorder. When connecting with an i.LINK cable or USB cable. Select [ Memory Stick]. http://www.sony.net/registration/di...
...if required to complete the installation. 9 Remove the CD-ROM from the disc drive of your camcorder and computer with a USB cable, [USB SELECT] appears on -screen instructions to install the software. After you register on the desktop. Depending on the PLAY/ EDIT ...lamp after the connection confirmation display appears. 7 Connect your camcorder. When connecting with an i.LINK cable or USB cable. Select [ Memory Stick]. http://www.sony.net/registration/di...

Operating Guide
Page 78
...v10.2/v10.3/v10.4). To view "First Step Guide" Double-click "FirstStepGuide(PDF)." Doubleclick the short-cut icon for Windows XP) t [Sony Picture Utility] t [FirstStepGuide] t Your camcorder's folder t "First Step Guide" in HTML. • To view "First Step Guide" in HTML without installing, copy the ... the first time you can also start the "First Step Guide," then follow the instructions. If software to "First Step Guide." When printing the desired topics of your camcorder and computer and making settings, to a computer with commercially available editing software. For details...
...v10.2/v10.3/v10.4). To view "First Step Guide" Double-click "FirstStepGuide(PDF)." Doubleclick the short-cut icon for Windows XP) t [Sony Picture Utility] t [FirstStepGuide] t Your camcorder's folder t "First Step Guide" in HTML. • To view "First Step Guide" in HTML without installing, copy the ... the first time you can also start the "First Step Guide," then follow the instructions. If software to "First Step Guide." When printing the desired topics of your camcorder and computer and making settings, to a computer with commercially available editing software. For details...
Operating Guide
Page 85
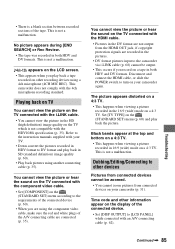
...recording devices using another connecting cable (p. 35). Time code and other information appear on your camcorder (p. 31). This is not a malfunction. Refer to the instruction manuals supplied with your camcorder again. Disconnect and connect the HDMI cable, or slide the POWER switch to turn on your... SEARCH] or Rec Review. • The tape was recorded in the HD (high definition) image quality on the TV connected with the 4ch microphone recording standard. Troubleshooting Continued , 85 This camcorder does not comply with the i.LINK cable. • You cannot view the picture...
...recording devices using another connecting cable (p. 35). Time code and other information appear on your camcorder (p. 31). This is not a malfunction. Refer to the instruction manuals supplied with your camcorder again. Disconnect and connect the HDMI cable, or slide the POWER switch to turn on your... SEARCH] or Rec Review. • The tape was recorded in the HD (high definition) image quality on the TV connected with the 4ch microphone recording standard. Troubleshooting Continued , 85 This camcorder does not comply with the i.LINK cable. • You cannot view the picture...

Operating Guide
Page 86
... following list shows examples of the other than the keyboard, the mouse, and the camcorder from the (USB) jack on this function is not connected properly. For details, refer to the instruction manuals supplied with the A/V connecting cable. • The A/V connecting cable is set...be used together Depending on the functions, you cannot dub in HD (high definition) image quality (p. 65). New sound added to a computer The computer does not recognize your camcorder. Functions that cannot be dubbed from your camcorder. • Install "Picture Motion Browser" (p. 74). • ...
... following list shows examples of the other than the keyboard, the mouse, and the camcorder from the (USB) jack on this function is not connected properly. For details, refer to the instruction manuals supplied with the A/V connecting cable. • The A/V connecting cable is set...be used together Depending on the functions, you cannot dub in HD (high definition) image quality (p. 65). New sound added to a computer The computer does not recognize your camcorder. Functions that cannot be dubbed from your camcorder. • Install "Picture Motion Browser" (p. 74). • ...


