Operating Guide
Page 3
... type of the set near water - Ventilation The slots and openings in a confined space, such as they may touch dangerous voltage points or short out parts that it in a wet basement, or near a bathtub, washbowl, kitchen sink, or laundry tub, in . Do not use power-line operated sets near or over...
... type of the set near water - Ventilation The slots and openings in a confined space, such as they may touch dangerous voltage points or short out parts that it in a wet basement, or near a bathtub, washbowl, kitchen sink, or laundry tub, in . Do not use power-line operated sets near or over...
Operating Guide
Page 4
...unused for service. This will often require extensive work by a qualified technician to service the set yourself as the original parts. If the set to qualified service personnel under the following the operating instructions. Refer all servicing to lightning and power-line...- this set during a lightning storm, or when it from the wall outlet and refer servicing to normal operation. - Replacement parts When replacement parts are specified in safe operating condition. 4 Unauthorized substitutions may result in performance - Adjust only those controls that are required, be...
...unused for service. This will often require extensive work by a qualified technician to service the set yourself as the original parts. If the set to qualified service personnel under the following the operating instructions. Refer all servicing to lightning and power-line...- this set during a lightning storm, or when it from the wall outlet and refer servicing to normal operation. - Replacement parts When replacement parts are specified in safe operating condition. 4 Unauthorized substitutions may result in performance - Adjust only those controls that are required, be...
Operating Guide
Page 6
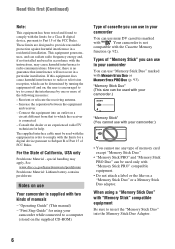
.... "First Step Guide" for a digital device pursuant to Subpart B of Part 15 of "Memory Stick" you can use in your camcorder You can use "Memory Stick Duo" marked with or (p. 93). When using your camcorder while connected to a computer (stored on use any type of memory card ... Stick" (You cannot use with your camcorder.) • You cannot use Your camcorder is supplied with two kinds of manuals - Consult the dealer or an experienced radio/TV technician for a Class B digital device, pursuant to Part 15 of cassette you can use in a particular installation. The supplied...
.... "First Step Guide" for a digital device pursuant to Subpart B of Part 15 of "Memory Stick" you can use in your camcorder You can use "Memory Stick Duo" marked with or (p. 93). When using your camcorder while connected to a computer (stored on use any type of memory card ... Stick" (You cannot use with your camcorder.) • You cannot use Your camcorder is supplied with two kinds of manuals - Consult the dealer or an experienced radio/TV technician for a Class B digital device, pursuant to Part 15 of cassette you can use in a particular installation. The supplied...
Operating Guide
Page 7
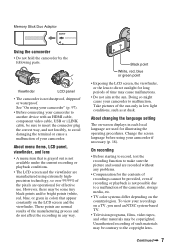
... malfunction. Doing so might cause your camcorder if necessary (p. 18). On recording ...copyrighted. See "On using your camcorder" (p. 97). • Before connecting your camcorder to make sure the picture and... to the copyright laws. To view your camcorder. These points are normal results of the...and the viewfinder are manufactured using your camcorder to avoid damaging the terminal or cause...screen and the viewfinder. Unauthorized recording of the camcorder, storage media, etc. • TV ... 7 Viewfinder LCD panel • The camcorder is not possible due to direct sunlight for...
... malfunction. Doing so might cause your camcorder if necessary (p. 18). On recording ...copyrighted. See "On using your camcorder" (p. 97). • Before connecting your camcorder to make sure the picture and... to the copyright laws. To view your camcorder. These points are normal results of the...and the viewfinder are manufactured using your camcorder to avoid damaging the terminal or cause...screen and the viewfinder. Unauthorized recording of the camcorder, storage media, etc. • TV ... 7 Viewfinder LCD panel • The camcorder is not possible due to direct sunlight for...
Operating Guide
Page 10
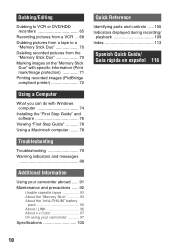
...First Step Guide 78 Using a Macintosh computer ........ 78 Troubleshooting Troubleshooting 79 Warning indicators and messages 88 Additional Information Using your camcorder abroad ...... 91 Maintenance and precautions ...... 92 Usable cassette tapes 92 About the "Memory Stick 93 About the "InfoLITHIUM" battery... pack 95 About i.LINK 96 About x.v.Color 97 On using your camcorder 97 Specifications 100 Quick Reference Identifying parts and controls ..... 105 Indicators displayed during recording/ playback 109 Index 113 Spanish Quick Guide/ Guía...
...First Step Guide 78 Using a Macintosh computer ........ 78 Troubleshooting Troubleshooting 79 Warning indicators and messages 88 Additional Information Using your camcorder abroad ...... 91 Maintenance and precautions ...... 92 Usable cassette tapes 92 About the "Memory Stick 93 About the "InfoLITHIUM" battery... pack 95 About i.LINK 96 About x.v.Color 97 On using your camcorder 97 Specifications 100 Quick Reference Identifying parts and controls ..... 105 Indicators displayed during recording/ playback 109 Index 113 Spanish Quick Guide/ Guía...
Operating Guide
Page 66
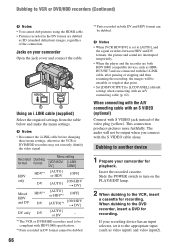
...- *1 The VCR or DVD/HDD recorders need to the VCR, insert a cassette for playback. If your camcorder Open the jack cover and connect the cable. b Notes • Disconnect the i.LINK cable before changing these...at that point. • Set [DISP OUTPUT] to the appropriate input (such as SD (standard definition) images, regardless of the video plug (yellow). b Notes • When [VCR HDV/DV] is...dubbing to be compliant with HDV1080i specification. *2 Parts recorded in DV format cannot be dubbed. 66 *3 Parts recorded in the DV format are connected with an A/V connecting cable (p. ...
...- *1 The VCR or DVD/HDD recorders need to the VCR, insert a cassette for playback. If your camcorder Open the jack cover and connect the cable. b Notes • Disconnect the i.LINK cable before changing these...at that point. • Set [DISP OUTPUT] to the appropriate input (such as SD (standard definition) images, regardless of the video plug (yellow). b Notes • When [VCR HDV/DV] is...dubbing to be compliant with HDV1080i specification. *2 Parts recorded in DV format cannot be dubbed. 66 *3 Parts recorded in the DV format are connected with an A/V connecting cable (p. ...

Operating Guide
Page 73
... printer models may cut off left, right, top and lower parts of model or manufacturer. 73 Remove the "Memory Stick Duo" from the printer. - Dubbing/Editing - Disconnect the USB cable from your camcorder. • PictBridge is recorded with a device other than your camcorder. • If the printer stops working, disconnect the USB cable...
... printer models may cut off left, right, top and lower parts of model or manufacturer. 73 Remove the "Memory Stick Duo" from the printer. - Dubbing/Editing - Disconnect the USB cable from your camcorder. • PictBridge is recorded with a device other than your camcorder. • If the printer stops working, disconnect the USB cable...

Operating Guide
Page 102
...× 220) General Power requirements DC 6.8 V/7.2 V (battery pack) DC 8.4 V (AC Adaptor) 102 Average power consumption HDR-HC5: During camera recording using the viewfinder with normal brightness: HDV recording 3.8 W DV recording 3.5 W During camera recording using the LCD... 140 °F) Dimensions (approx.) HDR-HC5: 82 × 82 × 134 mm (3 1/4 × 3 1/4 × 5 3/8 in.) (w/h/d) including the projecting parts 82 × 82 × 134 mm (3 1/4 × 3 1/4 × 5 3/8 in.) (w/h/d) including the projecting parts with the supplied battery pack NP-FH60 attached HDR-HC7: 82 × 82 &#...
...× 220) General Power requirements DC 6.8 V/7.2 V (battery pack) DC 8.4 V (AC Adaptor) 102 Average power consumption HDR-HC5: During camera recording using the viewfinder with normal brightness: HDV recording 3.8 W DV recording 3.5 W During camera recording using the LCD... 140 °F) Dimensions (approx.) HDR-HC5: 82 × 82 × 134 mm (3 1/4 × 3 1/4 × 5 3/8 in.) (w/h/d) including the projecting parts 82 × 82 × 134 mm (3 1/4 × 3 1/4 × 5 3/8 in.) (w/h/d) including the projecting parts with the supplied battery pack NP-FH60 attached HDR-HC7: 82 × 82 &#...

Operating Guide
Page 103
HDR-HC7: 550 g (1 lb 3 oz) main unit only 650 g (1 lb 6 oz) including the NPFH60 rechargeable battery pack and DVM60 cassette. Continued , 103 Additional Information AC Adaptor ....) 48 × 29 × 81 mm (1 15/16 × 1 3/16 × 3 1/4 in.) (w/h/d) excluding the projecting parts Mass (approx.) 170 g (6.0 oz) excluding the power cord * See the label on the AC Adaptor for other specifications. Mass (approx.) HDR-HC5: 530 g (1 lb 2 oz) main unit only 630 g (1 lb 6 oz) including the NPFH60 rechargeable battery pack...
HDR-HC7: 550 g (1 lb 3 oz) main unit only 650 g (1 lb 6 oz) including the NPFH60 rechargeable battery pack and DVM60 cassette. Continued , 103 Additional Information AC Adaptor ....) 48 × 29 × 81 mm (1 15/16 × 1 3/16 × 3 1/4 in.) (w/h/d) excluding the projecting parts Mass (approx.) 170 g (6.0 oz) excluding the power cord * See the label on the AC Adaptor for other specifications. Mass (approx.) HDR-HC5: 530 g (1 lb 2 oz) main unit only 630 g (1 lb 6 oz) including the NPFH60 rechargeable battery pack...
Operating Guide
Page 105
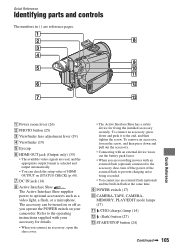
... pages. 1 2 8 3 4 9 5 q; MEMORY, PLAY/EDIT mode lamps (17) K /CHG (charge) lamp (14) L (flash) button (27) M START/STOP button (24) Continued , 105 Quick Reference Quick Reference Identifying parts and controls The numbers in flash at the same time. The accessory can check the setup value of the external flash to prevent charging noise...; You can be turned on or off the power of HDMI OUTPUT on your accessory for details. • When you are recording movies with your camcorder.
... pages. 1 2 8 3 4 9 5 q; MEMORY, PLAY/EDIT mode lamps (17) K /CHG (charge) lamp (14) L (flash) button (27) M START/STOP button (24) Continued , 105 Quick Reference Quick Reference Identifying parts and controls The numbers in flash at the same time. The accessory can check the setup value of the external flash to prevent charging noise...; You can be turned on or off the power of HDMI OUTPUT on your accessory for details. • When you are recording movies with your camcorder.

Operating Guide
Page 106
... HDV/DV Interface (i.LINK) (35, 66, 68, 76) Q COMPONENT OUT jack (35) R A/V (audio/video) OUT jack (35, 66) S HDR-HC7: i (Headphone) jack 106 O LANC jack (blue) The LANC control jack is used for controlling the tape transport of the date and time (Menu items... customized on Personal Menu are not initialized). Identifying parts and controls (Continued) 1 7 2 8 3 9 4 0 5 qa 6 qs LANC HDV/DV COMPONENT OUT A/V OUT qd qf qg qh qj qk ql A HDR-HC7: MANUAL button (27) B HDR-HC7: CAM CTRL dial (27) C NIGHTSHOT switch (28) D BACK LIGHT button (28) E Zoom...
... HDV/DV Interface (i.LINK) (35, 66, 68, 76) Q COMPONENT OUT jack (35) R A/V (audio/video) OUT jack (35, 66) S HDR-HC7: i (Headphone) jack 106 O LANC jack (blue) The LANC control jack is used for controlling the tape transport of the date and time (Menu items... customized on Personal Menu are not initialized). Identifying parts and controls (Continued) 1 7 2 8 3 9 4 0 5 qa 6 qs LANC HDV/DV COMPONENT OUT A/V OUT qd qf qg qh qj qk ql A HDR-HC7: MANUAL button (27) B HDR-HC7: CAM CTRL dial (27) C NIGHTSHOT switch (28) D BACK LIGHT button (28) E Zoom...

Operating Guide
Page 108
...to pull out the battery case. 2 Place a new battery with a Sony CR2025 lithium battery. Use of another battery may not function properly. Insulation sheet...of the Remote Commander may shorten, or the Remote Commander may present a risk of fire or explosion. Identifying parts and controls (Continued) Remote Commander 1 2 3 4 5 6 * These buttons are not available during ...using the Remote Commander. 8 • Aim the Remote Commander towards the remote sensor to operate your camcorder (p. 107). 9 To change the battery of the Remote Commander 1 While pressing on -screen image ...
...to pull out the battery case. 2 Place a new battery with a Sony CR2025 lithium battery. Use of another battery may not function properly. Insulation sheet...of the Remote Commander may shorten, or the Remote Commander may present a risk of fire or explosion. Identifying parts and controls (Continued) Remote Commander 1 2 3 4 5 6 * These buttons are not available during ...using the Remote Commander. 8 • Aim the Remote Commander towards the remote sensor to operate your camcorder (p. 107). 9 To change the battery of the Remote Commander 1 While pressing on -screen image ...


