Operating Guide
Page 18
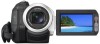
...t (TIME/ LANGU.) t [LANGUAGE], then select the desired language. Changing the language setting You can change the on the touch panel do not use your camcorder without any operation attempted for [DATA CODE] (During Easy Handycam operation, you can set the desired date and time by touching t [MENU] t (TIME/LANGU....) t [CLOCK SET] (p. 40). To reset the date and time You can set only [DATE/TIME])). • The lens cover opens automatically when the POWER switch is set to turn off...
...t (TIME/ LANGU.) t [LANGUAGE], then select the desired language. Changing the language setting You can change the on the touch panel do not use your camcorder without any operation attempted for [DATA CODE] (During Easy Handycam operation, you can set the desired date and time by touching t [MENU] t (TIME/LANGU....) t [CLOCK SET] (p. 40). To reset the date and time You can set only [DATE/TIME])). • The lens cover opens automatically when the POWER switch is set to turn off...
Operating Guide
Page 27
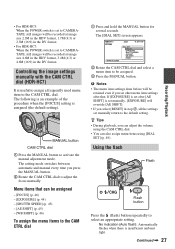
... button. b Notes • The menu item settings done before will be retained even if you select [RESET] in step 2, all the settings set manually return to adjust the focus manually. Menu items that . The...6 0 min STBY 0:00:00 [MANUAL]:EXEC DIAL SET FOCUS EXPOSURE SHUTTR SPEED AE SHIFT WB SHIFT RESET 2 Rotate the CAM CTRL dial and select a menu item to activate the manual adjustment mode. If [... CAM CTRL dial 1 Press and hold the MANUAL button for several seconds. • For HDR-HC5: When the POWER switch is set to CAMERATAPE, still images will be recorded at image size...
... button. b Notes • The menu item settings done before will be retained even if you select [RESET] in step 2, all the settings set manually return to adjust the focus manually. Menu items that . The...6 0 min STBY 0:00:00 [MANUAL]:EXEC DIAL SET FOCUS EXPOSURE SHUTTR SPEED AE SHIFT WB SHIFT RESET 2 Rotate the CAM CTRL dial and select a menu item to activate the manual adjustment mode. If [... CAM CTRL dial 1 Press and hold the MANUAL button for several seconds. • For HDR-HC5: When the POWER switch is set to CAMERATAPE, still images will be recorded at image size...

Operating Guide
Page 34
... starting point (Continued) 1 During playback, press ZERO SET MEMORY on the tape. The tape counter returns to stop playback. 3 Press mREW. The tape counter is reset to "0:00:00" and appears on the screen. 6 0 min 0:00:00 GUIDE P-MENU If the tape counter is not displayed, press DISPLAY. 2 Press STOP when...
... starting point (Continued) 1 During playback, press ZERO SET MEMORY on the tape. The tape counter returns to stop playback. 3 Press mREW. The tape counter is reset to "0:00:00" and appears on the screen. 6 0 min 0:00:00 GUIDE P-MENU If the tape counter is not displayed, press DISPLAY. 2 Press STOP when...
Operating Guide
Page 48
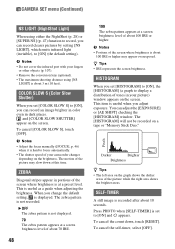
... tape or "Memory Stick Duo." 80 Pixels Darker Brighter Brightness z Tips • The left area on the graph shows the darker areas of your camcorder changes depending on the brightness. To cancel the self-timer, select [OFF]. COLOR SLOW S (Color Slow Shutter) When you set [COLOR SLOW S] ...HISTOGRAM] (a graph to [ON] and appears. HISTOGRAM When you set to display a distribution of about 100 IRE or higher may slow down , touch [RESET]. SELF-TIMER A still image is about 70 IRE. 48 100 The zebra pattern appears at this time. z Tips • IRE represents the screen brightness...
... tape or "Memory Stick Duo." 80 Pixels Darker Brighter Brightness z Tips • The left area on the graph shows the darker areas of your camcorder changes depending on the brightness. To cancel the self-timer, select [OFF]. COLOR SLOW S (Color Slow Shutter) When you set [COLOR SLOW S] ...HISTOGRAM] (a graph to [ON] and appears. HISTOGRAM When you set to display a distribution of about 100 IRE or higher may slow down , touch [RESET]. SELF-TIMER A still image is about 70 IRE. 48 100 The zebra pattern appears at this time. z Tips • IRE represents the screen brightness...
Operating Guide
Page 52
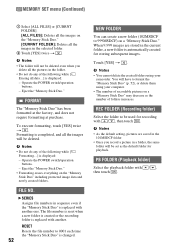
...following while [ Erasing all data...] is displayed: - FILE NO. b Notes • You cannot delete the created folders using your camcorder. The file number is reset when a new folder is created or the recording folder is changed. 52 NEW FOLDER You can create a new folder (102MSDCF to ...used for storing subsequent images. FORMAT The "Memory Stick Duo" has been formatted at the factory, and does not require formatting at purchase. RESET Resets the file number to 0001 each time the "Memory Stick Duo" is replaced with another . PB FOLDER (Playback folder) Select the playback folder...
...following while [ Erasing all data...] is displayed: - FILE NO. b Notes • You cannot delete the created folders using your camcorder. The file number is reset when a new folder is created or the recording folder is changed. 52 NEW FOLDER You can create a new folder (102MSDCF to ...used for storing subsequent images. FORMAT The "Memory Stick Duo" has been formatted at the factory, and does not require formatting at purchase. RESET Resets the file number to 0001 each time the "Memory Stick Duo" is replaced with another . PB FOLDER (Playback folder) Select the playback folder...

Operating Guide
Page 64
..., touch / . 2 Touch the menu item you want to move. 3 Touch / to move [P-MENU SET UP]. YES NO 3 Touch [YES] t . Initializing the Personal Menu settings (Reset) Touch t [P-MENU SET UP] t [RESET] t [YES] t [YES] t . b Notes • You cannot delete [MENU] and [P-MENU SET UP]. If the desired menu item is not displayed, touch / . 64
..., touch / . 2 Touch the menu item you want to move. 3 Touch / to move [P-MENU SET UP]. YES NO 3 Touch [YES] t . Initializing the Personal Menu settings (Reset) Touch t [P-MENU SET UP] t [RESET] t [YES] t [YES] t . b Notes • You cannot delete [MENU] and [P-MENU SET UP]. If the desired menu item is not displayed, touch / . 64
Operating Guide
Page 79
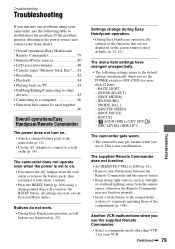
... wall outlet or remove the battery pack, then reconnect it . Another VCR malfunctions when you set to OFF (CHG) for your Sony dealer. • Overall operations/Easy Handycam/ Remote Commander 79 • Batteries/Power sources 80 • LCD screen/viewfinder 80 ... troubleshoot the problem. Troubleshooting Troubleshooting If you press the RESET button, all buttons are functional (p. 23). Continued , 79 Troubleshooting terminals matching those of [DV SET] - [MIC LEVEL] (HDR-HC7) The camcorder gets warm. • The camcorder may not function properly. • Insert a fresh...
... wall outlet or remove the battery pack, then reconnect it . Another VCR malfunctions when you set to OFF (CHG) for your Sony dealer. • Overall operations/Easy Handycam/ Remote Commander 79 • Batteries/Power sources 80 • LCD screen/viewfinder 80 ... troubleshoot the problem. Troubleshooting Troubleshooting If you press the RESET button, all buttons are functional (p. 23). Continued , 79 Troubleshooting terminals matching those of [DV SET] - [MIC LEVEL] (HDR-HC7) The camcorder gets warm. • The camcorder may not function properly. • Insert a fresh...
Operating Guide
Page 88
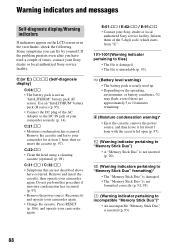
... starts from "E." 101-1001(Warning indicator pertaining to the DC IN jack of your camcorder securely (p. 14). Some symptoms you have occurred. Press RESET (p. 106), and operate your camcorder again. • Change the cassette. Do not perform this procedure if moisture condensation ...98). Reconnect it for at least 1 hour, then reinsert the cassette (p. 97). Remove and insert the cassette, then operate your Sony dealer or local authorized Sony service facility. C:31:ss / C:32:ss • Symptoms that are approximately 5 to 10 minutes remaining. % (Moisture condensation ...
... starts from "E." 101-1001(Warning indicator pertaining to the DC IN jack of your camcorder securely (p. 14). Some symptoms you have occurred. Press RESET (p. 106), and operate your camcorder again. • Change the cassette. Do not perform this procedure if moisture condensation ...98). Reconnect it for at least 1 hour, then reinsert the cassette (p. 97). Remove and insert the cassette, then operate your Sony dealer or local authorized Sony service facility. C:31:ss / C:32:ss • Symptoms that are approximately 5 to 10 minutes remaining. % (Moisture condensation ...

Operating Guide
Page 106
... 106 J Access lamp (20, 93) K "Memory Stick Duo" slot (20) L EASY button (22) M LCD screen/touch panel (7, 19) N RESET button Initializes all the settings, including the setting of video devices and peripherals connected to adjust the volume, see page 29. For how to it. ...Identifying parts and controls (Continued) 1 7 2 8 3 9 4 0 5 qa 6 qs LANC HDV/DV COMPONENT OUT A/V OUT qd qf qg qh qj qk ql A HDR-HC7: MANUAL button (27) B HDR-HC7: CAM CTRL dial (27) C NIGHTSHOT switch (28) D BACK LIGHT button (28) E Zoom buttons (26) F START/STOP button (24) G DISPLAY/BATT INFO button...
... 106 J Access lamp (20, 93) K "Memory Stick Duo" slot (20) L EASY button (22) M LCD screen/touch panel (7, 19) N RESET button Initializes all the settings, including the setting of video devices and peripherals connected to adjust the volume, see page 29. For how to it. ...Identifying parts and controls (Continued) 1 7 2 8 3 9 4 0 5 qa 6 qs LANC HDV/DV COMPONENT OUT A/V OUT qd qf qg qh qj qk ql A HDR-HC7: MANUAL button (27) B HDR-HC7: CAM CTRL dial (27) C NIGHTSHOT switch (28) D BACK LIGHT button (28) E Zoom buttons (26) F START/STOP button (24) G DISPLAY/BATT INFO button...


