Operating Guide
Page 3
For those sets designed to operate from battery power, or other similar surface. - If you are provided for cleaning the exterior of electrical power supplied to your home, consult your electrician to be ...
For those sets designed to operate from battery power, or other similar surface. - If you are provided for cleaning the exterior of electrical power supplied to your home, consult your electrician to be ...
Operating Guide
Page 5
.... Read this first Before operating the unit, please read this product, you may call: Sony Customer Information Center 1-800222-SONY (7669). Refer to operate this equipment. HDR-HC Serial No. ACNo. Otherwise, fire or injury may not cause harmful interference, and ... Sony dealer regarding recycling of Conformity Trade Name: SONY Model No.: HDR-HC5 Responsible Party: Sony Electronics Inc. Telephone Number: 858-942-2230 This device complies with Part15 of Conformity Trade Name: SONY Model No.: HDR-HC7 Responsible Party: Sony Electronics Inc. CAUTION Replace the battery ...
.... Read this first Before operating the unit, please read this product, you may call: Sony Customer Information Center 1-800222-SONY (7669). Refer to operate this equipment. HDR-HC Serial No. ACNo. Otherwise, fire or injury may not cause harmful interference, and ... Sony dealer regarding recycling of Conformity Trade Name: SONY Model No.: HDR-HC5 Responsible Party: Sony Electronics Inc. Telephone Number: 858-942-2230 This device complies with Part15 of Conformity Trade Name: SONY Model No.: HDR-HC7 Responsible Party: Sony Electronics Inc. CAUTION Replace the battery ...
Operating Guide
Page 6
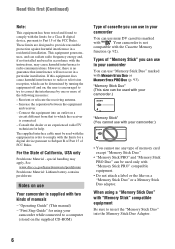
... Material - Read this equipment does cause harmful interference to radio or television reception, which the receiver is connected. - Your camcorder is no guarantee that to which can radiate radio frequency energy and, if not installed and used only with the instructions, ...may apply, See www.dtsc.ca.gov/hazardouswaste/perchlorate Perchlorate Material: Lithium battery contains perchlorate. These limits are designed to provide reasonable protection against harmful interference in accordance with "Memory Stick PRO" compatible ...
... Material - Read this equipment does cause harmful interference to radio or television reception, which the receiver is connected. - Your camcorder is no guarantee that to which can radiate radio frequency energy and, if not installed and used only with the instructions, ...may apply, See www.dtsc.ca.gov/hazardouswaste/perchlorate Perchlorate Material: Lithium battery contains perchlorate. These limits are designed to provide reasonable protection against harmful interference in accordance with "Memory Stick PRO" compatible ...

Operating Guide
Page 9
...camcorder to a 16:9 (wide) or 4:3 TV 37 Using the Menu Recording/Playback Easy Recording/Playback (Easy Handycam 22 Recording 24 Zooming 26 Recording high quality still images during tape recording (Dual Rec 26 Controlling the image settings manually with high definition... quality Trying out the new HDV format! ... 11 Viewing video recorded in the HDV format 12 Getting Started Step 1: Checking supplied items 13 Step 2: Charging the battery... Read this first 5 Enjoying pictures with the CAM CTRL dial (HDR-HC7 27 Using the flash 27 Recording in dark places (NightShot 28...
...camcorder to a 16:9 (wide) or 4:3 TV 37 Using the Menu Recording/Playback Easy Recording/Playback (Easy Handycam 22 Recording 24 Zooming 26 Recording high quality still images during tape recording (Dual Rec 26 Controlling the image settings manually with high definition... quality Trying out the new HDV format! ... 11 Viewing video recorded in the HDV format 12 Getting Started Step 1: Checking supplied items 13 Step 2: Charging the battery... Read this first 5 Enjoying pictures with the CAM CTRL dial (HDR-HC7 27 Using the flash 27 Recording in dark places (NightShot 28...
Operating Guide
Page 10
... ...... 91 Maintenance and precautions ...... 92 Usable cassette tapes 92 About the "Memory Stick 93 About the "InfoLITHIUM" battery pack 95 About i.LINK 96 About x.v.Color 97 On using your camcorder 97 Specifications 100 Quick Reference Identifying parts and controls ..... 105 Indicators displayed during recording/ playback 109 Index 113 Spanish Quick Guide/ Gu...
... ...... 91 Maintenance and precautions ...... 92 Usable cassette tapes 92 About the "Memory Stick 93 About the "InfoLITHIUM" battery pack 95 About i.LINK 96 About x.v.Color 97 On using your camcorder 97 Specifications 100 Quick Reference Identifying parts and controls ..... 105 Indicators displayed during recording/ playback 109 Index 113 Spanish Quick Guide/ Gu...
Operating Guide
Page 13
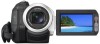
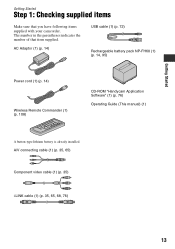
... of that you have following items supplied with your camcorder. AC Adaptor (1) (p. 14) USB cable (1) (p. 72) Rechargeable battery pack NP-FH60 (1) (p. 14, 95) Power cord (1) (p. 14) Wireless Remote Commander (1) (p. 108) CD-ROM "Handycam Application Software" (1) (p. 76) Operating Guide (This manual) (1) A button-type lithium battery is already installed. Getting Started Getting Started Step 1: Checking...
... of that you have following items supplied with your camcorder. AC Adaptor (1) (p. 14) USB cable (1) (p. 72) Rechargeable battery pack NP-FH60 (1) (p. 14, 95) Power cord (1) (p. 14) Wireless Remote Commander (1) (p. 108) CD-ROM "Handycam Application Software" (1) (p. 76) Operating Guide (This manual) (1) A button-type lithium battery is already installed. Getting Started Getting Started Step 1: Checking...
Operating Guide
Page 14
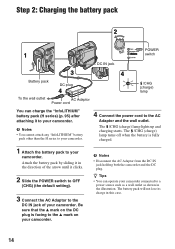
... starts. b Notes • Disconnect the AC Adaptor from the DC IN jack holding both the camcorder and the DC plug. Attach the battery pack by sliding it in the direction of your camcorder. The battery pack will not lose its charge in this case. 14 z Tips • You can charge the... the v mark on the DC plug is fully charged. 1 Attach the battery pack to your camcorder. 4 Connect the power cord to the AC Adaptor and the wall outlet. Step 2: Charging the battery pack 2 POWER 1 switch DC IN jack 3 Battery pack DC plug 4 To the wall outlet AC Adaptor Power cord 4 /CHG...
... starts. b Notes • Disconnect the AC Adaptor from the DC IN jack holding both the camcorder and the DC plug. Attach the battery pack by sliding it in the direction of your camcorder. The battery pack will not lose its charge in this case. 14 z Tips • You can charge the... the v mark on the DC plug is fully charged. 1 Attach the battery pack to your camcorder. 4 Connect the power cord to the AC Adaptor and the wall outlet. Step 2: Charging the battery pack 2 POWER 1 switch DC IN jack 3 Battery pack DC plug 4 To the wall outlet AC Adaptor Power cord 4 /CHG...
Operating Guide
Page 15
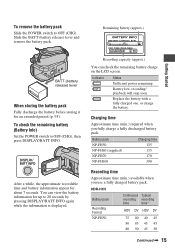
... 170 NP-FH100 390 Recording time Approximate time (min.) available when you fully charge a fully discharged battery pack. DISPLAY/ BATT INFO After a while, the approximate recordable time and battery information appear for an extended period (p. 95). HDR-HC5 Battery pack Recording Format NP-FH50 Continuous Typical recording recording time time* HDV DV HDV DV 75...
... 170 NP-FH100 390 Recording time Approximate time (min.) available when you fully charge a fully discharged battery pack. DISPLAY/ BATT INFO After a while, the approximate recordable time and battery information appear for an extended period (p. 95). HDR-HC5 Battery pack Recording Format NP-FH50 Continuous Typical recording recording time time* HDV DV HDV DV 75...

Operating Guide
Page 16
...: Top: When the LCD backlight turns on . On the battery pack • Before changing the battery pack, slide the POWER switch to the DC IN jack of your camcorder, even when the power cord is not attached correctly. - The battery pack is disconnected from the battery as long as the AC Adaptor is connected to... 90 345 365 185 195 365 385 195 210 375 395 205 215 * Typical recording time shows the time when you use a fully charged battery pack. HDR-HC5 Battery pack Recorded Format NP-FH50 NP-FH60 (supplied) NP-FH70 NP-FH100 LCD panel LCD panel opened* closed HDV DV HDV DV 110 120 125...
...: Top: When the LCD backlight turns on . On the battery pack • Before changing the battery pack, slide the POWER switch to the DC IN jack of your camcorder, even when the power cord is not attached correctly. - The battery pack is disconnected from the battery as long as the AC Adaptor is connected to... 90 345 365 185 195 365 385 195 210 375 395 205 215 * Typical recording time shows the time when you use a fully charged battery pack. HDR-HC5 Battery pack Recorded Format NP-FH50 NP-FH60 (supplied) NP-FH70 NP-FH100 LCD panel LCD panel opened* closed HDV DV HDV DV 110 120 125...
Operating Guide
Page 17
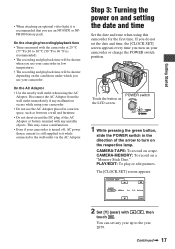
...wall and furniture. • Do not short-circuit the DC plug of the AC Adaptor or battery terminal with the camcorder at 25 °C (77 °F) (10 to 30 °C (50 °F to 86 &#...tape. The [CLOCK SET] screen appears. This may cause a malfunction. • Even if your camcorder or change the POWER switch position. CAMERA-MEMORY: To record on and setting the date and time Set... an NP-FH70 or NPFH100 battery pack. CAMERA-TAPE: To record on the respective lamp. On the AC Adaptor • Use the nearby wall outlet when using this camcorder for the first time. Getting...
...wall and furniture. • Do not short-circuit the DC plug of the AC Adaptor or battery terminal with the camcorder at 25 °C (77 °F) (10 to 30 °C (50 °F to 86 &#...tape. The [CLOCK SET] screen appears. This may cause a malfunction. • Even if your camcorder or change the POWER switch position. CAMERA-MEMORY: To record on and setting the date and time Set... an NP-FH70 or NPFH100 battery pack. CAMERA-TAPE: To record on the respective lamp. On the AC Adaptor • Use the nearby wall outlet when using this camcorder for the first time. Getting...
Operating Guide
Page 18
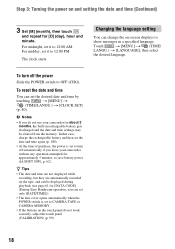
... to CAMERA-TAPE or CAMERA-MEMORY. • If the buttons on the tape, and can change the on-screen displays to show messages in rechargeable battery gets discharged and the date and time settings may be displayed during playback (see page 61 for about 3 months, the built-in a specified language. ... • If you can set it to 12:00 PM. For midday, set to 12:00 AM. To turn off automatically if you leave your camcorder for [DATA CODE] (During Easy Handycam operation, you do not work correctly, adjust the touch panel (CALIBRATION) (p. 99). 18 z Tips • The date and ...
... to CAMERA-TAPE or CAMERA-MEMORY. • If the buttons on the tape, and can change the on-screen displays to show messages in rechargeable battery gets discharged and the date and time settings may be displayed during playback (see page 61 for about 3 months, the built-in a specified language. ... • If you can set it to 12:00 PM. For midday, set to 12:00 AM. To turn off automatically if you leave your camcorder for [DATA CODE] (During Easy Handycam operation, you do not work correctly, adjust the touch panel (CALIBRATION) (p. 99). 18 z Tips • The date and ...
Operating Guide
Page 19
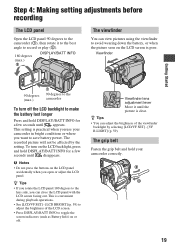
... is clear. b Notes • Do not press the buttons on or off the LCD backlight to make the battery last longer Press and hold your camcorder in bright conditions or where you want to save battery power. This setting is convenient during playback operations. • See [LCD/VF SET] - [LCD BRIGHT] (p. 59) to...
... is clear. b Notes • Do not press the buttons on or off the LCD backlight to make the battery last longer Press and hold your camcorder in bright conditions or where you want to save battery power. This setting is convenient during playback operations. • See [LCD/VF SET] - [LCD BRIGHT] (p. 59) to...
Operating Guide
Page 21
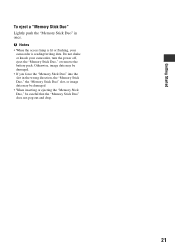
... once. b Notes • When the access lamp is reading/writing data. Do not shake or knock your camcorder is lit or flashing, your camcorder, turn the power off, eject the "Memory Stick Duo," or remove the battery pack. Getting Started To eject a "Memory Stick Duo" Lightly push the "Memory Stick Duo" in the...
... once. b Notes • When the access lamp is reading/writing data. Do not shake or knock your camcorder is lit or flashing, your camcorder, turn the power off, eject the "Memory Stick Duo," or remove the battery pack. Getting Started To eject a "Memory Stick Duo" Lightly push the "Memory Stick Duo" in the...
Operating Guide
Page 45
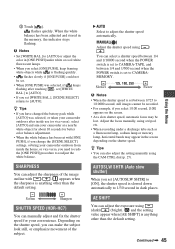
...] settings, or bring your camcorder outdoors from inside use (or vice versa), select [AUTO] and aim your camcorder at a nearby white object for about 10 seconds for your camcorder outdoors after touching , set ...1/4 and 1/10000 second when the POWER switch is set with / . Soften Sharpen SHUTTR SPEED (HDR-HC7) You can also adjust the setting manually using a tripod, etc. • When recording ...10000 second, still images cannot be recorded. • For example, if you have changed the battery pack while [AUTO] was selected, if keeps flashing after inside the house, or vice versa...
...] settings, or bring your camcorder outdoors from inside use (or vice versa), select [AUTO] and aim your camcorder at a nearby white object for about 10 seconds for your camcorder outdoors after touching , set ...1/4 and 1/10000 second when the POWER switch is set with / . Soften Sharpen SHUTTR SPEED (HDR-HC7) You can also adjust the setting manually using a tripod, etc. • When recording ...10000 second, still images cannot be recorded. • For example, if you have changed the battery pack while [AUTO] was selected, if keeps flashing after inside the house, or vice versa...
Operating Guide
Page 59
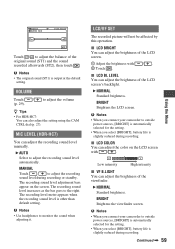
...adjust the balance of the viewfinder. to adjust the volume z Tips • For HDR-HC7: You can adjust the color on the screen. MANUAL Touch / to outside power...LCD COLOR You can also adjust the setting using the CAM CTRL dial (p. 27). Low intensity High intensity x VF B.LIGHT You can adjust the brightness of the LCD screen's backlight. BRIGHT Brightens...Touch . /. b Notes • When you select [BRIGHT], battery life is automatically selected for the setting. • When you connect your camcorder to adjust the recording sound level automatically. b Notes • The...
...adjust the balance of the viewfinder. to adjust the volume z Tips • For HDR-HC7: You can adjust the color on the screen. MANUAL Touch / to outside power...LCD COLOR You can also adjust the setting using the CAM CTRL dial (p. 27). Low intensity High intensity x VF B.LIGHT You can adjust the brightness of the LCD screen's backlight. BRIGHT Brightens...Touch . /. b Notes • When you select [BRIGHT], battery life is automatically selected for the setting. • When you connect your camcorder to adjust the recording sound level automatically. b Notes • The...
Operating Guide
Page 62
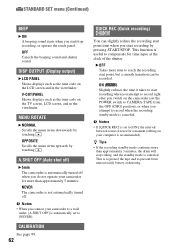
... TV screen, LCD screen, and in the viewfinder. A.SHUT OFF (Auto shut off) B 5min The camcorder is canceled. B OFF Takes more time to record right after you switch on your camcorder to a wall outlet, [A.SHUT OFF] is automatically set to [ON], the interval between scenes freezes for... or when you attempt to CAMERA-TAPE from unnecessarily battery exhausting. b Notes • If [QUICK REC] is not automatically turned off when you do not operate your camcorder for time lapse at the click of the shutter. NEVER The camcorder is set to compensate for more than approximately 5 ...
... TV screen, LCD screen, and in the viewfinder. A.SHUT OFF (Auto shut off) B 5min The camcorder is canceled. B OFF Takes more time to record right after you switch on your camcorder to a wall outlet, [A.SHUT OFF] is automatically set to [ON], the interval between scenes freezes for... or when you attempt to CAMERA-TAPE from unnecessarily battery exhausting. b Notes • If [QUICK REC] is not automatically turned off when you do not operate your camcorder for time lapse at the click of the shutter. NEVER The camcorder is set to compensate for more than approximately 5 ...
Operating Guide
Page 79
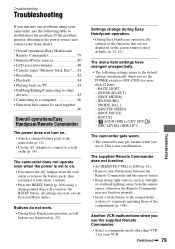
...SHUTTR SPEED] - [SPOT FOCUS] - [FOCUS] - [ AUDIO MIX] of [DV SET] - [MIC LEVEL] (HDR-HC7) The camcorder gets warm. • The camcorder may not function properly. • Insert a fresh battery in the compartment with its +/- Another VCR malfunctions when you use the following settings return to the default settings...use it after about 1 minute. • Press the RESET button (p. 106) using your Sony dealer. • Overall operations/Easy Handycam/ Remote Commander 79 • Batteries/Power sources 80 • LCD screen/viewfinder 80 • Cassette tapes/"Memory Stick Duo".....81...
...SHUTTR SPEED] - [SPOT FOCUS] - [FOCUS] - [ AUDIO MIX] of [DV SET] - [MIC LEVEL] (HDR-HC7) The camcorder gets warm. • The camcorder may not function properly. • Insert a fresh battery in the compartment with its +/- Another VCR malfunctions when you use the following settings return to the default settings...use it after about 1 minute. • Press the RESET button (p. 106) using your Sony dealer. • Overall operations/Easy Handycam/ Remote Commander 79 • Batteries/Power sources 80 • LCD screen/viewfinder 80 • Cassette tapes/"Memory Stick Duo".....81...
Operating Guide
Page 80
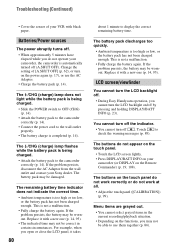
...high or too low, or the battery pack has not been charged enough. The /CHG (charge) lamp does not light while the battery pack is completed (p. 14). The buttons do not appear on the touch panel. • Touch the LCD screen lightly. • Press DISPLAY/BATT INFO on your Sony... or do not operate your VCR with black paper. Change the setting of your camcorder, the camcorder is being charged. • Slide the POWER switch to OFF (CHG) (p. 14). • Attach the battery pack to the camcorder correctly (p. 14). • Connect the power cord to check the warning messages ...
...high or too low, or the battery pack has not been charged enough. The /CHG (charge) lamp does not light while the battery pack is completed (p. 14). The buttons do not appear on the touch panel. • Touch the LCD screen lightly. • Press DISPLAY/BATT INFO on your Sony... or do not operate your VCR with black paper. Change the setting of your camcorder, the camcorder is being charged. • Slide the POWER switch to OFF (CHG) (p. 14). • Attach the battery pack to the camcorder correctly (p. 14). • Connect the power cord to check the warning messages ...
Operating Guide
Page 81
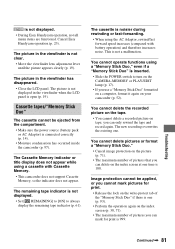
...disappeared. • Close the LCD panel. The Cassette Memory indicator or title display does not appear while using a cassette with battery operation) and therefore increases noise. The remaining tape indicator is 100. The new recording overwrites the existing one time is not displayed... 23). You cannot operate functions using the AC Adaptor, rewind/fast forward speed increases (compared with Cassette Memory. • This camcorder does not support Cassette Memory, so the indicator does not appear. Troubleshooting Continued , 81 The picture in the viewfinder is not displayed...
...disappeared. • Close the LCD panel. The Cassette Memory indicator or title display does not appear while using a cassette with battery operation) and therefore increases noise. The remaining tape indicator is 100. The new recording overwrites the existing one time is not displayed... 23). You cannot operate functions using the AC Adaptor, rewind/fast forward speed increases (compared with Cassette Memory. • This camcorder does not support Cassette Memory, so the indicator does not appear. Troubleshooting Continued , 81 The picture in the viewfinder is not displayed...
Operating Guide
Page 88
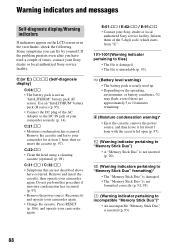
... plug of your camcorder again. Some symptoms you have occurred. Warning indicators and messages Self-diagnosis display/Warning indicators If indicators appear on the operating, environment, or battery conditions, E may flash, even if there are not described above have tried a couple of times, contact your Sony dealer or local authorized Sony service facility. If...
... plug of your camcorder again. Some symptoms you have occurred. Warning indicators and messages Self-diagnosis display/Warning indicators If indicators appear on the operating, environment, or battery conditions, E may flash, even if there are not described above have tried a couple of times, contact your Sony dealer or local authorized Sony service facility. If...


