
Operating Guide
Page 4
..., unplug it is left unattended and unused for service. Service Damage Requiring Service Unplug the set from the wall outlet and disconnect the antenna or cable system. Adjust only those controls that the set is in damage and will prevent damage to the set due to qualified service personnel. Servicing Do...
..., unplug it is left unattended and unused for service. Service Damage Requiring Service Unplug the set from the wall outlet and disconnect the antenna or cable system. Adjust only those controls that the set is in damage and will prevent damage to the set due to qualified service personnel. Servicing Do...

Operating Guide
Page 6
... the receiving antenna. - Increase the separation between the equipment and receiver. - The supplied interface cable must be used with your camcorder.) "Memory Stick" (You cannot use it in your camcorder. You can use any type of memory card except "Memory Stick Duo." 6 • "... See "Maintenance and precautions" (p. 118). • Before connecting your camcorder.) • You cannot use "Memory Stick Duo" marked with . Mini DV cassettes with an HDMI cable, component video cable, USB or i.LINK cable, be used only with the limits for help. Read this first (Continued...
... the receiving antenna. - Increase the separation between the equipment and receiver. - The supplied interface cable must be used with your camcorder.) "Memory Stick" (You cannot use it in your camcorder. You can use any type of memory card except "Memory Stick Duo." 6 • "... See "Maintenance and precautions" (p. 118). • Before connecting your camcorder.) • You cannot use "Memory Stick Duo" marked with . Mini DV cassettes with an HDMI cable, component video cable, USB or i.LINK cable, be used only with the limits for help. Read this first (Continued...

Operating Guide
Page 13
...other video devices (p. 74) Connecting to an HDV1080i device An optional i.LINK cable allows you to copy pictures in the HDV format can be played back as crisp HD (high definition) pictures on a high definition TV. • For details on Sony HDV1080i compliant TVs, see page 113. See page 87 for playback on ...enable copying. Copying movies on a tape to a computer The computer will need to an HDV1080i non-compliant device Your camcorder can down convert HDV format video to SD (standard definition) quality to a computer See page 84. Viewing on whether HDV or DV format video is to be set up...
...other video devices (p. 74) Connecting to an HDV1080i device An optional i.LINK cable allows you to copy pictures in the HDV format can be played back as crisp HD (high definition) pictures on a high definition TV. • For details on Sony HDV1080i compliant TVs, see page 113. See page 87 for playback on ...enable copying. Copying movies on a tape to a computer The computer will need to an HDV1080i non-compliant device Your camcorder can down convert HDV format video to SD (standard definition) quality to a computer See page 84. Viewing on whether HDV or DV format video is to be set up...
Operating Guide
Page 14
...) Rechargeable battery pack NP-FP60 (1) (p. 15, 116) Battery terminal cover (1) Attached to the camcorder. See page 6, 112 and 114 for compatible cassettes and "Memory Stick Duo" for your camcorder. Operating Guide (This manual) (1) Power cord (1) (p. 15) Wireless Remote Commander (1) (p. 40...) A button-type lithium battery is already installed. A/V connecting cable (1) (p. 42, 74) Component video cable (1) (p. 42) USB cable (1) (p. 81, 84) 14 The ...
...) Rechargeable battery pack NP-FP60 (1) (p. 15, 116) Battery terminal cover (1) Attached to the camcorder. See page 6, 112 and 114 for compatible cassettes and "Memory Stick Duo" for your camcorder. Operating Guide (This manual) (1) Power cord (1) (p. 15) Wireless Remote Commander (1) (p. 40...) A button-type lithium battery is already installed. A/V connecting cable (1) (p. 42, 74) Component video cable (1) (p. 42) USB cable (1) (p. 81, 84) 14 The ...
Operating Guide
Page 42
...A t (p. 43) B t (p. 43) C t (p. 44) 16:9 (wide) or 4:3 TV SD (standard definition) image quality* • An HDV formatted picture is down converted to your camcorder before connecting. Selecting the connection method according to DV format (SD image quality) and played back. • A DV formatted...connectors High definition TV HD (high definition) image quality* • An HDV formatted picture is played back as it is (HD image quality). • A DV formatted picture is played back as it is (SD image quality). Refer also to be connected. • Cancel Easy Handycam operation...
...A t (p. 43) B t (p. 43) C t (p. 44) 16:9 (wide) or 4:3 TV SD (standard definition) image quality* • An HDV formatted picture is down converted to your camcorder before connecting. Selecting the connection method according to DV format (SD image quality) and played back. • A DV formatted...connectors High definition TV HD (high definition) image quality* • An HDV formatted picture is played back as it is (HD image quality). • A DV formatted picture is played back as it is (SD image quality). Refer also to be connected. • Cancel Easy Handycam operation...

Operating Guide
Page 43
...) [VCR HDV/DV] t [AUTO] (p. 65) • Use an HDMI cable with the HDMI cable. Do not connect the HDMI OUT jack of your camcorder and HDMI OUT jack of your camcorder Open the jack cover and connect the cable. 4 1 3 2 Connecting to a high definition TV Type Camcorder Cable TV A 1 Component video cable (supplied) (Green) Y (Blue) PB/CB (Red) PR/CR : Signal...
...) [VCR HDV/DV] t [AUTO] (p. 65) • Use an HDMI cable with the HDMI cable. Do not connect the HDMI OUT jack of your camcorder and HDMI OUT jack of your camcorder Open the jack cover and connect the cable. 4 1 3 2 Connecting to a high definition TV Type Camcorder Cable TV A 1 Component video cable (supplied) (Green) Y (Blue) PB/CB (Red) PR/CR : Signal...
Operating Guide
Page 44
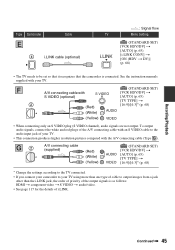
..., confirm the specifications of your TV. For details on Sony HDV1080i compliant TVs, see page 113. • If your TV is not compatible with HDV1080i, connect your camcorder and TV with the supplied component video cable and A/V connecting cable as illustrated in the DV format on a 4:3 TV ... 68). • When you play back a tape recorded in . • The TV needs to be set [ WIDE SELECT] to [4:3] on a TV (Continued) Type Camcorder C 4 Cable i.LINK cable (optional) : Signal flow TV Menu Setting (STANDARD SET) [VCR HDV/DV] t [AUTO] (p. 65) [i.LINK CONV] t [OFF] (p. 68) • Your ...
..., confirm the specifications of your TV. For details on Sony HDV1080i compliant TVs, see page 113. • If your TV is not compatible with HDV1080i, connect your camcorder and TV with the supplied component video cable and A/V connecting cable as illustrated in the DV format on a 4:3 TV ... 68). • When you play back a tape recorded in . • The TV needs to be set [ WIDE SELECT] to [4:3] on a TV (Continued) Type Camcorder C 4 Cable i.LINK cable (optional) : Signal flow TV Menu Setting (STANDARD SET) [VCR HDV/DV] t [AUTO] (p. 65) [i.LINK CONV] t [OFF] (p. 68) • Your ...
Operating Guide
Page 45
... TYPE] t [16:9]/[4:3]* (p. 68) * Change the settings according to the TV connected. • If you connect your camcorder to your TV using more than one type of cable to output images from a jack other than the i.LINK jack, the order of priority of the output signals is connected. Recording.../Playback Type Camcorder E Cable 4 i.LINK cable (optional) : Signal flow TV Menu Setting (STANDARD SET) [VCR HDV/DV] t [AUTO] (p. 65) [i.LINK CONV] t [ON (HDV t DV)] (p. 68...
... TYPE] t [16:9]/[4:3]* (p. 68) * Change the settings according to the TV connected. • If you connect your camcorder to your TV using more than one type of cable to output images from a jack other than the i.LINK jack, the order of priority of the output signals is connected. Recording.../Playback Type Camcorder E Cable 4 i.LINK cable (optional) : Signal flow TV Menu Setting (STANDARD SET) [VCR HDV/DV] t [AUTO] (p. 65) [i.LINK CONV] t [ON (HDV t DV)] (p. 68...

Operating Guide
Page 46
Set the input selector on a TV (Continued) About HDMI (High Definition Multimedia Interface) HDMI OUT jack is monaural (When your TV has only one audio input jack) Connect the yellow plug of the A/V connecting cable to the video input jack and connect the white (left channel) or the red (right channel) ... VIDEO 2, etc.). When you . Connect your camcorder to your TV or VCR. When connecting to the LINE IN input on the input jack of your TV via a VCR Select the connecting method on page 74 depending on the VCR using the A/V connecting cable. When your TV is an interface to play...
Set the input selector on a TV (Continued) About HDMI (High Definition Multimedia Interface) HDMI OUT jack is monaural (When your TV has only one audio input jack) Connect the yellow plug of the A/V connecting cable to the video input jack and connect the white (left channel) or the red (right channel) ... VIDEO 2, etc.). When you . Connect your camcorder to your TV or VCR. When connecting to the LINE IN input on the input jack of your TV via a VCR Select the connecting method on page 74 depending on the VCR using the A/V connecting cable. When your TV is an interface to play...

Operating Guide
Page 64
...SPD PB/END SEARCH, etc.) The default settings are marked with a USB cable and view pictures on selecting menu items. VAR.SPD PB (Various speed playback) You can also connect the camcorder to other than CAMERA-TAPE. 64 EDIT/PLAY menu Settings for details on ...** To reverse direction: (frame) t play back in about 10 minutes). - To reverse direction: (frame) during playback. When you connect the camcorder to a PictBridge compatible printer to view the demonstration in various modes while viewing movies. 1 Touch the following buttons during frame playback. * Horizontal lines...
...SPD PB/END SEARCH, etc.) The default settings are marked with a USB cable and view pictures on selecting menu items. VAR.SPD PB (Various speed playback) You can also connect the camcorder to other than CAMERA-TAPE. 64 EDIT/PLAY menu Settings for details on ...** To reverse direction: (frame) t play back in about 10 minutes). - To reverse direction: (frame) during playback. When you connect the camcorder to a PictBridge compatible printer to view the demonstration in various modes while viewing movies. 1 Touch the following buttons during frame playback. * Horizontal lines...

Operating Guide
Page 65
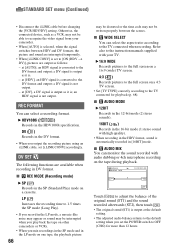
...picture to be copied to DVDs is connected to a Sony VAIO series personal computer, you can also select this when connecting the camcorder to the reverse direction are selected. Normally select [AUTO... frame by frame to a computer, etc. When your camcorder is SD (standard definition). You can also select this when connecting the camcorder to input/output from the HDV/DV Interface (i.LINK). REC...and records/ plays back. The selected signal is connected to another device using an i.LINK cable, select the signal to a computer, etc. During i.LINK connection, inputs/outputs only HDV ...
...picture to be copied to DVDs is connected to a Sony VAIO series personal computer, you can also select this when connecting the camcorder to the reverse direction are selected. Normally select [AUTO... frame by frame to a computer, etc. When your camcorder is SD (standard definition). You can also select this when connecting the camcorder to input/output from the HDV/DV Interface (i.LINK). REC...and records/ plays back. The selected signal is connected to another device using an i.LINK cable, select the signal to a computer, etc. During i.LINK connection, inputs/outputs only HDV ...
Operating Guide
Page 66
...Refer also to the instruction manuals supplied with high quality). • When recording in the HDV format, sound is automatically recorded in the LP mode, a mosaic-like noise may appear or sound may be interrupted when you play back the tape on other camcorders or VCRs. • When you set ...the POWER switch to 1.5 times the SP mode (Long Play). • If you record in [16BIT] mode. STANDARD SET menu (Continued) • Disconnect the i.LINK cable before changing the [VCR HDV/DV] setting. at...
...Refer also to the instruction manuals supplied with high quality). • When recording in the HDV format, sound is automatically recorded in the LP mode, a mosaic-like noise may appear or sound may be interrupted when you play back the tape on other camcorders or VCRs. • When you set ...the POWER switch to 1.5 times the SP mode (Long Play). • If you record in [16BIT] mode. STANDARD SET menu (Continued) • Disconnect the i.LINK cable before changing the [VCR HDV/DV] setting. at...

Operating Guide
Page 68
...Refer also to the manual supplied with the ID-1 system, or via an i.LINK connection, see [VCR HDV/DV] (p. 65). • Disconnect the i.LINK cable before setting [i.LINK CONV]. HDMI OUTPUT (p. 83) - [VCR HDV/DV] (when the POWER switch is set [TV TYPE] to [16:9]. Press DISP/ ...the frame and check that the subject is not recorded. HDV/DV (16:9) format pictures DV (4:3) format pictures • When you connect your camcorder to [ON]. DATA CODE During playback, displays the information (data code) recorded automatically at the cross point of recording. The frame is horizontal...
...Refer also to the manual supplied with the ID-1 system, or via an i.LINK connection, see [VCR HDV/DV] (p. 65). • Disconnect the i.LINK cable before setting [i.LINK CONV]. HDMI OUTPUT (p. 83) - [VCR HDV/DV] (when the POWER switch is set [TV TYPE] to [16:9]. Press DISP/ ...the frame and check that the subject is not recorded. HDV/DV (16:9) format pictures DV (4:3) format pictures • When you connect your camcorder to [ON]. DATA CODE During playback, displays the information (data code) recorded automatically at the cross point of recording. The frame is horizontal...

Operating Guide
Page 74
... with audio/video jacks*2 t SD quality*1 *1 Pictures recorded in the DV format are played back as SD (standard definition) images, regardless of the A/V connecting cable to the video jack on the device, and the white (left channel) or red (right channel) plug to VCR/...devices The connection method and the image quality will differ depending on the VCR/DVD device and the connectors used. : Signal flow Camcorder Cable External device i.LINK cable (optional) HDV1080i compatible device t HD quality*1 • i.LINK jack which is compatible with HDV1080i specification is required on the...
... with audio/video jacks*2 t SD quality*1 *1 Pictures recorded in the DV format are played back as SD (standard definition) images, regardless of the A/V connecting cable to the video jack on the device, and the white (left channel) or red (right channel) plug to VCR/...devices The connection method and the image quality will differ depending on the VCR/DVD device and the connectors used. : Signal flow Camcorder Cable External device i.LINK cable (optional) HDV1080i compatible device t HD quality*1 • i.LINK jack which is compatible with HDV1080i specification is required on the...

Operating Guide
Page 75
... format Format supported by the VCR/DVD device. Dubbing/Editing Continued , 75 Jacks on your camcorder Open the jack cover and connect the cable. 1 2 Using an i.LINK cable (optional) The dubbed format (HDV/DV) differs depending on the recording format or the format supported by the VCR/DVD device HDV format*1 DV...*3 Picture is not recognized (no recording is made). Select the required settings from the table below and make the menu settings. • Disconnect the i.LINK cable before changing these menu settings, otherwise the VCR/DVD device may not correctly identify the video signal.
... format Format supported by the VCR/DVD device. Dubbing/Editing Continued , 75 Jacks on your camcorder Open the jack cover and connect the cable. 1 2 Using an i.LINK cable (optional) The dubbed format (HDV/DV) differs depending on the recording format or the format supported by the VCR/DVD device HDV format*1 DV...*3 Picture is not recognized (no recording is made). Select the required settings from the table below and make the menu settings. • Disconnect the i.LINK cable before changing these menu settings, otherwise the VCR/DVD device may not correctly identify the video signal.

Operating Guide
Page 76
... picture and sound are interrupted temporarily. • When the recorder is HDR-HC3, set it to the appropriate input (such as video input1 and video input2). 3 Connect your VCR/DVD device to your camcorder as HDRHC3 and connected with the i.LINK cable, after pausing or stopping and then resuming the recording, the images will...
... picture and sound are interrupted temporarily. • When the recorder is HDR-HC3, set it to the appropriate input (such as video input1 and video input2). 3 Connect your VCR/DVD device to your camcorder as HDRHC3 and connected with the i.LINK cable, after pausing or stopping and then resuming the recording, the images will...

Operating Guide
Page 77
... you use an i.LINK cable, the video and sound signals are transmitted digitally, producing high quality pictures. • When an i.LINK cable is connected, the format of your camcorder to the wall outlet using an i.LINK cable. Continued , 77 Connect your camcorder. If you can set the... input mode to DV on your camcorder beforehand. Refer also...
... you use an i.LINK cable, the video and sound signals are transmitted digitally, producing high quality pictures. • When an i.LINK cable is connected, the format of your camcorder to the wall outlet using an i.LINK cable. Continued , 77 Connect your camcorder. If you can set the... input mode to DV on your camcorder beforehand. Refer also...

Operating Guide
Page 78
...POWER switch to turn on the PLAY/EDIT lamp. 2 Set the input signal of your camcorder. 78 You cannot record the picture and sound separately. - If you want to record movies. When an i.LINK cable is input, it will be recorded). 4 Insert a cassette into the VCR. 5 Operate .... 6 Start playing the cassette on the LCD screen of the playback device, however, it appears with an i.LINK cable: - The picture played on the connected device appears on your camcorder to start recording. 8 Stop recording. Set [VCR HDV/DV] to [AUTO] when recording from a DV format compatible...
...POWER switch to turn on the PLAY/EDIT lamp. 2 Set the input signal of your camcorder. 78 You cannot record the picture and sound separately. - If you want to record movies. When an i.LINK cable is input, it will be recorded). 4 Insert a cassette into the VCR. 5 Operate .... 6 Start playing the cassette on the LCD screen of the playback device, however, it appears with an i.LINK cable: - The picture played on the connected device appears on your camcorder to start recording. 8 Stop recording. Set [VCR HDV/DV] to [AUTO] when recording from a DV format compatible...

Operating Guide
Page 81
...101 OK 4 Touch t [END]. • To cancel image protection, touch the image again to turn on using other device. Connecting your camcorder to the printer 1 Slide the POWER switch to cancel image protection in the following orders: - Continued , 81 Insert the "Memory Stick Duo... compliant printer without connecting the camcorder to turn on the PLAY/EDIT lamp. 2 Connect the (USB) jack of the images stored on the screen automatically. 3 Touch [PictBridge PRINT]. Dubbing/Editing • You can print out pictures using the USB cable. [USB SELECT] appears on...
...101 OK 4 Touch t [END]. • To cancel image protection, touch the image again to turn on using other device. Connecting your camcorder to the printer 1 Slide the POWER switch to cancel image protection in the following orders: - Continued , 81 Insert the "Memory Stick Duo... compliant printer without connecting the camcorder to turn on the PLAY/EDIT lamp. 2 Connect the (USB) jack of the images stored on the screen automatically. 3 Touch [PictBridge PRINT]. Dubbing/Editing • You can print out pictures using the USB cable. [USB SELECT] appears on...

Operating Guide
Page 82
... to the operating instructions for the printer to be printed with a device other than your camcorder. • PictBridge is completed. • If the printer stops working, disconnect the USB cable, turn the printer off and on again and restart the operation from the beginning. •.../ time printing function. Touch [END] when printing is an industry standard established by connecting a printer directly to your camcorder. 82 Printing recorded images (PictBridge compliant printer) (Continued) - Operate the POWER switch. - A maximum of 20 copies of models that are...
... to the operating instructions for the printer to be printed with a device other than your camcorder. • PictBridge is completed. • If the printer stops working, disconnect the USB cable, turn the printer off and on again and restart the operation from the beginning. •.../ time printing function. Touch [END] when printing is an industry standard established by connecting a printer directly to your camcorder. 82 Printing recorded images (PictBridge compliant printer) (Continued) - Operate the POWER switch. - A maximum of 20 copies of models that are...


