Operating Guide
Page 3
... slots and openings with a cloth or other similar surface. - Overloading Do not overload wall outlets, extension cords or convenience receptacles beyond their capacity, since this manual for cleaning the exterior of electrical power supplied to your home, consult your electrician to direct sunlight. Cleaning Unplug the set on a bed, sofa, rug...
... slots and openings with a cloth or other similar surface. - Overloading Do not overload wall outlets, extension cords or convenience receptacles beyond their capacity, since this manual for cleaning the exterior of electrical power supplied to your home, consult your electrician to direct sunlight. Cleaning Unplug the set on a bed, sofa, rug...

Operating Guide
Page 5
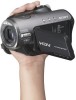
.... CAUTION You are designed to the collection and recycling location nearest you. Read this first Before operating the unit, please read this manual thoroughly, and retain it for a Class B digital device, pursuant to Part 15 of the FCC Rules. For customers in this product...model and serial numbers are recyclable. Model No. This Class B digital apparatus complies with Part 15 of Conformity Trade Name: SONY Model No.: HDR-HC3 Responsible Party: Sony Electronics Inc. For customers in accordance with the limits for future reference. However, there is for the FCC related matters only...
.... CAUTION You are designed to the collection and recycling location nearest you. Read this first Before operating the unit, please read this manual thoroughly, and retain it for a Class B digital device, pursuant to Part 15 of the FCC Rules. For customers in this product...model and serial numbers are recyclable. Model No. This Class B digital apparatus complies with Part 15 of Conformity Trade Name: SONY Model No.: HDR-HC3 Responsible Party: Sony Electronics Inc. For customers in accordance with the limits for future reference. However, there is for the FCC related matters only...

Operating Guide
Page 7
... the viewfinder used for effective use. Doing so might cause your camcorder is not possible due to malfunction. About this manual • The images of the camcorder, storage media, etc. • TV color systems differ depending on -screen displays in Germany, and Sony Corporation, and produces superior images. Check the contents of tapes by...
... the viewfinder used for effective use. Doing so might cause your camcorder is not possible due to malfunction. About this manual • The images of the camcorder, storage media, etc. • TV color systems differ depending on -screen displays in Germany, and Sony Corporation, and produces superior images. Check the contents of tapes by...
Operating Guide
Page 8
... Note on and holding your camcorder with automatic settings Easy Recording/Playback (Easy Handycam 26 Recording/Playback Recording 30 Playback 31 Functions used in this manual Features available for the HDV format only Features available for the DV format only IMPORTANT SAFEGUARDS 3 Read this first 5 Enjoying pictures with high definition quality Trying out the new...
... Note on and holding your camcorder with automatic settings Easy Recording/Playback (Easy Handycam 26 Recording/Playback Recording 30 Playback 31 Functions used in this manual Features available for the HDV format only Features available for the DV format only IMPORTANT SAFEGUARDS 3 Read this first 5 Enjoying pictures with high definition quality Trying out the new...
Operating Guide
Page 14
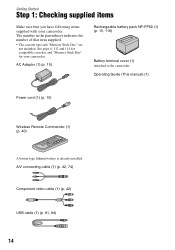
... page 6, 112 and 114 for compatible cassettes and "Memory Stick Duo" for your camcorder. AC Adaptor (1) (p. 15) Rechargeable battery pack NP-FP60 (1) (p. 15, 116) Battery terminal cover (1) Attached to the camcorder. Operating Guide (This manual) (1) Power cord (1) (p. 15) Wireless Remote Commander (1) (p. 40) A button-type lithium battery is already installed. A/V connecting cable (1) (p. 42, 74...
... page 6, 112 and 114 for compatible cassettes and "Memory Stick Duo" for your camcorder. AC Adaptor (1) (p. 15) Rechargeable battery pack NP-FP60 (1) (p. 15, 116) Battery terminal cover (1) Attached to the camcorder. Operating Guide (This manual) (1) Power cord (1) (p. 15) Wireless Remote Commander (1) (p. 40) A button-type lithium battery is already installed. A/V connecting cable (1) (p. 42, 74...
Operating Guide
Page 22
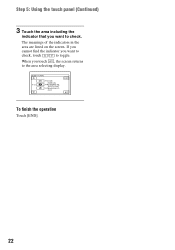
Step 5: Using the touch panel (Continued) 3 Touch the area including the indicator that you touch , the screen returns to the area selecting display. When you want to check, touch / to check. DISP GUIDE 1/2 FOCUS: MANUAL PROGRAM AE: SPOTLIGHT STEADYSHOT: OFF END To finish the operation Touch [END]. 22 If you cannot find the indicator you want to toggle. The meanings of the indicators in the area are listed on the screen.
Step 5: Using the touch panel (Continued) 3 Touch the area including the indicator that you touch , the screen returns to the area selecting display. When you want to check, touch / to check. DISP GUIDE 1/2 FOCUS: MANUAL PROGRAM AE: SPOTLIGHT STEADYSHOT: OFF END To finish the operation Touch [END]. 22 If you cannot find the indicator you want to toggle. The meanings of the indicators in the area are listed on the screen.
Operating Guide
Page 28
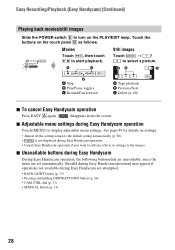
...(p. 33) • Pressing and holding DISP/BATT INFO button (p. 20) • CAM CTRL dial (p. 33) • MANUAL button (p. 33) 28 Easy Recording/Playback (Easy Handycam) (Continued) Playing back movies/still images Slide the POWER switch E to turn on settings. • Almost all the settings return... to the default setting automatically (p. 50). • is not displayed during Easy Handycam operation. • Cancel Easy Handycam operation if you want to add any effects or settings to the images. Movies Touch , then touch to select a picture...
...(p. 33) • Pressing and holding DISP/BATT INFO button (p. 20) • CAM CTRL dial (p. 33) • MANUAL button (p. 33) 28 Easy Recording/Playback (Easy Handycam) (Continued) Playing back movies/still images Slide the POWER switch E to turn on settings. • Almost all the settings return... to the default setting automatically (p. 50). • is not displayed during Easy Handycam operation. • Cancel Easy Handycam operation if you want to add any effects or settings to the images. Movies Touch , then touch to select a picture...
Operating Guide
Page 33
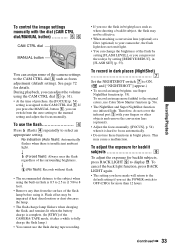
Recording/Playback To control the image settings manually with your camcorder, the flash light does not emit light. • You can adjust the volume using ...it takes a while to your fingers or other objects and remove the conversion lens (optional). • Adjust the focus manually ([FOCUS], p. 54) when it is complete. (In [STBY] of the CAMERA-TAPE mode, it . Flash ...Super NightShot function (p. 55). To record an image more than 12 hours. Continued , 33 If you press the MANUAL button 6, you set the POWER switch to OFF (CHG) for more faithful to the original colors, use Color...
Recording/Playback To control the image settings manually with your camcorder, the flash light does not emit light. • You can adjust the volume using ...it takes a while to your fingers or other objects and remove the conversion lens (optional). • Adjust the focus manually ([FOCUS], p. 54) when it is complete. (In [STBY] of the CAMERA-TAPE mode, it . Flash ...Super NightShot function (p. 55). To record an image more than 12 hours. Continued , 33 If you press the MANUAL button 6, you set the POWER switch to OFF (CHG) for more faithful to the original colors, use Color...
Operating Guide
Page 38
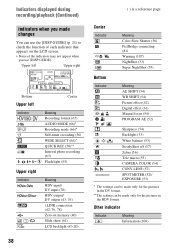
...) PictBridge connecting (81) Warning (107) NightShot (33) Super NightShot (55) Bottom Indicator 9 Meaning AE SHIFT (54) WB SHIFT (54) Picture effect (62) Digital effect (61) Manual focus (54) PROGRAM AE (52) . n Sharpness (54) Backlight (33) White balance (53) SteadyShot off (20) 38 ( ) is a reference page. Upper left Upper right 120 Q.REC...
...) PictBridge connecting (81) Warning (107) NightShot (33) Super NightShot (55) Bottom Indicator 9 Meaning AE SHIFT (54) WB SHIFT (54) Picture effect (62) Digital effect (61) Manual focus (54) PROGRAM AE (52) . n Sharpness (54) Backlight (33) White balance (53) SteadyShot off (20) 38 ( ) is a reference page. Upper left Upper right 120 Q.REC...
Operating Guide
Page 42
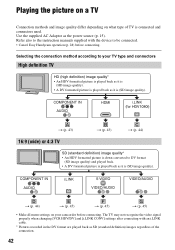
...C t (p. 44) 16:9 (wide) or 4:3 TV SD (standard definition) image quality* • An HDV formatted picture is down converted to the instruction manuals supplied with an i.LINK cable. * Pictures recorded in the DV format are...Connection methods and image quality differ depending on your TV type and connectors High definition TV HD (high definition) image quality* • An HDV formatted picture is played back as...SD (standard definition) images regardless of TV is (SD image quality). Selecting the connection method according to be connected. • Cancel Easy Handycam operation (p. 28...
...C t (p. 44) 16:9 (wide) or 4:3 TV SD (standard definition) image quality* • An HDV formatted picture is down converted to the instruction manuals supplied with an i.LINK cable. * Pictures recorded in the DV format are...Connection methods and image quality differ depending on your TV type and connectors High definition TV HD (high definition) image quality* • An HDV formatted picture is played back as...SD (standard definition) images regardless of TV is (SD image quality). Selecting the connection method according to be connected. • Cancel Easy Handycam operation (p. 28...
Operating Guide
Page 44
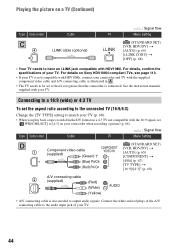
...cable is connected. For details on Sony HDV1080i compliant TVs, see page 113. • If your TV is not compatible with HDV1080i, connect your TV. Connect the white and red plugs of the A/V connecting cable to the audio input jack of your camcorder and TV with the supplied component ... illustrated in the DV format on a 4:3 TV not compatible with the 16:9 signal, set so that it recognizes that the camcorder is also needed to have an i.LINK jack compatible with your TV. 44 See the instruction manuals supplied with HDV1080i. For details, confirm the specifications of your TV.
...cable is connected. For details on Sony HDV1080i compliant TVs, see page 113. • If your TV is not compatible with HDV1080i, connect your TV. Connect the white and red plugs of the A/V connecting cable to the audio input jack of your camcorder and TV with the supplied component ... illustrated in the DV format on a 4:3 TV not compatible with the 16:9 signal, set so that it recognizes that the camcorder is also needed to have an i.LINK jack compatible with your TV. 44 See the instruction manuals supplied with HDV1080i. For details, confirm the specifications of your TV.
Operating Guide
Page 45
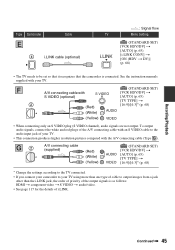
A/V connecting cable with your TV. • This connection produces higher resolution pictures compared with the A/V connecting cable (Type ). See the instruction manuals supplied with S VIDEO (optional) 2 (Red) (White) (Yellow) (STANDARD SET) [VCR HDV/DV] t [AUTO] (p. 65) [TV TYPE] t [16:9]/[4:3]* (p. 68) •...DV] t [AUTO] (p. 65) [TV TYPE] t [16:9]/[4:3]* (p. 68) * Change the settings according to the TV connected. • If you connect your camcorder to your TV using more than one type of cable to output images from a jack other than the i.LINK jack, the order of priority of...
A/V connecting cable with your TV. • This connection produces higher resolution pictures compared with the A/V connecting cable (Type ). See the instruction manuals supplied with S VIDEO (optional) 2 (Red) (White) (Yellow) (STANDARD SET) [VCR HDV/DV] t [AUTO] (p. 65) [TV TYPE] t [16:9]/[4:3]* (p. 68) •...DV] t [AUTO] (p. 65) [TV TYPE] t [16:9]/[4:3]* (p. 68) * Change the settings according to the TV connected. • If you connect your camcorder to your TV using more than one type of cable to output images from a jack other than the i.LINK jack, the order of priority of...
Operating Guide
Page 52
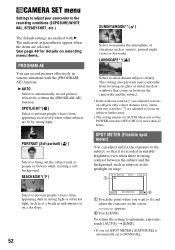
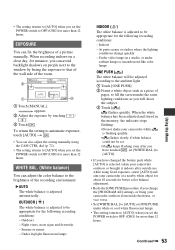
...automatic exposure, touch [AUTO] t [END]. • If you set [SPOT METER], [EXPOSURE] is strong contrast between the camcorder and the subject. • Items with B. SPOT METER (Flexible spot meter) You can record pictures effectively in parentheses appear ...when the items are selected. CAMERA SET menu Settings to adjust your camcorder from appearing excessively white when subjects are lit by strong light. The indicators in various situations with two asterisks...on a ski slope. 52 2 1 Touch the point where you set to [MANUAL].
...automatic exposure, touch [AUTO] t [END]. • If you set [SPOT METER], [EXPOSURE] is strong contrast between the camcorder and the subject. • Items with B. SPOT METER (Flexible spot meter) You can record pictures effectively in parentheses appear ...when the items are selected. CAMERA SET menu Settings to adjust your camcorder from appearing excessively white when subjects are lit by strong light. The indicators in various situations with two asterisks...on a ski slope. 52 2 1 Touch the point where you set to [MANUAL].
Operating Guide
Page 53
...as you will shoot the subject. 3 Touch [ ]. Under video lamps in the memory, the indicator stops flashing. •Do not shake your camcorder while is adjusted to be appropriate for the following recording conditions: - Night views, neon signs and fireworks - Sunrise or sunset - At party scenes... using fixed exposure, select [AUTO] and aim your camcorder outdoors from inside the house, or vice versa. • Set [WHITE BAL.] to [AUTO] or [ONE PUSH] under the same lighting conditions as a piece of the room. 2 1 3 1 Touch [MANUAL]. Continued , 53 Using the Menu Outdoors - When ...
...as you will shoot the subject. 3 Touch [ ]. Under video lamps in the memory, the indicator stops flashing. •Do not shake your camcorder while is adjusted to be appropriate for the following recording conditions: - Night views, neon signs and fireworks - Sunrise or sunset - At party scenes... using fixed exposure, select [AUTO] and aim your camcorder outdoors from inside the house, or vice versa. • Set [WHITE BAL.] to [AUTO] or [ONE PUSH] under the same lighting conditions as a piece of the room. 2 1 3 1 Touch [MANUAL]. Continued , 53 Using the Menu Outdoors - When ...
Operating Guide
Page 54
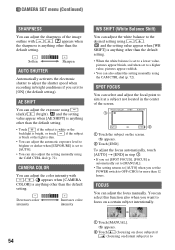
... automatically, touch [AUTO] t [END] in step 1. • If you set to a higher value, pictures appear reddish. • You can also adjust the setting manually using the CAM CTRL dial (p. 72). You can select this function also when you set to [AUTO]. • You can also adjust the setting... manually using the CAM CTRL dial (p. 72). AE SHIFT You can adjust the focus manually. and the setting value appear when [WB SHIFT] is anything other than 12 hours. CAMERA COLOR You can...
... automatically, touch [AUTO] t [END] in step 1. • If you set to a higher value, pictures appear reddish. • You can also adjust the setting manually using the CAM CTRL dial (p. 72). You can select this function also when you set to [AUTO]. • You can also adjust the setting... manually using the CAM CTRL dial (p. 72). AE SHIFT You can adjust the focus manually. and the setting value appear when [WB SHIFT] is anything other than 12 hours. CAMERA COLOR You can...
Operating Guide
Page 55
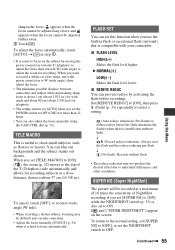
... be adjusted any closer, and appears when the focus cannot be difficult and can also adjust the focus manually using the CAM CTRL dial (p. 72). B NORMAL( ) LOW( ) Makes the flash level lower. x FLASH LEVEL HIGH( ) Makes the flash level higher. r (No flash): Records without flash. • The redeye... subject at a close range, move the power zoom lever to W (wide angle), then adjust the focus. • The minimum possible distance between camcorder and subject while maintaining sharp focus is about 1 cm (about 13/32 in flash or an external flash (optional) that is easier to focus on...
... be adjusted any closer, and appears when the focus cannot be difficult and can also adjust the focus manually using the CAM CTRL dial (p. 72). B NORMAL( ) LOW( ) Makes the flash level lower. x FLASH LEVEL HIGH( ) Makes the flash level higher. r (No flash): Records without flash. • The redeye... subject at a close range, move the power zoom lever to W (wide angle), then adjust the focus. • The minimum possible distance between camcorder and subject while maintaining sharp focus is about 1 cm (about 13/32 in flash or an external flash (optional) that is easier to focus on...
Operating Guide
Page 56
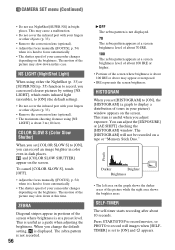
...• Do not cover the infrared port with your fingers or other objects (p. 33). • Remove the conversion lens (optional). • Adjust the focus manually ([FOCUS], p. 54) when it is hard to display a distribution of your fingers or other objects (p. 33). • Remove the conversion lens (optional)....The motion of the picture while the right area shows the brighter areas. This is about 100 IRE or higher. • Portions of your camcorder changes depending on the brightness. COLOR SLOW S (Color Slow Shutter) When you set [COLOR SLOW S] to [ON], you set to [ON...
...• Do not cover the infrared port with your fingers or other objects (p. 33). • Remove the conversion lens (optional). • Adjust the focus manually ([FOCUS], p. 54) when it is hard to display a distribution of your fingers or other objects (p. 33). • Remove the conversion lens (optional)....The motion of the picture while the right area shows the brighter areas. This is about 100 IRE or higher. • Portions of your camcorder changes depending on the brightness. COLOR SLOW S (Color Slow Shutter) When you set [COLOR SLOW S] to [ON], you set to [ON...
Operating Guide
Page 57
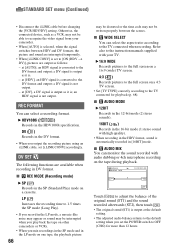
... to use the wide conversion lens (optional). CONV.LENS When using an optional conversion lens, use this to the CAM CTRL dial and adjust it manually using the digital zoom. WB SHIFT Assigns the [WB SHIFT] (p. 54) setting to the CAM CTRL dial. To cancel the self-timer, select [OFF]. •...
... to use the wide conversion lens (optional). CONV.LENS When using an optional conversion lens, use this to the CAM CTRL dial and adjust it manually using the digital zoom. WB SHIFT Assigns the [WB SHIFT] (p. 54) setting to the CAM CTRL dial. To cancel the self-timer, select [OFF]. •...
Operating Guide
Page 62
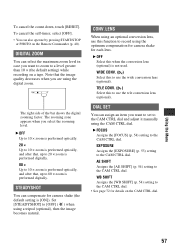
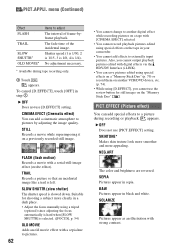
...still images on a previously recorded still image. SKINTONE* Makes skin texture look more smoother and more clearly in a dark place. • Adjust the focus manually using a tripod (optional) since adjusting the focus automatically is hard when [SLOW SHUTTR] is left. appears. SLOW SHUTTR (slow shutter) The shutter speed is... TRAIL SLOW SHUTTR* OLD MOVIE* Items to externally input pictures. NEG.ART The color and brightness are reversed. B&W Pictures appear in your camcorder. • You cannot add effects to adjust The interval of the incidental image. PICT.APPLI.
...still images on a previously recorded still image. SKINTONE* Makes skin texture look more smoother and more clearly in a dark place. • Adjust the focus manually using a tripod (optional) since adjusting the focus automatically is hard when [SLOW SHUTTR] is left. appears. SLOW SHUTTR (slow shutter) The shutter speed is... TRAIL SLOW SHUTTR* OLD MOVIE* Items to externally input pictures. NEG.ART The color and brightness are reversed. B&W Pictures appear in your camcorder. • You cannot add effects to adjust The interval of the incidental image. PICT.APPLI.
Operating Guide
Page 66
...as it is set [i.LINK CONV] accordingly. x AUDIO MIX You can monitor the sound recorded with your camcorder. • When [AUTO] is selected, when the signal switches between the scenes. at [HDV], ...may not be able to the TV connected for more than 12 hours. Refer also to the instruction manuals supplied with audio dubbing or 4ch microphone recording on a 4:3 TV screen. • Set [TV ...12-bit mode (2 stereo sounds). 16BIT ( ) Records in the 16-bit mode (1 stereo sound with high quality). • When recording in the DV format. • When you set the POWER switch to...
...as it is set [i.LINK CONV] accordingly. x AUDIO MIX You can monitor the sound recorded with your camcorder. • When [AUTO] is selected, when the signal switches between the scenes. at [HDV], ...may not be able to the TV connected for more than 12 hours. Refer also to the instruction manuals supplied with audio dubbing or 4ch microphone recording on a 4:3 TV screen. • Set [TV ...12-bit mode (2 stereo sounds). 16BIT ( ) Records in the 16-bit mode (1 stereo sound with high quality). • When recording in the DV format. • When you set the POWER switch to...


