
Operating Instructions
Page 1
Operating Instructions Read this first Digital HD Video Camera Recorder HDR-FX1 2-178-348-11(1) © 2004 Sony Corporation
Operating Instructions Read this first Digital HD Video Camera Recorder HDR-FX1 2-178-348-11(1) © 2004 Sony Corporation
Operating Instructions
Page 3
... order to comply with the instructions, may cause malfunctions. Be careful when placing the camera near a window or outdoors. ,continued 3 This equipment generates, uses, and can ...Notes on a TV, you need an NTSC system-based TV. • Television programs, films, video tapes, and other materials may be copyrighted. The interface cable supplied must be contrary to a malfunction... of the FCC Rules. If this equipment. z Tip • Your camcorder adopts the HDV1080i specification, which the receiver is adopted as the digital interface enabling a...
... order to comply with the instructions, may cause malfunctions. Be careful when placing the camera near a window or outdoors. ,continued 3 This equipment generates, uses, and can ...Notes on a TV, you need an NTSC system-based TV. • Television programs, films, video tapes, and other materials may be copyrighted. The interface cable supplied must be contrary to a malfunction... of the FCC Rules. If this equipment. z Tip • Your camcorder adopts the HDV1080i specification, which the receiver is adopted as the digital interface enabling a...
Operating Instructions
Page 6
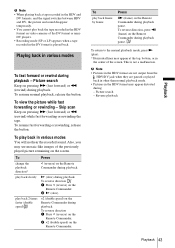
...the picture quality - Microphone volume level 36 Recording a picture using various features 37 Developing scenes smoothly - Data code 44 Displaying the video information - Rec Review 41 Playback Viewing movies 42 Playing back in 16:9 wide rec mode 40 Reviewing the most recent recording - ...scenes - PICTURE PROFILE 34 Adjusting the audio recording level - END SEARCH 44 Displaying the screen indicators 44 Displaying the date/time and camera settings data - FADER 38 Recording an index signal at the beginning of a scene- Adjusting the focus 32 Adjusting the focus manually...
...the picture quality - Microphone volume level 36 Recording a picture using various features 37 Developing scenes smoothly - Data code 44 Displaying the video information - Rec Review 41 Playback Viewing movies 42 Playing back in 16:9 wide rec mode 40 Reviewing the most recent recording - ...scenes - PICTURE PROFILE 34 Adjusting the audio recording level - END SEARCH 44 Displaying the screen indicators 44 Displaying the date/time and camera settings data - FADER 38 Recording an index signal at the beginning of a scene- Adjusting the focus 32 Adjusting the focus manually...
Operating Instructions
Page 30
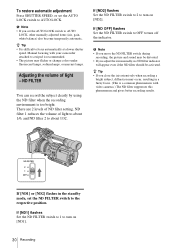
... mercury lamps. If [ND1] flashes Set the ND FILTER switch to 1 to a tripod is difficult to turn off the indicator. Manual focusing with video cameras.) The ND filter suppresses this phenomenon and gives better recording results. z Tip • If you close the iris extensively when recording a bright subject,...too bright. ND FILTER You can record the subject clearly by using the ND filter when the recording environment is a common phenomenon with your camcorder attached to turn on [ND1]. 30 Recording b Note • If you set the AUTO LOCK switch to turn on [ND2]. To ...
... mercury lamps. If [ND1] flashes Set the ND FILTER switch to 1 to a tripod is difficult to turn off the indicator. Manual focusing with video cameras.) The ND filter suppresses this phenomenon and gives better recording results. z Tip • If you close the iris extensively when recording a bright subject,...too bright. ND FILTER You can record the subject clearly by using the ND filter when the recording environment is a common phenomenon with your camcorder attached to turn on [ND1]. 30 Recording b Note • If you set the AUTO LOCK switch to turn on [ND2]. To ...
Operating Instructions
Page 43
... may appear distorted during playback - Reverse playback Playback 43 Skip scan Keep on the Remote Commander. To play back frame by frame Press C (frame) on video cameras of the DV format or miniDV players. • Recording mode (SP or LP) appears when a tape recorded in the DV format is not a malfunction. Picture...
... may appear distorted during playback - Reverse playback Playback 43 Skip scan Keep on the Remote Commander. To play back frame by frame Press C (frame) on video cameras of the DV format or miniDV players. • Recording mode (SP or LP) appears when a tape recorded in the DV format is not a malfunction. Picture...
Operating Instructions
Page 45
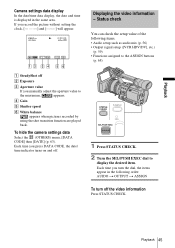
... record the picture without setting the clock and [--:--:--] will appear. 6 0min HDV1080i 0:00:00 6 0min AUTO F 1 . 7 6 dB 1 0 0 Displaying the video information - Playback 45 D Gain E Shutter speed F White balance appears when pictures recorded by using the shot transition function are played back. If you turn the... dial, the items appear in the same area. Playback Camera settings data display In the date/time data display, the date and time is displayed in the following items. • Audio setup...
... record the picture without setting the clock and [--:--:--] will appear. 6 0min HDV1080i 0:00:00 6 0min AUTO F 1 . 7 6 dB 1 0 0 Displaying the video information - Playback 45 D Gain E Shutter speed F White balance appears when pictures recorded by using the shot transition function are played back. If you turn the... dial, the items appear in the same area. Playback Camera settings data display In the date/time data display, the date and time is displayed in the following items. • Audio setup...
Operating Instructions
Page 48
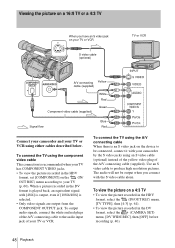
...CAMERA SET) menu, [DV WIDE REC], then [OFF] before recording (p. 40). 48 Playback The audio will not be connected, connect it with your TV or VCR. Viewing the picture on a 16:9 TV or a 4:3 TV When you connect with [480i] is output, even if [1080i/480i] is selected. • Only video...VCR S video cable (optional) TV or VCR A/V connecting Yellow cable (supplied) Component video cable (supplied) White Red Green Signal flow Blue Red Connect your camcorder and your TV or VCR using an S video cable (optional) instead of the yellow video plug of your camcorder by the S video jacks ...
...CAMERA SET) menu, [DV WIDE REC], then [OFF] before recording (p. 40). 48 Playback The audio will not be connected, connect it with your TV or VCR. Viewing the picture on a 16:9 TV or a 4:3 TV When you connect with [480i] is output, even if [1080i/480i] is selected. • Only video...VCR S video cable (optional) TV or VCR A/V connecting Yellow cable (supplied) Component video cable (supplied) White Red Green Signal flow Blue Red Connect your camcorder and your TV or VCR using an S video cable (optional) instead of the yellow video plug of your camcorder by the S video jacks ...
Operating Instructions
Page 61
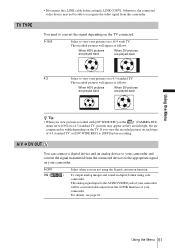
... appear as follows: When HDV pictures are played back When DV pictures are not using your camcorder. The analog signal input to recognize the video signal from the i.LINK Interface of your camcorder. Using the Menu 61 G16:9 Select to convert the signal depending on the TV. The ... on a 4:3 standard TV, pictures may not be able to the AUDIO/VIDEO jack of your camcorder will be converted and output from this camcorder. GOFF ON ( Select when you view pictures recorded with [DV WIDE REC] on the (CAMERA SET) menu set [DV WIDE REC] to [OFF] before setting [i.LINK...
... appear as follows: When HDV pictures are played back When DV pictures are not using your camcorder. The analog signal input to recognize the video signal from the i.LINK Interface of your camcorder. Using the Menu 61 G16:9 Select to convert the signal depending on the TV. The ... on a 4:3 standard TV, pictures may not be able to the AUDIO/VIDEO jack of your camcorder will be converted and output from this camcorder. GOFF ON ( Select when you view pictures recorded with [DV WIDE REC] on the (CAMERA SET) menu set [DV WIDE REC] to [OFF] before setting [i.LINK...
Operating Instructions
Page 72
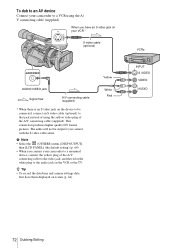
...VCR or the TV. z Tip • To record the date/time and camera settings data, first have an S video jack on your camcorder to a VCR using the yellow video plug of the A/V connecting cable to the video jack, and the red or the white plug to the audio jack on ...screen (p. 44). This connection produces higher quality DV format pictures. When you connect your camcorder to that jack instead of using the A/ V connecting cable (supplied). The audio will not be connected, connect an S video cable (optional) to a monaural device, connect the yellow plug of the A/V connecting cable...
...VCR or the TV. z Tip • To record the date/time and camera settings data, first have an S video jack on your camcorder to a VCR using the yellow video plug of the A/V connecting cable to the video jack, and the red or the white plug to the audio jack on ...screen (p. 44). This connection produces higher quality DV format pictures. When you connect your camcorder to that jack instead of using the A/ V connecting cable (supplied). The audio will not be connected, connect an S video cable (optional) to a monaural device, connect the yellow plug of the A/V connecting cable...
Operating Instructions
Page 77
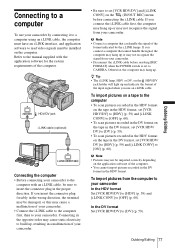
... an i.LINK cable, the computer must have an i.LINK interface, and application software to read video signals must be imported correctly depending on the computer. To import pictures from the computer to your camcorder. • Be sure to set [VCR HDV/DV] and [i.LINK CONV] on the (...before resetting [REC FORMAT] when the POWER switch is set to CAMERA. Otherwise, the computer may not be installed on the application software of your camcorder. • Connect the i.LINK cable to the computer first, then to your camcorder. To import pictures on a tape to the computer • ...
... an i.LINK cable, the computer must have an i.LINK interface, and application software to read video signals must be imported correctly depending on the computer. To import pictures from the computer to your camcorder. • Be sure to set [VCR HDV/DV] and [i.LINK CONV] on the (...before resetting [REC FORMAT] when the POWER switch is set to CAMERA. Otherwise, the computer may not be installed on the application software of your camcorder. • Connect the i.LINK cable to the computer first, then to your camcorder. To import pictures on a tape to the computer • ...

Operating Instructions
Page 86
...well (p. 46). cSet the ZEBRA/PEAKING switch to the - (soften) side in the middle of the A/V connecting cable are using an S VIDEO cable or a component video cable, make sure the red and white plugs of the tape. cClean the head using the cleaning cassette (p. 96). function (p. 34). "---" ...recorded without setting the date and time. • A blank section on the tape is set to [STEREO] on the picture. cSet [MULTI-SOUND] to CAMERA. • The cassette was recorded in reverse direction. is not a malfunction. This not work . • The POWER switch is being played. •...
...well (p. 46). cSet the ZEBRA/PEAKING switch to the - (soften) side in the middle of the A/V connecting cable are using an S VIDEO cable or a component video cable, make sure the red and white plugs of the tape. cClean the head using the cleaning cassette (p. 96). function (p. 34). "---" ...recorded without setting the date and time. • A blank section on the tape is set to [STEREO] on the picture. cSet [MULTI-SOUND] to CAMERA. • The cassette was recorded in reverse direction. is not a malfunction. This not work . • The POWER switch is being played. •...

Operating Instructions
Page 87
...on the 4:3 TV. cBefore recording, set [TV TYPE] on the screen. Symptom Cannot view the picture or hear the sound on the (CAMERA SET) menu to [OFF] (p. 40). • The tape was recorded in the DV format while transferring pictures to the connected device, pictures... moment when you are using the A/V connecting cable. The picture appears distorted on other than that of your camcorder. cWhen you press EXPANDED FOCUS. This camcorder does not comply with the component video cable. Cause and/or Corrective Actions cSet [DISP OUTPUT] to [LCD PANEL] on the (p. 64). ...
...on the 4:3 TV. cBefore recording, set [TV TYPE] on the screen. Symptom Cannot view the picture or hear the sound on the (CAMERA SET) menu to [OFF] (p. 40). • The tape was recorded in the DV format while transferring pictures to the connected device, pictures... moment when you are using the A/V connecting cable. The picture appears distorted on other than that of your camcorder. cWhen you press EXPANDED FOCUS. This camcorder does not comply with the component video cable. Cause and/or Corrective Actions cSet [DISP OUTPUT] to [LCD PANEL] on the (p. 64). ...

Operating Instructions
Page 89
... protection. cSee page 78. cSee page 78. Troubleshooting Troubleshooting 89 Old battery. Q The tape has reached the end. Cannot record due to CAMERA mode's P-MENU. Cannot add audio. Disconnect the i.LINK cable. Cannot add audio.* Not recorded in SHOT-B. Cannot add audio.* Cannot add... audio on the screen, check the following. Cannot add audio. No output image in A (p. 37). x Dirty video head. Use a cleaning cassette. Corrective Actions/ References cSee page 92. cCharge the battery (p. 11). cSee page 95. cSee page 78 cRegister a setting...
... protection. cSee page 78. cSee page 78. Troubleshooting Troubleshooting 89 Old battery. Q The tape has reached the end. Cannot record due to CAMERA mode's P-MENU. Cannot add audio. Disconnect the i.LINK cable. Cannot add audio.* Not recorded in SHOT-B. Cannot add audio.* Cannot add... audio on the screen, check the following. Cannot add audio. No output image in A (p. 37). x Dirty video head. Use a cleaning cassette. Corrective Actions/ References cSee page 92. cCharge the battery (p. 11). cSee page 95. cSee page 78 cRegister a setting...

Operating Instructions
Page 98
...: 72 mm (2 7/8 in.) 12 × (Optical) F = 1.6 ~ 2.8 Focal length 4.5 - 54 mm (3/16 - 2 1/4 in.) When converted to a 35 mm still camera 32.5 - 390 mm (1 5/16 - 15 3/8 in.) (40 - 480 mm (1 5/8 - 19 in.) in 4:3 TV mode) Color temperature [AUTO], [ONE-PUSH A/B], [INDOOR]... (3 200 K), [OUTDOOR] (5 800 K) Minimum illumination 3 lx (lux) (F 1.6) Input/Output connectors Audio/Video input/output Video signal: 1 Vp-p, 75 Ω (ohms), unbalanced, sync negative Audio signal: 327 mV (at load impedance 47 kΩ (kilohms)), Input impedance more...
...: 72 mm (2 7/8 in.) 12 × (Optical) F = 1.6 ~ 2.8 Focal length 4.5 - 54 mm (3/16 - 2 1/4 in.) When converted to a 35 mm still camera 32.5 - 390 mm (1 5/16 - 15 3/8 in.) (40 - 480 mm (1 5/8 - 19 in.) in 4:3 TV mode) Color temperature [AUTO], [ONE-PUSH A/B], [INDOOR]... (3 200 K), [OUTDOOR] (5 800 K) Minimum illumination 3 lx (lux) (F 1.6) Input/Output connectors Audio/Video input/output Video signal: 1 Vp-p, 75 Ω (ohms), unbalanced, sync negative Audio signal: 327 mV (at load impedance 47 kΩ (kilohms)), Input impedance more...
Operating Instructions
Page 103
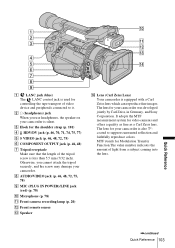
...is also T*coated to it. C Hook for your camcorder was developed jointly by Carl Zeiss, in Germany, and Sony Corporation. H AUDIO/VIDEO jack (p. 46, 48, 72, 75, 78) I MIC (PLUG IN POWER)/LINE jack (red) (p. 78) J Microphone (p. 78) K Front camera recording lamp (p. 20) L Front remote sensor M... Speaker N Lens (Carl Zeiss Lens) Your camcorder is used for Modulation Transfer...
...is also T*coated to it. C Hook for your camcorder was developed jointly by Carl Zeiss, in Germany, and Sony Corporation. H AUDIO/VIDEO jack (p. 46, 48, 72, 75, 78) I MIC (PLUG IN POWER)/LINE jack (red) (p. 78) J Microphone (p. 78) K Front camera recording lamp (p. 20) L Front remote sensor M... Speaker N Lens (Carl Zeiss Lens) Your camcorder is used for Modulation Transfer...
Operating Instructions
Page 107
... 35 Aperture 28 ASSIGN BTN 68 AT IRIS LMT 35 Audio dubbing (AUDIO MIX) ......56, 79 AUDIO MODE 56 AWB SENS 35 B BACK LIGHT (camera) ....25 Battery Battery Info 12 Battery pack 11 Remaining battery time 21, 93 Remote Commander..105 BEEP 62 BLACK FADER 38 Button-type battery 97... 97 CINEFRAME 35 CINEMATONE 35 Cleaning cassette 96 Clock set (CLOCK SET) ...16 Color bar 21 COLOR LEVEL 34 COLOR PHASE 34 COMPONENT 60 Component video cable 46, 48 Computer connection ........ 77 Customizing Personal Menu 65 D Data code (DATA CODE 44, 63 Date search 50 Date/time 16, 44 Display...
... 35 Aperture 28 ASSIGN BTN 68 AT IRIS LMT 35 Audio dubbing (AUDIO MIX) ......56, 79 AUDIO MODE 56 AWB SENS 35 B BACK LIGHT (camera) ....25 Battery Battery Info 12 Battery pack 11 Remaining battery time 21, 93 Remote Commander..105 BEEP 62 BLACK FADER 38 Button-type battery 97... 97 CINEFRAME 35 CINEMATONE 35 Cleaning cassette 96 Clock set (CLOCK SET) ...16 Color bar 21 COLOR LEVEL 34 COLOR PHASE 34 COMPONENT 60 Component video cable 46, 48 Computer connection ........ 77 Customizing Personal Menu 65 D Data code (DATA CODE 44, 63 Date search 50 Date/time 16, 44 Display...


