
Operating Instructions
Page 3
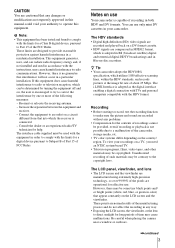
... be some tiny black points and/ or bright points (white, red, blue, or green in color) that appear constantly on the country/ region. z Tip • Your camcorder adopts the HDV1080i specification, which utilizes 1080 effective scanning lines, within the HDV standards, and records pictures at the image bit rate of time may cause harmful interference to direct sunlight for help. However, there...
... be some tiny black points and/ or bright points (white, red, blue, or green in color) that appear constantly on the country/ region. z Tip • Your camcorder adopts the HDV1080i specification, which utilizes 1080 effective scanning lines, within the HDV standards, and records pictures at the image bit rate of time may cause harmful interference to direct sunlight for help. However, there...
Operating Instructions
Page 7
... messages .....88 Additional Information Using your camcorder - REC FORMAT/TV TYPE, etc. ...59 Using the (OTHERS) menu - CLOCK SET/WORLD TIME, etc 62 Customizing Personal Menu 65 Assigning the functions 68 Dubbing/Editing Dubbing to another tape 70 Recording pictures from a VCR or TV 74 Connecting to a computer 77 Dubbing sound to a recorded tape 78 Connecting an analog VCR to the computer via your camcorder abroad 90 HDV format and recording/playback ..91 About the "InfoLITHIUM" battery...
... messages .....88 Additional Information Using your camcorder - REC FORMAT/TV TYPE, etc. ...59 Using the (OTHERS) menu - CLOCK SET/WORLD TIME, etc 62 Customizing Personal Menu 65 Assigning the functions 68 Dubbing/Editing Dubbing to another tape 70 Recording pictures from a VCR or TV 74 Connecting to a computer 77 Dubbing sound to a recorded tape 78 Connecting an analog VCR to the computer via your camcorder abroad 90 HDV format and recording/playback ..91 About the "InfoLITHIUM" battery...
Operating Instructions
Page 12
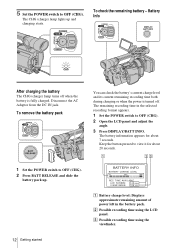
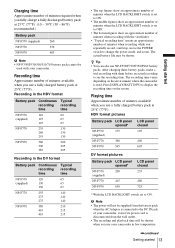
... battery - B Possible recording time using the viewfinder. 12 Getting started The CHG (charge) lamp lights up . Keep the button pressed to view it for about 20 seconds. 1 Set the POWER switch to OFF (CHG). 2 Press BATT RELEASE and slide the battery pack up and charging starts. Battery Info After charging the battery The CHG (charge) lamp turns off . BATTERY INFO BATTERY CHARGE LEVEL 0% 50% 100% REC T I ME AVA I LABLE LCD SCREEN: 1 1 0 min V I EWF I NDER: 1 2 5 min A Battery charge level: Displays...
... battery - B Possible recording time using the viewfinder. 12 Getting started The CHG (charge) lamp lights up . Keep the button pressed to view it for about 20 seconds. 1 Set the POWER switch to OFF (CHG). 2 Press BATT RELEASE and slide the battery pack up and charging starts. Battery Info After charging the battery The CHG (charge) lamp turns off . BATTERY INFO BATTERY CHARGE LEVEL 0% 50% 100% REC T I ME AVA I LABLE LCD SCREEN: 1 1 0 min V I EWF I NDER: 1 2 5 min A Battery charge level: Displays...
Operating Instructions
Page 13
... repeatedly record, start/stop, move the POWER switch to change the power mode, and zoom. z Tip • You can also use your camcorder. b Note • The power will not be supplied from the battery pack when the AC Adaptor is disconnected from the wall outlet. • The recording and playback time will be shorter. Press DISPLAY/BATT INFO to display the recording time on the environment where the camcorder is used...
... repeatedly record, start/stop, move the POWER switch to change the power mode, and zoom. z Tip • You can also use your camcorder. b Note • The power will not be supplied from the battery pack when the AC Adaptor is disconnected from the wall outlet. • The recording and playback time will be shorter. Press DISPLAY/BATT INFO to display the recording time on the environment where the camcorder is used...
Operating Instructions
Page 21
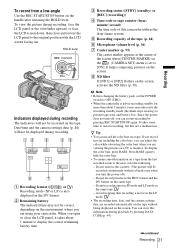
... 1 minute to restart recording, but this camcorder utilizes the drop-frame system. To view the picture during playback by pressing REC START/STOP again. HOLD lever Indicators displayed during recording. 6 0min HDV1080i ND 1 REC 0:00:00 6 0min L R A Recording format ( or ) Recording mode (SP or LP) is left in the LP mode. • The recording time, date, and the camera settings data are viewing the pictures on the screen. E Recording capacity of the tape (p. 64) F Microphone volume level (p. 36) G Center...
... 1 minute to restart recording, but this camcorder utilizes the drop-frame system. To view the picture during playback by pressing REC START/STOP again. HOLD lever Indicators displayed during recording. 6 0min HDV1080i ND 1 REC 0:00:00 6 0min L R A Recording format ( or ) Recording mode (SP or LP) is left in the LP mode. • The recording time, date, and the camera settings data are viewing the pictures on the screen. E Recording capacity of the tape (p. 64) F Microphone volume level (p. 36) G Center...
Operating Instructions
Page 22
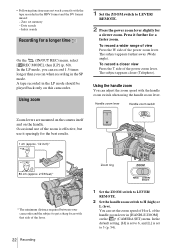
... camcorder and the subject to LEVER/ REMOTE. 2 Press the power zoom lever slightly for a longer time On the (IN/OUT REC) menu, select [ REC MODE], then [LP] (p. 60). To record a closer view Press the T side of the power zoom lever. You can when recording in [HANDLE ZOOM] on the (CAMERA SET) menu. In the default setting, [H] is set memory - To record a wider range of view Press the W side of the power zoom lever. • Following functions...
... camcorder and the subject to LEVER/ REMOTE. 2 Press the power zoom lever slightly for a longer time On the (IN/OUT REC) menu, select [ REC MODE], then [LP] (p. 60). To record a closer view Press the T side of the power zoom lever. You can when recording in [HANDLE ZOOM] on the (CAMERA SET) menu. In the default setting, [H] is set memory - To record a wider range of view Press the W side of the power zoom lever. • Following functions...
Operating Instructions
Page 37
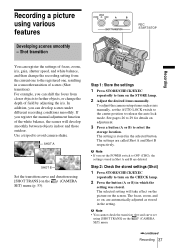
Shot transition REC START/STOP Recording You can register the settings of focus, zoom, iris, gain, shutter speed, and white balance, and then change the recording setting from closer objects to farther objects, or change the depth of field by adjusting the iris. b Note • If you can develop scenes under different recording conditions smoothly. The focus, zoom, and so on, are deleted. In addition, you register the manual adjustment function of scenes...
Shot transition REC START/STOP Recording You can register the settings of focus, zoom, iris, gain, shutter speed, and white balance, and then change the recording setting from closer objects to farther objects, or change the depth of field by adjusting the iris. b Note • If you can develop scenes under different recording conditions smoothly. The focus, zoom, and so on, are deleted. In addition, you register the manual adjustment function of scenes...
Operating Instructions
Page 44
... the button, the indicators appear in the HDV format, and [COMPONENT] on the (IN/OUT REC) menu is handy when you have recorded on the tape. 1 Set the POWER switch to VCR. 2 Press END SEARCH (VCR). Various playback functions You can choose to display the time code, tape counter, and other information on the screen. However, only playback mode indicators and tape counter appear when playing back a tape recorded in turn as follows: Date/time t Camera settings data t (no display) 44 Playback Data code During playback...
... the button, the indicators appear in the HDV format, and [COMPONENT] on the (IN/OUT REC) menu is handy when you have recorded on the tape. 1 Set the POWER switch to VCR. 2 Press END SEARCH (VCR). Various playback functions You can choose to display the time code, tape counter, and other information on the screen. However, only playback mode indicators and tape counter appear when playing back a tape recorded in turn as follows: Date/time t Camera settings data t (no display) 44 Playback Data code During playback...
Operating Instructions
Page 46
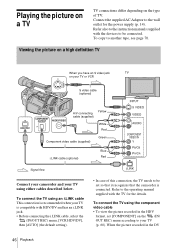
... the instruction manuals supplied with the devices to be set [COMPONENT] on your TV or VCR S video cable (optional) Yellow A/V connecting cable (supplied) White Red Component video cable (supplied) Green i.LINK cable (optional) Blue Red Signal flow Connect your camcorder and your TV is compatible with the TV for the power supply (p. 14). When the picture recorded in the HDV format, set so that it recognizes that the camcorder is recommended when your TV using...
... the instruction manuals supplied with the devices to be set [COMPONENT] on your TV or VCR S video cable (optional) Yellow A/V connecting cable (supplied) White Red Component video cable (supplied) Green i.LINK cable (optional) Blue Red Signal flow Connect your camcorder and your TV is compatible with the TV for the power supply (p. 14). When the picture recorded in the HDV format, set so that it recognizes that the camcorder is recommended when your TV using...
Operating Instructions
Page 47
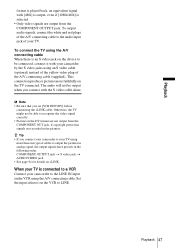
... LINE IN input on the VCR using an S video cable (optional) instead of the yellow video plug of cables to a VCR Connect your TV. z Tip • If you connect your camcorder to your camcorder by the S video jacks using the A/V connecting cable. format is played back, an equivalent signal with [480i] is output, even if [1080i/480i] is selected. • Only video signals are recorded in the following order: COMPONENT OUTPUT jack t S video jack t AUDIO/VIDEO jack...
... LINE IN input on the VCR using an S video cable (optional) instead of the yellow video plug of cables to a VCR Connect your TV. z Tip • If you connect your camcorder to your camcorder by the S video jacks using the A/V connecting cable. format is played back, an equivalent signal with [480i] is output, even if [1080i/480i] is selected. • Only video signals are recorded in the following order: COMPONENT OUTPUT jack t S video jack t AUDIO/VIDEO jack...
Operating Instructions
Page 48
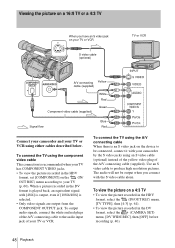
... VCR. To view the picture on a 4:3 TV • To view the picture recorded in the HDV format, select the (IN/OUT REC) menu, [TV TYPE], then [4:3] (p. 61). • To view the picture recorded in the HDV format, set [COMPONENT] on your TV or VCR S video cable (optional) TV or VCR A/V connecting Yellow cable (supplied) Component video cable (supplied) White Red Green Signal flow Blue Red Connect your camcorder and your TV (p. 60). To output audio signals, connect the white and red plugs of the A/V connecting cable...
... VCR. To view the picture on a 4:3 TV • To view the picture recorded in the HDV format, select the (IN/OUT REC) menu, [TV TYPE], then [4:3] (p. 61). • To view the picture recorded in the HDV format, set [COMPONENT] on your TV or VCR S video cable (optional) TV or VCR A/V connecting Yellow cable (supplied) Component video cable (supplied) White Red Green Signal flow Blue Red Connect your camcorder and your TV (p. 60). To output audio signals, connect the white and red plugs of the A/V connecting cable...
Operating Instructions
Page 62
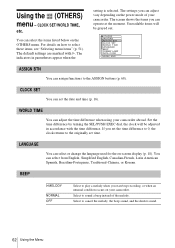
... on the power mode of the melody. BEEP GMELODY NORMAL OFF Select to the originally set the date and time (p. 16). Select to sound a beep instead of your camcorder abroad. The screen shows the items you can select the items listed below on -screen display (p. 18). The settings you can select or change the language used for the on the OTHERS menu. LANGUAGE You can operate at...
... on the power mode of the melody. BEEP GMELODY NORMAL OFF Select to the originally set the date and time (p. 16). Select to sound a beep instead of your camcorder abroad. The screen shows the items you can select the items listed below on -screen display (p. 18). The settings you can select or change the language used for the on the OTHERS menu. LANGUAGE You can operate at...
Operating Instructions
Page 70
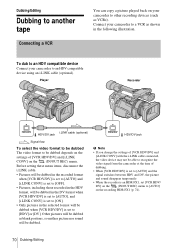
... selected format will be dubbed when [VCR HDV/DV] is an HDR-FX1, set to recognize the video signal from the camcorder at the time of [VCR HDV/DV] and [i.LINK CONV] on the (IN/OUT REC) menu. Connect your camcorder to [AUTO] on the recording HDR-FX1 (p. 74). 70 Dubbing/Editing Dubbing/Editing Dubbing to another tape Connecting a VCR You can copy a picture played back on your camcorder to an HDV compatible device using an i.LINK cable...
... selected format will be dubbed when [VCR HDV/DV] is an HDR-FX1, set to recognize the video signal from the camcorder at the time of [VCR HDV/DV] and [i.LINK CONV] on the (IN/OUT REC) menu. Connect your camcorder to [AUTO] on the recording HDR-FX1 (p. 74). 70 Dubbing/Editing Dubbing/Editing Dubbing to another tape Connecting a VCR You can copy a picture played back on your camcorder to an HDV compatible device using an i.LINK cable...
Operating Instructions
Page 79
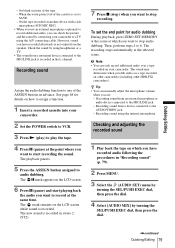
... of the cassette is recorded in the L channel. Check the sound by using the internal microphone. The X mark appears on how to assign a function. 1 Insert a recorded cassette into your camcorder. 2 Set the POWER switch to VCR. 3 Press N (play) to play the tape. 4 Press X (pause) at the selected scene. Recording sound using headphones or a TV. • The sound from the speaker. On blank sections of the ASSIGN buttons in "Recording sound" (p. 79). 2 Press MENU. 3 Select the (AUDIO SET) menu by turning the...
... of the cassette is recorded in the L channel. Check the sound by using the internal microphone. The X mark appears on how to assign a function. 1 Insert a recorded cassette into your camcorder. 2 Set the POWER switch to VCR. 3 Press N (play) to play the tape. 4 Press X (pause) at the selected scene. Recording sound using headphones or a TV. • The sound from the speaker. On blank sections of the ASSIGN buttons in "Recording sound" (p. 79). 2 Press MENU. 3 Select the (AUDIO SET) menu by turning the...

Operating Instructions
Page 86
... video cable, make sure the red and white plugs of the A/V connecting cable are not clear or do • There is new and has nothing recorded. Fine patterns flicker, diagonal lines cAdjust [SHARPNESS] to [STEREO] on the screen. cOn the (AUDIO SET) menu, adjust [AUDIO MIX] from the [ST2] (additional sound) side until the sound is not a malfunction. cClean the head using the cleaning cassette (p. 96). This not work . • The POWER switch...
... video cable, make sure the red and white plugs of the A/V connecting cable are not clear or do • There is new and has nothing recorded. Fine patterns flicker, diagonal lines cAdjust [SHARPNESS] to [STEREO] on the screen. cOn the (AUDIO SET) menu, adjust [AUDIO MIX] from the [ST2] (additional sound) side until the sound is not a malfunction. cClean the head using the cleaning cassette (p. 96). This not work . • The POWER switch...

Operating Instructions
Page 87
... you are using the component video cable, make sure the red and white plugs of the connected device (p. 59). cIn the (AUDIO SET) menu, adjust [AUDIO MIX] from the [ST1] (original sound) side until the sound is not heard. appears on the 4:3 TV. Pictures disappears for a moment when you play back the picture, set [DV WIDE REC] on the (CAMERA SET) menu to the connected device, pictures disappear when switching from connected devices are not displayed on the LCD screen or the...
... you are using the component video cable, make sure the red and white plugs of the connected device (p. 59). cIn the (AUDIO SET) menu, adjust [AUDIO MIX] from the [ST1] (original sound) side until the sound is not heard. appears on the 4:3 TV. Pictures disappears for a moment when you play back the picture, set [DV WIDE REC] on the (CAMERA SET) menu to the connected device, pictures disappear when switching from connected devices are not displayed on the LCD screen or the...
Operating Instructions
Page 91
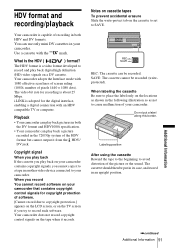
... another video device connected to SAVE. i.LINK is a video format developed to record and play back a picture recorded in the 720/30p system of the HDV format but cannot output it to a tape in the following illustration so as not to record such software. HDV format and recording/playback Your camcorder is capable of recording in an upright position. Use a cassette with 1080 effective scan lines of screen ruling (1080i, number of the picture or the sound...
... another video device connected to SAVE. i.LINK is a video format developed to record and play back a picture recorded in the 720/30p system of the HDV format but cannot output it to a tape in the following illustration so as not to record such software. HDV format and recording/playback Your camcorder is capable of recording in an upright position. Use a cassette with 1080 effective scan lines of screen ruling (1080i, number of the picture or the sound...
Operating Instructions
Page 96
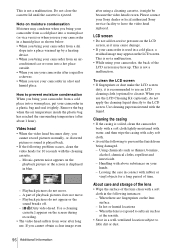
... following problem occurs, clean the video heads for a long period of the lens clean with a dry soft cloth. • Avoid the following instances: - Handling with the liquid. Leaving the case in blue. - Note on the LCD screen. Remove the bag when the air temperature inside the plastic bag has reached the surrounding temperature (after using your camcorder, the back of playback pictures does...
... following problem occurs, clean the video heads for a long period of the lens clean with a dry soft cloth. • Avoid the following instances: - Handling with the liquid. Leaving the case in blue. - Note on the LCD screen. Remove the bag when the air temperature inside the plastic bag has reached the surrounding temperature (after using your camcorder, the back of playback pictures does...
Operating Instructions
Page 107
... LIGHT (camera) ....25 Battery Battery Info 12 Battery pack 11 Remaining battery time 21, 93 Remote Commander..105 BEEP 62 BLACK FADER 38 Button-type battery 97 C Camera settings data display 44 Cassette 17 Center marker (CENTER MARKR 55 Charging the battery Battery pack 11 Pre-installed button-type battery 97 CINEFRAME 35 CINEMATONE 35 Cleaning cassette 96 Clock set (CLOCK SET) ...16 Color bar 21 COLOR LEVEL 34 COLOR PHASE 34 COMPONENT 60 Component video cable 46, 48 Computer connection ........ 77 Customizing Personal Menu 65 D Data code (DATA CODE...
... LIGHT (camera) ....25 Battery Battery Info 12 Battery pack 11 Remaining battery time 21, 93 Remote Commander..105 BEEP 62 BLACK FADER 38 Button-type battery 97 C Camera settings data display 44 Cassette 17 Center marker (CENTER MARKR 55 Charging the battery Battery pack 11 Pre-installed button-type battery 97 CINEFRAME 35 CINEMATONE 35 Cleaning cassette 96 Clock set (CLOCK SET) ...16 Color bar 21 COLOR LEVEL 34 COLOR PHASE 34 COMPONENT 60 Component video cable 46, 48 Computer connection ........ 77 Customizing Personal Menu 65 D Data code (DATA CODE...
Operating Instructions
Page 108
... Play) See Recording mode (REC MODE) SPOT LIGHT 25 STATUS CHECK........24, 45 SteadyShot (STEADYSHOT) ........ 54 SteadyShot type (STDYSHOT TYP).....54 Stereo 56 Sub sound See MULTI-SOUND T Tape counter 21, 49 Telephoto See Zoom Time code 21 Transition curve (TRANS CURVE 53 Transition time (TRANS TIME 53 TV color systems 90 TV TYPE 61 U Using abroad 90 V VCR HDV/DV 59 Video head 96 Viewfinder Adjusting 15 Brightness (VF B.LIGHT)......58 Maintenance 97 Volume...
... Play) See Recording mode (REC MODE) SPOT LIGHT 25 STATUS CHECK........24, 45 SteadyShot (STEADYSHOT) ........ 54 SteadyShot type (STDYSHOT TYP).....54 Stereo 56 Sub sound See MULTI-SOUND T Tape counter 21, 49 Telephoto See Zoom Time code 21 Transition curve (TRANS CURVE 53 Transition time (TRANS TIME 53 TV color systems 90 TV TYPE 61 U Using abroad 90 V VCR HDV/DV 59 Video head 96 Viewfinder Adjusting 15 Brightness (VF B.LIGHT)......58 Maintenance 97 Volume...


