Operating Guide
Page 8
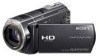
... green in such situations. In this camcorder. The camcorder may be sure to insert the connector plug in a malfunction of the camcorder. Even if the camcorder is turned off and landing of an airplane (HDR-CX500V/CX520V). If you repeat recording...this case, an indicator appears on the camcorder/battery pack temperature When the temperature of quantity. AC Adaptor (1) Power cord (Mains lead) (1) Component A/V cable (1) A/V connecting cable (1) USB cable (1) Wireless Remote Commander...
... green in such situations. In this camcorder. The camcorder may be sure to insert the connector plug in a malfunction of the camcorder. Even if the camcorder is turned off and landing of an airplane (HDR-CX500V/CX520V). If you repeat recording...this case, an indicator appears on the camcorder/battery pack temperature When the temperature of quantity. AC Adaptor (1) Power cord (Mains lead) (1) Component A/V cable (1) A/V connecting cable (1) USB cable (1) Wireless Remote Commander...

Operating Guide
Page 28
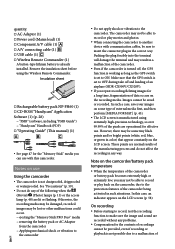
When using the supplied USB cable. http://guide.d-imaging.sony.co.jp/mac/ ms/us/ Step 2 Installing the supplied software...an Administrator for the application to be installed, then proceed to the next screen. Turn on your camcorder, see the following website. If the version number of the previously installed "PMB" is displayed by Macintosh computers....Compare the version number of the supplied CD-ROM with another device has already been installed on the "Handycam" Handbook. Confirm that the versions have been installed in order, from the lower to the ...
When using the supplied USB cable. http://guide.d-imaging.sony.co.jp/mac/ ms/us/ Step 2 Installing the supplied software...an Administrator for the application to be installed, then proceed to the next screen. Turn on your camcorder, see the following website. If the version number of the previously installed "PMB" is displayed by Macintosh computers....Compare the version number of the supplied CD-ROM with another device has already been installed on the "Handycam" Handbook. Confirm that the versions have been installed in order, from the lower to the ...

Operating Guide
Page 29
... computer if required to install the software. Depending on the camcorder screen. Disconnect the USB cable. You can create a Blu-ray disc by using a computer with a computer Other icons may appear depending on the installation procedure. The "Handycam" Handbook is completed, following icons will appear. Install the BD Add...
... computer if required to install the software. Depending on the camcorder screen. Disconnect the USB cable. You can create a Blu-ray disc by using a computer with a computer Other icons may appear depending on the installation procedure. The "Handycam" Handbook is completed, following icons will appear. Install the BD Add...

Operating Guide
Page 32
... definition image quality (SD) disc (p. 36). Install "PMB" beforehand (p. 28), however, do not start "PMB." Connect your camcorder, you can be saved on a disc automatically. You cannot play a high definition image quality (HD) disc on the computer when you perform One Touch...definition image quality (SD) disc from high definition image quality (HD) movies, import movies to the wall outlet (wall socket) using the supplied USB cable. 3 Press (DISC BURN). 4 Follow the instructions on the computer screen. Movies and photos are not saved on DVD players. ...
... definition image quality (SD) disc (p. 36). Install "PMB" beforehand (p. 28), however, do not start "PMB." Connect your camcorder, you can be saved on a disc automatically. You cannot play a high definition image quality (HD) disc on the computer when you perform One Touch...definition image quality (SD) disc from high definition image quality (HD) movies, import movies to the wall outlet (wall socket) using the supplied USB cable. 3 Press (DISC BURN). 4 Follow the instructions on the computer screen. Movies and photos are not saved on DVD players. ...

Operating Guide
Page 33
...(p. 36) from imported high definition image quality (HD) movies. See "PMB Guide" on your camcorder to the wall outlet (wall socket) using the supplied USB cable. US 33 Importing movies and photos to a computer (Easy PC Back-up) Movies and photos recorded on ...the camcorder screen. 2 Touch [ USB CONNECT] to import images from the internal memory, or [ USB CONNECT] to import images from a "Memory Stick PRO Duo" media. See "PMB Guide" for movies and photos On the [Handycam...
...(p. 36) from imported high definition image quality (HD) movies. See "PMB Guide" on your camcorder to the wall outlet (wall socket) using the supplied USB cable. US 33 Importing movies and photos to a computer (Easy PC Back-up) Movies and photos recorded on ...the camcorder screen. 2 Touch [ USB CONNECT] to import images from the internal memory, or [ USB CONNECT] to import images from a "Memory Stick PRO Duo" media. See "PMB Guide" for movies and photos On the [Handycam...

Operating Guide
Page 39
... recorded onto the disc. The [DISC BURN] screen appears on the camcorder screen. 3 Press (DISC BURN) on the camcorder screen. Use the supplied AC Adaptor as the power source (p. 14). US 39 Saving images with the USB cable of the disc. 5 After the operation is completed, touch ... [END] on the camcorder screen. Touch [EJECT DISC] and remove any discs will be saved on a created disc &#...
... recorded onto the disc. The [DISC BURN] screen appears on the camcorder screen. 3 Press (DISC BURN) on the camcorder screen. Use the supplied AC Adaptor as the power source (p. 14). US 39 Saving images with the USB cable of the disc. 5 After the operation is completed, touch ... [END] on the camcorder screen. Touch [EJECT DISC] and remove any discs will be saved on a created disc &#...

Operating Guide
Page 40
... the DVD writer opens after the operation is completed, touch [EXIT] [END] on the camcorder screen. Close the disc tray on the DVD writer, and disconnect the USB cable from high definition image quality (HD) to standard definition image quality (SD). Touch ...new disc and touch [CREATE SAME DISC]. After the operation is completed. Touch and disconnect the USB cable. Be sure to turn on the camcorder. MEMORY]/[ MEMORY STICK]: The screen to select the image qualityof the disc to confirm the image. Movie thumbnails appear...
... the DVD writer opens after the operation is completed, touch [EXIT] [END] on the camcorder screen. Close the disc tray on the DVD writer, and disconnect the USB cable from high definition image quality (HD) to standard definition image quality (SD). Touch ...new disc and touch [CREATE SAME DISC]. After the operation is completed. Touch and disconnect the USB cable. Be sure to turn on the camcorder. MEMORY]/[ MEMORY STICK]: The screen to select the image qualityof the disc to confirm the image. Movie thumbnails appear...

Operating Guide
Page 41
...do any reason, connect the camcorder to the DVD writer, and then play back. The disc mark appears on the camcorder screen. Sony DVD writer may not be cut off the camcorder Close the LCD screen of the camcorder Disconnect the USB cable or the AC Adaptor &#...58317; Subject the camcorder to mechanical shock or vibration Eject the ...
...do any reason, connect the camcorder to the DVD writer, and then play back. The disc mark appears on the camcorder screen. Sony DVD writer may not be cut off the camcorder Close the LCD screen of the camcorder Disconnect the USB cable or the AC Adaptor &#...58317; Subject the camcorder to mechanical shock or vibration Eject the ...

Operating Guide
Page 42
... image quality (HD) disc with high definition image quality (HD) movies, such as a Sony DVD writer. other than DVDirect Express Use USB cable to connect your camcorder to eject the disc. Sony DVD writer may fail to the wall outlet (wall socket) using the AC Adaptor for this... operation (p. 14). 1 Turn on the camcorder screen. 5 Disconnect the USB cable. The high definition ...
... image quality (HD) disc with high definition image quality (HD) movies, such as a Sony DVD writer. other than DVDirect Express Use USB cable to connect your camcorder to eject the disc. Sony DVD writer may fail to the wall outlet (wall socket) using the AC Adaptor for this... operation (p. 14). 1 Turn on the camcorder screen. 5 Disconnect the USB cable. The high definition ...

Operating Guide
Page 57
...any new recordings during operation. The camcorder is full. Notes before sending your camcorder to be deleted. However, your Sony dealer will not compensate you have ...USB jack of the computer other media (backup) before sending your camcorder for details on the symptoms of your computer. We will neither copy nor retain your data. See the "Handycam" Handbook (p. 56) for repair Your camcorder... It takes a few seconds for your camcorder for any problems using your camcorder. Disconnect the USB cable from the wall outlet (wall socket) or remove...
...any new recordings during operation. The camcorder is full. Notes before sending your camcorder to be deleted. However, your Sony dealer will not compensate you have ...USB jack of the computer other media (backup) before sending your camcorder for details on the symptoms of your computer. We will neither copy nor retain your data. See the "Handycam" Handbook (p. 56) for repair Your camcorder... It takes a few seconds for your camcorder for any problems using your camcorder. Disconnect the USB cable from the wall outlet (wall socket) or remove...


