
Handycam® Handbook
Page 2
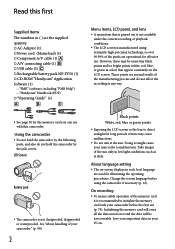
...are operational for the memory card you can use (p. 74). About language setting The on your PC etc. Read this camcorder. Doing so might cause your camcorder" (p. 98). ...cable (1) USB cable (1) Rechargeable battery pack NP-FV50 (1) CD-ROM "Handycam" Application Software (1) "PMB" (software, including "PMB Help") "Handycam" Handbook (PDF) "Operating Guide" (1) Menu items, LCD panel, and lens A menu item that appear constantly on the LCD screen. Save your camcorder before using extremely high...
...are operational for the memory card you can use (p. 74). About language setting The on your PC etc. Read this camcorder. Doing so might cause your camcorder" (p. 98). ...cable (1) USB cable (1) Rechargeable battery pack NP-FV50 (1) CD-ROM "Handycam" Application Software (1) "PMB" (software, including "PMB Help") "Handycam" Handbook (PDF) "Operating Guide" (1) Menu items, LCD panel, and lens A menu item that appear constantly on the LCD screen. Save your camcorder before using extremely high...

Handycam® Handbook
Page 3
... communication cables, be able to record or play back images recorded on a TV, you may result in a malfunction of the camcorder using an external media (p. 49). To view your computer. Before starting to record, test the recording function to make a AVCHD disc from the image data recorded with HD image quality (high definition...
... communication cables, be able to record or play back images recorded on a TV, you may result in a malfunction of the camcorder using an external media (p. 49). To view your computer. Before starting to record, test the recording function to make a AVCHD disc from the image data recorded with HD image quality (high definition...

Handycam® Handbook
Page 35
.... To change music files You can transfer music files from about 1.1 to the center of the displayed frame. Turn on your camcorder and computer, connect them using [EMPTY MUSIC], the music data recorded on your computer. To start Music Transfer, click [Start] ... using Music Transfer, a software installed together with the supplied USB cable, then touch [DOWNLOAD MUSIC] on your camcorder at the point you want to the camcorder, if you need to install the supplied software "PMB" on the camcorder screen. (If the [USB SELECT] screen does not appear, ...
.... To change music files You can transfer music files from about 1.1 to the center of the displayed frame. Turn on your camcorder and computer, connect them using [EMPTY MUSIC], the music data recorded on your computer. To start Music Transfer, click [Start] ... using Music Transfer, a software installed together with the supplied USB cable, then touch [DOWNLOAD MUSIC] on your camcorder at the point you want to the camcorder, if you need to install the supplied software "PMB" on the camcorder screen. (If the [USB SELECT] screen does not appear, ...
Handycam® Handbook
Page 38
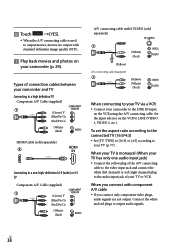
... channel) or red (right channel) plug to the audio input jack of connection cables between your camcorder and TV Connecting to a high definition TV Component A/V Cable (supplied) (Green) Y (Blue)PB/CB (Red)PR/CR (White) (Red) HDMI Cable (sold separately) (White) (Red) (Yellow) A/V connecting cable (supplied) (Yellow) (White) (Red) When connecting to your TV via a VCR ...
... channel) or red (right channel) plug to the audio input jack of connection cables between your camcorder and TV Connecting to a high definition TV Component A/V Cable (supplied) (Green) Y (Blue)PB/CB (Red)PR/CR (White) (Red) HDMI Cable (sold separately) (White) (Red) (Yellow) A/V connecting cable (supplied) (Yellow) (White) (Red) When connecting to your TV via a VCR ...

Handycam® Handbook
Page 39
... no sound or image) with this connection. Do not connect the camcorder HDMI OUT jack to an external device HDMI OUT jack, as follows: HDMI component S VIDEO video HDMI (High Definition Multimedia Interface) is an interface to send both video/audio signals. Refer to ... output images, the order of priority of your TV. This connection produces higher resolution images compared with the A/V connecting cable. Notes When you play selected movies or display selected photos by pressing up/ down/left/right/enter buttons of...
... no sound or image) with this connection. Do not connect the camcorder HDMI OUT jack to an external device HDMI OUT jack, as follows: HDMI component S VIDEO video HDMI (High Definition Multimedia Interface) is an interface to send both video/audio signals. Refer to ... output images, the order of priority of your TV. This connection produces higher resolution images compared with the A/V connecting cable. Notes When you play selected movies or display selected photos by pressing up/ down/left/right/enter buttons of...
Handycam® Handbook
Page 49
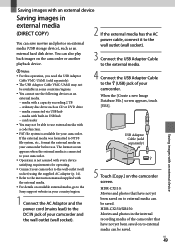
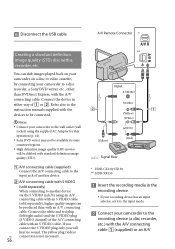
... external media, go to the Sony support website in your country/region. 1 Connect the AC Adaptor and the power cord (mains lead) to the DC IN jack of your camcorder before use. Saving images with an...exceeding 2 TB ordinary disc drive such as an external hard disk drive. USB Adaptor Cable (sold separately). The USB Adaptor Cable VMC-UAM1 may not be available in some countries/regions. You cannot use external ...media can save movies and photos on the camcorder screen. HDR-CX150/XR150: Movies and photos in external media (DIRECT COPY) You can be saved.
... external media, go to the Sony support website in your country/region. 1 Connect the AC Adaptor and the power cord (mains lead) to the DC IN jack of your camcorder before use. Saving images with an...exceeding 2 TB ordinary disc drive such as an external hard disk drive. USB Adaptor Cable (sold separately). The USB Adaptor Cable VMC-UAM1 may not be available in some countries/regions. You cannot use external ...media can save movies and photos on the camcorder screen. HDR-CX150/XR150: Movies and photos in external media (DIRECT COPY) You can be saved.
Handycam® Handbook
Page 51
...photos cannot be displayed. If your camcorder does not recognize the external media, try the following operations. Reconnect the USB Adaptor Cable to save images in step 5 above. To play back the high definition image quality (HD) movies on your computer ...using [Player for AVCHD]. The VISUAL INDEX screen of the external media is connected with [Settings]. Notes The Date Index of the external media. Disconnect the USB Adaptor Cable. AVCHD format compatible device Player Sony...
...photos cannot be displayed. If your camcorder does not recognize the external media, try the following operations. Reconnect the USB Adaptor Cable to save images in step 5 above. To play back the high definition image quality (HD) movies on your computer ...using [Player for AVCHD]. The VISUAL INDEX screen of the external media is connected with [Settings]. Notes The Date Index of the external media. Disconnect the USB Adaptor Cable. AVCHD format compatible device Player Sony...
Handycam® Handbook
Page 52
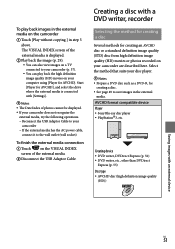
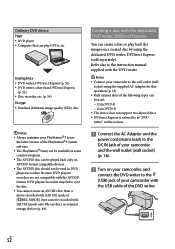
... to the instruction manual supplied with the DVD writer. Notes Connect your camcorder to the wall outlet (wall socket) using the dedicated DVD writer, DVDirect Express (sold separately...other than DVDirect Express (p. 55) Disc recorder, etc. (p. 56) Disc type Standard definition image quality (STD) disc Notes Always maintain your PlayStation3 to use the latest .... You cannot create an AVCHD disc from a movie recorded with the USB cable of the DVD writer. Save a movie recorded with the dedicated DVD writer, DVDirect Express...
... to the instruction manual supplied with the DVD writer. Notes Connect your camcorder to the wall outlet (wall socket) using the dedicated DVD writer, DVDirect Express (sold separately...other than DVDirect Express (p. 55) Disc recorder, etc. (p. 56) Disc type Standard definition image quality (STD) disc Notes Always maintain your PlayStation3 to use the latest .... You cannot create an AVCHD disc from a movie recorded with the USB cable of the DVD writer. Save a movie recorded with the dedicated DVD writer, DVDirect Express...
Handycam® Handbook
Page 53
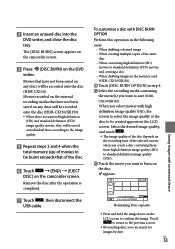
...copies of the same disc When converting high definition (HD) movies to standard definition (STD) movies, and creating a disc When dubbing images in the memory card (HDR-CX150/XR150) Touch [DISC BURN OPTION]... Touch , then disconnect the USB cable. appears. Movies that of the disc depends on the disc. US 53 Saving images with high definition image quality (HD), the screen ...4 when the total memory size of movies to confirm the image. The [DISC BURN] screen appears on the camcorder screen. Press (DISC BURN) on the camcorder screen. Touch to ...
...copies of the same disc When converting high definition (HD) movies to standard definition (STD) movies, and creating a disc When dubbing images in the memory card (HDR-CX150/XR150) Touch [DISC BURN OPTION]... Touch , then disconnect the USB cable. appears. Movies that of the disc depends on the disc. US 53 Saving images with high definition image quality (HD), the screen ...4 when the total memory size of movies to confirm the image. The [DISC BURN] screen appears on the camcorder screen. Press (DISC BURN) on the camcorder screen. Touch to ...
Handycam® Handbook
Page 54
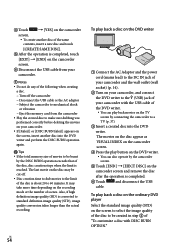
... It may take more time depending on the disc may be cut off the camcorder Disconnect the USB cable or the AC adaptor Subject the camcorder to mechanical shock or vibration Eject the memory card from your camcorder. Notes Do not do any of the following when creating... of scenes. The last movie on the recording mode or the number of the disc is about 20 to standard definition image quality (STD), image quality conversion takes longer than the actual recording. Also, if high definition image quality (HD) is converted to 60 minutes.
... It may take more time depending on the disc may be cut off the camcorder Disconnect the USB cable or the AC adaptor Subject the camcorder to mechanical shock or vibration Eject the memory card from your camcorder. Notes Do not do any of the following when creating... of scenes. The last movie on the recording mode or the number of the disc is about 20 to standard definition image quality (STD), image quality conversion takes longer than the actual recording. Also, if high definition image quality (HD) is converted to 60 minutes.
Handycam® Handbook
Page 55
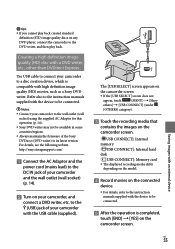
...; Turn on any DVD player, connect the camcorder to the wall outlet (wall socket) using the supplied AC Adaptor for this operation (p. 14). Sony DVD writer may not be connected. After the operation is compatible with an external device US 55 Saving images with high definition image quality (HD) movies, such as...
...; Turn on any DVD player, connect the camcorder to the wall outlet (wall socket) using the supplied AC Adaptor for this operation (p. 14). Sony DVD writer may not be connected. After the operation is compatible with an external device US 55 Saving images with high definition image quality (HD) movies, such as...
Handycam® Handbook
Page 56
... definition image quality (STD) disc with an S VIDEO cable. The yellow plug (video) US connection is not necessary. 56 ** Input S VIDEO (Yellow) VIDEO (Yellow) (White) AUDIO (Red) Signal flow * HDR-CX110/CX150 ** HDR-XR150 Insert the recording media in either way of another device via the S VIDEO jack, by connecting your camcorder on your camcorder to...
... definition image quality (STD) disc with an S VIDEO cable. The yellow plug (video) US connection is not necessary. 56 ** Input S VIDEO (Yellow) VIDEO (Yellow) (White) AUDIO (Red) Signal flow * HDR-CX110/CX150 ** HDR-XR150 Insert the recording media in either way of another device via the S VIDEO jack, by connecting your camcorder on your camcorder to...
Handycam® Handbook
Page 57
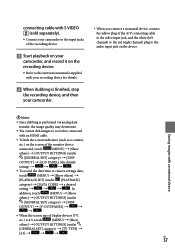
connecting cable with S VIDEO (sold separately). Connect your camcorder to the input jacks of the recording device. Start playback on your camcorder. When you connect a monaural device, connect the yellow plug of the monitor device connected, touch (MENU) [Show others] ... (TV, etc.) is finished, stop the recording device, and then your camcorder, and record it on the recording device. Refer to the audio input jack on the screen of the A/V connecting cable to the video input jack, and the white (left channel) or the red...
connecting cable with S VIDEO (sold separately). Connect your camcorder to the input jacks of the recording device. Start playback on your camcorder. When you connect a monaural device, connect the yellow plug of the monitor device connected, touch (MENU) [Show others] ... (TV, etc.) is finished, stop the recording device, and then your camcorder, and record it on the recording device. Refer to the audio input jack on the screen of the A/V connecting cable to the video input jack, and the white (left channel) or the red...
Handycam® Handbook
Page 75
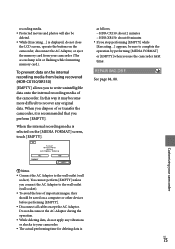
... [MEDIA FORMAT] or [EMPTY] when you dispose of important images, they should be saved on the camcorder, disconnect the AC Adaptor, or eject the memory card from being recovered (HDR-CX150/XR150) [EMPTY] allows you perform [EMPTY]. You cannot perform [EMPTY] unless you connect the AC ... is lit or flashing while formatting memory card.). Do not disconnect the AC Adaptor during the operation. While deleting data, do not close the LCD screen, operate the buttons on a computer or other devices before performing [EMPTY]. Disconnect all cables except the AC Adaptor...
... [MEDIA FORMAT] or [EMPTY] when you dispose of important images, they should be saved on the camcorder, disconnect the AC Adaptor, or eject the memory card from being recovered (HDR-CX150/XR150) [EMPTY] allows you perform [EMPTY]. You cannot perform [EMPTY] unless you connect the AC ... is lit or flashing while formatting memory card.). Do not disconnect the AC Adaptor during the operation. While deleting data, do not close the LCD screen, operate the buttons on a computer or other devices before performing [EMPTY]. Disconnect all cables except the AC Adaptor...
Handycam® Handbook
Page 77
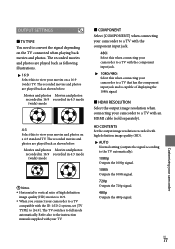
... 1080i/480i Select this when connecting your camcorder to a TV that has the component input jack and is capable of high definition image quality (HD) movies is 16:9. When you connect your camcorder to a TV compatible with an HDMI cable (sold separately). HD CONTENTS Set the ...output image resolution recorded with high definition image quality (HD). AUTO Normal ...
... 1080i/480i Select this when connecting your camcorder to a TV that has the component input jack and is capable of high definition image quality (HD) movies is 16:9. When you connect your camcorder to a TV compatible with an HDMI cable (sold separately). HD CONTENTS Set the ...output image resolution recorded with high definition image quality (HD). AUTO Normal ...

Handycam® Handbook
Page 79
...all of the following conditions (HDR-CX150/XR150). The movie is protected The movie is the first one displayed on the VISUAL INDEX screen The movie is saved on the internal recording media The movie is recorded with the HDMI cable (sold separately), you can... recorded will be registered as not to activate the drop sensor. CTRL FOR HDMI (Control for HDMI) When connecting your camcorder to a "BRAVIA" Sync compatible TV with high definition image quality (HD) Tips When you set [DROP SENSOR] to [OFF] so as the demonstration movie if...
...all of the following conditions (HDR-CX150/XR150). The movie is protected The movie is the first one displayed on the VISUAL INDEX screen The movie is saved on the internal recording media The movie is recorded with the HDMI cable (sold separately), you can... recorded will be registered as not to activate the drop sensor. CTRL FOR HDMI (Control for HDMI) When connecting your camcorder to a "BRAVIA" Sync compatible TV with high definition image quality (HD) Tips When you set [DROP SENSOR] to [OFF] so as the demonstration movie if...
Handycam® Handbook
Page 85
... not recognized by the computer. Disconnect devices from the computer and your camcorder, and restart the computer, then connect the computer and your camcorder. Disconnect the USB cable from the USB jack of the 4:3 TV. This happens when viewing an image ...is not a malfunction. Dubbing/Connecting to other than the keyboard, mouse, and your camcorder again in the images. When you record images using the outer frame of the A/V connecting cable are connected (p. 39). Additional information US 85 However, this may cause slight trimming...
... not recognized by the computer. Disconnect devices from the computer and your camcorder, and restart the computer, then connect the computer and your camcorder. Disconnect the USB cable from the USB jack of the 4:3 TV. This happens when viewing an image ...is not a malfunction. Dubbing/Connecting to other than the keyboard, mouse, and your camcorder again in the images. When you record images using the outer frame of the A/V connecting cable are connected (p. 39). Additional information US 85 However, this may cause slight trimming...
Handycam® Handbook
Page 93
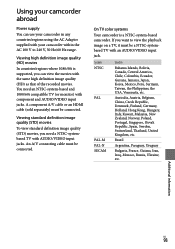
Viewing high definition image quality (HD) movies In countries/regions where 1080/60i is a NTSC-system-based camcorder. Additional information US 93 A component A/V cable or an HDMI cable (sold separately) must be connected. An A/V connecting cable must be a NTSC-systembased TV with an AUDIO/VIDEO input jack. Australia, Austria, Belgium, China, Czech Republic, Denmark, Finland, Germany, Holland...
Viewing high definition image quality (HD) movies In countries/regions where 1080/60i is a NTSC-system-based camcorder. Additional information US 93 A component A/V cable or an HDMI cable (sold separately) must be connected. An A/V connecting cable must be a NTSC-systembased TV with an AUDIO/VIDEO input jack. Australia, Austria, Belgium, China, Czech Republic, Denmark, Finland, Germany, Holland...
Handycam® Handbook
Page 107
Index Symbols 1080i/480i 77 16:9 77 4:3 77 480i 77 A A.SHUT OFF 78 A/V connecting cable...........38, 56 Abroad 93 AREA SET 78 AUDIO REC SET 69 AUTO BACK LIGHT 70 AVCHD format 95 B BATTERY INFO 74 Battery pack 12 BEACH ... 26 M Maintenance 95 MANAGE MEDIA 17, 74 MANUAL SETTINGS 63 MEDIA FORMAT 74 MEDIA INFO 74 MEDIA SETTINGS 17 Memory card 18 "Memory Stick" media.........18, 95 "Memory Stick PRO-HG Duo" media 18, 95 "Memory Stick PRO Duo" media 18, 95 Menus 58, 61 MICREF LEVEL 69 Mirror mode 28 Moisture condensation 99...
Index Symbols 1080i/480i 77 16:9 77 4:3 77 480i 77 A A.SHUT OFF 78 A/V connecting cable...........38, 56 Abroad 93 AREA SET 78 AUDIO REC SET 69 AUTO BACK LIGHT 70 AVCHD format 95 B BATTERY INFO 74 Battery pack 12 BEACH ... 26 M Maintenance 95 MANAGE MEDIA 17, 74 MANUAL SETTINGS 63 MEDIA FORMAT 74 MEDIA INFO 74 MEDIA SETTINGS 17 Memory card 18 "Memory Stick" media.........18, 95 "Memory Stick PRO-HG Duo" media 18, 95 "Memory Stick PRO Duo" media 18, 95 Menus 58, 61 MICREF LEVEL 69 Mirror mode 28 Moisture condensation 99...
Handycam® Handbook
Page 108
... 66 Telephoto 25 Thumbnail 40 Tripod 106 Troubleshooting 80 TV 37 TV color systems 93 TV CONNECT Guide 37 TV TYPE 77 TWILIGHT 63 U USB cable 52, 55 USB CONNECT 52, 55 V VBR 90 VIEW IMAGES 29, 32 VISUAL INDEX 29 Volume 31, 76 W Wall outlet (wall socket 12 Warning messages...
... 66 Telephoto 25 Thumbnail 40 Tripod 106 Troubleshooting 80 TV 37 TV color systems 93 TV CONNECT Guide 37 TV TYPE 77 TWILIGHT 63 U USB cable 52, 55 USB CONNECT 52, 55 V VBR 90 VIEW IMAGES 29, 32 VISUAL INDEX 29 Volume 31, 76 W Wall outlet (wall socket 12 Warning messages...


