Operating Guide (Large File - 11.29 MB)
Page 10
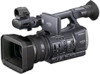
... point Do not expose your camcorder or battery 10 pack is recommended that you format the memory card when you need an NTSC system-based TV. • Television programs, films, video tapes, and other media such as a computer, before formatting the memory card. • Before starting to record, test the recording function to make sure the...
... point Do not expose your camcorder or battery 10 pack is recommended that you format the memory card when you need an NTSC system-based TV. • Television programs, films, video tapes, and other media such as a computer, before formatting the memory card. • Before starting to record, test the recording function to make sure the...
Operating Guide (Large File - 11.29 MB)
Page 11
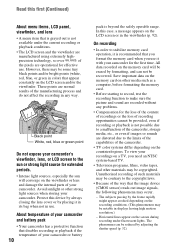
... body of your camcorder with the AVCHD format • Movies made using a slower shutter speed. Discs recorded with a flash. If this manual for illustration purposes are used with High Profile - DVD media containing AVCHD footage should not be reduced by using this camcorder may fail to prevent the recovery of the memory card. Format the recording media using your recorded images on...
... body of your camcorder with the AVCHD format • Movies made using a slower shutter speed. Discs recorded with a flash. If this manual for illustration purposes are used with High Profile - DVD media containing AVCHD footage should not be reduced by using this camcorder may fail to prevent the recovery of the memory card. Format the recording media using your recorded images on...
Operating Guide (Large File - 11.29 MB)
Page 12
... and viewfinder 20 Step 6: Setting the date and time 22 Changing the language setting 23 Step 7: Inserting a memory card 23 Recording/Playback Recording 25 Selecting the recording format 27 Changing the settings of your camcorder recordings 29 Adjusting the zoom 29 Adjusting the focus manually 30 Adjusting the image brightness 31 Adjusting to natural color (White...
... and viewfinder 20 Step 6: Setting the date and time 22 Changing the language setting 23 Step 7: Inserting a memory card 23 Recording/Playback Recording 25 Selecting the recording format 27 Changing the settings of your camcorder recordings 29 Adjusting the zoom 29 Adjusting the focus manually 30 Adjusting the image brightness 31 Adjusting to natural color (White...

Operating Guide (Large File - 11.29 MB)
Page 13
...still images 61 Formatting the memory card 62 Preventing data on the memory card from being recovered 63 Repairing the image database file 64 Using the Menu Operating the menu 65 Menu items 67 (CAMERA SET) menu 69 Settings to adjust your camcorder to the recording conditions (GAIN... SET/ BACK LIGHT/STEADYSHOT, etc.) (REC/OUT SET) menu 73 Recording settings, input and output settings (REC FORMAT/VIDEO OUT, etc.) (AUDIO SET) menu 75 Settings for the audio recording (AUDIO LIMIT/XLR SET, etc.) (DISPLAY ...
...still images 61 Formatting the memory card 62 Preventing data on the memory card from being recovered 63 Repairing the image database file 64 Using the Menu Operating the menu 65 Menu items 67 (CAMERA SET) menu 69 Settings to adjust your camcorder to the recording conditions (GAIN... SET/ BACK LIGHT/STEADYSHOT, etc.) (REC/OUT SET) menu 73 Recording settings, input and output settings (REC FORMAT/VIDEO OUT, etc.) (AUDIO SET) menu 75 Settings for the audio recording (AUDIO LIMIT/XLR SET, etc.) (DISPLAY ...
Operating Guide (Large File - 11.29 MB)
Page 14
...83 Warning indicators and messages 92 Additional Information Recording time of movies 95 Using your camcorder abroad 97 File/folder structure on the memory card 98 Maintenance and precautions 99 About the AVCHD format 99 About the "Memory Stick" media 99 About the "InfoLITHIUM" battery pack 100 ...About x.v.Color 101 About handling of your camcorder 102 Specifications 105 Quick Reference Identifying parts and controls 109 ...
...83 Warning indicators and messages 92 Additional Information Recording time of movies 95 Using your camcorder abroad 97 File/folder structure on the memory card 98 Maintenance and precautions 99 About the AVCHD format 99 About the "Memory Stick" media 99 About the "InfoLITHIUM" battery pack 100 ...About x.v.Color 101 About handling of your camcorder 102 Specifications 105 Quick Reference Identifying parts and controls 109 ...
Operating Guide (Large File - 11.29 MB)
Page 24
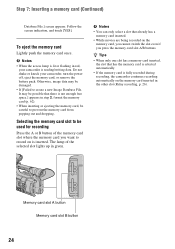
b Notes • You can only select a slot that there is fully recorded during recording, the camcorder continues recording automatically on the memory card inserted in step 2, format the memory card (p. 62). • When inserting or ejecting the memory card, be damaged. • If [Failed to prevent the ...B button 24 b Notes • When the access lamp is lit or flashing in green. Otherwise, image data may be used for recording Press the A or B button of the selected slot lights up in red, your camcorder, turn the power off, eject the memory card, or remove the battery pack...
b Notes • You can only select a slot that there is fully recorded during recording, the camcorder continues recording automatically on the memory card inserted in step 2, format the memory card (p. 62). • When inserting or ejecting the memory card, be damaged. • If [Failed to prevent the ...B button 24 b Notes • When the access lamp is lit or flashing in green. Otherwise, image data may be used for recording Press the A or B button of the selected slot lights up in red, your camcorder, turn the power off, eject the memory card, or remove the battery pack...
Operating Guide (Large File - 11.29 MB)
Page 25
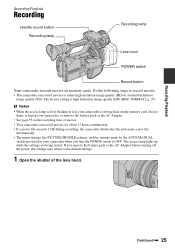
...flashing in red, your camcorder when you remove the battery pack or the AC Adaptor before turning off the power, the settings may return to OFF. If you turn the POWER switch to the default settings. 1 Open the shutter of movies. • Your camcorder can record movies in your camcorder... (HD) ([REC FORMAT], p. 27). Recording/Playback Recording Handle record button Recording lamp Recording lamp Lens hood POWER switch Record button Your camcorder records movies on the memory card. Do the following steps to record movies. • This camcorder can record movies for about 13...
...flashing in red, your camcorder when you remove the battery pack or the AC Adaptor before turning off the power, the settings may return to OFF. If you turn the POWER switch to the default settings. 1 Open the shutter of movies. • Your camcorder can record movies in your camcorder... (HD) ([REC FORMAT], p. 27). Recording/Playback Recording Handle record button Recording lamp Recording lamp Lens hood POWER switch Record button Your camcorder records movies on the memory card. Do the following steps to record movies. • This camcorder can record movies for about 13...
Operating Guide (Large File - 11.29 MB)
Page 27
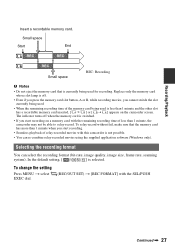
...card is not possible. • You can select the recording format (bit-rate, image quality, image size, frame rate, scanning system). To change the setting Press MENU t select EXEC dial. (REC/OUT SET) t [REC FORMAT] with this camcorder is switched. • If you cannot switch the ... being used for recording. Small space Start End Small space REC: Recording b Notes • Do not eject the memory card that the memory card has more than 1 minute when you start recording on the camcorder screen. Selecting the recording format You can re-combine relay-recorded movies using the ...
...card is not possible. • You can select the recording format (bit-rate, image quality, image size, frame rate, scanning system). To change the setting Press MENU t select EXEC dial. (REC/OUT SET) t [REC FORMAT] with this camcorder is switched. • If you cannot switch the ... being used for recording. Small space Start End Small space REC: Recording b Notes • Do not eject the memory card that the memory card has more than 1 minute when you start recording on the camcorder screen. Selecting the recording format You can re-combine relay-recorded movies using the ...

Operating Guide (Large File - 11.29 MB)
Page 28
... definition image quality SD: Standard definition image quality • Image size FX: 1920×1080 FH: 1920×1080 HQ: HD recording 1440×1080 SD recording 720×480 LP: 1440×1080 • Frame rate either 24, 30, or 60 • Scanning system i: interlace p:... image quality. • 1080: Effective scanning lines • 60: Frame rate • i: Scanning system • FX: Recording mode b Notes • The recording mode is fixed to FX or FH with following format. • HD: High definition image quality. Setting value If you select [ ], for example, movies are...
... definition image quality SD: Standard definition image quality • Image size FX: 1920×1080 FH: 1920×1080 HQ: HD recording 1440×1080 SD recording 720×480 LP: 1440×1080 • Frame rate either 24, 30, or 60 • Scanning system i: interlace p:... image quality. • 1080: Effective scanning lines • 60: Frame rate • i: Scanning system • FX: Recording mode b Notes • The recording mode is fixed to FX or FH with following format. • HD: High definition image quality. Setting value If you select [ ], for example, movies are...
Operating Guide (Large File - 11.29 MB)
Page 55
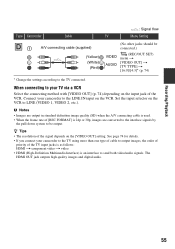
... digital audio. 55 b Notes • Images are converted to the interlace signals by the pull-down system to send both video/audio signals. Recording/Playback Type Camcorder Cable : Signal flow TV Menu Setting A/V connecting cable (supplied) (Yellow) (White) (Red) (No other jacks should be output. See...VIDEO OUT] (p. 74) depending on the [VIDEO OUT] setting. z Tips • The resolution of the signal depends on the input jack of [REC FORMAT] is an interface to be connected.) VIDEO AUDIO (REC/OUT SET) menu t [VIDEO OUT] t [TV TYPE] t [16:9]/[4:3]* (p. 74) * Change ...
... digital audio. 55 b Notes • Images are converted to the interlace signals by the pull-down system to send both video/audio signals. Recording/Playback Type Camcorder Cable : Signal flow TV Menu Setting A/V connecting cable (supplied) (Yellow) (White) (Red) (No other jacks should be output. See...VIDEO OUT] (p. 74) depending on the [VIDEO OUT] setting. z Tips • The resolution of the signal depends on the input jack of [REC FORMAT] is an interface to be connected.) VIDEO AUDIO (REC/OUT SET) menu t [VIDEO OUT] t [TV TYPE] t [16:9]/[4:3]* (p. 74) * Change ...
Operating Guide (Large File - 11.29 MB)
Page 56
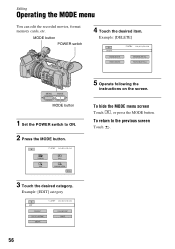
To hide the MODE menu screen Touch , or press the MODE button. Example: [DELETE] MODE button 1 Set the POWER switch to the previous screen Touch . 3 Touch the desired category. Example: [EDIT] category 56 To return to ON. 2 Press the MODE button. 5 Operate following the instructions on the screen. MODE button POWER switch 4 Touch the desired item. Editing Operating the MODE menu You can edit the recorded movies, format memory cards, etc.
To hide the MODE menu screen Touch , or press the MODE button. Example: [DELETE] MODE button 1 Set the POWER switch to the previous screen Touch . 3 Touch the desired category. Example: [EDIT] category 56 To return to ON. 2 Press the MODE button. 5 Operate following the instructions on the screen. MODE button POWER switch 4 Touch the desired item. Editing Operating the MODE menu You can edit the recorded movies, format memory cards, etc.
Operating Guide (Large File - 11.29 MB)
Page 61
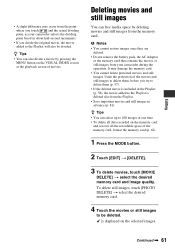
...media space by pressing the MENU button on the selected images. Undo the protection of the movies and still images to delete them (p. 57). • If the deleted movie is included in the Playlist (p. 58), the movie added to 100 images at one time. • To delete all data recorded... on the memory card and recover all the recordable space of movies. is deleted also from the point where you touch and the actual dividing point, as your camcorder...the VISUAL INDEX screen or the playback screen of the memory card, format the memory card (p. 62). 1 Press the MODE button. 2 ...
...media space by pressing the MENU button on the selected images. Undo the protection of the movies and still images to delete them (p. 57). • If the deleted movie is included in the Playlist (p. 58), the movie added to 100 images at one time. • To delete all data recorded... on the memory card and recover all the recordable space of movies. is deleted also from the point where you touch and the actual dividing point, as your camcorder...the VISUAL INDEX screen or the playback screen of the memory card, format the memory card (p. 62). 1 Press the MODE button. 2 ...
Operating Guide (Large File - 11.29 MB)
Page 62
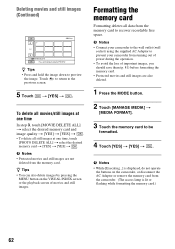
... still images are also deleted. 1 Press the MODE button. 2 Touch [MANAGE MEDIA] t [MEDIA FORMAT]. 3 Touch the memory card to be formatted. 4 Touch [YES] t [YES] t . To delete all movies/still ... Notes • Connect your camcorder to the wall outlet (wall socket) using the supplied AC Adaptor to recover recordable free space. Formatting the memory card Formatting deletes all still images at ... (p. 81) before formatting the memory card. • Protected movies and still images are not deleted from the camcorder. (The access lamp is lit or flashing while formatting the memory card.) ...
... still images are also deleted. 1 Press the MODE button. 2 Touch [MANAGE MEDIA] t [MEDIA FORMAT]. 3 Touch the memory card to be formatted. 4 Touch [YES] t [YES] t . To delete all movies/still ... Notes • Connect your camcorder to the wall outlet (wall socket) using the supplied AC Adaptor to recover recordable free space. Formatting the memory card Formatting deletes all still images at ... (p. 81) before formatting the memory card. • Protected movies and still images are not deleted from the camcorder. (The access lamp is lit or flashing while formatting the memory card.) ...
Operating Guide (Large File - 11.29 MB)
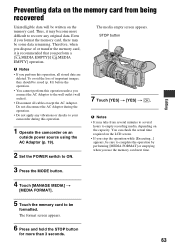
Page 63
...formatted. Therefore, when you dispose of important images, they should be saved (p. 81) before the operation. • You cannot perform this operation unless you perform this operation. 1 Operate the camcorder on an outside power source using the AC Adaptor (p. 19). 2 Set the POWER switch to empty recording media..., depending on the memory card. b Notes • If you connect the AC Adaptor to recover any vibrations or shocks to your camcorder during this operation, all cables except the AC Adaptor. The media empty screen appears. Preventing...
...formatted. Therefore, when you dispose of important images, they should be saved (p. 81) before the operation. • You cannot perform this operation unless you perform this operation. 1 Operate the camcorder on an outside power source using the AC Adaptor (p. 19). 2 Set the POWER switch to empty recording media..., depending on the memory card. b Notes • If you connect the AC Adaptor to recover any vibrations or shocks to your camcorder during this operation, all cables except the AC Adaptor. The media empty screen appears. Preventing...

Operating Guide (Large File - 11.29 MB)
Page 72
...indicator stops flashing and disappears when the fading is selected. - D.EXTENDER When you switch the format, perform the function by the MODE button, or turn off the camcorder. • You cannot change the setting during standby to fade in the following cases: - During recording movies ...you set to [ON] ( ), you switch the format, perform the function by the MODE button, or turn off the camcorder. • You cannot set . This function helps you view movies recorded with the selected effect. 2 Press the record button. Fading out WHITE FADER Fading in step 1. ...
...indicator stops flashing and disappears when the fading is selected. - D.EXTENDER When you switch the format, perform the function by the MODE button, or turn off the camcorder. • You cannot change the setting during standby to fade in the following cases: - During recording movies ...you set to [ON] ( ), you switch the format, perform the function by the MODE button, or turn off the camcorder. • You cannot set . This function helps you view movies recorded with the selected effect. 2 Press the record button. Fading out WHITE FADER Fading in step 1. ...

Operating Guide (Large File - 11.29 MB)
Page 73
.../OUT SET) with B. b Notes • Set [TV TYPE] correctly to work as [ON/OFF] (p. 43). (REC/OUT SET) menu Recording settings, input and output settings (REC FORMAT/VIDEO OUT, etc.) The default settings are selected. OFF ( ) Records a movie in an aspect ratio that matches the full screen of a TV that you... ratio that matches that of a 4:3 TV. x TYPE Selects a type of a 16:9 (wide) TV. B ON Records a movie in an aspect ratio that matches the full screen of the color bars. REC FORMAT See page 27. WIDE REC You can assign an ASSIGN button to suite a TV that come with high...
.../OUT SET) with B. b Notes • Set [TV TYPE] correctly to work as [ON/OFF] (p. 43). (REC/OUT SET) menu Recording settings, input and output settings (REC FORMAT/VIDEO OUT, etc.) The default settings are selected. OFF ( ) Records a movie in an aspect ratio that matches the full screen of a TV that you... ratio that matches that of a 4:3 TV. x TYPE Selects a type of a 16:9 (wide) TV. B ON Records a movie in an aspect ratio that matches the full screen of the color bars. REC FORMAT See page 27. WIDE REC You can assign an ASSIGN button to suite a TV that come with high...

Operating Guide (Large File - 11.29 MB)
Page 74
... signal from the HDMI OUT jack. B 16:9 Select to view your movies on a 16:9 (wide) TV. 16:9 format movies 4:3 format movies b Notes • When you play back the standard definition image quality (SD) movies recorded with the SEL/PUSH EXEC dial. Press the MENU button t select (REC/OUT SET) with [ WIDE REC] set...], images may appear normal in vertical direction, but compressed in horizontal direction, depending on the TV. 4:3 Select to view your movies on a 4:3 standard TV. 16:9 format movies 4:3 format movies 74 The recorded movies are played back as following illustrations.
... signal from the HDMI OUT jack. B 16:9 Select to view your movies on a 16:9 (wide) TV. 16:9 format movies 4:3 format movies b Notes • When you play back the standard definition image quality (SD) movies recorded with the SEL/PUSH EXEC dial. Press the MENU button t select (REC/OUT SET) with [ WIDE REC] set...], images may appear normal in vertical direction, but compressed in horizontal direction, depending on the TV. 4:3 Select to view your movies on a 4:3 standard TV. 16:9 format movies 4:3 format movies 74 The recorded movies are played back as following illustrations.
Operating Guide (Large File - 11.29 MB)
Page 95
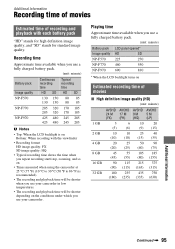
Additional Information Recording time of movies Estimated time of movies x High definition image quality (HD) (unit: minute) AVCHD AVCHD AVCHD AVCHD 24 M 17 M 9 M 5 M (FX) (FH) (HQ) (LP) 1 GB 5 6 10 20 (5) (6) (9) (15) 2 GB 10 10 25 40 (10) (10) (15) (35) 4 GB ...When the LCD backlight is on Bottom: When recording with the viewfinder • Recording format HD image quality: FX SD image quality: HQ • Typical recording time shows the time when you repeat recording start/stop, zooming, and so on. • Times measured when using the camcorder at 25 °C (77 °F) ...
Additional Information Recording time of movies Estimated time of movies x High definition image quality (HD) (unit: minute) AVCHD AVCHD AVCHD AVCHD 24 M 17 M 9 M 5 M (FX) (FH) (HQ) (LP) 1 GB 5 6 10 20 (5) (6) (9) (15) 2 GB 10 10 25 40 (10) (10) (15) (35) 4 GB ...When the LCD backlight is on Bottom: When recording with the viewfinder • Recording format HD image quality: FX SD image quality: HQ • Typical recording time shows the time when you repeat recording start/stop, zooming, and so on. • Times measured when using the camcorder at 25 °C (77 °F) ...
Operating Guide (Large File - 11.29 MB)
Page 116
... 20 Lens 103 Lens cover lever 16 M MANAGE MEDIA 62 MARKER 77, 87 MEDIA FORMAT 62 Memory card 9 Insert/Eject 23 Memory card slot 23 "Memory Stick Duo" media slot cover 23 "Memory Stick" media 9, 99 "Memory Stick PRO Duo" media 99 Menu 65 AUDIO SET menu ........75 CAMERA SET... (lens hood release) button 16 R REC CH SELECT switch .... 39 REC FORMAT 27 REC LAMP 80 REC SET 73 Record button 25 Recording 25 Recording format 27 Recording lamp 25 REC/OUT SET menu...........73 Relay recording 26 REMAINING 79 REMOTE CONTROL.......... 80 Remote sensor 110 REPAIR IMAGE DB FILE 64...
... 20 Lens 103 Lens cover lever 16 M MANAGE MEDIA 62 MARKER 77, 87 MEDIA FORMAT 62 Memory card 9 Insert/Eject 23 Memory card slot 23 "Memory Stick Duo" media slot cover 23 "Memory Stick" media 9, 99 "Memory Stick PRO Duo" media 99 Menu 65 AUDIO SET menu ........75 CAMERA SET... (lens hood release) button 16 R REC CH SELECT switch .... 39 REC FORMAT 27 REC LAMP 80 REC SET 73 Record button 25 Recording 25 Recording format 27 Recording lamp 25 REC/OUT SET menu...........73 Relay recording 26 REMAINING 79 REMOTE CONTROL.......... 80 Remote sensor 110 REPAIR IMAGE DB FILE 64...
Marketing Specifications
Page 2
...media (Class 4 or higher) are recommended. © 2010 Sony Electronics Inc. Except where noted, all photos are subject to change without notice. Sony, the Sony logo, Handycam, the Handycam...AVCHD) SD: MPEG-2 (MPEG-2 PS) HDV / MiniDV HD Movie, FX mode: 32GB Memory Card: 180min 16GB Memory Card: 90min SD Movie, HQ mode: 32GB Memory Card: 475min 16GB Memory Card: 235min AUDIO Audio Recording Format...system and compatible i.LINK devices. All rights reserved. HDR-AX2000 High Definition Prosumer Handycam® Camcorder Specifications IMAGER Imaging Device 3x 1/3" Exmor...
...media (Class 4 or higher) are recommended. © 2010 Sony Electronics Inc. Except where noted, all photos are subject to change without notice. Sony, the Sony logo, Handycam, the Handycam...AVCHD) SD: MPEG-2 (MPEG-2 PS) HDV / MiniDV HD Movie, FX mode: 32GB Memory Card: 180min 16GB Memory Card: 90min SD Movie, HQ mode: 32GB Memory Card: 475min 16GB Memory Card: 235min AUDIO Audio Recording Format...system and compatible i.LINK devices. All rights reserved. HDR-AX2000 High Definition Prosumer Handycam® Camcorder Specifications IMAGER Imaging Device 3x 1/3" Exmor...


