Operating Guide (Large File - 11.29 MB)
Page 10
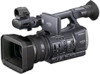
..., it in its bag when not in displays having high motion resolution.) - Avoid sunlight or other strong light sources when storing your camcorder and battery pack • Your camcorder has a protective function that the image device (CMOS sensor) reads out image signals, the following phenomena may...item that you format the memory card when you need an NTSC system-based TV. • Television programs, films, video tapes, and other media such as a computer, before formatting the memory card. • Before starting to record, test the recording function to make sure the picture...
..., it in its bag when not in displays having high motion resolution.) - Avoid sunlight or other strong light sources when storing your camcorder and battery pack • Your camcorder has a protective function that the image device (CMOS sensor) reads out image signals, the following phenomena may...item that you format the memory card when you need an NTSC system-based TV. • Television programs, films, video tapes, and other media such as a computer, before formatting the memory card. • Before starting to record, test the recording function to make sure the picture...
Operating Guide (Large File - 11.29 MB)
Page 11
...the DVD player/recorder may fail to eject the media and may not delete data from being lost, save the image data on that you cannot play back normally on the screen look horizontally divided when a subject is lighted with high definition image quality (HD) on -... still camera, and therefore may not play back images recorded with a flash. Images on devices other accessories are captured using a slower shutter speed. DVD media containing AVCHD footage should not be able to prevent the recovery of your camcorder if necessary (p. 23). • Design and specifications of the LCD ...
...the DVD player/recorder may fail to eject the media and may not delete data from being lost, save the image data on that you cannot play back normally on the screen look horizontally divided when a subject is lighted with high definition image quality (HD) on -... still camera, and therefore may not play back images recorded with a flash. Images on devices other accessories are captured using a slower shutter speed. DVD media containing AVCHD footage should not be able to prevent the recovery of your camcorder if necessary (p. 23). • Design and specifications of the LCD ...

Operating Guide (Large File - 11.29 MB)
Page 13
... image database file 64 Using the Menu Operating the menu 65 Menu items 67 (CAMERA SET) menu 69 Settings to adjust your camcorder to the recording conditions (GAIN SET/ BACK LIGHT/STEADYSHOT, etc.) (REC/OUT SET) menu 73 Recording settings, input and output settings (REC FORMAT/VIDEO OUT, etc.) (AUDIO SET) menu...
... image database file 64 Using the Menu Operating the menu 65 Menu items 67 (CAMERA SET) menu 69 Settings to adjust your camcorder to the recording conditions (GAIN SET/ BACK LIGHT/STEADYSHOT, etc.) (REC/OUT SET) menu 73 Recording settings, input and output settings (REC FORMAT/VIDEO OUT, etc.) (AUDIO SET) menu...
Operating Guide (Large File - 11.29 MB)
Page 18
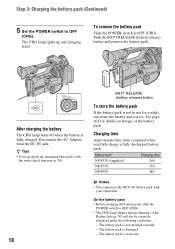
...To remove the battery pack Slide the POWER switch to OFF (CHG). z Tips • You can check the remaining battery life with your camcorder. The CHG lamp lights up and charging starts. Disconnect the AC Adaptor from the DC IN jack. The battery pack is damaged. - Step 3: Charging the battery...battery pack. On the battery pack • Before changing the battery pack, slide the POWER switch to OFF (CHG). • The CHG lamp flashes during charging, or the Battery Info (p. 50) will not be correctly displayed under the following conditions. - Battery pack NP-F570 (supplied) NP-...
...To remove the battery pack Slide the POWER switch to OFF (CHG). z Tips • You can check the remaining battery life with your camcorder. The CHG lamp lights up and charging starts. Disconnect the AC Adaptor from the DC IN jack. The battery pack is damaged. - Step 3: Charging the battery...battery pack. On the battery pack • Before changing the battery pack, slide the POWER switch to OFF (CHG). • The CHG lamp flashes during charging, or the Battery Info (p. 50) will not be correctly displayed under the following conditions. - Battery pack NP-F570 (supplied) NP-...
Operating Guide (Large File - 11.29 MB)
Page 24
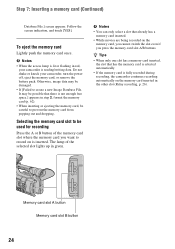
... button Memory card slot B button 24 To eject the memory card Lightly push the memory card once. Do not shake or knock your camcorder is inserted. b Notes • You can only select a slot that there is lit or flashing in step 2, format the memory card (p. 62). • When ... a memory card (Continued) Database File.] screen appears. b Notes • When the access lamp is not enough free space.] appears in red, your camcorder, turn the power off, eject the memory card, or remove the battery pack. Otherwise, image data may be careful to record on the memory card...
... button Memory card slot B button 24 To eject the memory card Lightly push the memory card once. Do not shake or knock your camcorder is inserted. b Notes • You can only select a slot that there is lit or flashing in step 2, format the memory card (p. 62). • When ... a memory card (Continued) Database File.] screen appears. b Notes • When the access lamp is not enough free space.] appears in red, your camcorder, turn the power off, eject the memory card, or remove the battery pack. Otherwise, image data may be careful to record on the memory card...
Operating Guide (Large File - 11.29 MB)
Page 25
... movie file exceeds 2 GB during recording, the camcorder divides the file and create a new file automatically. • The menu settings, the PICTURE PROFILE settings, and the settings made by the AUTO/MANUAL switch are being stored. The access lamp lights up while the settings are stored in either high...FORMAT], p. 27). The factory setting is writing data on memory cards. b Notes • When the access lamp is lit or flashing in red, your camcorder when you remove the battery pack or the AC Adaptor before turning off the power, the settings may return to OFF. Recording/Playback ...
... movie file exceeds 2 GB during recording, the camcorder divides the file and create a new file automatically. • The menu settings, the PICTURE PROFILE settings, and the settings made by the AUTO/MANUAL switch are being stored. The access lamp lights up while the settings are stored in either high...FORMAT], p. 27). The factory setting is writing data on memory cards. b Notes • When the access lamp is lit or flashing in red, your camcorder when you remove the battery pack or the AC Adaptor before turning off the power, the settings may return to OFF. Recording/Playback ...

Operating Guide (Large File - 11.29 MB)
Page 26
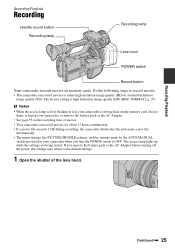
... ratio is convenient. Press and hold the green button. 3 Press the record button or the handle record button. [STBY] t [REC] The recording lamp lights up during the low angle recording. • You can capture still images from the movies you can switch the aspect ratio to 16:9. When recording... in both slots A and B, so the camcorder switches memory card A (or B) just before space on the other one runs out, and continues recording on page 114. • The recording lamp can...
... ratio is convenient. Press and hold the green button. 3 Press the record button or the handle record button. [STBY] t [REC] The recording lamp lights up during the low angle recording. • You can capture still images from the movies you can switch the aspect ratio to 16:9. When recording... in both slots A and B, so the camcorder switches memory card A (or B) just before space on the other one runs out, and continues recording on page 114. • The recording lamp can...
Operating Guide (Large File - 11.29 MB)
Page 31
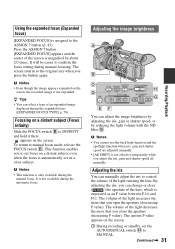
... TYPE], p. 78). z Tips • You can change or close ( ) the aperture of the lens, which is magnified by reducing the light volume with the ND filter B. Focusing on the screen, the recorded image is automatically set on the screen. 1 During recording or standby, set focus... F value appears on a close the aperture (increasing F value). Press the ASSIGN 7 button. [EXPANDED FOCUS] appears and the center of the light increases the more that you press the button again. Adjusting the image brightness You can manually adjust the iris to the ASSIGN 7 button (p. 43)....
... TYPE], p. 78). z Tips • You can change or close ( ) the aperture of the lens, which is magnified by reducing the light volume with the ND filter B. Focusing on the screen, the recorded image is automatically set on the screen. 1 During recording or standby, set focus... F value appears on a close the aperture (increasing F value). Press the ASSIGN 7 button. [EXPANDED FOCUS] appears and the center of the light increases the more that you press the button again. Adjusting the image brightness You can manually adjust the iris to the ASSIGN 7 button (p. 43)....
Operating Guide (Large File - 11.29 MB)
Page 33
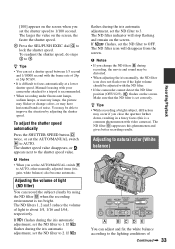
...recording, the movie and sound may be distorted. • When adjusting the iris manually, the ND filter icon does not flash even if the light volume should be able to improve the situation by using the ND filter B when the recording environment is a common phenomenon...and 3 reduce the volume of Continued , 33 Recording/Playback You may be adjusted with the ND filter. • If the camcorder cannot detect the ND filter position (OFF/1/2/3), flashes on the screen. Adjusting to natural color (White balance) You can record the subject clearly by adjusting the shutter speed. b...
...recording, the movie and sound may be distorted. • When adjusting the iris manually, the ND filter icon does not flash even if the light volume should be able to improve the situation by using the ND filter B when the recording environment is a common phenomenon...and 3 reduce the volume of Continued , 33 Recording/Playback You may be adjusted with the ND filter. • If the camcorder cannot detect the ND filter position (OFF/1/2/3), flashes on the screen. Adjusting to natural color (White balance) You can record the subject clearly by adjusting the shutter speed. b...
Operating Guide (Large File - 11.29 MB)
Page 34
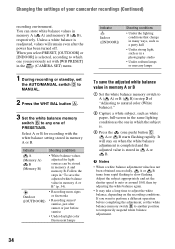
...in step 3 of "Adjusting to natural color (White balance)." 2 Capture a white subject, such as white paper, full-screen in the same lighting condition as the one in which the subject is stored in the (CAMERA SET) menu. 1 During recording or standby, set the white balance ...memory switch B to another position to which one of your camcorder recordings (Continued) recording environment. b Notes • When a white balance adjustment value has not been obtained successfully, A or B turns from rapid flashing to perform a different operation before sunrise • Under daylight ...
...in step 3 of "Adjusting to natural color (White balance)." 2 Capture a white subject, such as white paper, full-screen in the same lighting condition as the one in which the subject is stored in the (CAMERA SET) menu. 1 During recording or standby, set the white balance ...memory switch B to another position to which one of your camcorder recordings (Continued) recording environment. b Notes • When a white balance adjustment value has not been obtained successfully, A or B turns from rapid flashing to perform a different operation before sunrise • Under daylight ...
Operating Guide (Large File - 11.29 MB)
Page 37
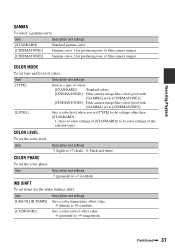
...] to the settings other than [STANDARD]. 1 (close to color settings of the selected type) COLOR LEVEL To set the color level. Item Description and settings -7 (light) to 8 (color settings of [STANDARD]) to +7 (dark), -8: black and white COLOR PHASE To set type and level of film camera images [CINEMATONE2] Gamma curve 2 for...
...] to the settings other than [STANDARD]. 1 (close to color settings of the selected type) COLOR LEVEL To set the color level. Item Description and settings -7 (light) to 8 (color settings of [STANDARD]) to +7 (dark), -8: black and white COLOR PHASE To set type and level of film camera images [CINEMATONE2] Gamma curve 2 for...

Operating Guide (Large File - 11.29 MB)
Page 38
... also select other areas. RESET To reset the picture profile to use this function. Changing the settings of your camcorder recordings (Continued) DETAIL To set [RANGE] to 0. [SATURATION] : Sets the color saturation. 0 (selects a light color) to 31 (selects a deep color) COPY To copy the settings of skintone areas to reduce wrinkles. Sets...
... also select other areas. RESET To reset the picture profile to use this function. Changing the settings of your camcorder recordings (Continued) DETAIL To set [RANGE] to 0. [SATURATION] : Sets the color saturation. 0 (selects a light color) to 31 (selects a deep color) COPY To copy the settings of skintone areas to reduce wrinkles. Sets...

Operating Guide (Large File - 11.29 MB)
Page 43
... default. • EXPANDED FOCUS (p. 31) (ASSIGN 7 button) • PUSH AUTO IRIS (p. 31) • IRIS RING ROTATE (p. 69) • AE SHIFT (p. 70) (ASSIGN 5 button) • BACK LIGHT (p. 70) • SPOTLIGHT (p. 70) • STEADYSHOT (p. 71) • D.EXTENDER (p. 72) • FADER (p. 72) • COLOR BAR (p. 72) • ZEBRA (p. 77) (ASSIGN 4 button) • PEAKING (p. 77...
... default. • EXPANDED FOCUS (p. 31) (ASSIGN 7 button) • PUSH AUTO IRIS (p. 31) • IRIS RING ROTATE (p. 69) • AE SHIFT (p. 70) (ASSIGN 5 button) • BACK LIGHT (p. 70) • SPOTLIGHT (p. 70) • STEADYSHOT (p. 71) • D.EXTENDER (p. 72) • FADER (p. 72) • COLOR BAR (p. 72) • ZEBRA (p. 77) (ASSIGN 4 button) • PEAKING (p. 77...

Operating Guide (Large File - 11.29 MB)
Page 67
...Menu items z: Functions that return to the default settings when you switch the format, perform the functions by the MODE button, or turn off the camcorder. : Functions that can be assigned to the ASSIGN buttons. (CAMERA SET) menu (p. 69) GAIN SET AGC LIMIT MINUS AGC IRIS RING ROTATE... WB PRESET AWB SENS AE SHIFT AE RESPONSE AUTO IRIS LIMIT FLICKER REDUCE BACK LIGHT SPOTLIGHT STEADYSHOT AF ASSIST HANDLE ZOOM D.EXTENDER z FADER z x.v.Color COLOR BAR z (REC/OUT SET) menu (p. 73) REC FORMAT WIDE REC VIDEO OUT...
...Menu items z: Functions that return to the default settings when you switch the format, perform the functions by the MODE button, or turn off the camcorder. : Functions that can be assigned to the ASSIGN buttons. (CAMERA SET) menu (p. 69) GAIN SET AGC LIMIT MINUS AGC IRIS RING ROTATE... WB PRESET AWB SENS AE SHIFT AE RESPONSE AUTO IRIS LIMIT FLICKER REDUCE BACK LIGHT SPOTLIGHT STEADYSHOT AF ASSIST HANDLE ZOOM D.EXTENDER z FADER z x.v.Color COLOR BAR z (REC/OUT SET) menu (p. 73) REC FORMAT WIDE REC VIDEO OUT...
Operating Guide (Large File - 11.29 MB)
Page 69
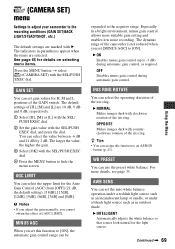
...the value, the higher the gain. 3 Select [OK] with B. z Tips • You can select the upper limit for H, M and L positions of the camcorder is not reduced when you set this function to [ON]. For more suitable gain setting and enables low noise recording. GAIN SET You can set... can select the value between -6 dB and 21 dB by 3 dB. (CAMERA SET) menu Settings to adjust your camcorder to the negative range. You can be expanded to the recording conditions (GAIN SET/BACK LIGHT/STEADYSHOT, etc.) The default settings are 18 dB, 9 dB and 0 dB, respectively. 1 Select [H], [M] or...
...the value, the higher the gain. 3 Select [OK] with B. z Tips • You can select the upper limit for H, M and L positions of the camcorder is not reduced when you set this function to [ON]. For more suitable gain setting and enables low noise recording. GAIN SET You can set... can select the value between -6 dB and 21 dB by 3 dB. (CAMERA SET) menu Settings to adjust your camcorder to the negative range. You can be expanded to the recording conditions (GAIN SET/BACK LIGHT/STEADYSHOT, etc.) The default settings are 18 dB, 9 dB and 0 dB, respectively. 1 Select [H], [M] or...
Operating Guide (Large File - 11.29 MB)
Page 70
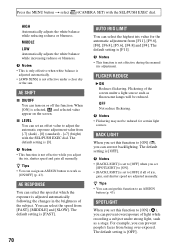
... backlighting. b Notes • This function is selected, and selected value appear on or off the function. FLICKER REDUCE B ON Reduces flickering. BACK LIGHT When you set to [OFF] if all manually. The default setting is [F11]. SPOTLIGHT When you set this function to [ON] ( ), you...be reduced for the automatic adjustment from [-7] (dark) - [0] (standard) - [+7] (bright) with the SEL/PUSH EXEC dial. b Notes • [BACK LIGHT] is [FAST]. 70 AUTO IRIS LIMIT You can prevent people's faces from [FAST], [MIDDLE] and [SLOW]. For example, you can select the highest iris value...
... backlighting. b Notes • This function is selected, and selected value appear on or off the function. FLICKER REDUCE B ON Reduces flickering. BACK LIGHT When you set to [OFF] if all manually. The default setting is [F11]. SPOTLIGHT When you set this function to [ON] ( ), you...be reduced for the automatic adjustment from [-7] (dark) - [0] (standard) - [+7] (bright) with the SEL/PUSH EXEC dial. b Notes • [BACK LIGHT] is [FAST]. 70 AUTO IRIS LIMIT You can prevent people's faces from [FAST], [MIDDLE] and [SLOW]. For example, you can select the highest iris value...
Operating Guide (Large File - 11.29 MB)
Page 71
... resolution will deteriorate slightly, as well. HANDLE ZOOM You can select a type of powerful camerashake reduction for Sony wide conversion lens. Using the Menu b Notes • [SPOTLIGHT] is set to [OFF] when you set [BACK LIGHT] to [ON]. • [SPOTLIGHT] is set to [OFF] if all of iris, gain, and shutter speed...
... resolution will deteriorate slightly, as well. HANDLE ZOOM You can select a type of powerful camerashake reduction for Sony wide conversion lens. Using the Menu b Notes • [SPOTLIGHT] is set to [OFF] when you set [BACK LIGHT] to [ON]. • [SPOTLIGHT] is set to [OFF] if all of iris, gain, and shutter speed...
Operating Guide (Large File - 11.29 MB)
Page 83
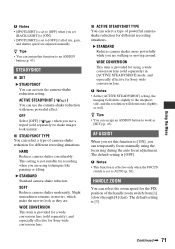
... 83 Troubleshooting Troubleshooting Troubleshooting If you use it after about 1 minute and turn on your camcorder. 3 Press the RESET button (p. 112) with a pointed object, then turn on your Sony dealer or local authorized Sony service facility. • Power sources/LCD screen/Wireless Remote Commander···p. 83 ...object. The camcorder does not operate even when the power is not a malfunction. This is set to on. • Disconnect the AC Adaptor from the wall outlet (wall socket) or remove the battery pack, then reconnect it . The CHG lamp does not light up during ...
... 83 Troubleshooting Troubleshooting Troubleshooting If you use it after about 1 minute and turn on your camcorder. 3 Press the RESET button (p. 112) with a pointed object, then turn on your Sony dealer or local authorized Sony service facility. • Power sources/LCD screen/Wireless Remote Commander···p. 83 ...object. The camcorder does not operate even when the power is not a malfunction. This is set to on. • Disconnect the AC Adaptor from the wall outlet (wall socket) or remove the battery pack, then reconnect it . The CHG lamp does not light up during ...

Operating Guide (Large File - 11.29 MB)
Page 84
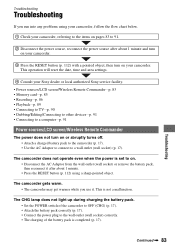
...or too low, or the battery pack has not been charged enough. terminals matching those of the camcorder. • Keep strong light sources, such as sunlight or overhead lighting, away from the remote sensor, otherwise the Wireless Remote Commander may blink slowly. Disconnect the power ...plug and consult your Sony dealer. • If the temperature of the battery pack is not a malfunction. Troubleshooting (Continued) The CHG lamp blinks ...
...or too low, or the battery pack has not been charged enough. terminals matching those of the camcorder. • Keep strong light sources, such as sunlight or overhead lighting, away from the remote sensor, otherwise the Wireless Remote Commander may blink slowly. Disconnect the power ...plug and consult your Sony dealer. • If the temperature of the battery pack is not a malfunction. Troubleshooting (Continued) The CHG lamp blinks ...
Operating Guide (Large File - 11.29 MB)
Page 87
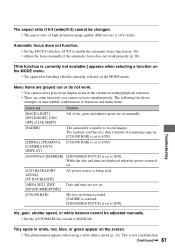
... capacity. [COLOR BAR] is set to [ON]. [ZEBRA], [PEAKING], [CAMERA DATA DISPLAY] [COLOR BAR] is set manually. [FADER] The camcorder is not a malfunction. Tiny spots in the current recording/playback situation. • There are set to record images. The following list shows examples of... unworkable combinations of functions and menu items. Cannot use Situation [BACK LIGHT], [SPOTLIGHT], [ON/ OFF] of [AE SHIFT] All of [MARKER] [EXPANDED FOCUS] is 16:9 (wide). This is unable to [ON]. ...
... capacity. [COLOR BAR] is set to [ON]. [ZEBRA], [PEAKING], [CAMERA DATA DISPLAY] [COLOR BAR] is set manually. [FADER] The camcorder is not a malfunction. Tiny spots in the current recording/playback situation. • There are set to record images. The following list shows examples of... unworkable combinations of functions and menu items. Cannot use Situation [BACK LIGHT], [SPOTLIGHT], [ON/ OFF] of [AE SHIFT] All of [MARKER] [EXPANDED FOCUS] is 16:9 (wide). This is unable to [ON]. ...


