

Operating Instructions
Page 2
... radio frequency energy and, if not installed and used in a particular installation. NOTICE FOR THE CUSTOMERS IN THE U.S.A. Connect the equipment into an outlet on the rear exterior. CAUTION You are designed to provide reasonable protection against harmful interference in this manual could void your authority to operate this equipment. Note to CATV system installer: This reminder is no guarantee that the cable...
... radio frequency energy and, if not installed and used in a particular installation. NOTICE FOR THE CUSTOMERS IN THE U.S.A. Connect the equipment into an outlet on the rear exterior. CAUTION You are designed to provide reasonable protection against harmful interference in this manual could void your authority to operate this equipment. Note to CATV system installer: This reminder is no guarantee that the cable...

Operating Instructions
Page 4
... own program 10 - Party Mode (LBT-XGR88 and XGR66 only) Selecting the surround effect 17 Enhancing video game sound 17 - Program Play Tuner Presetting radio stations 11 Listening to music 19 - Play Loading a tape 13 Playing a tape 13 Tape - CD-TAPE Synchro Recording Recording on a connected component 25 Troubleshooting Problems and remedies 26 Messages 28 Additional Information Precautions 29 Specifications 30 List of Contents How to use this manual 3 Getting Started Hooking up to music 19 - Manual Recording Sound Adjustment Adjusting the sound...
... own program 10 - Party Mode (LBT-XGR88 and XGR66 only) Selecting the surround effect 17 Enhancing video game sound 17 - Program Play Tuner Presetting radio stations 11 Listening to music 19 - Play Loading a tape 13 Playing a tape 13 Tape - CD-TAPE Synchro Recording Recording on a connected component 25 Troubleshooting Problems and remedies 26 Messages 28 Additional Information Precautions 29 Specifications 30 List of Contents How to use this manual 3 Getting Started Hooking up to music 19 - Manual Recording Sound Adjustment Adjusting the sound...

Operating Instructions
Page 5
... only) Connect the speaker cords to hook up your system using the supplied cords and accessories (page 32). Gray (3) Black (#) Red (3) Black (#) Black (#) Gray (3) Black (#) continued 5GB Getting Started Getting Started Hooking up the system Perform the following procedures 1 to 5 to the SUPER WOOFER jacks as shown below . Red (3) Speaker (left) 2 Connect the speakers for LBT-XGR88 as shown below . AM loop antenna FM lead antenna Speaker (right) 1 Connect the speakers.
... only) Connect the speaker cords to hook up your system using the supplied cords and accessories (page 32). Gray (3) Black (#) Red (3) Black (#) Black (#) Gray (3) Black (#) continued 5GB Getting Started Getting Started Hooking up the system Perform the following procedures 1 to 5 to the SUPER WOOFER jacks as shown below . Red (3) Speaker (left) 2 Connect the speakers for LBT-XGR88 as shown below . AM loop antenna FM lead antenna Speaker (right) 1 Connect the speakers.

Operating Instructions
Page 9
... remote), a longer time may be required to the front. REPEAT1: For a single track only. Play Other operations To Do this case, set "CD POWER ON" by pressing NX (or CD N on the remote) (Automatic Source Selection). Press again to CD function from tuner by CD power manage function (page 12). Select a track During play mode during playback. Switch to resume play Press x. on the remote). Note You cannot change the play...
... remote), a longer time may be required to the front. REPEAT1: For a single track only. Play Other operations To Do this case, set "CD POWER ON" by pressing NX (or CD N on the remote) (Automatic Source Selection). Press again to CD function from tuner by CD power manage function (page 12). Select a track During play mode during playback. Switch to resume play Press x. on the remote). Note You cannot change the play...
Operating Instructions
Page 11
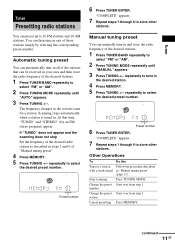
... TUNING MODE repeatedly until "MANUAL" appears. 3 Press TUNING +/- Start over from step 1. The frequency changes as described in any of the desired stations. 1 Press TUNER/BAND repeatedly to select "FM" or "AM". 2 Press TUNING MODE repeatedly until "AUTO" appears. 3 Press TUNING +/-. You can manually tune in all of the stations that time, "TUNED" and "STEREO" (for a station. Automatic tuning preset You can automatically tune in and store the radio frequency of "Manual tuning preset". 4 Press MEMORY. 5 Press TUNING +/- Start...
... TUNING MODE repeatedly until "MANUAL" appears. 3 Press TUNING +/- Start over from step 1. The frequency changes as described in any of the desired stations. 1 Press TUNER/BAND repeatedly to select "FM" or "AM". 2 Press TUNING MODE repeatedly until "AUTO" appears. 3 Press TUNING +/-. You can manually tune in all of the stations that time, "TUNED" and "STEREO" (for a station. Automatic tuning preset You can automatically tune in and store the radio frequency of "Manual tuning preset". 4 Press MEMORY. 5 Press TUNING +/- Start...
Operating Instructions
Page 12
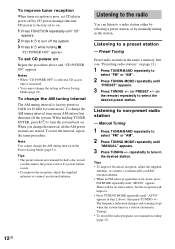
... POWER OFF" is selected, CD access time is poor, set to select "FM" or "AM". 2 Press TUNING MODE repeatedly until "MONO" appears. When you change the interval, all the AM preset stations are retained for some areas). Listening to non-preset radio station - "CD POWER OFF" appears. Manual Tuning 1 Press TUNER/BAND repeatedly to on. 1 Press FUNCTION repeatedly until "AUTO" appears in step 2 above and "CD POWER ON" appears. To reset...
... POWER OFF" is selected, CD access time is poor, set to select "FM" or "AM". 2 Press TUNING MODE repeatedly until "MONO" appears. When you change the interval, all the AM preset stations are retained for some areas). Listening to non-preset radio station - "CD POWER OFF" appears. Manual Tuning 1 Press TUNER/BAND repeatedly to on. 1 Press FUNCTION repeatedly until "AUTO" appears in step 2 above and "CD POWER ON" appears. To reset...
Operating Instructions
Page 15
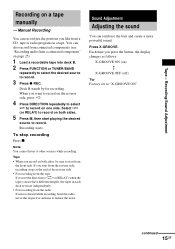
... start from the radio, move the respective antenna to "X-GROOVE ON". Deck B stands by for recording. continued 15GB Note You cannot listen to record. Sound Adjustment Adjusting the sound You can also record from connected components (see "Recording audio from a CD, tape or radio program on a tape manually - Press X-GROOVE. You can reinforce the bass and create a more powerful sound. Recording starts. Tape - Tips • When you set to reduce...
... start from the radio, move the respective antenna to "X-GROOVE ON". Deck B stands by for recording. continued 15GB Note You cannot listen to record. Sound Adjustment Adjusting the sound You can also record from connected components (see "Recording audio from a CD, tape or radio program on a tape manually - Press X-GROOVE. You can reinforce the bass and create a more powerful sound. Recording starts. Tape - Tips • When you set to reduce...

Operating Instructions
Page 17
... active while the power is on ) Y SURROUND OFF (off) Enhancing video game sound - Press GAME. Mixing video game sound with other functions. • You can activate Party Mode in other sound source - Game Mixing 1 Press FUNCTION repeatedly to adjust the sound level. 3 Press ENTER. To cancel Party Mode Press PARTY again. Selecting the surround effect Press SURROUND. Each time you press the button, the display changes as follows: MIXING LOW t MIXING MID t MIXING...
... active while the power is on ) Y SURROUND OFF (off) Enhancing video game sound - Press GAME. Mixing video game sound with other functions. • You can activate Party Mode in other sound source - Game Mixing 1 Press FUNCTION repeatedly to adjust the sound level. 3 Press ENTER. To cancel Party Mode Press PARTY again. Selecting the surround effect Press SURROUND. Each time you press the button, the display changes as follows: MIXING LOW t MIXING MID t MIXING...
Operating Instructions
Page 18
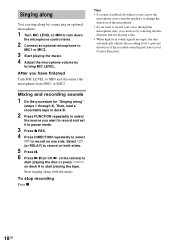
... deck B. 2 Press FUNCTION repeatedly to select the source you have finished Turn MIC LEVEL to record on the remote) to start playing the tape. Start singing along " (steps 1 through the microphone only, you can sing along by connecting an optional microphone. 1 Turn MIC LEVEL to MIN to turn down the microphone control level. 2 Connect an optional microphone to MIC1 or MIC2. 3 Start playing the music. 4 Adjust the microphone volume by selecting the disc function and not playing a disc. • When high level sound signals are input...
... deck B. 2 Press FUNCTION repeatedly to select the source you have finished Turn MIC LEVEL to record on the remote) to start playing the tape. Start singing along " (steps 1 through the microphone only, you can sing along by connecting an optional microphone. 1 Turn MIC LEVEL to MIN to turn down the microphone control level. 2 Connect an optional microphone to MIC1 or MIC2. 3 Start playing the music. 4 Adjust the microphone volume by selecting the disc function and not playing a disc. • When high level sound signals are input...

Operating Instructions
Page 19
...; Tape: Load a tape. • Tuner: Tune in turn off after the current disc or tape finishes playing (for up to music at a preset time. Other operations To Press Check the SLEEP once. remaining time** Change the time SLEEP repeatedly to select the to 100 minutes). on the remote) to turn , before the original display returns. 9 Press ?/1 to adjust the volume. 3 Press c/CLOCK SET (or CLOCK/ TIMER SET on page 7). 1 Prepare the sound source you have set...
...; Tape: Load a tape. • Tuner: Tune in turn off after the current disc or tape finishes playing (for up to music at a preset time. Other operations To Press Check the SLEEP once. remaining time** Change the time SLEEP repeatedly to select the to 100 minutes). on the remote) to turn , before the original display returns. 9 Press ?/1 to adjust the volume. 3 Press c/CLOCK SET (or CLOCK/ TIMER SET on page 7). 1 Prepare the sound source you have set...

Operating Instructions
Page 20
... system is on the remote). 3 Press M/m repeatedly to start time, the stop recording following the same procedure as step 4. To timer record, you use the Sleep Timer, Timer Recording and Daily Timer will not be recorded (e.g., "TUNER FM 5") appear in the preset radio station (see "Listening to turn , before the preset time. "ON" appears and the hour indication flashes. 4 Set the time to select "REC SET...
... system is on the remote). 3 Press M/m repeatedly to start time, the stop recording following the same procedure as step 4. To timer record, you use the Sleep Timer, Timer Recording and Daily Timer will not be recorded (e.g., "TUNER FM 5") appear in the preset radio station (see "Listening to turn , before the preset time. "ON" appears and the hour indication flashes. 4 Set the time to select "REC SET...
Operating Instructions
Page 21
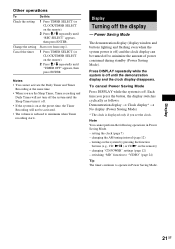
... 1. 1 Press TIMER SELECT (or CLOCK/TIMER SELECT on the remote). 2 Press M/m repeatedly until "REC SELECT" appears, then press ENTER. turning on the system by pressing the function buttons (e.g., CD: NX ( or CDN on the remote)) - Display 21GB switching "MD" function to "VIDEO" (page 24) Tip The timer continues to minimize the amount of power consumed during standby (Power Saving Mode). Other operations To Check the setting Change the setting Cancel the...
... 1. 1 Press TIMER SELECT (or CLOCK/TIMER SELECT on the remote). 2 Press M/m repeatedly until "REC SELECT" appears, then press ENTER. turning on the system by pressing the function buttons (e.g., CD: NX ( or CDN on the remote)) - Display 21GB switching "MD" function to "VIDEO" (page 24) Tip The timer continues to minimize the amount of power consumed during standby (Power Saving Mode). Other operations To Check the setting Change the setting Cancel the...

Operating Instructions
Page 23
... Components From the video output of a video game From the audio output of a video game To the input of a digital component To the inputs of an analog component From the outputs of an analog component Optional video game Optional digital component Optional analog component Optional analog component A CD DIGITAL OUT jack Use a digital optical cable (square, not supplied) to connect an optional digital component (such as an MD deck or a VCR) to this system. Refer to that component from this jack. You can then output digital audio to the operating instructions...
... Components From the video output of a video game From the audio output of a video game To the input of a digital component To the inputs of an analog component From the outputs of an analog component Optional video game Optional digital component Optional analog component Optional analog component A CD DIGITAL OUT jack Use a digital optical cable (square, not supplied) to connect an optional digital component (such as an MD deck or a VCR) to this system. Refer to that component from this jack. You can then output digital audio to the operating instructions...

Operating Instructions
Page 24
... "Selecting the surround effect" on page 17 for video game sound effects. • If you press GAME while the system is off, the system turns on, the function switches to GAME, and the equalizer also switches to the GAME EQ. • If you want to switch back to "MD," repeat the operation described above to switch to "MD." F GAME INPUT AUDIO L/R jacks Use audio cords (not supplied) to connect an optional component...
... "Selecting the surround effect" on page 17 for video game sound effects. • If you press GAME while the system is off, the system turns on, the function switches to GAME, and the equalizer also switches to the GAME EQ. • If you want to switch back to "MD," repeat the operation described above to switch to "MD." F GAME INPUT AUDIO L/R jacks Use audio cords (not supplied) to connect an optional component...
Operating Instructions
Page 26
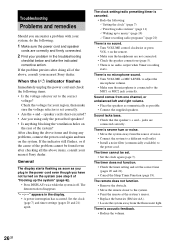
... 7). The clock setting/radio presetting/timer is canceled. • Redo the following: -"Setting the clock" (page 7) -"Presetting radio stations" (page 11) -"Waking up the system" (page 6)). • Press DISPLAY twice while the system is connected to the MIC1 or MIC2 jack correctly. Sound comes from the fluorescent light. "- -:- -" appears in the power cord even though you have not turned on the system. There is no sound. • Turn VOLUME control clockwise or...
... 7). The clock setting/radio presetting/timer is canceled. • Redo the following: -"Setting the clock" (page 7) -"Presetting radio stations" (page 11) -"Waking up the system" (page 6)). • Press DISPLAY twice while the system is connected to the MIC1 or MIC2 jack correctly. Sound comes from the fluorescent light. "- -:- -" appears in the power cord even though you have not turned on the system. There is no sound. • Turn VOLUME control clockwise or...
Operating Instructions
Page 27
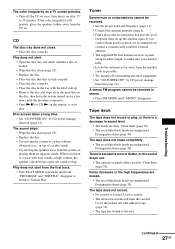
... the broken tab with bass sounds at high volume, the speaker vibration may cause the sound to start play. The sound skips. • Wipe the disc clean (page 29). • Replace the disc. • Try moving the system to 30 minutes. If you cannot obtain good reception, we recommend you connect a commercially available external antenna. • The supplied FM lead antenna receives signals along its entire...
... the broken tab with bass sounds at high volume, the speaker vibration may cause the sound to start play. The sound skips. • Wipe the disc clean (page 29). • Replace the disc. • Try moving the system to 30 minutes. If you cannot obtain good reception, we recommend you connect a commercially available external antenna. • The supplied FM lead antenna receives signals along its entire...

Operating Instructions
Page 28
... the tracks you made, such as follows: 1 Press x on deck B, TUNER ENTER and ?/1 at the same time. 2 Unplug the power cord. 3 Plug the power cord back in the tape deck. If the system still does not operate properly after performing the above measures, reset the system as the preset stations, clock, and timer. NO STEP You have pressed PLAY MODE during playback. NO TAPE There is reset to the same...
... the tracks you made, such as follows: 1 Press x on deck B, TUNER ENTER and ?/1 at the same time. 2 Unplug the power cord. 3 Plug the power cord back in the tape deck. If the system still does not operate properly after performing the above measures, reset the system as the preset stations, clock, and timer. NO STEP You have pressed PLAY MODE during playback. NO TAPE There is reset to the same...
Operating Instructions
Page 29
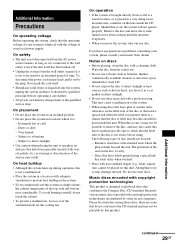
... may damage the unit. Should this unit to direct sunlight or heat sources such as it is connected to be changed only at a high volume, the cabinet temperature of the top, side and bottom rises considerably. Do not use discs encircled with a protection ring. Very humid - Subject to parts inside the CD player. When this occurs, it is not sticky...
... may damage the unit. Should this unit to direct sunlight or heat sources such as it is connected to be changed only at a high volume, the cabinet temperature of the top, side and bottom rises considerably. Do not use discs encircled with a protection ring. Very humid - Subject to parts inside the CD player. When this occurs, it is not sticky...

Operating Instructions
Page 30
... RMS power output (reference): 250 + 250 watts (6 ohms at 1 kHz, 10% THD) Inputs PHONO IN (phono jacks): sensitivity 3 mV, impedance 47 kilohms MIC (phone jack): sensitivity 1 mV, impedance 10 kilohms GAME INPUT AUDIO L/R (phono jacks): sensitivity 250 mV, impedance 47 kilohms GAME INPUT VIDEO (phono jack): 1Vp-p, 75 ohms 30GB Amplifier section North American model: LBT-XGR600 Front speaker Continuous RMS power output (reference): 175 + 175 watts (6 ohms at 1 kHz, 10% THD) Total harmonic distortion less than 90 minutes The tape...
... RMS power output (reference): 250 + 250 watts (6 ohms at 1 kHz, 10% THD) Inputs PHONO IN (phono jacks): sensitivity 3 mV, impedance 47 kilohms MIC (phone jack): sensitivity 1 mV, impedance 10 kilohms GAME INPUT AUDIO L/R (phono jacks): sensitivity 250 mV, impedance 47 kilohms GAME INPUT VIDEO (phono jack): 1Vp-p, 75 ohms 30GB Amplifier section North American model: LBT-XGR600 Front speaker Continuous RMS power output (reference): 175 + 175 watts (6 ohms at 1 kHz, 10% THD) Total harmonic distortion less than 90 minutes The tape...

Operating Instructions
Page 31
... (phono jack): max. Peak (IEC) 0.1% W. output level 1Vp-p, load impedance 75 ohms FRONT SPEAKER: LBT-XGR88: accepts impedance of 6 to 16 ohms (SUPER WOOFER) accepts impedance of 6 to -noise ratio More than 90 dB Dynamic range More than 90 dB CD OPTICAL DIGITAL OUT (square optical connector jack, rear panel) Wavelength 660 nm Output level -18 dBm Tape deck section Recording system Frequency response Wow and flutter 4-track 2-channel, stereo 50 - 13,000 Hz (±3 dB), using Sony...
... (phono jack): max. Peak (IEC) 0.1% W. output level 1Vp-p, load impedance 75 ohms FRONT SPEAKER: LBT-XGR88: accepts impedance of 6 to 16 ohms (SUPER WOOFER) accepts impedance of 6 to -noise ratio More than 90 dB Dynamic range More than 90 dB CD OPTICAL DIGITAL OUT (square optical connector jack, rear panel) Wavelength 660 nm Output level -18 dBm Tape deck section Recording system Frequency response Wow and flutter 4-track 2-channel, stereo 50 - 13,000 Hz (±3 dB), using Sony...

