
Operating Instructions
Page 4
... a qualified service shop only. The use any discs. never pull the cord. • Should the AC power cord (mains lead) need to be completely turned off . On operation • If the system is played. Though the LED remains lit for an extended period of time you leave the still video image or on-screen display image displayed on your TV's colour If the speakers should...
... a qualified service shop only. The use any discs. never pull the cord. • Should the AC power cord (mains lead) need to be completely turned off . On operation • If the system is played. Though the LED remains lit for an extended period of time you leave the still video image or on-screen display image displayed on your TV's colour If the speakers should...
Operating Instructions
Page 8
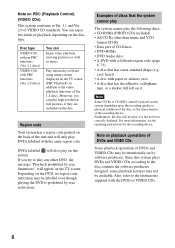
... 1.1 discs. will also play if it . Examples of DVDs and VIDEO CDs may not be intentionally set by area limitations." Note on playback operations of DVDs and VIDEO CDs Some playback operations of discs that has a non-standard shape (e.g., card, heart) • A disc with PBC functions (Ver. 2.0 discs) You can Enjoy video playback (moving pictures) as well as music. Play interactive software using menu screens displayed on the TV screen. DVDs labelled...
... 1.1 discs. will also play if it . Examples of DVDs and VIDEO CDs may not be intentionally set by area limitations." Note on playback operations of DVDs and VIDEO CDs Some playback operations of discs that has a non-standard shape (e.g., card, heart) • A disc with PBC functions (Ver. 2.0 discs) You can Enjoy video playback (moving pictures) as well as music. Play interactive software using menu screens displayed on the TV screen. DVDs labelled...
Operating Instructions
Page 17
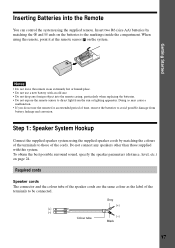
To obtain the best possible surround sound, specify the speaker parameters (distance, level, etc.) on the system. Step 1: Speaker System Hookup Connect the supplied speaker system using the supplied speaker cords by matching the 3 and # ends on the batteries to the markings inside the compartment. Required cords Speaker cords The connector and the colour tube of the speaker cords are the same colour as the label of time, remove...
To obtain the best possible surround sound, specify the speaker parameters (distance, level, etc.) on the system. Step 1: Speaker System Hookup Connect the supplied speaker system using the supplied speaker cords by matching the 3 and # ends on the batteries to the markings inside the compartment. Required cords Speaker cords The connector and the colour tube of the speaker cords are the same colour as the label of time, remove...

Operating Instructions
Page 18
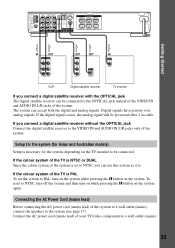
... connecting the speakers Connect the Front speakers Rear speakers Centre speaker Subwoofer To the SPEAKER FRONT L (white) and R (red) terminals SPEAKER REAR L (blue) and R (grey) terminals SPEAKER CENTER (green) terminal SPEAKER WOOFER (purple) terminal Front speaker (R) Centre speaker Front speaker (L) Colour label AM COAXIAL FM 75Ω VIDEO OUT VIDEO IN VIDEO IN SVIDEO (DVD ONLY) AUDIO OUT AUDIO IN AUDIO IN L L OPTICAL OPTICAL DIGITAL (CD ONLY) IN VIDEO R R DIGITAL MONITOR VIDEO 2 OUT OUT FRONT R CENTER FRONT L REAR R WOOFER REAR L Rear speaker (R) Subwoofer Rear...
... connecting the speakers Connect the Front speakers Rear speakers Centre speaker Subwoofer To the SPEAKER FRONT L (white) and R (red) terminals SPEAKER REAR L (blue) and R (grey) terminals SPEAKER CENTER (green) terminal SPEAKER WOOFER (purple) terminal Front speaker (R) Centre speaker Front speaker (L) Colour label AM COAXIAL FM 75Ω VIDEO OUT VIDEO IN VIDEO IN SVIDEO (DVD ONLY) AUDIO OUT AUDIO IN AUDIO IN L L OPTICAL OPTICAL DIGITAL (CD ONLY) IN VIDEO R R DIGITAL MONITOR VIDEO 2 OUT OUT FRONT R CENTER FRONT L REAR R WOOFER REAR L Rear speaker (R) Subwoofer Rear...

Operating Instructions
Page 22
... output through the video jacks. Step 3: TV and Video Component Hookups Required cords Video cord for connecting video components Connect a TV monitor VCR Digital satellite receiver To the MONITOR OUT jack VIDEO 1 jacks VIDEO 2 jacks z When using the FUNCTION button, the signal is not in 2CH STEREO mode, the line outputs may not function properly. 22 Notes • When you use the Video 1 line outputs, please set the unit to the appropriate jacks on a separate bus from the VIDEO 1 VIDEO OUT and AUDIO OUT L/R jacks. • When you select VIDEO 1 using the S-video jack...
... output through the video jacks. Step 3: TV and Video Component Hookups Required cords Video cord for connecting video components Connect a TV monitor VCR Digital satellite receiver To the MONITOR OUT jack VIDEO 1 jacks VIDEO 2 jacks z When using the FUNCTION button, the signal is not in 2CH STEREO mode, the line outputs may not function properly. 22 Notes • When you use the Video 1 line outputs, please set the unit to the appropriate jacks on a separate bus from the VIDEO 1 VIDEO OUT and AUDIO OUT L/R jacks. • When you select VIDEO 1 using the S-video jack...
Operating Instructions
Page 23
... Digital signals have priority over analog signals. AM COAXIAL FM 75Ω VIDEO OUT VIDEO IN VIDEO IN SVIDEO (DVD ONLY) AUDIO OUT AUDIO IN AUDIO IN L L OPTICAL OPTICAL DIGITAL (CD ONLY) IN R R VIDEO SPEAKER FRONT R CENTER FRONT L REAR R WOOFER REAR L Getting Started IN OUT VIDEO VIDEO IN OUT AUDIO AUDIO IN OUT L R OUT VIDEO OUT AUDIO OUT L R OUT OUTPUT OPTICAL IN INPUT VIDEO IN VCR Digital satellite receiver TV monitor If you connect a digital satellite receiver without the OPTICAL jack Connect the digital satellite receiver to the VIDEO IN and AUDIO...
... Digital signals have priority over analog signals. AM COAXIAL FM 75Ω VIDEO OUT VIDEO IN VIDEO IN SVIDEO (DVD ONLY) AUDIO OUT AUDIO IN AUDIO IN L L OPTICAL OPTICAL DIGITAL (CD ONLY) IN R R VIDEO SPEAKER FRONT R CENTER FRONT L REAR R WOOFER REAR L Getting Started IN OUT VIDEO VIDEO IN OUT AUDIO AUDIO IN OUT L R OUT VIDEO OUT AUDIO OUT L R OUT OUTPUT OPTICAL IN INPUT VIDEO IN VCR Digital satellite receiver TV monitor If you connect a digital satellite receiver without the OPTICAL jack Connect the digital satellite receiver to the VIDEO IN and AUDIO...

Operating Instructions
Page 28
LEVEL (0 dB) (rear speakers level) Adjust the level of the rear speakers (-6 dB to +6 dB, 1 dB steps). To adjust the volume of all settings such as follows. N" and "Really? Y" appears. is displayed and all the speakers at one time Use the VOLUME control. LEV. (0 dB) (subwoofer level) Adjust the level of the subwoofer (-6 dB to +6 dB, 1 dB steps). • S. Other AMP MENU settings You can control the brightness of the front panel display, clear the preset stations and the station names, and...
LEVEL (0 dB) (rear speakers level) Adjust the level of the rear speakers (-6 dB to +6 dB, 1 dB steps). To adjust the volume of all settings such as follows. N" and "Really? Y" appears. is displayed and all the speakers at one time Use the VOLUME control. LEV. (0 dB) (subwoofer level) Adjust the level of the subwoofer (-6 dB to +6 dB, 1 dB steps). • S. Other AMP MENU settings You can control the brightness of the front panel display, clear the preset stations and the station names, and...

Operating Instructions
Page 45
... language code list on page 79 to select the desired audio signal. To turn off . Each time you can select the audio format you want to the sound of settings varies. • MULTI: The disc has multichannel playback area • 2CH: The disc has the 2 channel playback area. • CD: When you want while playing the DVD. Sound Adjustments Changing the Sound If a DVD is turned off the Control Menu Press DVD DISPLAY repeatedly until the Control Menu...
... language code list on page 79 to select the desired audio signal. To turn off . Each time you can select the audio format you want to the sound of settings varies. • MULTI: The disc has multichannel playback area • 2CH: The disc has the 2 channel playback area. • CD: When you want while playing the DVD. Sound Adjustments Changing the Sound If a DVD is turned off the Control Menu Press DVD DISPLAY repeatedly until the Control Menu...

Operating Instructions
Page 47
... virtual speakers. Sound Adjustments CINEMA STUDIO EX B* Reproduces the sound characteristics of the Sony Pictures Entertainment's mixing studio using the 3D sound imaging of actual rear speakers. Note When you play sound tracks with 96 kHz sampling frequency, the output signals will be applied again. MULTI DIMENSION (page 48) to . continued 47 This is a standard mode, great for all preset stations. Surround sound can also use SOUND FIELD on the front panel display. This mode is...
... virtual speakers. Sound Adjustments CINEMA STUDIO EX B* Reproduces the sound characteristics of the Sony Pictures Entertainment's mixing studio using the 3D sound imaging of actual rear speakers. Note When you play sound tracks with 96 kHz sampling frequency, the output signals will be applied again. MULTI DIMENSION (page 48) to . continued 47 This is a standard mode, great for all preset stations. Surround sound can also use SOUND FIELD on the front panel display. This mode is...

Operating Instructions
Page 48
... acoustics of audio signal being input (Dolby Digital, DTS, Dolby Pro Logic, or standard 2 channel stereo) and performs the proper decoding if necessary. This mode presents the sound as a reference. Software with 2 channel audio signals, is played according to create virtual rear speakers from video game software. DIMENSION* (Virtual Semi Multi Dimension) Uses 3D sound imaging to the way it was recorded. NORMAL SURROUND Software with multichannel surround audio signals is decoded with stereo sound capabilities. AUTO FORMAT DECODE...
... acoustics of audio signal being input (Dolby Digital, DTS, Dolby Pro Logic, or standard 2 channel stereo) and performs the proper decoding if necessary. This mode presents the sound as a reference. Software with 2 channel audio signals, is played according to create virtual rear speakers from video game software. DIMENSION* (Virtual Semi Multi Dimension) Uses 3D sound imaging to the way it was recorded. NORMAL SURROUND Software with multichannel surround audio signals is decoded with stereo sound capabilities. AUTO FORMAT DECODE...
Operating Instructions
Page 54
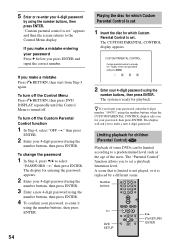
... Parental Control function 1 In Step 4, select "OFF t," then press ENTER. 2 Enter your 4-digit password using the number buttons, then press ENTER. The CUSTOM PARENTAL CONTROL display appears. appears and then the screen returns to set 1 Insert the disc for playback. "Custom parental control is already set ." To turn off . To play, enter your password and press ENTER . 2 Enter your 4-digit password using the number buttons when the CUSTOM PARENTAL CONTROL display asks you to the Control Menu display...
... Parental Control function 1 In Step 4, select "OFF t," then press ENTER. 2 Enter your 4-digit password using the number buttons, then press ENTER. The CUSTOM PARENTAL CONTROL display appears. appears and then the screen returns to set 1 Insert the disc for playback. "Custom parental control is already set ." To turn off . To play, enter your password and press ENTER . 2 Enter your 4-digit password using the number buttons when the CUSTOM PARENTAL CONTROL display asks you to the Control Menu display...
Operating Instructions
Page 56
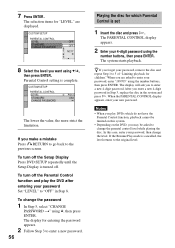
... SETUP PARENTAL CONTROL LEVEL: STANDARD: CHANGE PASSWORD OFF OFF 8: 7: NC17 6: R 5: 8 Select the level you to the original level. Parental Control setting is cancelled, the level returns to enter a new 4-digit password. When you play the DVD after entering your password, remove the disc and repeat Step 1 to 5 of "Limiting playback for "LEVEL" are asked to enter your password, then change the password 1 In Step 5, select "CHANGE PASSWORD t" using the number buttons, then press ENTER. To turn off . The display...
... SETUP PARENTAL CONTROL LEVEL: STANDARD: CHANGE PASSWORD OFF OFF 8: 7: NC17 6: R 5: 8 Select the level you to the original level. Parental Control setting is cancelled, the level returns to enter a new 4-digit password. When you play the DVD after entering your password, remove the disc and repeat Step 1 to 5 of "Limiting playback for "LEVEL" are asked to enter your password, then change the password 1 In Step 5, select "CHANGE PASSWORD t" using the number buttons, then press ENTER. To turn off . The display...

Operating Instructions
Page 59
... input sources. DVD t VIDEO 1 t VIDEO 2 t TUNER t DVD... Watching the Video or other Unit You can switch the remote signal between the TV and other units connected to control your TV using the buttons below. The table below shows the buttons that you may not be able to the VIDEO 1 or VIDEO 2 jacks. Standard enter function for DVD. Standard preceding title, chapter skip function for DVD. Each time you press FUNCTION, the mode of controllable TVs. ** For double digit number...
... input sources. DVD t VIDEO 1 t VIDEO 2 t TUNER t DVD... Watching the Video or other Unit You can switch the remote signal between the TV and other units connected to control your TV using the buttons below. The table below shows the buttons that you may not be able to the VIDEO 1 or VIDEO 2 jacks. Standard enter function for DVD. Standard preceding title, chapter skip function for DVD. Each time you press FUNCTION, the mode of controllable TVs. ** For double digit number...

Operating Instructions
Page 60
... time you press DISPLAY, the front panel display changes as follows: index name of the station t frequency t sound field t index name of the station To turn off the radio Press ?/1. 60 TUNING +/- 1 Press FUNCTION repeatedly until TUNER appears on the front panel display. z If an FM programme is tuned in. To listen to restore the stereo effect. Listening to select the preset station you press the button, the system tunes in one preset station. 3 Adjust the volume...
... time you press DISPLAY, the front panel display changes as follows: index name of the station t frequency t sound field t index name of the station To turn off the radio Press ?/1. 60 TUNING +/- 1 Press FUNCTION repeatedly until TUNER appears on the front panel display. z If an FM programme is tuned in. To listen to restore the stereo effect. Listening to select the preset station you press the button, the system tunes in one preset station. 3 Adjust the volume...

Operating Instructions
Page 66
... contain a jacket picture, the "GRAPHICS" picture appears. Custom Settings (CUSTOM SETUP) Allows setting up Parental Control and other settings. Changes the video signal of a PAL disc and outputs it in the PAL system. Press H to the connected TV. Turns off the screen saver. For details on the screen saver. CUSTOM SETUP COLOR SYSTEM PAUSE MODE: PARENTAL CONTROL TRACK SELECTION AUTO AUTO OFF xCOLOR SYSTEM for more than 15 minutes. JACKET...
... contain a jacket picture, the "GRAPHICS" picture appears. Custom Settings (CUSTOM SETUP) Allows setting up Parental Control and other settings. Changes the video signal of a PAL disc and outputs it in the PAL system. Press H to the connected TV. Turns off the screen saver. For details on the screen saver. CUSTOM SETUP COLOR SYSTEM PAUSE MODE: PARENTAL CONTROL TRACK SELECTION AUTO AUTO OFF xCOLOR SYSTEM for more than 15 minutes. JACKET...

Operating Instructions
Page 67
... CLEAR. The default settings are recorded. Settings and Adjustments continued 67 OFF AUTO No priority given. The "TRACK SELECTION" setting has higher priority than the "AUDIO" settings in this case, you cannot change . Priority given. Then use the test tone to adjust the volume and the balance of channels, the system selects PCM, DTS, Dolby Digital, and MPEG audio sound tracks in "LANGUAGE SETUP" (page 64). • If PCM, DTS, MPEG audio, and Dolby Digital sound tracks have connected and their distance...
... CLEAR. The default settings are recorded. Settings and Adjustments continued 67 OFF AUTO No priority given. The "TRACK SELECTION" setting has higher priority than the "AUDIO" settings in this case, you cannot change . Priority given. Then use the test tone to adjust the volume and the balance of channels, the system selects PCM, DTS, Dolby Digital, and MPEG audio sound tracks in "LANGUAGE SETUP" (page 64). • If PCM, DTS, MPEG audio, and Dolby Digital sound tracks have connected and their distance...
Operating Instructions
Page 71
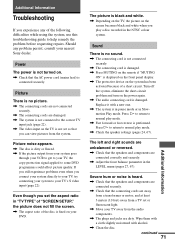
... play a disc recorded in the LEVEL menu (pages 27, 67). Power The power is not turned on the TV is not connected to the correct TV input jack (page 22). , The video input on . , Check that the connecting cords are away from a transformer or motor, and at least 3 meters (10 feet) away from a TV set so that the speakers and components are connected correctly and securely. , Adjust the front balance...
... play a disc recorded in the LEVEL menu (pages 27, 67). Power The power is not turned on the TV is not connected to the correct TV input jack (page 22). , The video input on . , Check that the connecting cords are away from a transformer or motor, and at least 3 meters (10 feet) away from a TV set so that the speakers and components are connected correctly and securely. , Adjust the front balance...

Operating Instructions
Page 72
... output signal may come from the rear speakers. , Make sure the sound field function is turned over. Operation Radio stations cannot be the entire 5.1 channels. Remove the disc and leave the system turned on (page 47). , Select a sound field containing the word "cinema" or "virtual" (page 47). 72 No sound or only a very low-level sound is heard from the centre speaker only. Preset the stations (page 29). , Press DISPLAY so that the antennas are playing a Dolby Digital...
... output signal may come from the rear speakers. , Make sure the sound field function is turned over. Operation Radio stations cannot be the entire 5.1 channels. Remove the disc and leave the system turned on (page 47). , Select a sound field containing the word "cinema" or "virtual" (page 47). 72 No sound or only a very low-level sound is heard from the centre speaker only. Preset the stations (page 29). , Press DISPLAY so that the antennas are playing a Dolby Digital...
Operating Instructions
Page 73
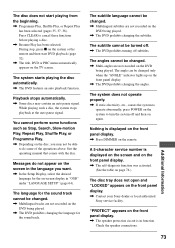
... front panel display. , The DVD prohibits changing the angles. While playing such a disc, the system stops playback at the auto pause signal. See the operating manual that comes with the disc. The angles cannot be changed . , Multi-angles are not recorded on -screen display in function. The system does not operate properly. , If static electricity, etc., causes the system to operate abnormally, press POWER on the system to turn the...
... front panel display. , The DVD prohibits changing the angles. While playing such a disc, the system stops playback at the auto pause signal. See the operating manual that comes with the disc. The angles cannot be changed . , Multi-angles are not recorded on -screen display in function. The system does not operate properly. , If static electricity, etc., causes the system to operate abnormally, press POWER on the system to turn the...
Operating Instructions
Page 81
... PLAY MODE 35 Preset Station 29, 60 Programme Play 35 Q Quick Overview 16 R Radio 60 RDS 61 Rear Panel 12 Region code 8, 75 Remote 13, 58 REPEAT 38 RESET 64 Resume Play 32 S SACD 76 S VIDEO 22 Scan 39 SCENE 40 Scene 7 SCREEN SAVER 66 SCREEN SETUP 65 SHUFFLE 37 Shuffle Play 37 SIZE 67 Slow-motion Play 39 Sound Field 47 SPEAKER SETUP 67 Speaker System Hookup 17 SUBTITLE 51, 64 T TEST TONE 70 TIME...
... PLAY MODE 35 Preset Station 29, 60 Programme Play 35 Q Quick Overview 16 R Radio 60 RDS 61 Rear Panel 12 Region code 8, 75 Remote 13, 58 REPEAT 38 RESET 64 Resume Play 32 S SACD 76 S VIDEO 22 Scan 39 SCENE 40 Scene 7 SCREEN SAVER 66 SCREEN SETUP 65 SHUFFLE 37 Shuffle Play 37 SIZE 67 Slow-motion Play 39 Sound Field 47 SPEAKER SETUP 67 Speaker System Hookup 17 SUBTITLE 51, 64 T TEST TONE 70 TIME...


