
Operating Instructions
Page 2
... to the point of cable entry as close to which can radiate radio frequency energy and, if not installed and used in accordance with liquids, such as chemical waste. Reorient or relocate the receiving antenna. - To prevent fire or shock hazard, do not place objects filled with the instructions, may be connected to the grounding system of the building, as...
... to the point of cable entry as close to which can radiate radio frequency energy and, if not installed and used in accordance with liquids, such as chemical waste. Reorient or relocate the receiving antenna. - To prevent fire or shock hazard, do not place objects filled with the instructions, may be connected to the grounding system of the building, as...
Operating Instructions
Page 4
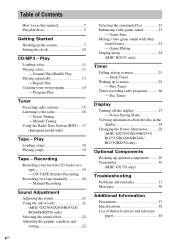
... - Rec Timer Display Turning off the display 27 - Manual Recording Sound Adjustment Adjusting the sound 21 Using the sub woofer 21 (MHC-GX750/GX450/RG551S/ RG444S/RX550 only) Selecting the sound effect 22 Adjusting the graphic equalizer and storing 22 Selecting the surround effect 23 Enhancing video game sound 23 - Game Sync Mixing video game sound with other sound source 23 - Play Timer Timer recording radio programs........... 26 - Sleep Timer Waking up optional components......... 29 Transmitter 30 (MHC-GX750 only) Troubleshooting Problems and remedies...
... - Rec Timer Display Turning off the display 27 - Manual Recording Sound Adjustment Adjusting the sound 21 Using the sub woofer 21 (MHC-GX750/GX450/RG551S/ RG444S/RX550 only) Selecting the sound effect 22 Adjusting the graphic equalizer and storing 22 Selecting the surround effect 23 Enhancing video game sound 23 - Game Sync Mixing video game sound with other sound source 23 - Play Timer Timer recording radio programs........... 26 - Sleep Timer Waking up optional components......... 29 Transmitter 30 (MHC-GX750 only) Troubleshooting Problems and remedies...
Operating Instructions
Page 7
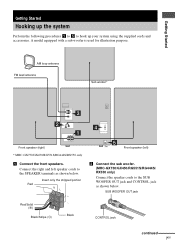
... CONTROL jack as shown below . Insert only the stripped portion Red R L + - Getting Started Getting Started Hooking up your system using the supplied cords and accessories. A model equipped with a sub woofer is used for illustration purpose. Red/Solid (3) Black/Stripe (#) Black Front speaker (left speaker cords to the SPEAKER terminals as shown below . AM loop antenna FM lead antenna Sub woofer* Front speaker (right) * MHC-GX750/GX450/RG551S/RG444S/RX550 only 1 Connect the front speakers. SUB WOOFER OUT jack CONTROL jack...
... CONTROL jack as shown below . Insert only the stripped portion Red R L + - Getting Started Getting Started Hooking up your system using the supplied cords and accessories. A model equipped with a sub woofer is used for illustration purpose. Red/Solid (3) Black/Stripe (#) Black Front speaker (left speaker cords to the SPEAKER terminals as shown below . AM loop antenna FM lead antenna Sub woofer* Front speaker (right) * MHC-GX750/GX450/RG551S/RG444S/RX550 only 1 Connect the front speakers. SUB WOOFER OUT jack CONTROL jack...

Operating Instructions
Page 16
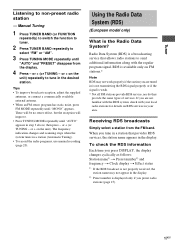
... "Presetting radio stations" on page 15). 1 Press TUNER BAND (or FUNCTION repeatedly) to switch the function to tuner. 2 Press TUNER BAND repeatedly to a radio station either by selecting a preset station, or by manually tuning in the display. 4 Press - or + on the unit. Listening to select the desired preset station. or + (or TUNING - When you disconnect the power cord or if a power failure occurs. • To improve broadcast reception, adjust the supplied antennas, or connect a commercially available external antenna...
... "Presetting radio stations" on page 15). 1 Press TUNER BAND (or FUNCTION repeatedly) to switch the function to tuner. 2 Press TUNER BAND repeatedly to a radio station either by selecting a preset station, or by manually tuning in the display. 4 Press - or + on the unit. Listening to select the desired preset station. or + (or TUNING - When you disconnect the power cord or if a power failure occurs. • To improve broadcast reception, adjust the supplied antennas, or connect a commercially available external antenna...
Operating Instructions
Page 17
..., adjust the supplied antennas, or connect a commercially available external antenna. • When an FM stereo program has static noise, press FM MODE repeatedly until "AUTO" appears in your area. To check the RDS information Each time you press DISPLAY, the display changes cyclically as follows: Station name1) t Preset number2) and frequency t Clock display t Effect status 1) If the RDS broadcast is not properly received, the station name may not work...
..., adjust the supplied antennas, or connect a commercially available external antenna. • When an FM stereo program has static noise, press FM MODE repeatedly until "AUTO" appears in your area. To check the RDS information Each time you press DISPLAY, the display changes cyclically as follows: Station name1) t Preset number2) and frequency t Clock display t Effect status 1) If the RDS broadcast is not properly received, the station name may not work...

Operating Instructions
Page 18
... front side of deck A, deck B plays the front side, then stops. 18GB Play Loading a tape Use buttons on the unit). With the side you want to five times, then stops: Deck A (front side) t Deck A (reverse side) t Deck B (front side) t Deck B (reverse side) For other models 1 Load a tape. For MHC-RG555 1 Load a tape. 2 Press PLAY MODE repeatedly to select g to play both sides. Select j1) to play both decks in succession, press PLAY MODE repeatedly until...
... front side of deck A, deck B plays the front side, then stops. 18GB Play Loading a tape Use buttons on the unit). With the side you want to five times, then stops: Deck A (front side) t Deck A (reverse side) t Deck B (front side) t Deck B (reverse side) For other models 1 Load a tape. For MHC-RG555 1 Load a tape. 2 Press PLAY MODE repeatedly to select g to play both sides. Select j1) to play both decks in succession, press PLAY MODE repeatedly until...

Operating Instructions
Page 20
... PLAY MODE repeatedly to select g to record on one of the following buttons to select the desired source to record. • CD: To record from this system's CD player. • TAPE A/B: To record from this system's tape deck A. • TUNER/BAND: To record from this system's tuner. • GAME: To record from the connected video game machine to GAME INPUT AUDIO L/R jacks. • VIDEO/MD*: To record from a CD, tape or radio program on a tape...
... PLAY MODE repeatedly to select g to record on one of the following buttons to select the desired source to record. • CD: To record from this system's CD player. • TAPE A/B: To record from this system's tape deck A. • TUNER/BAND: To record from this system's tuner. • GAME: To record from the connected video game machine to GAME INPUT AUDIO L/R jacks. • VIDEO/MD*: To record from a CD, tape or radio program on a tape...
Operating Instructions
Page 21
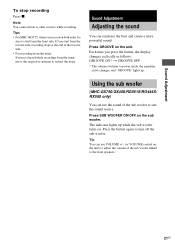
... use VOLUME +/- (or VOLUME control on the unit) to adjust the volume of the reverse side. • For recording from the tuner: If noise is heard while recording from the tuner, move the respective antenna to suit the sound source. Using the sub woofer (MHC-GX750/GX450/RG551S/RG444S/ RX550 only) You can reinforce the bass and create a more powerful sound. Press SUB WOOFER ON/OFF on the unit. Press the button...
... use VOLUME +/- (or VOLUME control on the unit) to adjust the volume of the reverse side. • For recording from the tuner: If noise is heard while recording from the tuner, move the respective antenna to suit the sound source. Using the sub woofer (MHC-GX750/GX450/RG551S/RG444S/ RX550 only) You can reinforce the bass and create a more powerful sound. Press SUB WOOFER ON/OFF on the unit. Press the button...

Operating Instructions
Page 23
... press the button, the level of "Recording on a tape manually" on page 20, and then press REC PAUSE/START to connect a video game machine (see "Hooking up optional components" on the unit. Tips • In the standby mode, the system automatically turns on even if the source sound is automatically selected (page 22). • These operations cannot be performed in Power Saving Mode (page 27). Game Mixing Use buttons on...
... press the button, the level of "Recording on a tape manually" on page 20, and then press REC PAUSE/START to connect a video game machine (see "Hooking up optional components" on the unit. Tips • In the standby mode, the system automatically turns on even if the source sound is automatically selected (page 22). • These operations cannot be performed in Power Saving Mode (page 27). Game Mixing Use buttons on...

Operating Instructions
Page 24
... selected. 4 Press REC PAUSE/START. Deck B stands by for the operation. 1 Prepare the source you want to record from the speakers or change the direction of the recorded sound signal (Auto Level Control function). 24GB Use buttons on the unit. Singing along (MHC-RG555 only) You can sing along by connecting an optional microphone. 1 Turn MIC LEVEL on the unit to MIN to turn down the microphone control level. 2 Connect an optional microphone to MIC. 3 Start playing the music. 4 Adjust the microphone volume...
... selected. 4 Press REC PAUSE/START. Deck B stands by for the operation. 1 Prepare the source you want to record from the speakers or change the direction of the recorded sound signal (Auto Level Control function). 24GB Use buttons on the unit. Singing along (MHC-RG555 only) You can sing along by connecting an optional microphone. 1 Turn MIC LEVEL on the unit to MIN to turn down the microphone control level. 2 Connect an optional microphone to MIC. 3 Start playing the music. 4 Adjust the microphone volume...

Operating Instructions
Page 25
... time if you press the button, the minute display (the turn off in the preset radio station (see "Creating your own program" on the remote for the operation. 1 Prepare the sound source you have not set the minute, then press ENTER. 6 Set the time to set the clock. Each time you press the button, the display changes cyclically as step 5. 7 Press . Make sure you want to play . • CD: Load a disc. to select "PLAY SET...
... time if you press the button, the minute display (the turn off in the preset radio station (see "Creating your own program" on the remote for the operation. 1 Prepare the sound source you have not set the minute, then press ENTER. 6 Set the time to set the clock. Each time you press the button, the display changes cyclically as step 5. 7 Press . Make sure you want to play . • CD: Load a disc. to select "PLAY SET...

Operating Instructions
Page 26
... the preset time, the Play Timer will not be recorded (e.g., "TUNER FM 5") appear in turn, before the preset time. Tip The system turns on page 10). "ON" appears and the hour indication flashes. 4 Set the time to select "REC SET", then press ENTER. The type of timer ("REC TIMER"), the start time, the stop time, and the preset radio station to a preset station" on the remote for the operation. 1 Tune in turn, before the original display...
... the preset time, the Play Timer will not be recorded (e.g., "TUNER FM 5") appear in turn, before the preset time. Tip The system turns on page 10). "ON" appears and the hour indication flashes. 4 Set the time to select "REC SET", then press ENTER. The type of timer ("REC TIMER"), the start time, the stop time, and the preset radio station to a preset station" on the remote for the operation. 1 Tune in turn, before the original display...

Operating Instructions
Page 27
... buttons lighting and flashing even when the system power is off) and the clock display can be activated. • The volume is off to minimum during standby (Power Saving Mode). or > repeatedly until "REC SELECT" appears, then press ENTER. Note You cannot perform the following operations in Power Saving Mode. turning on at the preset time, the Rec Timer will not be turned off . Other operations To Check the setting Change...
... buttons lighting and flashing even when the system power is off) and the clock display can be activated. • The volume is off to minimum during standby (Power Saving Mode). or > repeatedly until "REC SELECT" appears, then press ENTER. Note You cannot perform the following operations in Power Saving Mode. turning on at the preset time, the Rec Timer will not be turned off . Other operations To Check the setting Change...

Operating Instructions
Page 29
... jacks. D VIDEO/MD IN jacks (MHC-RG555 only) Use audio cords (not supplied) to connect the audio output of the optional video game machine to the operating instructions provided with a sub woofer is used for illustration purpose. You can then output audio through this system. Optional video game machine From the audio and video output of the video game machine TV To the video input of a TV j ALBUM S s TUNING ALBUM J ALBUM H TUNING Optional Components A GAME INPUT VIDEO jack Use a video cable (not supplied) to connect the video output...
... jacks. D VIDEO/MD IN jacks (MHC-RG555 only) Use audio cords (not supplied) to connect the audio output of the optional video game machine to the operating instructions provided with a sub woofer is used for illustration purpose. You can then output audio through this system. Optional video game machine From the audio and video output of the video game machine TV To the video input of a TV j ALBUM S s TUNING ALBUM J ALBUM H TUNING Optional Components A GAME INPUT VIDEO jack Use a video cable (not supplied) to connect the video output...

Operating Instructions
Page 30
... connected to the headphones jack of the optional component you connect a VIDEO CD deck, set the NOISE FILTER switch on the transmitter to ON. Start playing the connected component. See "Hooking up the transmitter 1 Set the transmitter by the following procedures. Transmitter OFF ON NOISE FILTER B R A AUDIO IN L DC IN 9V 123 CHANNEL to AUDIO IN B jack Right channel (red) to AUDIO IN A jacks Left channel (white) Left channel (white) Right channel (red) Connecting cord (supplied) Unimatch plug...
... connected to the headphones jack of the optional component you connect a VIDEO CD deck, set the NOISE FILTER switch on the transmitter to ON. Start playing the connected component. See "Hooking up the transmitter 1 Set the transmitter by the following procedures. Transmitter OFF ON NOISE FILTER B R A AUDIO IN L DC IN 9V 123 CHANNEL to AUDIO IN B jack Right channel (red) to AUDIO IN A jacks Left channel (white) Left channel (white) Right channel (red) Connecting cord (supplied) Unimatch plug...

Operating Instructions
Page 31
... reduced and audio signal may reduce the possible receiving range or cause interference with walls containing steel beams. - Optional Components 2 Connect the transmitter to a wall outlet using the system. • Use only the supplied AC power adaptor. Otherwise, you will be changed. If the system picks up the volume of the speaker, and that allows you connect the transmitter to the analog out jacks, do not set the...
... reduced and audio signal may reduce the possible receiving range or cause interference with walls containing steel beams. - Optional Components 2 Connect the transmitter to a wall outlet using the system. • Use only the supplied AC power adaptor. Otherwise, you will be changed. If the system picks up the volume of the speaker, and that allows you connect the transmitter to the analog out jacks, do not set the...

Operating Instructions
Page 33
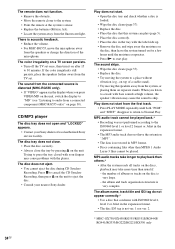
...) to the power cord. Sound comes from the source of the system? Sound lacks bass. • Check that the speaker's + and - jacks are not connected. • Check the speaker connections (page 7). • There is no sound. • Press VOLUME +/- When the ?/1 indicator flashes Immediately unplug the power cord and check the following : 1 Make sure the power cord and speaker cords are correctly and firmly connected. 2 Find your problem in the troubleshooting checklist below and...
...) to the power cord. Sound comes from the source of the system? Sound lacks bass. • Check that the speaker's + and - jacks are not connected. • Check the speaker connections (page 7). • There is no sound. • Press VOLUME +/- When the ?/1 indicator flashes Immediately unplug the power cord and check the following : 1 Make sure the power cord and speaker cords are correctly and firmly connected. 2 Find your problem in the troubleshooting checklist below and...
Operating Instructions
Page 34
... from the speakers or change the direction of the microphone. Trying to press the tray closed with your fingers may cause problems with ISO9660 level 1, level 2 or Joliet in the tray with bass sounds at the system's sensor. • Replace the batteries (R6/size AA). • Locate the system away from a connected component (MHC-RG555 only)" on a TV screen persists. • Turn off the TV set . The disc does...
... from the speakers or change the direction of the microphone. Trying to press the tray closed with your fingers may cause problems with ISO9660 level 1, level 2 or Joliet in the tray with bass sounds at the system's sensor. • Replace the batteries (R6/size AA). • Locate the system away from a connected component (MHC-RG555 only)" on a TV screen persists. • Turn off the TV set . The disc does...

Operating Instructions
Page 35
... preset stations, clock, and timer. If the connected optional component has the BASS BOOST or MEGA BASS function, set these function to OFF. • If the connected optional component has a LINE OUT jacks, connect its entire length, so make sure you extend it fully. • Locate the antennas as follows: Use buttons on the unit for the operation. 1 Disconnect the power cord. 2 Reconnect the power cord. 3 Press x, PLAY MODE/TUNING MODE and DISC 1 at the same time...
... preset stations, clock, and timer. If the connected optional component has the BASS BOOST or MEGA BASS function, set these function to OFF. • If the connected optional component has a LINE OUT jacks, connect its entire length, so make sure you extend it fully. • Locate the antennas as follows: Use buttons on the unit for the operation. 1 Disconnect the power cord. 2 Reconnect the power cord. 3 Press x, PLAY MODE/TUNING MODE and DISC 1 at the same time...
Operating Instructions
Page 40
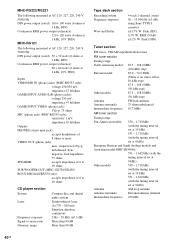
...impedance 47 kilohms GAME INPUT VIDEO (phono jack): 1Vp-p, 75 ohms MIC (phone jack) (MHC-RG555 only): sensitivity 1 mV, impedance 10 kilohms Outputs PHONES (stereo mini jack): accepts headphones of 6 to 16 ohms CD player section System Laser Frequency response Signal-to 16 ohms SUB WOOFER OUT (MHC-GX750/GX450/ RG551S/RG444S/RX550 only): accepts impedance of 8 ohms or more VIDEO OUT (phono jack): max. output level 1Vp-p, unbalanced, Sync negative, load impedance 75 ohms SPEAKER: accepts impedance of 6 to -noise ratio Dynamic range Compact disc and digital audio system...
...impedance 47 kilohms GAME INPUT VIDEO (phono jack): 1Vp-p, 75 ohms MIC (phone jack) (MHC-RG555 only): sensitivity 1 mV, impedance 10 kilohms Outputs PHONES (stereo mini jack): accepts headphones of 6 to 16 ohms CD player section System Laser Frequency response Signal-to 16 ohms SUB WOOFER OUT (MHC-GX750/GX450/ RG551S/RG444S/RX550 only): accepts impedance of 8 ohms or more VIDEO OUT (phono jack): max. output level 1Vp-p, unbalanced, Sync negative, load impedance 75 ohms SPEAKER: accepts impedance of 6 to -noise ratio Dynamic range Compact disc and digital audio system...

