

Operating Instructions
Page 2
... the literature accompanying the appliance. European model The following measures: - However, there is no guarantee that any changes or modifications not expressly approved in this manual could void your authority to operate this CD/DVD player is intended to alert the user to disassemble the cabinet. WARNING This equipment has been...
... the literature accompanying the appliance. European model The following measures: - However, there is no guarantee that any changes or modifications not expressly approved in this manual could void your authority to operate this CD/DVD player is intended to alert the user to disassemble the cabinet. WARNING This equipment has been...
Operating Instructions
Page 5
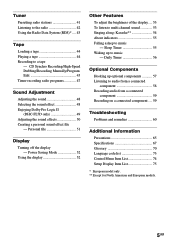
Sleep Timer 55 Waking up optional components 57 Listening to music - CD Synchro Recording/High-Speed Dubbing/Recording Manually/Program Edit 45 Timer-recording radio programs 47 Sound Adjustment Adjusting the sound 48 Selecting the sound effect 48 Enjoying Dolby Pro Logic II (DHC-FL7D only 49 Adjusting the sound effects 50 Creating a ...asleep to a tape - Personal file 51 Display Turning off the display - Tuner Presetting radio stations 41 Listening to the radio 42 Using the Radio Data System (RDS)* .... 43 Tape Loading a tape 44 Playing a tape 44 Recording to music -
Sleep Timer 55 Waking up optional components 57 Listening to music - CD Synchro Recording/High-Speed Dubbing/Recording Manually/Program Edit 45 Timer-recording radio programs 47 Sound Adjustment Adjusting the sound 48 Selecting the sound effect 48 Enjoying Dolby Pro Logic II (DHC-FL7D only 49 Adjusting the sound effects 50 Creating a ...asleep to a tape - Personal file 51 Display Turning off the display - Tuner Presetting radio stations 41 Listening to the radio 42 Using the Radio Data System (RDS)* .... 43 Tape Loading a tape 44 Playing a tape 44 Recording to music -

Operating Instructions
Page 41
...The stations are stored from preset number 1. At that can then tune in and store the radio frequency of the desired radio station as the system scans for stereo program only) appear. If "TUNED" does not appear and the scanning does not stop Set the frequency of your area and... then store them manually Manually tune in any of "Setting presets through 4 to tune in the desired station. 3 Press TUNER MEMORY on the remote. The stations are two ...
...The stations are stored from preset number 1. At that can then tune in and store the radio frequency of the desired radio station as the system scans for stereo program only) appear. If "TUNED" does not appear and the scanning does not stop Set the frequency of your area and... then store them manually Manually tune in any of "Setting presets through 4 to tune in the desired station. 3 Press TUNER MEMORY on the remote. The stations are two ...

Operating Instructions
Page 42
... buttons instead of performing step 2. Preset Tuning Preset radio stations in the Power Saving Mode. The frequency indication changes and scanning stops when the system tunes in the desired station. To set another station to a preset station - or > repeatedly to 9 kHz (or 10 kHz for half...desired preset station. When you want to store a new station, then proceed to a radio station either by selecting a preset station, or by manually tuning in step 2 above. After step 3, press . Note You cannot change the interval, all the AM preset stations are retained for some areas...
... buttons instead of performing step 2. Preset Tuning Preset radio stations in the Power Saving Mode. The frequency indication changes and scanning stops when the system tunes in the desired station. To set another station to a preset station - or > repeatedly to 9 kHz (or 10 kHz for half...desired preset station. When you want to store a new station, then proceed to a radio station either by selecting a preset station, or by manually tuning in step 2 above. After step 3, press . Note You cannot change the interval, all the AM preset stations are retained for some areas...

Operating Instructions
Page 45
... • You cannot use TYPE I (normal) tapes. Pause recording* REC PAUSE/START. * Only when recording manually. continued 45GB record into deck B. CD Synchro Recording/High-Speed Dubbing/Recording Manually/Program Edit You can use the digipad during recording. • If you start playback of the reverse side. &#...recording Press x. Recording from a VIDEO CD/ Steps CD/Super Audio CD/MP3 file (CD Synchro Recording) Recording from a disc, tape (or connected components) or radio. You can record from a tape (High-Speed Dubbing) 1 Insert a recordable tape into deck A.
... • You cannot use TYPE I (normal) tapes. Pause recording* REC PAUSE/START. * Only when recording manually. continued 45GB record into deck B. CD Synchro Recording/High-Speed Dubbing/Recording Manually/Program Edit You can use the digipad during recording. • If you start playback of the reverse side. &#...recording Press x. Recording from a VIDEO CD/ Steps CD/Super Audio CD/MP3 file (CD Synchro Recording) Recording from a disc, tape (or connected components) or radio. You can record from a tape (High-Speed Dubbing) 1 Insert a recordable tape into deck A.

Operating Instructions
Page 59
...). Notes • Digital signals are not output from OPTICAL DVD DIGITAL OUT (DHC-FL7D only). • This unit is selected, or you switched to VIDEO. Start playing the connected component. Digital signals from Super Audio CDs are output from the OPTICAL DVD DIGITAL OUT jack...optical cable for digital recording. 2 Press EFFECT repeatedly to select "EFFECT OFF". 3 Press 2.1CH/MULTI on page 57. 2 Start recording manually. Optional Components 59GB (Other models) To listen to select "2.1CH". 4 Start recording. Once you want to switch back to MD function, repeat the operation...
...). Notes • Digital signals are not output from OPTICAL DVD DIGITAL OUT (DHC-FL7D only). • This unit is selected, or you switched to VIDEO. Start playing the connected component. Digital signals from Super Audio CDs are output from the OPTICAL DVD DIGITAL OUT jack...optical cable for digital recording. 2 Press EFFECT repeatedly to select "EFFECT OFF". 3 Press 2.1CH/MULTI on page 57. 2 Start recording manually. Optional Components 59GB (Other models) To listen to select "2.1CH". 4 Start recording. Once you want to switch back to MD function, repeat the operation...
Operating Instructions
Page 75
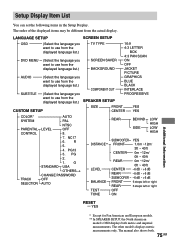
... different from the displayed language list.) CUSTOM SETUP TV TYPE SCREEN SAVER BACKGROUND COMPONENT OUT 16:9 4:3 LETTER BOX 4:3 PAN SCAN ON OFF JACKET PICTURE GRAPHICS BLUE BLACK ...INTERLACE PROGRESSIVE SPEAKER SETUP SIZE FRONT CENTER YES YES COLOR* SYSTEM PARENTAL CONTROL TRACK SELECTION AUTO PAL NTSC LEVEL OFF 8. 7. PG13 3. G STANDARD USA...models. ** In SPEAKER SETUP, the North American model's OSD displays both . 75GB The manual also shows both metric and imperial measurements. LANGUAGE SETUP SCREEN SETUP OSD (Select the language you...
... different from the displayed language list.) CUSTOM SETUP TV TYPE SCREEN SAVER BACKGROUND COMPONENT OUT 16:9 4:3 LETTER BOX 4:3 PAN SCAN ON OFF JACKET PICTURE GRAPHICS BLUE BLACK ...INTERLACE PROGRESSIVE SPEAKER SETUP SIZE FRONT CENTER YES YES COLOR* SYSTEM PARENTAL CONTROL TRACK SELECTION AUTO PAL NTSC LEVEL OFF 8. 7. PG13 3. G STANDARD USA...models. ** In SPEAKER SETUP, the North American model's OSD displays both . 75GB The manual also shows both metric and imperial measurements. LANGUAGE SETUP SCREEN SETUP OSD (Select the language you...

