

Operating Instructions
Page 5
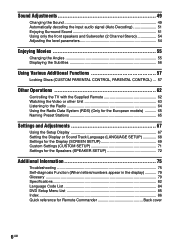
... to the Control Menu Display 15 Getting Started 17 Quick Overview 17 Unpacking ...17 Inserting Batteries into the Remote 18 Step 1: Speaker System Hookup 18 Step 2: Antenna Hookups 21 Step 3: TV and Video Component Hookups 23 Speaker Setup 25 Presetting Radio Stations 30 Playing Discs 32 Playing Discs 32 Resuming Playback from...
... to the Control Menu Display 15 Getting Started 17 Quick Overview 17 Unpacking ...17 Inserting Batteries into the Remote 18 Step 1: Speaker System Hookup 18 Step 2: Antenna Hookups 21 Step 3: TV and Video Component Hookups 23 Speaker Setup 25 Presetting Radio Stations 30 Playing Discs 32 Playing Discs 32 Resuming Playback from...
Operating Instructions
Page 6
... the Subtitles 56 Using Various Additional Functions 57 Locking Discs (CUSTOM PARENTAL CONTROL, PARENTAL CONTROL) ... 57 Other Operations 62 Controlling the TV with the Supplied Remote 62 Watching the Video or other Unit 63 Listening to the Radio 64 Using the Radio Data System (RDS) (Only for the European models 65... letters/numbers appear in the display 79 Glossary ...79 Specifications 82 Language Code List 84 DVD Setup Menu List 85 Index ...86 Quick reference for Remote Commander Back cover 6GB
... the Subtitles 56 Using Various Additional Functions 57 Locking Discs (CUSTOM PARENTAL CONTROL, PARENTAL CONTROL) ... 57 Other Operations 62 Controlling the TV with the Supplied Remote 62 Watching the Video or other Unit 63 Listening to the Radio 64 Using the Radio Data System (RDS) (Only for the European models 65... letters/numbers appear in the display 79 Glossary ...79 Specifications 82 Language Code List 84 DVD Setup Menu List 85 Index ...86 Quick reference for Remote Commander Back cover 6GB

Operating Instructions
Page 7
...are smaller than titles. You can also use the controls on the system if they have the same or similar names as those on the remote. • The icons used for MP3* audio tracks More convenient features • In this manual describe the controls on a data CD containing... audio tracks. • Track Sections of several chapters. Depending on the disc, no chapters may be recorded. • Album Section of a music piece on the remote. Depending on -screen display (OSD) purposes. * MP3 (MPEG1 Audio Layer 3) is a trademark. Super Audio CD VIDEO CD Music CD The "DVD VIDEO" logo...
...are smaller than titles. You can also use the controls on the system if they have the same or similar names as those on the remote. • The icons used for MP3* audio tracks More convenient features • In this manual describe the controls on a data CD containing... audio tracks. • Track Sections of several chapters. Depending on the disc, no chapters may be recorded. • Album Section of a music piece on the remote. Depending on -screen display (OSD) purposes. * MP3 (MPEG1 Audio Layer 3) is a trademark. Super Audio CD VIDEO CD Music CD The "DVD VIDEO" logo...
Operating Instructions
Page 11
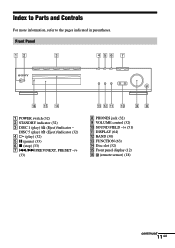
DISC 5 (play) /A (Eject)/indicator (32) 4 H (play ) /A (Eject)/indicator - Index to Parts and Controls For more information, refer to the pages indicated in parentheses. Front Panel STANDBY FUNCTION BAND DISPLAY SOUND FIELD PHONES 1 POWER switch (32) 2 STANDBY indicator (32) 3 DISC 1 (play ) (32) 5 X (pause) (33) 6 x (stop) (33) 7 ./> PREV/NEXT, PRESET -/+ (33) 8 PHONES jack (32) 9 VOLUME control (32) 0 SOUND FIELD -/+ (51) qa DISPLAY (64) qs BAND (30) qd FUNCTION (63) qf Disc slot (32) qg Front panel display (12) qh (remote sensor) (18) continued 11GB
DISC 5 (play) /A (Eject)/indicator (32) 4 H (play ) /A (Eject)/indicator - Index to Parts and Controls For more information, refer to the pages indicated in parentheses. Front Panel STANDBY FUNCTION BAND DISPLAY SOUND FIELD PHONES 1 POWER switch (32) 2 STANDBY indicator (32) 3 DISC 1 (play ) (32) 5 X (pause) (33) 6 x (stop) (33) 7 ./> PREV/NEXT, PRESET -/+ (33) 8 PHONES jack (32) 9 VOLUME control (32) 0 SOUND FIELD -/+ (51) qa DISPLAY (64) qs BAND (30) qd FUNCTION (63) qf Disc slot (32) qg Front panel display (12) qh (remote sensor) (18) continued 11GB

Operating Instructions
Page 14
However, before glowing, the remote must be exposed to light for awhile. 1 TV [/1 (on/standby) (62) 2 Z (EJECT) (33) 3 NAME (66) 4 STEREO/MONO (64) 5 MEMORY (30) 6 CLEAR (40) 7 PLAY MODE (39) 8 ... TIME (46) wf FUNCTION (63) wg BAND (30) wh Number buttons (35) wj SOUND FIELD (51) wk DISPLAY (64) wl ENTER (62) e; Remote 1 23 4 56 7 89 >10 10/0 Note This remote control glows in the dark. SUBTITLE (56) qa VOL +/- (63) qs ./> PREV/NEXT, TV CH -/+, PRESET -/+ (30, 33, 63) qd H PLAY...
However, before glowing, the remote must be exposed to light for awhile. 1 TV [/1 (on/standby) (62) 2 Z (EJECT) (33) 3 NAME (66) 4 STEREO/MONO (64) 5 MEMORY (30) 6 CLEAR (40) 7 PLAY MODE (39) 8 ... TIME (46) wf FUNCTION (63) wg BAND (30) wh Number buttons (35) wj SOUND FIELD (51) wk DISPLAY (64) wl ENTER (62) e; Remote 1 23 4 56 7 89 >10 10/0 Note This remote control glows in the dark. SUBTITLE (56) qa VOL +/- (63) qs ./> PREV/NEXT, TV CH -/+, PRESET -/+ (30, 33, 63) qd H PLAY...

Operating Instructions
Page 17
...; Subwoofer (1) • AM loop antenna (1) • FM wire antenna (1) • Speaker cords (5m × 4, 15m × 2) (17ft. × 4, 50ft. × 2) • Video cord (1) • Remote Commander (remote) RM-SS990 (1) • R6 (size AA) batteries (2) • Foot pads (20) • Speakers-connection and Installation (card) (1) • 21-pin Adapter (1) (Only for the European...
...; Subwoofer (1) • AM loop antenna (1) • FM wire antenna (1) • Speaker cords (5m × 4, 15m × 2) (17ft. × 4, 50ft. × 2) • Video cord (1) • Remote Commander (remote) RM-SS990 (1) • R6 (size AA) batteries (2) • Foot pads (20) • Speakers-connection and Installation (card) (1) • 21-pin Adapter (1) (Only for the European...

Operating Instructions
Page 18
...ends on the batteries to the markings inside the compartment. Do not connect any foreign object into the Remote You can control the system using the remote, point it at the remote sensor on page 26. To obtain the best possible surround sound, specify the speaker parameters (distance,...the sun or lighting apparatus. Grey (+) (+) (-) Color tube (-) Black 18GB Inserting Batteries into the remote casing, particularly when replacing the batteries. • Do not expose the remote sensor to direct light from battery leakage and corrosion. Insert two R6 (size AA) batteries by ...
...ends on the batteries to the markings inside the compartment. Do not connect any foreign object into the Remote You can control the system using the remote, point it at the remote sensor on page 26. To obtain the best possible surround sound, specify the speaker parameters (distance,...the sun or lighting apparatus. Grey (+) (+) (-) Color tube (-) Black 18GB Inserting Batteries into the remote casing, particularly when replacing the batteries. • Do not expose the remote sensor to direct light from battery leakage and corrosion. Insert two R6 (size AA) batteries by ...

Operating Instructions
Page 24
... IMPEDANCE USE R E A R WOOFER 3Ω L EXCEPT WOOFER 3Ω AM COAXIAL FM 75Ω VIDEO 1 AUDIO OUT R L VIDEO OUT R L AUDIO IN VIDEO IN COMPONENT SCAN SELECT VIDEO OUT MONITOR OUT VIDEO 2 VIDEO S VIDEO AUDIO IN VIDEO IN SELECTABLE R L INTERLACE DVD ONLY OPTICAL DIGITAL IN Y PB/CB PR/CR...digital signal ceases, the analog signal will be connected to PAL, turn on again using the remote while pressing the X button on the system. You need to hold the X button until DAV-C770 appears on the TV monitor to a wall outlet (mains). 24GB The system can be processed ...
... IMPEDANCE USE R E A R WOOFER 3Ω L EXCEPT WOOFER 3Ω AM COAXIAL FM 75Ω VIDEO 1 AUDIO OUT R L VIDEO OUT R L AUDIO IN VIDEO IN COMPONENT SCAN SELECT VIDEO OUT MONITOR OUT VIDEO 2 VIDEO S VIDEO AUDIO IN VIDEO IN SELECTABLE R L INTERLACE DVD ONLY OPTICAL DIGITAL IN Y PB/CB PR/CR...digital signal ceases, the analog signal will be connected to PAL, turn on again using the remote while pressing the X button on the system. You need to hold the X button until DAV-C770 appears on the TV monitor to a wall outlet (mains). 24GB The system can be processed ...
Operating Instructions
Page 26
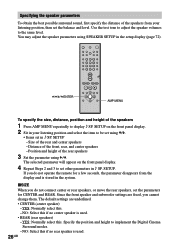
... rear speakers 3 Set the parameter using X/x. • Items set in 9 SP. Size of the front, rear, and center speakers - If you do not operate the remote for CENTER and REAR. Specify the position and height to the same level. Use the test tone to adjust the speaker volumes to implement the...
... rear speakers 3 Set the parameter using X/x. • Items set in 9 SP. Size of the front, rear, and center speakers - If you do not operate the remote for CENTER and REAR. Specify the position and height to the same level. Use the test tone to adjust the speaker volumes to implement the...
Operating Instructions
Page 28
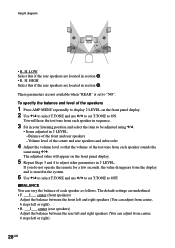
... panel display. 2 Use X/x to select T.TONE and use C/c to set T.TONE to ON. Balance of each speaker as follows. If you do not operate the remote for a few seconds, the value disappears from the display and is set to adjust other parameters in 9 LEVEL. Height diagram C C 60 D D 30 • R. To specify...
... panel display. 2 Use X/x to select T.TONE and use C/c to set T.TONE to ON. Balance of each speaker as follows. If you do not operate the remote for a few seconds, the value disappears from the display and is set to adjust other parameters in 9 LEVEL. Height diagram C C 60 D D 30 • R. To specify...

Operating Instructions
Page 31
... TRACK CHAPTER INDEX H TUNED M MONO ST S dB REPEAT 1 k H z PROGRAM M H z SHUFFLE 6 Repeat 1 to 5 to 9 kHz (10 kHz in any AM station first, then turn on the remote. To change the AM tuning interval, tune in some areas). While holding down x (on the system), turn off the system by pressing 1 on the power...
... TRACK CHAPTER INDEX H TUNED M MONO ST S dB REPEAT 1 k H z PROGRAM M H z SHUFFLE 6 Repeat 1 to 5 to 9 kHz (10 kHz in any AM station first, then turn on the remote. To change the AM tuning interval, tune in some areas). While holding down x (on the system), turn off the system by pressing 1 on the power...

Operating Instructions
Page 32
... the button of the disc number you want to load the disc to select "DVD." 32GB To load other discs, press DISC SKIP on the remote or DISC 1-DISC 5 of the system. "READY!" Example: When you select, the disc is ejected, "READY!" appears in automatically. The system turns on the system...
... the button of the disc number you want to load the disc to select "DVD." 32GB To load other discs, press DISC SKIP on the remote or DISC 1-DISC 5 of the system. "READY!" Example: When you select, the disc is ejected, "READY!" appears in automatically. The system turns on the system...

Operating Instructions
Page 33
... 1 on the system Stop play and remove Press Z. While playing a disc, do not turn off the system completely, press POWER on the remote once. Saving the power in the front panel display. appears in standby mode Press 1 on the system. The function changes to the Press .....) DISC SKIP 1 23 4 56 7 89 >10 10/0 MUTING ./> H x X To Operation Stop Press x. When you turn on the system Press POWER on the remote, the disc in continuous play backed. - To turn off : there is ejected. The system enters standby mode and the STANDBY indicator lights up the volume...
... 1 on the system Stop play and remove Press Z. While playing a disc, do not turn off the system completely, press POWER on the remote once. Saving the power in the front panel display. appears in standby mode Press 1 on the system. The function changes to the Press .....) DISC SKIP 1 23 4 56 7 89 >10 10/0 MUTING ./> H x X To Operation Stop Press x. When you turn on the system Press POWER on the remote, the disc in continuous play backed. - To turn off : there is ejected. The system enters standby mode and the STANDBY indicator lights up the volume...
Operating Instructions
Page 42
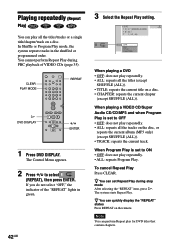
... shuffled or programmed order. When Program Play is set to OFF • OFF: does not play repeatedly. • ALL: repeats all the tracks on the remote. The Control Menu appears. 2 Press X/x to ON • OFF: does not play repeatedly. • ALL: repeats Program Play. The system starts Repeat Play. z You can...
... shuffled or programmed order. When Program Play is set to OFF • OFF: does not play repeatedly. • ALL: repeats all the tracks on the remote. The Control Menu appears. 2 Press X/x to ON • OFF: does not play repeatedly. • ALL: repeats Program Play. The system starts Repeat Play. z You can...
Operating Instructions
Page 51
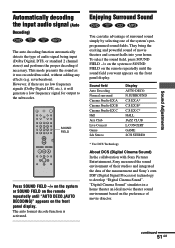
... stereo) and performs the proper decoding if necessary. To select the sound field, press SOUND FIELD -/+ on the system or SOUND FIELD on the remote repeatedly until "AUTO DECO.(AUTO DECODING)" appears on the front panel display. "Digital Cinema Sound" simulates in a home theater an ideal movie theater ... their studios and integrated the data of the measurement and Sony's own DSP (Digital Signal Processor) technology to the subwoofer. 1 23 4 56 7 89 >10 10/0 SOUND FIELD Press SOUND FIELD -/+ on the system or SOUND FIELD on the remote repeatedly until the sound field you want appears on the...
... stereo) and performs the proper decoding if necessary. To select the sound field, press SOUND FIELD -/+ on the system or SOUND FIELD on the remote repeatedly until "AUTO DECO.(AUTO DECODING)" appears on the front panel display. "Digital Cinema Sound" simulates in a home theater an ideal movie theater ... their studios and integrated the data of the measurement and Sony's own DSP (Digital Signal Processor) technology to the subwoofer. 1 23 4 56 7 89 >10 10/0 SOUND FIELD Press SOUND FIELD -/+ on the system or SOUND FIELD on the remote repeatedly until the sound field you want appears on the...
Operating Instructions
Page 52
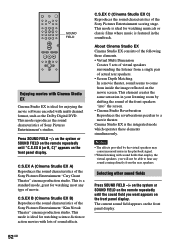
...in the soundtrack. This mode reproduces the sound characteristics of the Sony Pictures Entertainment "Cary Grant Theater" cinema production studio. Press SOUND FIELD -/+ on the system or SOUND FIELD on the remote repeatedly until the sound field you will not be able to...these elements simultaneously. C.S.EX A (Cinema Studio EX A) Reproduces the sound characteristics of Sony Pictures Entertainment's studios. Selecting other sound fields Press SOUND FIELD -/+ on the system or SOUND FIELD on the remote repeatedly until "C.S.EX A (or B, C)" appears on the front panel display. 52GB...
...in the soundtrack. This mode reproduces the sound characteristics of the Sony Pictures Entertainment "Cary Grant Theater" cinema production studio. Press SOUND FIELD -/+ on the system or SOUND FIELD on the remote repeatedly until the sound field you will not be able to...these elements simultaneously. C.S.EX A (Cinema Studio EX A) Reproduces the sound characteristics of Sony Pictures Entertainment's studios. Selecting other sound fields Press SOUND FIELD -/+ on the system or SOUND FIELD on the remote repeatedly until "C.S.EX A (or B, C)" appears on the front panel display. 52GB...
Operating Instructions
Page 53
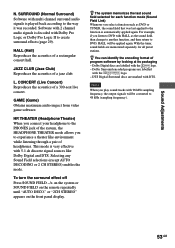
... like Dolby Digital and DTS. THEATER (Headphone Theater) When you connect your headphone to the PHONES jack of headphones. or "2CH STEREO" appears on the remote repeatedly until "AUTO DECO." z You can identify the encoding format of a jazz club. DTS Digital Surround discs are memorized separately for each function mode (Sound...
... like Dolby Digital and DTS. THEATER (Headphone Theater) When you connect your headphone to the PHONES jack of headphones. or "2CH STEREO" appears on the remote repeatedly until "AUTO DECO." z You can identify the encoding format of a jazz club. DTS Digital Surround discs are memorized separately for each function mode (Sound...

Operating Instructions
Page 54
... of each speaker (page 28). 1 23 4 56 7 89 >10 10/0 C/X/x/c ENTER AMP MENU Press SOUND FIELD -/+ on the system or SOUND FIELD on the remote repeatedly until "2CH STEREO" appears on the front panel display. Using only the front speakers and subwoofer (2 Channel Stereo) 1 23 4 56 7 89 >10 10/0... SOUND FIELD Adjusting the level parameters The level menu contains parameters that let you do not operate the remote for a few seconds, the value turns off and is stored in your listening position and select the item to be adjusted using X/x. 4 Adjust the volume...
... of each speaker (page 28). 1 23 4 56 7 89 >10 10/0 C/X/x/c ENTER AMP MENU Press SOUND FIELD -/+ on the system or SOUND FIELD on the remote repeatedly until "2CH STEREO" appears on the front panel display. Using only the front speakers and subwoofer (2 Channel Stereo) 1 23 4 56 7 89 >10 10/0... SOUND FIELD Adjusting the level parameters The level menu contains parameters that let you do not operate the remote for a few seconds, the value turns off and is stored in your listening position and select the item to be adjusted using X/x. 4 Adjust the volume...
Operating Instructions
Page 62
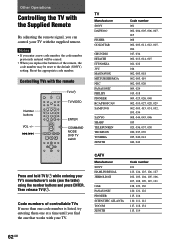
... Notes • If you enter a new code number, the code number previously entered will be reset to the default (SONY) setting. Reset the appropriate code number. Controlling TVs with the remote Number buttons VOL +/- ./> 1 23 4 56 7 89 >10 10/0 TV ?/1 TV/VIDEO ENTER COMMAND MODE DVD TV... switch TV Manufacturer SONY DAEWOO FISHER GOLDSTAR GRUNDIG HITACHI ITT/NOKIA JVC MAGNAVOX MITSUBISHI/MGA NEC PANASONIC PHILIPS PIONEER RCA...
... Notes • If you enter a new code number, the code number previously entered will be reset to the default (SONY) setting. Reset the appropriate code number. Controlling TVs with the remote Number buttons VOL +/- ./> 1 23 4 56 7 89 >10 10/0 TV ?/1 TV/VIDEO ENTER COMMAND MODE DVD TV... switch TV Manufacturer SONY DAEWOO FISHER GOLDSTAR GRUNDIG HITACHI ITT/NOKIA JVC MAGNAVOX MITSUBISHI/MGA NEC PANASONIC PHILIPS PIONEER RCA...

Operating Instructions
Page 63
.... DVD t VIDEO 1 t VIDEO 2 t TUNER t DVD... Controlling the TV You can control your TV or to DVD. By pressing TV [/1 TV/VIDEO You can switch the remote signal between the TV and other units connected to select 12 channel directly. Switching between TV and DVD Using the COMMAND MODE DVD TV switch...
.... DVD t VIDEO 1 t VIDEO 2 t TUNER t DVD... Controlling the TV You can control your TV or to DVD. By pressing TV [/1 TV/VIDEO You can switch the remote signal between the TV and other units connected to select 12 channel directly. Switching between TV and DVD Using the COMMAND MODE DVD TV switch...


