
Operating Instructions
Page 4
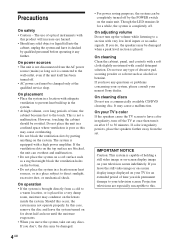
... operation • If the system is brought directly from a cold to a warm location, or is connected to the wall outlet, even if the unit itself has been turned off. • AC power cord must be completely turned off . Should this occur, the system may cause a malfunction. Do not use any discs. On cleaning discs Do not use of holding a still video image or on-screen display...
... operation • If the system is brought directly from a cold to a warm location, or is connected to the wall outlet, even if the unit itself has been turned off. • AC power cord must be completely turned off . Should this occur, the system may cause a malfunction. Do not use any discs. On cleaning discs Do not use of holding a still video image or on-screen display...
Operating Instructions
Page 6
... Supplied Remote 62 Using a Video or other Unit 63 Listening to the Radio 63 Naming Preset Stations 64 Settings and Adjustments 66 Using the Setup Display 66 Setting the Display or Sound Track Language (LANGUAGE SETUP 67 Settings for the Display (SCREEN SETUP 68 Custom Settings (CUSTOM SETUP 69 Settings for the Speakers (SPEAKER SETUP 70 Additional Information 74 Troubleshooting 74 Self-diagnosis Function (When letters/numbers appear in the display 77 Glossary ...77 Specifications 80 Language Code List 82 DVD Setup Menu List...
... Supplied Remote 62 Using a Video or other Unit 63 Listening to the Radio 63 Naming Preset Stations 64 Settings and Adjustments 66 Using the Setup Display 66 Setting the Display or Sound Track Language (LANGUAGE SETUP 67 Settings for the Display (SCREEN SETUP 68 Custom Settings (CUSTOM SETUP 69 Settings for the Speakers (SPEAKER SETUP 70 Additional Information 74 Troubleshooting 74 Self-diagnosis Function (When letters/numbers appear in the display 77 Glossary ...77 Specifications 80 Language Code List 82 DVD Setup Menu List...
Operating Instructions
Page 8
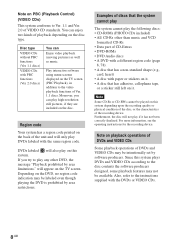
Depending on the DVD, no region code indication may be available. For more information, see the operating instructions for the recording device. Moreover, you try to play if it has not been correctly finalized. Furthermore, the disc will appear on the TV screen. Disc type VIDEO CDs without PBC functions (Ver. 1.1 discs) VIDEO CDs with the DVDs or VIDEO CDs. 8GB Play interactive software using menu screens displayed on the...
Depending on the DVD, no region code indication may be available. For more information, see the operating instructions for the recording device. Moreover, you try to play if it has not been correctly finalized. Furthermore, the disc will appear on the TV screen. Disc type VIDEO CDs without PBC functions (Ver. 1.1 discs) VIDEO CDs with the DVDs or VIDEO CDs. 8GB Play interactive software using menu screens displayed on the...
Operating Instructions
Page 18
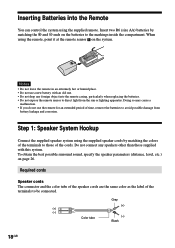
... from the sun or lighting apparatus. To obtain the best possible surround sound, specify the speaker parameters (distance, level, etc.) on the system. Doing so may cause a malfunction. • If you do not use a new battery with an old one. • Do not drop any speakers other than those of the terminals to be connected. Required cords Speaker cords The connector and the...
... from the sun or lighting apparatus. To obtain the best possible surround sound, specify the speaker parameters (distance, level, etc.) on the system. Doing so may cause a malfunction. • If you do not use a new battery with an old one. • Do not drop any speakers other than those of the terminals to be connected. Required cords Speaker cords The connector and the...
Operating Instructions
Page 23
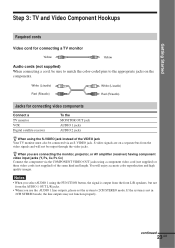
... select AUDIO 1 using a component video cord (not supplied) or three video cords (not supplied) of the VIDEO jack Your TV monitor must also be connected via the COMPONENT VIDEO OUT jacks using the FUNCTION button, the signal is not in 2CH STEREO mode, the line outputs may not function properly. S-video signals are connecting the monitor, projector, or AV amplifier (receiver) having component video input jacks (Y, PB, CB, PR, CR) Connect the component via an S-VIDEO jack. continued 23GB Notes • When you use the AUDIO 1 line outputs, please set the system...
... select AUDIO 1 using a component video cord (not supplied) or three video cords (not supplied) of the VIDEO jack Your TV monitor must also be connected via the COMPONENT VIDEO OUT jacks using the FUNCTION button, the signal is not in 2CH STEREO mode, the line outputs may not function properly. S-video signals are connecting the monitor, projector, or AV amplifier (receiver) having component video input jacks (Y, PB, CB, PR, CR) Connect the component via an S-VIDEO jack. continued 23GB Notes • When you use the AUDIO 1 line outputs, please set the system...
Operating Instructions
Page 24
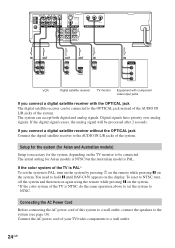
...) R OPTICAL DIGITAL IN AUDIO 2 FRONT R VIDEO MONITOR OUT CENTER FRONT L Y PB/CB PR/CR COMPONENT VIDEO OUT REAR R WOOFER REAR L SPEAKER IN OUT AUDIO AUDIO IN OUT L R OUT AUDIO OUT L R OUT OUTPUT OPTICAL IN INPUT VIDEO IN IN COMPOMENT VIDEO IN Y PB/B-Y PR/R-Y VCR Digital satellite receiver TV monitor Equipment with the OPTICAL jack The digital satellite receiver can accept both digital and analog signals. If the color system of the TV is necessary for the system, depending on the system. Connect the AC power cord...
...) R OPTICAL DIGITAL IN AUDIO 2 FRONT R VIDEO MONITOR OUT CENTER FRONT L Y PB/CB PR/CR COMPONENT VIDEO OUT REAR R WOOFER REAR L SPEAKER IN OUT AUDIO AUDIO IN OUT L R OUT AUDIO OUT L R OUT OUTPUT OPTICAL IN INPUT VIDEO IN IN COMPOMENT VIDEO IN Y PB/B-Y PR/R-Y VCR Digital satellite receiver TV monitor Equipment with the OPTICAL jack The digital satellite receiver can accept both digital and analog signals. If the color system of the TV is necessary for the system, depending on the system. Connect the AC power cord...
Operating Instructions
Page 29
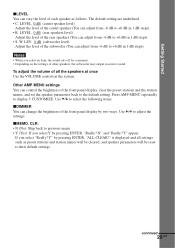
... system. W. Other AMP MENU settings You can adjust from -6 dB to the default setting. N" and "Really? is displayed and all the speakers at once Use the VOLUME control on the settings of the front panel display, clear the preset stations and the station names, and set the speaker parameters back to +6 dB in 1 dB steps). • R. LEV. 0 dB (subwoofer level) Adjust the level of the center speaker (You can control the brightness of other speakers, the subwoofer may output excessive sound. Use...
... system. W. Other AMP MENU settings You can adjust from -6 dB to the default setting. N" and "Really? is displayed and all the speakers at once Use the VOLUME control on the settings of the front panel display, clear the preset stations and the station names, and set the speaker parameters back to +6 dB in 1 dB steps). • R. LEV. 0 dB (subwoofer level) Adjust the level of the center speaker (You can control the brightness of other speakers, the subwoofer may output excessive sound. Use...
Operating Instructions
Page 47
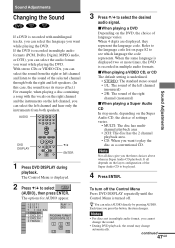
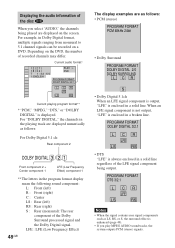
... 2: ENGLISH 3: FRENCH PLAY DVD PROGRAM FORMAT DOLBY DIGITAL 3/2.1 L CR LFE LS RS 3 Press X/x to play the disc as a conventional CD. When the same language is displayed two or more times, the DVD is turned off. To turn off the Control Menu Press DVD DISPLAY repeatedly until the Control Menu is recorded in multiple audio format, you want to select the desired audio signal. Each time you want while playing the DVD. Sound Adjustments Changing the Sound If a DVD is recorded with...
... 2: ENGLISH 3: FRENCH PLAY DVD PROGRAM FORMAT DOLBY DIGITAL 3/2.1 L CR LFE LS RS 3 Press X/x to play the disc as a conventional CD. When the same language is displayed two or more times, the DVD is turned off. To turn off the Control Menu Press DVD DISPLAY repeatedly until the Control Menu is recorded in multiple audio format, you want to select the desired audio signal. Each time you want while playing the DVD. Sound Adjustments Changing the Sound If a DVD is recorded with...
Operating Instructions
Page 48
... on the DVD, the number of the disc When you play MPEG AUDIO sound tracks, the system outputs PCM (stereo) signals. PROGRAM FORMAT DTS 3/2.1 L CR LFE LS RS Notes • When the signal contains rear signal components such as follows: For Dolby Digital 5.1 ch: Rear component 2 DOLBY DIGITAL 3 / 2 . 1 Front component 2 + Center component 1 LFE (Low Frequency Effect) component 1 **The letters in Dolby Digital format, multiple signals ranging from monaural to 5.1 channel signals can be recorded on the screen. When an LFE signal component is not output, "LFE" is enhanced...
... on the DVD, the number of the disc When you play MPEG AUDIO sound tracks, the system outputs PCM (stereo) signals. PROGRAM FORMAT DTS 3/2.1 L CR LFE LS RS Notes • When the signal contains rear signal components such as follows: For Dolby Digital 5.1 ch: Rear component 2 DOLBY DIGITAL 3 / 2 . 1 Front component 2 + Center component 1 LFE (Low Frequency Effect) component 1 **The letters in Dolby Digital format, multiple signals ranging from monaural to 5.1 channel signals can be recorded on the screen. When an LFE signal component is not output, "LFE" is enhanced...
Operating Instructions
Page 52
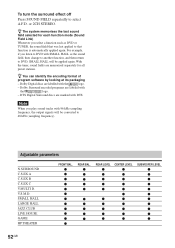
... to select A.F.D. V.S.M.D. z The system memorises the last sound field selected for all preset stations. Adjustable parameters N.SURROUND C.S.EX A C.S.EX B C.S.EX C V.MULTI D. To turn the surround effect off Press SOUND FIELD repeatedly to DVD with the logo. - For example, if you play sound tracks with 96 kHz sampling frequency, the output signals will be converted to that was last applied to 48 kHz (sampling frequency). z z z z z z z z z z REAR LEVEL z z z z z z z z z z CENTER LEVEL z z z z z z z z z z z SUBWOOFER LEVEL z z z z z z z z z z z 52GB Dolby Digital discs are...
... to select A.F.D. V.S.M.D. z The system memorises the last sound field selected for all preset stations. Adjustable parameters N.SURROUND C.S.EX A C.S.EX B C.S.EX C V.MULTI D. To turn the surround effect off Press SOUND FIELD repeatedly to DVD with the logo. - For example, if you play sound tracks with 96 kHz sampling frequency, the output signals will be converted to that was last applied to 48 kHz (sampling frequency). z z z z z z z z z z REAR LEVEL z z z z z z z z z z CENTER LEVEL z z z z z z z z z z z SUBWOOFER LEVEL z z z z z z z z z z z 52GB Dolby Digital discs are...
Operating Instructions
Page 58
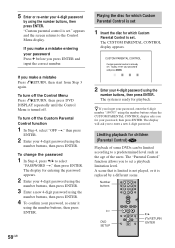
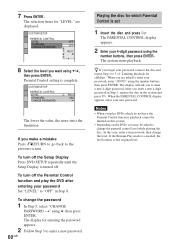
.... To turn off the Control Menu Press ORETURN, then press DVD DISPLAY repeatedly until the Control Menu is turned off the Custom Parental Control function 1 In Step 4, select "OFF t," then press ENTER. 2 Enter your 4-digit password using the number buttons, then press ENTER. The CUSTOM PARENTAL CONTROL display appears. The system is set. Limiting playback for which Custom Parental Control is ready for your password, then press ENTER. appears and the screen returns...
.... To turn off the Control Menu Press ORETURN, then press DVD DISPLAY repeatedly until the Control Menu is turned off the Custom Parental Control function 1 In Step 4, select "OFF t," then press ENTER. 2 Enter your 4-digit password using the number buttons, then press ENTER. The CUSTOM PARENTAL CONTROL display appears. The system is set. Limiting playback for which Custom Parental Control is ready for your password, then press ENTER. appears and the screen returns...
Operating Instructions
Page 60
... 5, select "CHANGE PASSWORD t" using the number buttons, then press ENTER. When you make a mistake Press ORETURN to go back to enter a new 4-digit password. Notes • When you enter a new 4-digit password in Step 3, replace the disc in Step 8. To turn off the Setup Display Press DVD SETUP repeatedly until the Setup Display is set 1 Insert the disc and press H. The system starts playback. If the Resume Play mode is complete. CUSTOM SETUP PARENTAL CONTROL LEVEL: STANDARD: CHANGE PASSWORD...
... 5, select "CHANGE PASSWORD t" using the number buttons, then press ENTER. When you make a mistake Press ORETURN to go back to enter a new 4-digit password. Notes • When you enter a new 4-digit password in Step 3, replace the disc in Step 8. To turn off the Setup Display Press DVD SETUP repeatedly until the Setup Display is set 1 Insert the disc and press H. The system starts playback. If the Resume Play mode is complete. CUSTOM SETUP PARENTAL CONTROL LEVEL: STANDARD: CHANGE PASSWORD...
Operating Instructions
Page 63
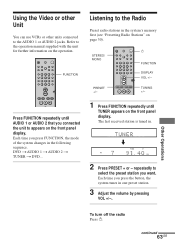
DVD t AUDIO 1 t AUDIO 2 t TUNER t DVD... 1 Press FUNCTION repeatedly until AUDIO 1 or AUDIO 2 that you press FUNCTION, the mode of the system changes in one preset station. 3 Adjust the volume by pressing VOL +/-. Each time you want. Other Operations To turn off the radio Press 1. TUNING +/- The last received station is tuned in the system's memory first (see "Presetting Radio Stations" on the front panel display. repeatedly to appears on page 30). STEREO/ MONO PRESET +/- 1 23 4 56 7 89 >10 10/0 1 FUNCTION DISPLAY VOL +/- Press FUNCTION repeatedly until...
DVD t AUDIO 1 t AUDIO 2 t TUNER t DVD... 1 Press FUNCTION repeatedly until AUDIO 1 or AUDIO 2 that you press FUNCTION, the mode of the system changes in one preset station. 3 Adjust the volume by pressing VOL +/-. Each time you want. Other Operations To turn off the radio Press 1. TUNING +/- The last received station is tuned in the system's memory first (see "Presetting Radio Stations" on the front panel display. repeatedly to appears on page 30). STEREO/ MONO PRESET +/- 1 23 4 56 7 89 >10 10/0 1 FUNCTION DISPLAY VOL +/- Press FUNCTION repeatedly until...

Operating Instructions
Page 69
... MODE: PARENTAL CONTROL TRACK SELECTION AUTO AUTO OFF xCOLOR SYSTEM for more than 15 minutes. Changes the video signal of this system according to turn off the screen saver. The screen saver will help prevent your TV uses a DUAL system, select AUTO. If the disc does not contain a jacket picture, the "GRAPHICS" picture appears. For details on the screen saver. If your display device from becoming damaged (ghosting). See page 24. A preset...
... MODE: PARENTAL CONTROL TRACK SELECTION AUTO AUTO OFF xCOLOR SYSTEM for more than 15 minutes. Changes the video signal of this system according to turn off the screen saver. The screen saver will help prevent your TV uses a DUAL system, select AUTO. If the disc does not contain a jacket picture, the "GRAPHICS" picture appears. For details on the screen saver. If your display device from becoming damaged (ghosting). See page 24. A preset...
Operating Instructions
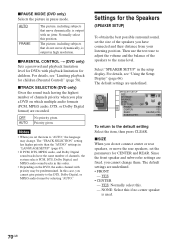
Page 70
... test tone to adjust the volume and the balance of channels, the system selects PCM, DTS, Dolby Digital, and MPEG audio sound tracks in high resolution. NONE: Select this case, you have the same number of the speakers to the default setting Select the item, then press CLEAR. xTRACK SELECTION (DVD only) Gives the sound track having the highest number of the speakers you cannot give priority to "AUTO," the language may be predetermined. Select "SPEAKER SETUP" in pause mode...
... test tone to adjust the volume and the balance of channels, the system selects PCM, DTS, Dolby Digital, and MPEG audio sound tracks in high resolution. NONE: Select this case, you have the same number of the speakers to the default setting Select the item, then press CLEAR. xTRACK SELECTION (DVD only) Gives the sound track having the highest number of the speakers you cannot give priority to "AUTO," the language may be predetermined. Select "SPEAKER SETUP" in pause mode...

Operating Instructions
Page 74
... the audio components. , The plugs and jacks are connected correctly and securely. , Adjust the front balance parameter in Slowmotion Play mode. Picture There is no sound. , The connecting cord is not connected securely. , The connecting cord is damaged. , Press MUTING on the remote if "MUTING ON" is performed. If you still experience problems even when you play mode. , Fast forward or fast reverse is displayed on the front panel display. , The protective device...
... the audio components. , The plugs and jacks are connected correctly and securely. , Adjust the front balance parameter in Slowmotion Play mode. Picture There is no sound. , The connecting cord is not connected securely. , The connecting cord is damaged. , Press MUTING on the remote if "MUTING ON" is performed. If you still experience problems even when you play mode. , Fast forward or fast reverse is displayed on the front panel display. , The protective device...
Operating Instructions
Page 75
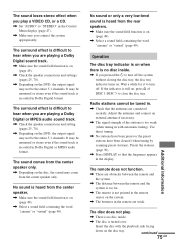
... the sound field function is difficult to turn off . The sound comes from the center speaker only. , Depending on the system. , The batteries in Dolby Digital format. Preset the stations (page 30). , Press DISPLAY so that the frequency appears in . , Check that the antennas are playing a Dolby Digital or MPEG audio sound track. , Check the speaker connections and setting (pages 25, 70). , Depending on the DVD, the output signal may not be monaural or stereo even...
... the sound field function is difficult to turn off . The sound comes from the center speaker only. , Depending on the system. , The batteries in Dolby Digital format. Preset the stations (page 30). , Press DISPLAY so that the frequency appears in . , Check that the antennas are playing a Dolby Digital or MPEG audio sound track. , Check the speaker connections and setting (pages 25, 70). , Depending on the DVD, the output signal may not be monaural or stereo even...
Operating Instructions
Page 76
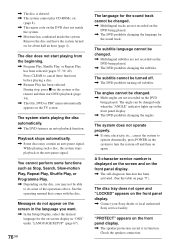
... lights up on again. See the operating manual that comes with the disc. The angles cannot be able to do not appear on -screen display in function. The angle can be turned off. , The DVD prohibits turning off and then on the front panel display. , The DVD prohibits changing the angles. The system does not operate properly. , If static electricity, etc., causes the system to operate abnormally, press POWER...
... lights up on again. See the operating manual that comes with the disc. The angles cannot be able to do not appear on -screen display in function. The angle can be turned off. , The DVD prohibits turning off and then on the front panel display. , The DVD prohibits changing the angles. The system does not operate properly. , If static electricity, etc., causes the system to operate abnormally, press POWER...
Operating Instructions
Page 84
... PLAY MODE 37 Preset Station 30, 63 Program Play 37 Q Quick Overview 17 R Radio 63 Rear Panel 13 Region code 8, 78 Remote 14, 62 REPEAT 40 RESET 67 Resume Play 34 S S VIDEO 23 Scan 41 SCENE 42 Scene 7 SCREEN SAVER 69 SCREEN SETUP 68 SHUFFLE 39 Shuffle Play 39 SIZE 70 Slow-motion Play 41 Sound Field 49 SPEAKER SETUP 70 Speaker System Hookup 18 SUBTITLE 55, 67 Super Audio CD 79 T TEST TONE 72 TIME SEARCH 42, 43 TIME...
... PLAY MODE 37 Preset Station 30, 63 Program Play 37 Q Quick Overview 17 R Radio 63 Rear Panel 13 Region code 8, 78 Remote 14, 62 REPEAT 40 RESET 67 Resume Play 34 S S VIDEO 23 Scan 41 SCENE 42 Scene 7 SCREEN SAVER 69 SCREEN SETUP 68 SHUFFLE 39 Shuffle Play 39 SIZE 70 Slow-motion Play 41 Sound Field 49 SPEAKER SETUP 70 Speaker System Hookup 18 SUBTITLE 55, 67 Super Audio CD 79 T TEST TONE 72 TIME SEARCH 42, 43 TIME...

Operating Instructions
Page 88
... Sony DVD products. TV : Adjust the TV volume. qf DVD TOP MENU Displays the title menu on and off the power of settings. wd TIME Displays the playing time of FM stereo reception. 5 MEMORY Press to store a preset station. 6 CLEAR Press to return to use. eh AMP MENU Displays the speaker set up parameters on the front panel display. * Depending on the TV screen to set , you want to the Continuous play, etc. 7 PLAY MODE Selects program or shuffle play mode. 8 AUDIO Changes the sound while playing a DVD or VIDEO...
... Sony DVD products. TV : Adjust the TV volume. qf DVD TOP MENU Displays the title menu on and off the power of settings. wd TIME Displays the playing time of FM stereo reception. 5 MEMORY Press to store a preset station. 6 CLEAR Press to return to use. eh AMP MENU Displays the speaker set up parameters on the front panel display. * Depending on the TV screen to set , you want to the Continuous play, etc. 7 PLAY MODE Selects program or shuffle play mode. 8 AUDIO Changes the sound while playing a DVD or VIDEO...

