

Operating Instructions
Page 2
...with general house waste, dispose of it correctly as a CLASS 1 LASER product. Refer servicing to operate this manual could void your Sony dealer regarding this equipment does cause harmful interference to radio or television reception, which the receiver is no guarantee that may cause harmful... on a circuit different from that the cable ground shall be connected to the grounding system of the building, as vases, on the rear exterior. Refer to disassemble the cabinet. DAV-C450 Serial No CAUTION As the laser beam used in a particular installation. These limits are...
...with general house waste, dispose of it correctly as a CLASS 1 LASER product. Refer servicing to operate this manual could void your Sony dealer regarding this equipment does cause harmful interference to radio or television reception, which the receiver is no guarantee that may cause harmful... on a circuit different from that the cable ground shall be connected to the grounding system of the building, as vases, on the rear exterior. Refer to disassemble the cabinet. DAV-C450 Serial No CAUTION As the laser beam used in a particular installation. These limits are...
Operating Instructions
Page 3
ENERGY STAR® is a U.S. Thank you for purchasing this manual thoroughly and retain it for energy efficiency. 3GB registered mark. Before operating this system, please read this Sony Compact AV System. As an ENERGY STAR® partner, Sony Corporation has determined that this product meets the ENERGY STAR® guidelines for future reference. Welcome! For the customers in Canada CAUTION TO PREVENT ELECTRIC SHOCK, DO NOT USE THIS POLARIZED AC PLUG WITH AN EXTENSION CORD, RECEPTACLE OR OTHER OUTLET UNLESS THE BLADES CAN BE FULLY INSERTED TO PREVENT BLADE EXPOSURE.
ENERGY STAR® is a U.S. Thank you for purchasing this manual thoroughly and retain it for energy efficiency. 3GB registered mark. Before operating this system, please read this Sony Compact AV System. As an ENERGY STAR® partner, Sony Corporation has determined that this product meets the ENERGY STAR® guidelines for future reference. Welcome! For the customers in Canada CAUTION TO PREVENT ELECTRIC SHOCK, DO NOT USE THIS POLARIZED AC PLUG WITH AN EXTENSION CORD, RECEPTACLE OR OTHER OUTLET UNLESS THE BLADES CAN BE FULLY INSERTED TO PREVENT BLADE EXPOSURE.
Operating Instructions
Page 4
...qualified personnel before operating it any questions or problems concerning your system, please consult your television screen. Should this . Though the LED remains lit for an extended period of time, the cabinet becomes hot to your nearest Sony dealer. On cleaning discs Do not use of holding a... still video image or on-screen display image on the lenses inside the system. If you have color irregularity, turn up in the system. • At high volume, over long...
...qualified personnel before operating it any questions or problems concerning your system, please consult your television screen. Should this . Though the LED remains lit for an extended period of time, the cabinet becomes hot to your nearest Sony dealer. On cleaning discs Do not use of holding a... still video image or on-screen display image on the lenses inside the system. If you have color irregularity, turn up in the system. • At high volume, over long...
Operating Instructions
Page 5
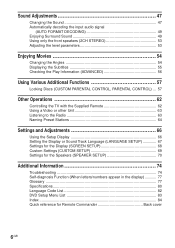
Table of Contents WARNING ...2 Welcome! ...3 Precautions ...4 About this Manual 7 This system Can Play the Following Discs 7 Notes about the Discs 9 Note on DVD 5-disc changer with EXCHANGE mechanism 10 Index to Parts and Controls 11 Guide ...to the Control Menu Display (Magic Pad 15 Getting Started 17 Quick Overview 17 Unpacking ...17 Inserting Batteries into the Remote 18 Step 1: Speaker System Hookup 18 Step 2: Antenna Hookups 21 Step 3: TV and Video Component Hookups 23 Speaker Setup 25 Presetting Radio Stations 30 Playing Discs 32 Playing Discs...
Table of Contents WARNING ...2 Welcome! ...3 Precautions ...4 About this Manual 7 This system Can Play the Following Discs 7 Notes about the Discs 9 Note on DVD 5-disc changer with EXCHANGE mechanism 10 Index to Parts and Controls 11 Guide ...to the Control Menu Display (Magic Pad 15 Getting Started 17 Quick Overview 17 Unpacking ...17 Inserting Batteries into the Remote 18 Step 1: Speaker System Hookup 18 Step 2: Antenna Hookups 21 Step 3: TV and Video Component Hookups 23 Speaker Setup 25 Presetting Radio Stations 30 Playing Discs 32 Playing Discs...
Operating Instructions
Page 6
Sound Adjustments 47 Changing the Sound 47 Automatically decoding the input audio signal (AUTO FORMAT DECODING 49 Enjoying Surround Sound 49 Using only the front speakers (2CH STEREO 53 Adjusting the level parameters 53 Enjoying Movies 54 Changing the Angles 54 Displaying the Subtitles 55 Checking the Play Information (ADVANCED 56 Using Various Additional Functions 57 Locking Discs (CUSTOM PARENTAL CONTROL, PARENTAL CONTROL) ... 57 Other Operations 62 Controlling the TV with the Supplied Remote 62 Using a Video or other Unit 63 Listening to the Radio 63 Naming Preset Stations ...
Sound Adjustments 47 Changing the Sound 47 Automatically decoding the input audio signal (AUTO FORMAT DECODING 49 Enjoying Surround Sound 49 Using only the front speakers (2CH STEREO 53 Adjusting the level parameters 53 Enjoying Movies 54 Changing the Angles 54 Displaying the Subtitles 55 Checking the Play Information (ADVANCED 56 Using Various Additional Functions 57 Locking Discs (CUSTOM PARENTAL CONTROL, PARENTAL CONTROL) ... 57 Other Operations 62 Controlling the TV with the Supplied Remote 62 Using a Video or other Unit 63 Listening to the Radio 63 Naming Preset Stations ...
Operating Instructions
Page 7
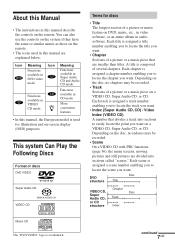
... to easily locate the point you want . Each scene is assigned a track number enabling you to locate the track you want on the remote. This system Can Play the Following Discs Format of discs DVD VIDEO Super Audio CD VIDEO CD Terms for illustration and on a VIDEO CD, Super Audio CD...; Index (Super Audio CD, CD) / Video Index (VIDEO CD) A number that are smaller than titles. continued 7GB You can also use the controls on the system if they have the same or similar names as those on the remote. • The icons used for discs • Title The longest section of...
... to easily locate the point you want . Each scene is assigned a track number enabling you to locate the track you want on the remote. This system Can Play the Following Discs Format of discs DVD VIDEO Super Audio CD VIDEO CD Terms for illustration and on a VIDEO CD, Super Audio CD...; Index (Super Audio CD, CD) / Video Index (VIDEO CD) A number that are smaller than titles. continued 7GB You can also use the controls on the system if they have the same or similar names as those on the remote. • The icons used for discs • Title The longest section of...
Operating Instructions
Page 8
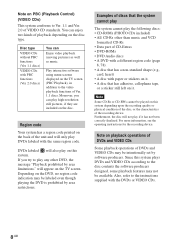
... the message "Playback prohibited by area restrictions. Depending on the TV screen. Play interactive software using menu screens displayed on this system plays DVDs and VIDEO CDs according to the disc contents the software producers designed, some playback features may be played on the TV...instructions for the recording device. Examples of discs that has adhesive, cellophane tape, or a sticker still left on the disc. Since this system depending upon the recording quality or physical condition of the disc, or the characteristics of CD-Extras • DVD-ROMs • DVD Audio...
... the message "Playback prohibited by area restrictions. Depending on the TV screen. Play interactive software using menu screens displayed on this system plays DVDs and VIDEO CDs according to the disc contents the software producers designed, some playback features may be played on the TV...instructions for the recording device. Examples of discs that has adhesive, cellophane tape, or a sticker still left on the disc. Since this system depending upon the recording quality or physical condition of the disc, or the characteristics of CD-Extras • DVD-ROMs • DVD Audio...
Operating Instructions
Page 9
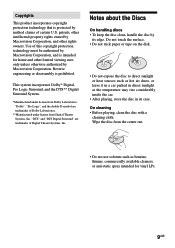
... are trademarks of Dolby Laboratories. **Manufactured under license from Dolby Laboratories. "DTS" and "DTS Digital Surround" are trademarks of Digital Theater Systems, Inc. Notes about the Discs On handling discs • To keep the disc clean, handle the disc by method claims of this ...other rights owners. Use of certain U.S. Reverse engineering or disassembly is protected by its case. This system incorporates Dolby* Digital, Pro Logic Surround, and the DTS** Digital Surround System. *Manufactured under license from the center out. • Do not use solvents such as the ...
... are trademarks of Dolby Laboratories. **Manufactured under license from Dolby Laboratories. "DTS" and "DTS Digital Surround" are trademarks of Digital Theater Systems, Inc. Notes about the Discs On handling discs • To keep the disc clean, handle the disc by method claims of this ...other rights owners. Use of certain U.S. Reverse engineering or disassembly is protected by its case. This system incorporates Dolby* Digital, Pro Logic Surround, and the DTS** Digital Surround System. *Manufactured under license from the center out. • Do not use solvents such as the ...
Operating Instructions
Page 10
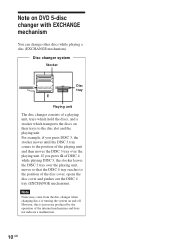
...pushes out the DISC 4 tray (EXCHANGE mechanism). Note on and off. Note Noise may come from the disc changer when changing discs or turning the system on DVD 5-disc changer with EXCHANGE mechanism You can change other discs while playing a disc (EXCHANGE mechanism). Disc changer... system Stocker 1 2 4 4 3 5 Disc tray Playing unit The disc changer consists of the internal mechanisms and does not indicate a malfunction. 10GB If you press DISC 3, the ...
...pushes out the DISC 4 tray (EXCHANGE mechanism). Note on and off. Note Noise may come from the disc changer when changing discs or turning the system on DVD 5-disc changer with EXCHANGE mechanism You can change other discs while playing a disc (EXCHANGE mechanism). Disc changer... system Stocker 1 2 4 4 3 5 Disc tray Playing unit The disc changer consists of the internal mechanisms and does not indicate a malfunction. 10GB If you press DISC 3, the ...

Operating Instructions
Page 11
SOUND FIELD +/- (49) qa DISPLAY (49, 64) qs BAND (30) qd FUNCTION (63) qf (remote sensor) (18) qg Disc tray (32) continued 11GB Front Panel 1 POWER switch/indicator (32) 2 DISC 1 (play) / A (open/close)-DISC 5 (play) / A (open/close) (32) 3 Front panel display (12) 4 ./> PREV/NEXT, PRESET +/- (30, 33) 5 H (play) (32) 6 X (pause) (33) 7 x (stop) (33) 8 PHONES jack (32) 9 VOLUME control (32) q; Index to Parts and Controls For more information, refer to the pages indicated in parentheses.
SOUND FIELD +/- (49) qa DISPLAY (49, 64) qs BAND (30) qd FUNCTION (63) qf (remote sensor) (18) qg Disc tray (32) continued 11GB Front Panel 1 POWER switch/indicator (32) 2 DISC 1 (play) / A (open/close)-DISC 5 (play) / A (open/close) (32) 3 Front panel display (12) 4 ./> PREV/NEXT, PRESET +/- (30, 33) 5 H (play) (32) 6 X (pause) (33) 7 x (stop) (33) 8 PHONES jack (32) 9 VOLUME control (32) q; Index to Parts and Controls For more information, refer to the pages indicated in parentheses.

Operating Instructions
Page 12
Front Panel Display When playing back a DVD Disc mode Playing Current title status number Current chapter number Current sound ALL1DISC S AUTO TITLE PRO LOGIC DIGITAL FM AM NTSCPBC ANGLE TRACK CHAPTER INDEX H TUNED M MONO ST S dB REPEAT 1 k H z PROGRAM M H z SHUFFLE Current surround format Lights up when you can change the angle Playing time Current play mode When playing back a Super Audio CD, CD, or VIDEO CD Disc mode Current index number Current track (The index indicator does not number appear during Super Audio CD playback.) Current sound ALL1DISC S AUTO TITLE PRO ...
Front Panel Display When playing back a DVD Disc mode Playing Current title status number Current chapter number Current sound ALL1DISC S AUTO TITLE PRO LOGIC DIGITAL FM AM NTSCPBC ANGLE TRACK CHAPTER INDEX H TUNED M MONO ST S dB REPEAT 1 k H z PROGRAM M H z SHUFFLE Current surround format Lights up when you can change the angle Playing time Current play mode When playing back a Super Audio CD, CD, or VIDEO CD Disc mode Current index number Current track (The index indicator does not number appear during Super Audio CD playback.) Current sound ALL1DISC S AUTO TITLE PRO ...
Operating Instructions
Page 14
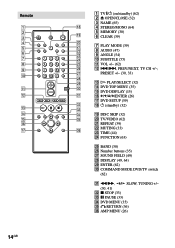
TV/VIDEO (62) wa REPEAT (39) ws MUTING (33) wd TIME (44) wf FUNCTION (63) wg BAND (30) wh Number buttons (35) wj SOUND FIELD (49) wk DISPLAY (49, 64) wl ENTER (62) e; Remote 1 23 4 56 7 89 >10 10/0 14GB 1 TV [/1 (on/standby) (62) 2 Z OPEN/CLOSE (32) 3 NAME (65) 4 STEREO/MONO (64) 5 MEMORY (30) 6 CLEAR (39) 7 PLAY MODE (39) 8 AUDIO (47) 9 ANGLE (54) q; SUBTITLE (55) qa VOL +/- (62) qs ./>, PREV/NEXT, TV CH +/-, PRESET +/- (30, 33) qd H PLAY/SELECT (32) qf DVD TOP MENU (35) qg DVD DISPLAY (15) qh C/X/x/c/ENTER (26) qj DVD SETUP (59) qk 1 (standby) (32) ql DISC SKIP (32) w; COMMAND MODE ...
TV/VIDEO (62) wa REPEAT (39) ws MUTING (33) wd TIME (44) wf FUNCTION (63) wg BAND (30) wh Number buttons (35) wj SOUND FIELD (49) wk DISPLAY (49, 64) wl ENTER (62) e; Remote 1 23 4 56 7 89 >10 10/0 14GB 1 TV [/1 (on/standby) (62) 2 Z OPEN/CLOSE (32) 3 NAME (65) 4 STEREO/MONO (64) 5 MEMORY (30) 6 CLEAR (39) 7 PLAY MODE (39) 8 AUDIO (47) 9 ANGLE (54) q; SUBTITLE (55) qa VOL +/- (62) qs ./>, PREV/NEXT, TV CH +/-, PRESET +/- (30, 33) qd H PLAY/SELECT (32) qf DVD TOP MENU (35) qg DVD DISPLAY (15) qh C/X/x/c/ENTER (26) qj DVD SETUP (59) qk 1 (standby) (32) ql DISC SKIP (32) w; COMMAND MODE ...
Operating Instructions
Page 15
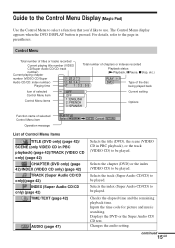
Selects the track (Super Audio CD/CD) to be played. continued 15GB Selects the chapter (DVD) or the index (VIDEO CD) to be played. Control Menu Total number of titles or tracks recorded Current playing title number (VIDEO Total number of chapters or indexes recorded CD/Super Audio CD/CD: track Playback status number) Current playing chapter (NPlayback, XPause, xStop, etc.) number (VIDEO CD/Super Audio CD/CD: index number) 1 2 ( 2 7 ) 1 8 ( 3 4 ) PLAY DVD Type of the disc Playing time T 1:32:55 being played back Icon of selected Control Menu item Control Menu items OFF ...
Selects the track (Super Audio CD/CD) to be played. continued 15GB Selects the chapter (DVD) or the index (VIDEO CD) to be played. Control Menu Total number of titles or tracks recorded Current playing title number (VIDEO Total number of chapters or indexes recorded CD/Super Audio CD/CD: track Playback status number) Current playing chapter (NPlayback, XPause, xStop, etc.) number (VIDEO CD/Super Audio CD/CD: index number) 1 2 ( 2 7 ) 1 8 ( 3 4 ) PLAY DVD Type of the disc Playing time T 1:32:55 being played back Icon of selected Control Menu item Control Menu items OFF ...

Operating Instructions
Page 16
Checks the information (bit rate or layer) on the disc. You can also set the REPEAT PLAY setting to items such as follows: , Control Menu display m ADVANCED display (Appears if you press DVD DISPLAY, the Control Menu display changes as picture and sound. See page 56.) m Control Menu display off The Control Menu items are different depending on the disc while playing a DVD. Plays the entire disc (all titles/all tracks) repeatedly, or one disc or all discs. Sets the disc to the default setting. CUSTOM Setup By using the Setup Display, you set a language for the subtitles and the...
Checks the information (bit rate or layer) on the disc. You can also set the REPEAT PLAY setting to items such as follows: , Control Menu display m ADVANCED display (Appears if you press DVD DISPLAY, the Control Menu display changes as picture and sound. See page 56.) m Control Menu display off The Control Menu items are different depending on the disc while playing a DVD. Plays the entire disc (all titles/all tracks) repeatedly, or one disc or all discs. Sets the disc to the default setting. CUSTOM Setup By using the Setup Display, you set a language for the subtitles and the...
Operating Instructions
Page 17
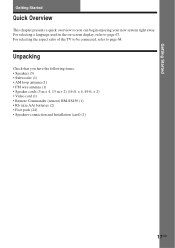
Unpacking Check that you can begin enjoying your new system right away. For selecting the aspect ratio of the TV to be connected, refer to page 67. For selecting a language used in the on-screen ...
Unpacking Check that you can begin enjoying your new system right away. For selecting the aspect ratio of the TV to be connected, refer to page 67. For selecting a language used in the on-screen ...
Operating Instructions
Page 18
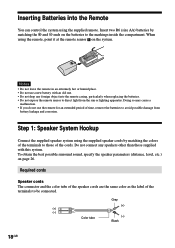
... remote sensor on the batteries to be connected. Doing so may cause a malfunction. • If you do not use a new battery with this system. Notes • Do not leave the remote in an extremely hot or humid place. • Do not use the remote for an extended period.... To obtain the best possible surround sound, specify the speaker parameters (distance, level, etc.) on page 26. Step 1: Speaker System Hookup Connect the supplied speaker system using the supplied remote. Required cords Speaker cords The connector and the color tube of the speaker cords are the same color as...
... remote sensor on the batteries to be connected. Doing so may cause a malfunction. • If you do not use a new battery with this system. Notes • Do not leave the remote in an extremely hot or humid place. • Do not use the remote for an extended period.... To obtain the best possible surround sound, specify the speaker parameters (distance, level, etc.) on page 26. Step 1: Speaker System Hookup Connect the supplied speaker system using the supplied remote. Required cords Speaker cords The connector and the color tube of the speaker cords are the same color as...

Operating Instructions
Page 19
Getting Started Terminals for connecting the speakers Connect the Front speakers Rear speakers Center speaker Subwoofer To the SPEAKER FRONT L (white) and R (red) terminals SPEAKER REAR L (blue) and R (gray) terminals SPEAKER CENTER (green) terminal SPEAKER WOOFER (purple) terminal Front speaker (R) Center speaker Front speaker (L) Color label AM COAXIAL FM 75Ω OUT IN L R AUDIO 1 IN L S VIDEO (DVD ONLY) R OPTICAL DIGITAL IN AUDIO 2 FRONT R VIDEO MONITOR OUT CENTER FRONT L Y PB/CB PR/CR COMPONENT VIDEO OUT REAR R WOOFER REAR L SPEAKER Rear speaker (R) Subwoofer ...
Getting Started Terminals for connecting the speakers Connect the Front speakers Rear speakers Center speaker Subwoofer To the SPEAKER FRONT L (white) and R (red) terminals SPEAKER REAR L (blue) and R (gray) terminals SPEAKER CENTER (green) terminal SPEAKER WOOFER (purple) terminal Front speaker (R) Center speaker Front speaker (L) Color label AM COAXIAL FM 75Ω OUT IN L R AUDIO 1 IN L S VIDEO (DVD ONLY) R OPTICAL DIGITAL IN AUDIO 2 FRONT R VIDEO MONITOR OUT CENTER FRONT L Y PB/CB PR/CR COMPONENT VIDEO OUT REAR R WOOFER REAR L SPEAKER Rear speaker (R) Subwoofer ...
Operating Instructions
Page 20
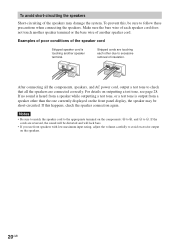
... front speakers with low maximum input rating, adjust the volume carefully to avoid excessive output on the front panel display, the speaker may damage the system. For details on the components: 3 to 3, and # to excessive removal of the speaker cord Stripped speaker cord is output from a speaker while outputting a test tone...
... front speakers with low maximum input rating, adjust the volume carefully to avoid excessive output on the front panel display, the speaker may damage the system. For details on the components: 3 to 3, and # to excessive removal of the speaker cord Stripped speaker cord is output from a speaker while outputting a test tone...
Operating Instructions
Page 21
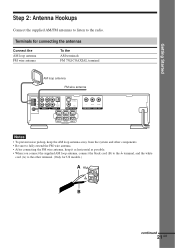
... L Y PB/CB PR/CR COMPONENT VIDEO OUT REAR R WOOFER REAR L SPEAKER Notes • To prevent noise pickup, keep the AM loop antenna away from the system and other components. • Be sure to fully extend the FM wire antenna. • After connecting the FM wire antenna, keep it as horizontal as...
... L Y PB/CB PR/CR COMPONENT VIDEO OUT REAR R WOOFER REAR L SPEAKER Notes • To prevent noise pickup, keep the AM loop antenna away from the system and other components. • Be sure to fully extend the FM wire antenna. • After connecting the FM wire antenna, keep it as horizontal as...

Operating Instructions
Page 22
To prevent a gas explosion, do not connect the ground wire to protect against lightning. Outdoor FM antenna System AM Ground wire (not supplied) COAXIAL FM 75Ω To ground Note If you have poor FM reception Use a 75-ohms coaxial cable (not supplied) to connect the system to an outdoor FM antenna as shown below. z If you connect the system to an outdoor antenna, ground it to a gas pipe. 22GB
To prevent a gas explosion, do not connect the ground wire to protect against lightning. Outdoor FM antenna System AM Ground wire (not supplied) COAXIAL FM 75Ω To ground Note If you have poor FM reception Use a 75-ohms coaxial cable (not supplied) to connect the system to an outdoor FM antenna as shown below. z If you connect the system to an outdoor antenna, ground it to a gas pipe. 22GB