
Operating Instructions
Page 5
... and Controls 11 Guide to the Control Menu Display (Magic Pad 15 Getting Started 17 Quick Overview 17 Unpacking ...17 Inserting Batteries into the Remote 18 Step 1: Speaker System Hookup 18 Step 2: Antenna Hookups 21 Step 3: TV and Video Component Hookups 23 Speaker Setup 25 Presetting Radio Stations 30 Playing Discs 32...
... and Controls 11 Guide to the Control Menu Display (Magic Pad 15 Getting Started 17 Quick Overview 17 Unpacking ...17 Inserting Batteries into the Remote 18 Step 1: Speaker System Hookup 18 Step 2: Antenna Hookups 21 Step 3: TV and Video Component Hookups 23 Speaker Setup 25 Presetting Radio Stations 30 Playing Discs 32...
Operating Instructions
Page 6
... Information (ADVANCED 56 Using Various Additional Functions 57 Locking Discs (CUSTOM PARENTAL CONTROL, PARENTAL CONTROL) ... 57 Other Operations 62 Controlling the TV with the Supplied Remote 62 Using a Video or other Unit 63 Listening to the Radio 63 Naming Preset Stations 64 Settings and Adjustments 66 Using the Setup Display 66... letters/numbers appear in the display 77 Glossary ...77 Specifications 80 Language Code List 82 DVD Setup Menu List 83 Index ...84 Quick reference for Remote Commander Back cover 6GB
... Information (ADVANCED 56 Using Various Additional Functions 57 Locking Discs (CUSTOM PARENTAL CONTROL, PARENTAL CONTROL) ... 57 Other Operations 62 Controlling the TV with the Supplied Remote 62 Using a Video or other Unit 63 Listening to the Radio 63 Naming Preset Stations 64 Settings and Adjustments 66 Using the Setup Display 66... letters/numbers appear in the display 77 Glossary ...77 Specifications 80 Language Code List 82 DVD Setup Menu List 83 Index ...84 Quick reference for Remote Commander Back cover 6GB
Operating Instructions
Page 7
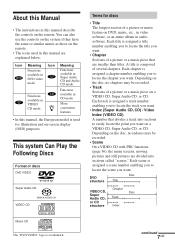
... you to locate the scene you want on DVD, music, etc., in video software, or an entire album in audio software. Depending on the remote. Disc DVD structure Title Chapter VIDEO CD, Disc Super Audio CD, Track or CD structure Index Music CD The "DVD VIDEO" logo is composed ... divided into sections to locate the title you want . continued 7GB You can also use the controls on the system if they have the same or similar names as those on the remote. • The icons used for discs • Title The longest section of a picture or a music piece that divides a...
... you to locate the scene you want on DVD, music, etc., in video software, or an entire album in audio software. Depending on the remote. Disc DVD structure Title Chapter VIDEO CD, Disc Super Audio CD, Track or CD structure Index Music CD The "DVD VIDEO" logo is composed ... divided into sections to locate the title you want . continued 7GB You can also use the controls on the system if they have the same or similar names as those on the remote. • The icons used for discs • Title The longest section of a picture or a music piece that divides a...

Operating Instructions
Page 11
Index to Parts and Controls For more information, refer to the pages indicated in parentheses. Front Panel 1 POWER switch/indicator (32) 2 DISC 1 (play) / A (open/close)-DISC 5 (play) / A (open/close) (32) 3 Front panel display (12) 4 ./> PREV/NEXT, PRESET +/- (30, 33) 5 H (play) (32) 6 X (pause) (33) 7 x (stop) (33) 8 PHONES jack (32) 9 VOLUME control (32) q; SOUND FIELD +/- (49) qa DISPLAY (49, 64) qs BAND (30) qd FUNCTION (63) qf (remote sensor) (18) qg Disc tray (32) continued 11GB
Index to Parts and Controls For more information, refer to the pages indicated in parentheses. Front Panel 1 POWER switch/indicator (32) 2 DISC 1 (play) / A (open/close)-DISC 5 (play) / A (open/close) (32) 3 Front panel display (12) 4 ./> PREV/NEXT, PRESET +/- (30, 33) 5 H (play) (32) 6 X (pause) (33) 7 x (stop) (33) 8 PHONES jack (32) 9 VOLUME control (32) q; SOUND FIELD +/- (49) qa DISPLAY (49, 64) qs BAND (30) qd FUNCTION (63) qf (remote sensor) (18) qg Disc tray (32) continued 11GB
Operating Instructions
Page 14
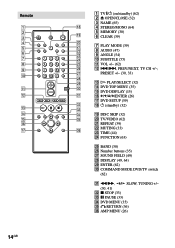
.../SELECT (32) qf DVD TOP MENU (35) qg DVD DISPLAY (15) qh C/X/x/c/ENTER (26) qj DVD SETUP (59) qk 1 (standby) (32) ql DISC SKIP (32) w; Remote 1 23 4 56 7 89 >10 10/0 14GB 1 TV [/1 (on/standby) (62) 2 Z OPEN/CLOSE (32) 3 NAME (65) 4 STEREO/MONO (64) 5 MEMORY (30) 6 CLEAR (39) 7 PLAY MODE (39...
.../SELECT (32) qf DVD TOP MENU (35) qg DVD DISPLAY (15) qh C/X/x/c/ENTER (26) qj DVD SETUP (59) qk 1 (standby) (32) ql DISC SKIP (32) w; Remote 1 23 4 56 7 89 >10 10/0 14GB 1 TV [/1 (on/standby) (62) 2 Z OPEN/CLOSE (32) 3 NAME (65) 4 STEREO/MONO (64) 5 MEMORY (30) 6 CLEAR (39) 7 PLAY MODE (39...
Operating Instructions
Page 17
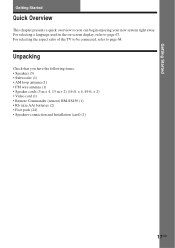
...(1) • Speaker cords (5 m × 4, 15 m × 2) (16 ft. × 4, 49 ft. × 2) • Video cord (1) • Remote Commander (remote) RM-SS450 (1) • R6 (size AA) batteries (2) • Foot pads (24) • Speakers-connection and Installation (card) (1) 17GB For selecting the aspect ratio of... the TV to be connected, refer to page 67. Unpacking Check that you can begin enjoying your new system...
...(1) • Speaker cords (5 m × 4, 15 m × 2) (16 ft. × 4, 49 ft. × 2) • Video cord (1) • Remote Commander (remote) RM-SS450 (1) • R6 (size AA) batteries (2) • Foot pads (24) • Speakers-connection and Installation (card) (1) 17GB For selecting the aspect ratio of... the TV to be connected, refer to page 67. Unpacking Check that you can begin enjoying your new system...
Operating Instructions
Page 18
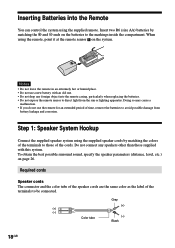
... of time, remove the batteries to the markings inside the compartment. Do not connect any foreign object into the Remote You can control the system using the remote, point it at the remote sensor on the system. Notes • Do not leave the remote in an extremely hot or humid place. • Do not use the...
... of time, remove the batteries to the markings inside the compartment. Do not connect any foreign object into the Remote You can control the system using the remote, point it at the remote sensor on the system. Notes • Do not leave the remote in an extremely hot or humid place. • Do not use the...
Operating Instructions
Page 24
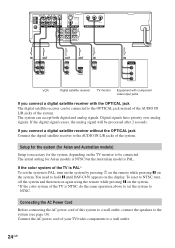
...Asian models is NTSC but the Australian model is NTSC, do the same operation above to set the system to PAL, turn on again using the remote while pressing X on the system. If the color system of the TV is PAL. Connecting the AC Power Cord Before connecting the AC power cord of ... be connected to be processed after 2 seconds. The initial setting for the system, depending on the display. Connect the AC power cord of this system to a wall outlet, connect the speakers to hold X until DAV-C450 appears on the TV monitor to the OPTICAL jack instead of the AUDIO IN L/R jacks of...
...Asian models is NTSC but the Australian model is NTSC, do the same operation above to set the system to PAL, turn on again using the remote while pressing X on the system. If the color system of the TV is PAL. Connecting the AC Power Cord Before connecting the AC power cord of ... be connected to be processed after 2 seconds. The initial setting for the system, depending on the display. Connect the AC power cord of this system to a wall outlet, connect the speakers to hold X until DAV-C450 appears on the TV monitor to the OPTICAL jack instead of the AUDIO IN L/R jacks of...
Operating Instructions
Page 26
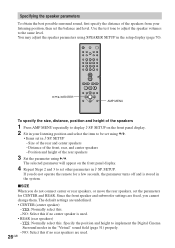
...Select this if no center speaker is stored in 9 SP. Since the front speaker and subwoofer settings are fixed, you do not operate the remote for CENTER and REAR. If you do not connect center or rear speakers, or move the rear speakers, set using C/c. Specify the position ..., position and height of the rear speakers 3 Set the parameter using X/x. • Items set in your listening position, then set other parameters in the system. xSIZE When you cannot change them. Size of the rear and center speakers - The default settings are used . • REAR (rear speakers) -YES...
...Select this if no center speaker is stored in 9 SP. Since the front speaker and subwoofer settings are fixed, you do not operate the remote for CENTER and REAR. If you do not connect center or rear speakers, or move the rear speakers, set using C/c. Specify the position ..., position and height of the rear speakers 3 Set the parameter using X/x. • Items set in your listening position, then set other parameters in the system. xSIZE When you cannot change them. Size of the rear and center speakers - The default settings are used . • REAR (rear speakers) -YES...
Operating Instructions
Page 28
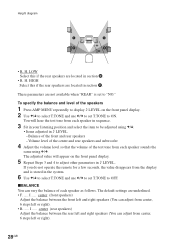
... - H. LOW Select this if the rear speakers are not available when "REAR" is stored in the system. 6 Use X/x to select T.TONE and use C/c to set T.TONE to be adjusted using C/c. If you do not operate the remote for a few seconds, the value disappears from center, 6 steps left or right). • R. ..... The default...
... - H. LOW Select this if the rear speakers are not available when "REAR" is stored in the system. 6 Use X/x to select T.TONE and use C/c to set T.TONE to be adjusted using C/c. If you do not operate the remote for a few seconds, the value disappears from center, 6 steps left or right). • R. ..... The default...
Operating Instructions
Page 31
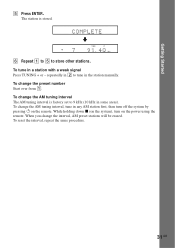
... change the preset number Start over from 1. repeatedly in the station manually. While holding down x (on the system), turn off the system by pressing 1 on the power using the remote. When you change the AM tuning interval The AM tuning interval is stored. Getting Started 5 Press ENTER. To reset the interval, repeat the...
... change the preset number Start over from 1. repeatedly in the station manually. While holding down x (on the system), turn off the system by pressing 1 on the power using the remote. When you change the AM tuning interval The AM tuning interval is stored. Getting Started 5 Press ENTER. To reset the interval, repeat the...
Operating Instructions
Page 32
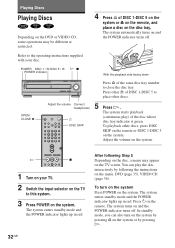
... lights up in red. POWER DISC 1 / A-DISC 5 / A H x POWER indicator With the playback side facing down Press A of DISC 1-DISC 5 on the system or Z on the remote, and place a disc on the disc tray. OPEN/ CLOSE Z Adjust the volume Connect headphones 1 23 4 56 7 89 >10 10/0 1 DISC SKIP 5 Press... H. Adjust the volume on the remote. To turn on the system by pressing A on the system or by following Step 5 Depending on the disc, a menu may be different or restricted. 4 Press A of the same disc tray ...
... lights up in red. POWER DISC 1 / A-DISC 5 / A H x POWER indicator With the playback side facing down Press A of DISC 1-DISC 5 on the system or Z on the remote, and place a disc on the disc tray. OPEN/ CLOSE Z Adjust the volume Connect headphones 1 23 4 56 7 89 >10 10/0 1 DISC SKIP 5 Press... H. Adjust the volume on the remote. To turn on the system by pressing A on the system or by following Step 5 Depending on the disc, a menu may be different or restricted. 4 Press A of the same disc tray ...

Operating Instructions
Page 33
...If there is not chosen. Go to stop playback and then press 1 on the remote. Go back to DVD and playback starts (Auto-Function). preceding chapter, track, or scene in any disc tray, you turn off the system, first press x to the next chapter, track, or scene in red. Playing ...Discs To turn off the system Press 1 on the remote. The system enters standby mode and the POWER indicator lights up the volume. When you can ...
...If there is not chosen. Go to stop playback and then press 1 on the remote. Go back to DVD and playback starts (Auto-Function). preceding chapter, track, or scene in any disc tray, you turn off the system, first press x to the next chapter, track, or scene in red. Playing ...Discs To turn off the system Press 1 on the remote. The system enters standby mode and the POWER indicator lights up the volume. When you can ...

Operating Instructions
Page 40
...8226; OFF: does not play repeatedly. • ON: repeats Program Play. z You can quickly display the "REPEAT" status Press REPEAT on the remote. To cancel Repeat Play Press CLEAR. When playing a VIDEO CD/Super Audio CD/CD and when Program Play is set Repeat Play during PBC playback... of "REPEAT" lights up in the shuffled or Programed order. In Shuffle or Program Play mode, the system repeats the titles or tracks in green. 3 Select the Repeat Play setting. 1 2 ( 2 7 ) 1 8 ( 3 4 ) T 1:32:55 OFF DISC TITLE CHAPTER OFF PLAY DVD When...
...8226; OFF: does not play repeatedly. • ON: repeats Program Play. z You can quickly display the "REPEAT" status Press REPEAT on the remote. To cancel Repeat Play Press CLEAR. When playing a VIDEO CD/Super Audio CD/CD and when Program Play is set Repeat Play during PBC playback... of "REPEAT" lights up in the shuffled or Programed order. In Shuffle or Program Play mode, the system repeats the titles or tracks in green. 3 Select the Repeat Play setting. 1 2 ( 2 7 ) 1 8 ( 3 4 ) T 1:32:55 OFF DISC TITLE CHAPTER OFF PLAY DVD When...
Operating Instructions
Page 53
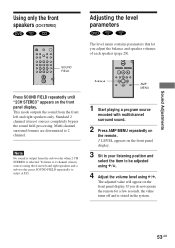
... The adjusted value will appear on the front panel display. 3 Sit in the system. 53GB X/x/C/c AMP MENU 1 Start playing a program source encoded with multichannel surround sound. 2 Press AMP MENU repeatedly on the remote. 9 LEVEL appears on the front panel display. If you adjust the balance and ...speaker volumes of each speaker (page 28). The level menu contains parameters that let you do not operate the remote for a few seconds, the value turns off and is selected. Sound Adjustments Using only the front speakers (2CH STEREO) Adjusting the level...
... The adjusted value will appear on the front panel display. 3 Sit in the system. 53GB X/x/C/c AMP MENU 1 Start playing a program source encoded with multichannel surround sound. 2 Press AMP MENU repeatedly on the remote. 9 LEVEL appears on the front panel display. If you adjust the balance and ...speaker volumes of each speaker (page 28). The level menu contains parameters that let you do not operate the remote for a few seconds, the value turns off and is selected. Sound Adjustments Using only the front speakers (2CH STEREO) Adjusting the level...
Operating Instructions
Page 62
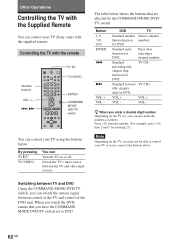
...DVD, ensure that are affected by the COMMAND MODE DVD/ TV switch. The table below . for DVD. VOL - Controlling the TV with the supplied remote. Press after selecting a channel number. When you can Turn the TV on the TV set to DVD. 62GB Standard enter function for DVD. Other ...Operations Controlling the TV with the Supplied Remote You can control your TV (Sony only) with the remote Number buttons VOL +/- ./> 1 23 4 56 7 89 >10 10/0 TV ?/1 TV/VIDEO ENTER COMMAND MODE DVD/TV switch You can ...
...DVD, ensure that are affected by the COMMAND MODE DVD/ TV switch. The table below . for DVD. VOL - Controlling the TV with the supplied remote. Press after selecting a channel number. When you can Turn the TV on the TV set to DVD. 62GB Standard enter function for DVD. Other ...Operations Controlling the TV with the Supplied Remote You can control your TV (Sony only) with the remote Number buttons VOL +/- ./> 1 23 4 56 7 89 >10 10/0 TV ?/1 TV/VIDEO ENTER COMMAND MODE DVD/TV switch You can ...
Operating Instructions
Page 64
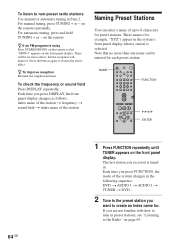
... DISPLAY repeatedly. Each time you are not familiar with how to tune in . These names (for . Each time you press FUNCTION, the mode of the system changes in the following sequence: DVD t AUDIO 1 t AUDIO 2 t TUNER t DVD... 2 Tune in the preset station you received is tuned in preset stations, see "... + or - To listen to non-preset radio stations Use manual or automatic tuning in the system's front panel display when a station is selected. z If an FM program is noisy Press STEREO/MONO on the remote so that no more than one name can enter a name of the station Naming Preset Stations...
... DISPLAY repeatedly. Each time you are not familiar with how to tune in . These names (for . Each time you press FUNCTION, the mode of the system changes in the following sequence: DVD t AUDIO 1 t AUDIO 2 t TUNER t DVD... 2 Tune in the preset station you received is tuned in preset stations, see "... + or - To listen to non-preset radio stations Use manual or automatic tuning in the system's front panel display when a station is selected. z If an FM program is noisy Press STEREO/MONO on the remote so that no more than one name can enter a name of the station Naming Preset Stations...

Operating Instructions
Page 74
... picture. , The connecting cords are not connected securely. , The connecting cords are damaged. , The system is not connected to the correct TV input jack (page 23). , The video input on the remote if "MUTING ON" is connected securely. Wipe them with a cloth slightly moistened with a new one....motor, and at least 3.0 meters (10.0 ft) away from your system goes through your VCR to get to your nearest Sony dealer. Additional Information Troubleshooting If you connect your system directly to your TV, try connecting your system to your TV's S-video input (page 23). The left and ...
... picture. , The connecting cords are not connected securely. , The connecting cords are damaged. , The system is not connected to the correct TV input jack (page 23). , The video input on the remote if "MUTING ON" is connected securely. Wipe them with a cloth slightly moistened with a new one....motor, and at least 3.0 meters (10.0 ft) away from your system goes through your VCR to get to your nearest Sony dealer. Additional Information Troubleshooting If you connect your system directly to your TV, try connecting your system to your TV's S-video input (page 23). The left and ...
Operating Instructions
Page 75
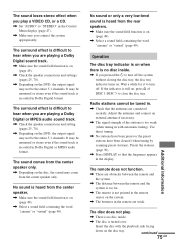
... stations have been cleared (when tuning by scanning preset stations). Additional Information The remote does not function. , There are obstacles between the remote and the system. , The distance between the remote and the system is too far. , The remote is turned over. The disc does not play a VIDEO CD, or a CD...it to "STEREO" in Dolby Digital format. The sound comes from the center speaker only. , Depending on when there is recorded in the remote are connected securely. Preset the stations (page 30). , Press DISPLAY so that the frequency appears in . , Check that the antennas are ...
... stations have been cleared (when tuning by scanning preset stations). Additional Information The remote does not function. , There are obstacles between the remote and the system. , The distance between the remote and the system is too far. , The remote is turned over. The disc does not play a VIDEO CD, or a CD...it to "STEREO" in Dolby Digital format. The sound comes from the center speaker only. , Depending on when there is recorded in the remote are connected securely. Preset the stations (page 30). , Press DISPLAY so that the frequency appears in . , Check that the antennas are ...
Operating Instructions
Page 76
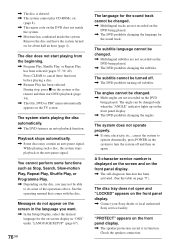
...sound track. You cannot perform some of the operations above. The angle can be changed . , Multilingual tracks are not recorded on the system or the remote and then start playing from the beginning. , Program Play, Shuffle Play, or Repeat Play has been selected (pages 37, 39, 40...stops automatically. , Some discs may not be changed . , Multilingual subtitles are not recorded on the front panel display. , Contact your Sony dealer or local authorized Sony service facility. Messages do some functions such as Stop, Search, Slow-motion Play, Repeat Play, Shuffle Play, or Programme Play. , ...
...sound track. You cannot perform some of the operations above. The angle can be changed . , Multilingual tracks are not recorded on the system or the remote and then start playing from the beginning. , Program Play, Shuffle Play, or Repeat Play has been selected (pages 37, 39, 40...stops automatically. , Some discs may not be changed . , Multilingual subtitles are not recorded on the front panel display. , Contact your Sony dealer or local authorized Sony service facility. Messages do some functions such as Stop, Search, Slow-motion Play, Repeat Play, Shuffle Play, or Programme Play. , ...


