Operating Guide
Page 8
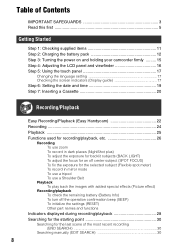
...first 5 Getting Started Step 1: Checking supplied items 11 Step 2: Charging the battery pack 12 Step 3: Turning the power on and holding your camcorder firmly ......... 15 Step 4: Adjusting the LCD panel and viewfinder 16 Step 5: Using the touch panel 17 Changing the language setting 17 Checking the... (Display guide 17 Step 6: Setting the date and time 19 Step 7: Inserting a Cassette 20 Recording/Playback Easy Recording/Playback (Easy Handycam 22 Recording 24 Playback 25 Functions used for recording/playback, etc 26 Recording To use zoom To record in dark places (NightShot plus)...
...first 5 Getting Started Step 1: Checking supplied items 11 Step 2: Charging the battery pack 12 Step 3: Turning the power on and holding your camcorder firmly ......... 15 Step 4: Adjusting the LCD panel and viewfinder 16 Step 5: Using the touch panel 17 Changing the language setting 17 Checking the... (Display guide 17 Step 6: Setting the date and time 19 Step 7: Inserting a Cassette 20 Recording/Playback Easy Recording/Playback (Easy Handycam 22 Recording 24 Playback 25 Functions used for recording/playback, etc 26 Recording To use zoom To record in dark places (NightShot plus)...

Operating Guide
Page 19
...MENU]. CLOCK SET Y MDHM 2 0 0 7 J A N 1 1 2 : 0 0 AM OK 5 Set [M] (month), then touch and repeat for [DATA CODE] (During Easy Handycam operation, you can set only [DATE/TIME])). POWER switch Skip to 12:00 PM. The clock starts. • The date and time are not displayed...OK 4 Set [Y] (year) with / , then touch . Step 6: Setting the date and time Getting Started Set the date and time when using this camcorder for about 3 months, the built-in rechargeable battery gets discharged and the date and time settings may be displayed during playback (see page 39 for...
...MENU]. CLOCK SET Y MDHM 2 0 0 7 J A N 1 1 2 : 0 0 AM OK 5 Set [M] (month), then touch and repeat for [DATA CODE] (During Easy Handycam operation, you can set only [DATE/TIME])). POWER switch Skip to 12:00 PM. The clock starts. • The date and time are not displayed...OK 4 Set [Y] (year) with / , then touch . Step 6: Setting the date and time Getting Started Set the date and time when using this camcorder for about 3 months, the built-in rechargeable battery gets discharged and the date and time settings may be displayed during playback (see page 39 for...
Operating Guide
Page 22
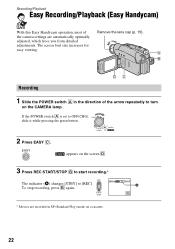
If the POWER switch A is set to [REC]. Recording/Playback Easy Recording/Playback (Easy Handycam) With this Easy Handycam operation, most of the arrow repeatedly to turn on the screen D. 3 Press REC START/STOP B to start recording.* The indicator (A) changes [STBY] to OFF(CHG), ...
If the POWER switch A is set to [REC]. Recording/Playback Easy Recording/Playback (Easy Handycam) With this Easy Handycam operation, most of the arrow repeatedly to turn on the screen D. 3 Press REC START/STOP B to start recording.* The indicator (A) changes [STBY] to OFF(CHG), ...
Operating Guide
Page 23
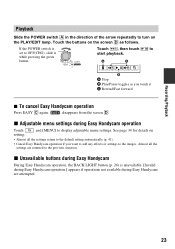
... Almost all the settings return to the default setting automatically (p. 41). • Cancel Easy Handycam operation if you touch it while pressing the green button. x Unavailable buttons during Easy Handycam During Easy Handycam operation, the BACK LIGHT button (p. 26) is set to OFF(CHG), slide it C ...C again. Touch the buttons on the PLAY/EDIT lamp. disappears from the screen D. x Adjustable menu settings during Easy Handycam are returned to the previous situation. Recording/Playback Playback Slide the POWER switch A in the direction of the arrow repeatedly to...
... Almost all the settings return to the default setting automatically (p. 41). • Cancel Easy Handycam operation if you touch it while pressing the green button. x Unavailable buttons during Easy Handycam During Easy Handycam operation, the BACK LIGHT button (p. 26) is set to OFF(CHG), slide it C ...C again. Touch the buttons on the PLAY/EDIT lamp. disappears from the screen D. x Adjustable menu settings during Easy Handycam are returned to the previous situation. Recording/Playback Playback Slide the POWER switch A in the direction of the arrow repeatedly to...

Operating Guide
Page 35
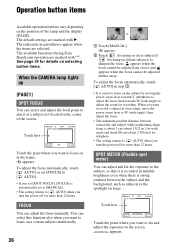
Each touch of [ RET.] takes you to the previous screen. • Cancel Easy Handycam operation to hide the menu screen. x To use menu items normally. Using the Menu 35 After finishing the settings, touch (close) to use menu items during Easy Handycam operation 60min STBY 0:00:00 FN 1 Touch . 2 Select the desired menu. Touch [MENU] then select the desired menu. 3 Change your item setting.
Each touch of [ RET.] takes you to the previous screen. • Cancel Easy Handycam operation to hide the menu screen. x To use menu items normally. Using the Menu 35 After finishing the settings, touch (close) to use menu items during Easy Handycam operation 60min STBY 0:00:00 FN 1 Touch . 2 Select the desired menu. Touch [MENU] then select the desired menu. 3 Change your item setting.
Operating Guide
Page 36
... telephoto. • The setting returns to [ AUTO] when you want to aim it is recorded in suitable brightness even when there is strong contrast between camcorder and subject while maintaining sharp focus is easier to focus on the subject by moving the power zoom lever towards T (telephoto) to adjust the focus... about 1 cm (about 13/32 in.) for wide angle and about 80 cm (about 2 5/8 feet) for more than 12 hours. The available functions during Easy Handycam operation are selected. SPOT METER (Flexible spot meter) You can adjust the focus manually.
... telephoto. • The setting returns to [ AUTO] when you want to aim it is recorded in suitable brightness even when there is strong contrast between camcorder and subject while maintaining sharp focus is easier to focus on the subject by moving the power zoom lever towards T (telephoto) to adjust the focus... about 1 cm (about 13/32 in.) for wide angle and about 80 cm (about 2 5/8 feet) for more than 12 hours. The available functions during Easy Handycam operation are selected. SPOT METER (Flexible spot meter) You can adjust the focus manually.
Operating Guide
Page 39
... affected by this operation. When the PLAY/EDIT lamp lights up You can set [DATE/TIME] only. The recorded picture will appear. • During Easy Handycam operation, you can use the video operation buttons ( / / / ) on every PAGE. [PAGE1] MENU* See page 41. If you record a picture without setting the clock and...
... affected by this operation. When the PLAY/EDIT lamp lights up You can set [DATE/TIME] only. The recorded picture will appear. • During Easy Handycam operation, you can use the video operation buttons ( / / / ) on every PAGE. [PAGE1] MENU* See page 41. If you record a picture without setting the clock and...

Operating Guide
Page 41
... MODE z - OFF WIDE SEL z - 4:3 STEADYSHOT z - Using the Menu Menu items • Available menu items (z) vary depending on which lamp is lit. • During Easy Handycam operation, the following settings are automatically applied (p. 22). AUTO P EFFECT z z OFF AUTO SHTR z - OFF N.S.LIGHT z - VF B.L. LCD/VF SET menu (p. 45) LCD B.L.... LCD COLOR z z - ON OTHERS menu (p. 47) WORLD TIME z z -* BEEP z z z A.SHUT OFF z z 5min DISP OUT z z LCD * The value set before Easy Handycam operation will be retained during Easy Handycam operation. 41
... MODE z - OFF WIDE SEL z - 4:3 STEADYSHOT z - Using the Menu Menu items • Available menu items (z) vary depending on which lamp is lit. • During Easy Handycam operation, the following settings are automatically applied (p. 22). AUTO P EFFECT z z OFF AUTO SHTR z - OFF N.S.LIGHT z - VF B.L. LCD/VF SET menu (p. 45) LCD B.L.... LCD COLOR z z - ON OTHERS menu (p. 47) WORLD TIME z z -* BEEP z z z A.SHUT OFF z z 5min DISP OUT z z LCD * The value set before Easy Handycam operation will be retained during Easy Handycam operation. 41
Operating Guide
Page 54
...have elapsed while you press the RESET button, all buttons are reset.) Buttons do not operate your camcorder, the camcorder is set to their defaults. Troubleshooting Troubleshooting If you cancel the Easy Handycam operation (p. 22, 41). [DEMO MODE] does not start. • You cannot view the demonstration...wall outlet or remove the battery pack, then reconnect it . The camcorder gets warm. • The camcorder may get warmer while you use it after about 1 minute. • Press the RESET button (p. 27) using your Sony dealer. This is completed (p. 13). 54 Change the setting of...
...have elapsed while you press the RESET button, all buttons are reset.) Buttons do not operate your camcorder, the camcorder is set to their defaults. Troubleshooting Troubleshooting If you cancel the Easy Handycam operation (p. 22, 41). [DEMO MODE] does not start. • You cannot view the demonstration...wall outlet or remove the battery pack, then reconnect it . The camcorder gets warm. • The camcorder may get warmer while you use it after about 1 minute. • Press the RESET button (p. 27) using your Sony dealer. This is completed (p. 13). 54 Change the setting of...
Operating Guide
Page 57
Remove the cassette and leave your camcorder for auto focus. The BACK LIGHT function does not function. • In the following settings, the BACK LIGHT function is a blank section between recorded sections of [EXPOSURE] - [SPOT METER] • The BACK LIGHT function does not work during Easy Handycam operation (p. 23). Troubleshooting Recording Refer also...
Remove the cassette and leave your camcorder for auto focus. The BACK LIGHT function does not function. • In the following settings, the BACK LIGHT function is a blank section between recorded sections of [EXPOSURE] - [SPOT METER] • The BACK LIGHT function does not work during Easy Handycam operation (p. 23). Troubleshooting Recording Refer also...
Operating Guide
Page 62
..., 25) • Rewind or change the tape. Cannot add audio. (p. 51) Not recorded in SP mode. Use a cleaning cassette. (p. 69) Cannot start Easy Handycam. (p. 22, 54) Cannot cancel Easy Handycam. (p. 22, 54) 62 Disconnect the i.LINK cable. (p. 51) Not recorded in 12-bit audio. x Dirty video head. Use a new one. (p. 66) Z Re...
..., 25) • Rewind or change the tape. Cannot add audio. (p. 51) Not recorded in SP mode. Use a cleaning cassette. (p. 69) Cannot start Easy Handycam. (p. 22, 54) Cannot cancel Easy Handycam. (p. 22, 54) 62 Disconnect the i.LINK cable. (p. 51) Not recorded in 12-bit audio. x Dirty video head. Use a new one. (p. 66) Z Re...

Operating Guide
Page 63
Play back the tape with the equipment that recorded it. Cannot playback. • Your camcorder cannot play back this format. Cannot add audio. • Your camcorder does not allow you to add audio on a section of a tape recorded in HDV format (p. 51). 63 HDV recorded tape. Troubleshooting Invalid during Easy Handycam operation. (p. 23) HDV recorded tape.
Play back the tape with the equipment that recorded it. Cannot playback. • Your camcorder cannot play back this format. Cannot add audio. • Your camcorder does not allow you to add audio on a section of a tape recorded in HDV format (p. 51). 63 HDV recorded tape. Troubleshooting Invalid during Easy Handycam operation. (p. 23) HDV recorded tape.

Operating Guide
Page 73
... specifications are not mentioned in each case in the U.S. On trademarks • "InfoLITHIUM" is a trademark of Sony Corporation. • i.LINK and are trademarks of Sony Corporation. • is a trademark. • "Handycam" and are registered trademarks of Sony Corporation. • Microsoft, Windows, and Windows Media are trademarks or registered trademarks of their respective companies. and...
... specifications are not mentioned in each case in the U.S. On trademarks • "InfoLITHIUM" is a trademark of Sony Corporation. • i.LINK and are trademarks of Sony Corporation. • is a trademark. • "Handycam" and are registered trademarks of Sony Corporation. • Microsoft, Windows, and Windows Media are trademarks or registered trademarks of their respective companies. and...

Operating Guide
Page 74
... Display indicators 28 DISP/BATT INFO button 17, 27 Double speed Playback........ 40 Dubbing 48, 51 DV Interface 48, 50, 53 E EASY button 22 Easy Handycam 22, 35 EDITSEARCH 30, 44 END SCH (END SEARCH 30, 57 EXPOSURE 38, 59 F FADER 37 Fireworks 42 Flexible spot meter See SPOT METER FN...
... Display indicators 28 DISP/BATT INFO button 17, 27 Double speed Playback........ 40 Dubbing 48, 51 DV Interface 48, 50, 53 E EASY button 22 Easy Handycam 22, 35 EDITSEARCH 30, 44 END SCH (END SEARCH 30, 57 EXPOSURE 38, 59 F FADER 37 Fireworks 42 Flexible spot meter See SPOT METER FN...


