Operating Instructions
Page 2
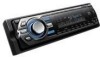
... do not set the Auto Off function, press and hold (OFF) until the display disappears each time you will help to the addresses given in the European Union and other countries. For installation and connections, see the supplied installation/connections manual. Disposal of Old Electrical & Electronic Equipment (Applicable in the set the Auto Off function (page 14). Warning if your household waste disposal service or...
... do not set the Auto Off function, press and hold (OFF) until the display disappears each time you will help to the addresses given in the European Union and other countries. For installation and connections, see the supplied installation/connections manual. Disposal of Old Electrical & Electronic Equipment (Applicable in the set the Auto Off function (page 14). Warning if your household waste disposal service or...
Operating Instructions
Page 3
... manually 9 Receiving the stored stations 9 Tuning automatically 9 RDS 10 Overview 10 Setting AF and TA 10 Selecting PTY 11 Setting CT 11 USB devices USB device playback 11 Display items 12 Listening to music on a Mass Storage Class type audio device 12 Listening to music on discs 16 About USB devices 17 Playback order of controls and basic operations Main unit 6 Card remote commander RM-X151 6 Searching for a track - SET 13 Using optional equipment 14 Auxiliary audio...
... manually 9 Receiving the stored stations 9 Tuning automatically 9 RDS 10 Overview 10 Setting AF and TA 10 Selecting PTY 11 Setting CT 11 USB devices USB device playback 11 Display items 12 Listening to music on a Mass Storage Class type audio device 12 Listening to music on discs 16 About USB devices 17 Playback order of controls and basic operations Main unit 6 Card remote commander RM-X151 6 Searching for a track - SET 13 Using optional equipment 14 Auxiliary audio...

Operating Instructions
Page 4
... services You can use FM station with Radio Data System (RDS). • Search function Quick-BrowZer: You can store up to About USB devices (page 17) or the Sony support website (page 22). • Auxiliary equipment connection An AUX input jack on the disc Getting Started Resetting the unit Before operating the unit for the first time, or after replacing the car battery or changing the connections, you for purchasing this unit (page 8). • Sound adjustment - Digital Music...
... services You can use FM station with Radio Data System (RDS). • Search function Quick-BrowZer: You can store up to About USB devices (page 17) or the Sony support website (page 22). • Auxiliary equipment connection An AUX input jack on the disc Getting Started Resetting the unit Before operating the unit for the first time, or after replacing the car battery or changing the connections, you for purchasing this unit (page 8). • Sound adjustment - Digital Music...
Operating Instructions
Page 5
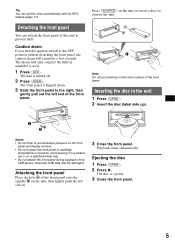
... front panel. Playback starts automatically. The front panel is used. 1 Press (OFF). Attaching the front panel Place the hole A of the USB device, otherwise USB data may be damaged. The alarm will sound for a few seconds. The unit is ejected. 3 Close the front panel. 5 Tip You can detach the front panel of this unit to operate the unit. Caution alarm If you turn the ignition switch to...
... front panel. Playback starts automatically. The front panel is used. 1 Press (OFF). Attaching the front panel Place the hole A of the USB device, otherwise USB data may be damaged. The alarm will sound for a few seconds. The unit is ejected. 3 Close the front panel. 5 Tip You can detach the front panel of this unit to operate the unit. Caution alarm If you turn the ignition switch to...
Operating Instructions
Page 6
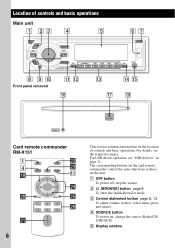
... contains instructions on ; A OFF button To power off; B (BROWSE) button page 8 To enter the Quick-BrowZer mode. For details, see "USB devices" on the unit. For USB device operation, see the respective pages. The corresponding buttons on the card remote commander control the same functions as those on page 11. E Display window OFF ATT SOURCE SEL MODE + - stop the source. C Control dial/select button page 8, 13 To adjust volume (rotate); select items (press and rotate). change the source (Radio/CD/ USB/AUX).
... contains instructions on ; A OFF button To power off; B (BROWSE) button page 8 To enter the Quick-BrowZer mode. For details, see "USB devices" on the unit. For USB device operation, see the respective pages. The corresponding buttons on the card remote commander control the same functions as those on page 11. E Display window OFF ATT SOURCE SEL MODE + - stop the source. C Control dial/select button page 8, 13 To adjust volume (rotate); select items (press and rotate). change the source (Radio/CD/ USB/AUX).
Operating Instructions
Page 7
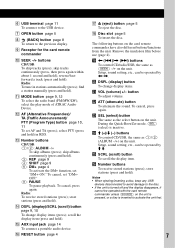
... buttons/functions from the unit. store stations (press and hold ). I Receptor for the card remote commander J SEEK -/+ buttons CD/USB: To skip tracks (press); Radio: To tune in RDS. find a station manually (press and hold ). L AF (Alternative Frequencies)/ TA (Traffic Announcement)/ PTY (Program Type) button page 10, 11 To set "DM+OFF." (6): PAUSE To pause playback. Setup, sound setting, etc., can be operated by < ,. Notes • When ejecting/inserting a disc, keep any USB devices...
... buttons/functions from the unit. store stations (press and hold ). I Receptor for the card remote commander J SEEK -/+ buttons CD/USB: To skip tracks (press); Radio: To tune in RDS. find a station manually (press and hold ). L AF (Alternative Frequencies)/ TA (Traffic Announcement)/ PTY (Program Type) button page 10, 11 To set "DM+OFF." (6): PAUSE To pause playback. Setup, sound setting, etc., can be operated by < ,. Notes • When ejecting/inserting a disc, keep any USB devices...

Operating Instructions
Page 8
The unit enters the Quick-BrowZer mode, and the list of device or disc. 2 Rotate the control dial to select the desired search category, then press it to confirm. 3 Repeat step 2 until the desired track is canceled. • Depending on the USB device, display items may output during the Quick-BrowZer mode. 8 Playback starts. Searching for a track in a CD or USB device ("Walkman"/Mass Storage...
The unit enters the Quick-BrowZer mode, and the list of device or disc. 2 Rotate the control dial to select the desired search category, then press it to confirm. 3 Repeat step 2 until the desired track is canceled. • Depending on the USB device, display items may output during the Quick-BrowZer mode. 8 Playback starts. Searching for a track in a CD or USB device ("Walkman"/Mass Storage...

Operating Instructions
Page 9
... desired frequency (manual tuning). 9 Tip If you want to store, press and hold a number button ((1) to (6)) until "MEM" appears. Repeat and shuffle play track repeatedly. BTM 1 Press (SOURCE) repeatedly until the desired setting appears. Tip Displayed items will be replaced. disc in stations while driving, use Best Tuning Memory (BTM) to search for the station. The unit stores stations in random order. To change the band, press (MODE) repeatedly. To change display items...
... desired frequency (manual tuning). 9 Tip If you want to store, press and hold a number button ((1) to (6)) until "MEM" appears. Repeat and shuffle play track repeatedly. BTM 1 Press (SOURCE) repeatedly until the desired setting appears. Tip Displayed items will be replaced. disc in stations while driving, use Best Tuning Memory (BTM) to search for the station. The unit stores stations in random order. To change the band, press (MODE) repeatedly. To change display items...
Operating Instructions
Page 10
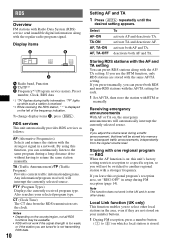
..., Function B TA/TP*1 C Frequency*2 (Program service name), Preset number, Clock, RDS data *1 "TA" flashes during FM reception (page 14). Select AF-ON TA-ON AF, TA-ON AF, TA-OFF To activate AF and deactivate TA. If you are not stored on , the emergency announcements will interrupt the currently selected source. "TP" lights up while such a station is received. *2 While receiving the RDS station, " *" is stored. To change display...
..., Function B TA/TP*1 C Frequency*2 (Program service name), Preset number, Clock, RDS data *1 "TA" flashes during FM reception (page 14). Select AF-ON TA-ON AF, TA-ON AF, TA-OFF To activate AF and deactivate TA. If you are not stored on , the emergency announcements will interrupt the currently selected source. "TP" lights up while such a station is received. *2 While receiving the RDS station, " *" is stored. To change display...
Operating Instructions
Page 11
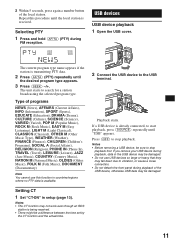
Selecting PTY 1 Press and hold (AF/TA) (PTY) during playback, data in setup (page 13). The current program type name appears if the station is being received. • There might be damaged. • Do not use this procedure until "USB" appears. Setting CT 1 Set "CT-ON" in the USB device may be a difference between the time set by the CT function and the actual time. 2 Connect the...
Selecting PTY 1 Press and hold (AF/TA) (PTY) during playback, data in setup (page 13). The current program type name appears if the station is being received. • There might be damaged. • Do not use this procedure until "USB" appears. Setting CT 1 Set "CT-ON" in the USB device may be a difference between the time set by the CT function and the actual time. 2 Connect the...
Operating Instructions
Page 13
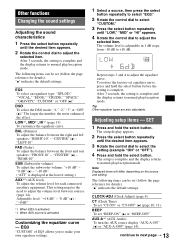
... equalizer curve. BAL (Balance) To adjust the balance between the front and rear speakers: "FRONT-10" - EQ3 "CUSTOM" of EQ3 allows you to make your own equalizer settings. 1 Select a source, then press the select button repeatedly to select "EQ3." 2 Rotate the control dial to select "CUSTOM." 3 Press the select button repeatedly until the desired item appears. 3 Rotate the control dial to normal play /reception mode. Adjusting setup items - The setup is complete and the display...
... equalizer curve. BAL (Balance) To adjust the balance between the front and rear speakers: "FRONT-10" - EQ3 "CUSTOM" of EQ3 allows you to make your own equalizer settings. 1 Select a source, then press the select button repeatedly to select "EQ3." 2 Rotate the control dial to select "CUSTOM." 3 Press the select button repeatedly until the desired item appears. 3 Rotate the control dial to normal play /reception mode. Adjusting setup items - The setup is complete and the display...

Operating Instructions
Page 14
... stations with stronger signals. - Follow the procedure below: Connecting the portable audio device 1 Turn off . *2 When FM is received. 14 Using optional equipment Auxiliary audio equipment By connecting an optional portable audio device to listen clearly at a moderate volume. 4 Set your car speakers. "AUX FRONT IN" appears. 3 Start playback of the display. - DIMMER To change the illumination color: "ILLUMI-1" (z) or "ILLUMI-2." "DIMMER-AT" (z): to dim the display automatically when you to the AUX input jack (stereo...
... stations with stronger signals. - Follow the procedure below: Connecting the portable audio device 1 Turn off . *2 When FM is received. 14 Using optional equipment Auxiliary audio equipment By connecting an optional portable audio device to listen clearly at a moderate volume. 4 Set your car speakers. "AUX FRONT IN" appears. 3 Start playback of the display. - DIMMER To change the illumination color: "ILLUMI-1" (z) or "ILLUMI-2." "DIMMER-AT" (z): to dim the display automatically when you to the AUX input jack (stereo...

Operating Instructions
Page 15
ATT SEL PRESET/ DISC MODE SOURCE OFF DSPL VOL SEEK/AMS OFF The following controls on the rotary commander require a different operation from the unit. • SEL (select) button The same as the select button on this unit. To increase To decrease 15 If you need to mount the rotary commander on the right hand side of the steering column, you mount the rotary commander. SEL MODE DSPL...
ATT SEL PRESET/ DISC MODE SOURCE OFF DSPL VOL SEEK/AMS OFF The following controls on the rotary commander require a different operation from the unit. • SEL (select) button The same as the select button on this unit. To increase To decrease 15 If you need to mount the rotary commander on the right hand side of the steering column, you mount the rotary commander. SEL MODE DSPL...

Operating Instructions
Page 16
.... • The unit is skipped). However, since the audio material side does not conform to the Compact Disc (CD) standard, playback on discs • To keep a disc clean, do so may not be played on a dashboard/rear tray. • Do not attach labels, or use . • Do not subject discs to a label or sticker peeling off before operating it. • Power antenna (aerial) will...
.... • The unit is skipped). However, since the audio material side does not conform to the Compact Disc (CD) standard, playback on discs • To keep a disc clean, do so may not be played on a dashboard/rear tray. • Do not attach labels, or use . • Do not subject discs to a label or sticker peeling off before operating it. • Power antenna (aerial) will...
Operating Instructions
Page 17
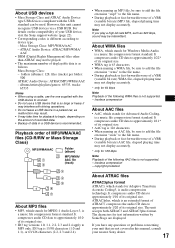
... file, elapsed playing time may not display accurately. * only for 128 kbps Note Playback of the following WMA files is an extended format of ATRAC3, compresses the audio CD data to begin, depending on the compatibility of data in a parked car, as malfunction may result. • It may interfere with driving operations. • Do not leave a USB device in a USB device is 15...
... file, elapsed playing time may not display accurately. * only for 128 kbps Note Playback of the following WMA files is an extended format of ATRAC3, compresses the audio CD data to begin, depending on the compatibility of data in a parked car, as malfunction may result. • It may interfere with driving operations. • Do not leave a USB device in a USB device is 15...

Operating Instructions
Page 18
..., check the power connection and replace the fuse. Do not recharge, disassemble, or dispose of the protection collar, then pull it out. Use of any metal device. Cleaning the connectors The unit may present a risk of fire or explosion. + side up 2c 1 Notes on the lithium battery • Keep the lithium battery out of the reach of the card remote commander becomes...
..., check the power connection and replace the fuse. Do not recharge, disassemble, or dispose of the protection collar, then pull it out. Use of any metal device. Cleaning the connectors The unit may present a risk of fire or explosion. + side up 2c 1 Notes on the lithium battery • Keep the lithium battery out of the reach of the card remote commander becomes...
Operating Instructions
Page 19
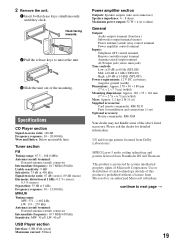
...LW: 40 µV USB Player section Interface: USB (Full-speed) Maximum current: 500mA Power amplifier section Outputs: Speaker outputs (sure seal connectors) Speaker impedance: 4 - 8 ohms Maximum power output: 52 W × 4 (at 4 ohms) General Output: Audio outputs terminal (front/rear) Subwoofer output terminal (mono) Power antenna (aerial) relay control terminal Power amplifier control terminal Inputs: Telephone ATT control terminal Remote controller input terminal Antenna (aerial) input terminal AUX input jack (stereo mini jack) Tone controls: Low: ±10 dB at 60 Hz (XPLOD) Mid: ±10...
...LW: 40 µV USB Player section Interface: USB (Full-speed) Maximum current: 500mA Power amplifier section Outputs: Speaker outputs (sure seal connectors) Speaker impedance: 4 - 8 ohms Maximum power output: 52 W × 4 (at 4 ohms) General Output: Audio outputs terminal (front/rear) Subwoofer output terminal (mono) Power antenna (aerial) relay control terminal Power amplifier control terminal Inputs: Telephone ATT control terminal Remote controller input terminal Antenna (aerial) input terminal AUX input jack (stereo mini jack) Tone controls: Low: ±10 dB at 60 Hz (XPLOD) Mid: ±10...
Operating Instructions
Page 20
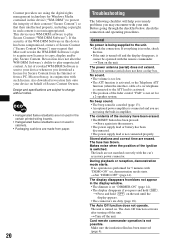
... connection. The power antenna (aerial) does not extend. The contents of the ignition is set , demonstration mode starts. Makes noise when the position of the memory have a relay box. Stored stations and correct time are not using the digital rights management technology for 5 minutes with your device on the unit until the display appears. • The connectors are made from /does not appear in amplifier...
... connection. The power antenna (aerial) does not extend. The contents of the ignition is set , demonstration mode starts. Makes noise when the position of the memory have a relay box. Stored stations and correct time are not using the digital rights management technology for 5 minutes with your device on the unit until the display appears. • The connectors are made from /does not appear in amplifier...
Operating Instructions
Page 21
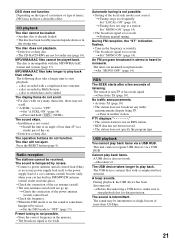
... local seek mode is not correct. The unit is sometimes hampered by noises. • Connect a power antenna (aerial) control lead (blue) or accessory power supply lead (red) to play back. The sound skips. • Installation is not correct. Automatic tuning is not possible. • Setting of less than 320 kbps. 21 t Before disconnecting a USB device, make sure to "OFF" (page 13). No traffic announcements. • Activate TA...
... local seek mode is not correct. The unit is sometimes hampered by noises. • Connect a power antenna (aerial) control lead (blue) or accessory power supply lead (red) to play back. The sound skips. • Installation is not correct. Automatic tuning is not possible. • Setting of less than 320 kbps. 21 t Before disconnecting a USB device, make sure to "OFF" (page 13). No traffic announcements. • Activate TA...
Operating Instructions
Page 22
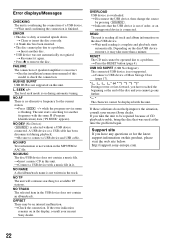
... mode is connected. t Insert a music CD in the USB device does not contain an album/track. t Press the RESET button (page 4). The unit starts searching for the latest support information on during playback. NO MUSIC The disc/USB device does not contain a music file. If these solutions do not help improve the situation, consult your nearest Sony dealer. t Indicates that the USB device is out of CD playback trouble, bring the disc...
... mode is connected. t Insert a music CD in the USB device does not contain an album/track. t Press the RESET button (page 4). The unit starts searching for the latest support information on during playback. NO MUSIC The disc/USB device does not contain a music file. If these solutions do not help improve the situation, consult your nearest Sony dealer. t Indicates that the USB device is out of CD playback trouble, bring the disc...


