
Operating Instructions
Page 49
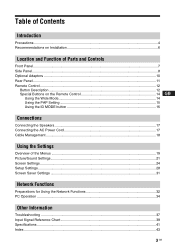
Table of Contents Introduction Precautions ...4 Recommendations on Installation 6 Location and Function of Parts and Controls Front Panel...7 Side Panel...8 Optional Adaptors ...10 Rear Panel ...11 Remote Control ...12 Button Description...12 Special Buttons on the Remote Control 14 GB Using the Wide Mode...14 Using the PAP Setting 15 Using the ID MODE button 16 Connections Connecting the Speakers...
Table of Contents Introduction Precautions ...4 Recommendations on Installation 6 Location and Function of Parts and Controls Front Panel...7 Side Panel...8 Optional Adaptors ...10 Rear Panel ...11 Remote Control ...12 Button Description...12 Special Buttons on the Remote Control 14 GB Using the Wide Mode...14 Using the PAP Setting 15 Using the ID MODE button 16 Connections Connecting the Speakers...
Operating Instructions
Page 50
...and brightness irregularities do not indicate malfunction. Dark spots on the edge of the way it is made, when this unit, contact your authorized Sony dealers. 4 GB When cleaning it any questions on the carton. When shipping the unit, repack it as at high altitudes, a buzzing ... Should any solid object or liquid fall into the screen and leave a ghosting image behind. Although the plasma display panel is located on it will not accept commands from the remote control or from the wall outlet if it checked by grasping the plug. After one of the unit and other...
...and brightness irregularities do not indicate malfunction. Dark spots on the edge of the way it is made, when this unit, contact your authorized Sony dealers. 4 GB When cleaning it any questions on the carton. When shipping the unit, repack it as at high altitudes, a buzzing ... Should any solid object or liquid fall into the screen and leave a ghosting image behind. Although the plasma display panel is located on it will not accept commands from the remote control or from the wall outlet if it checked by grasping the plug. After one of the unit and other...
Operating Instructions
Page 53
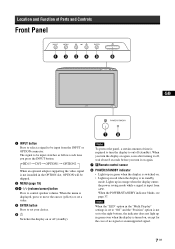
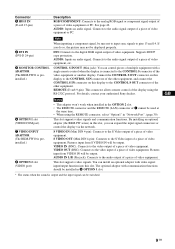
... Note To protect the panel, a certain amount of time is required to turn the display to on . • Lights up in orange when the display enters the power saving mode while a signal is switched on /off , wait about 8 seconds before you turn it on again. 7 Remote control sensor 8 POWER/STANDBY ... turning it off (standby). When the POWER/STANDBY indicator blinks, see page 37. When you press the INPUT button. Location and Function of Parts and Controls Front Panel GB 1 INPUT button Press to select a signal to be input from a PC. The signal to be skipped. 2 MENU (page 19) 34 f/F ...
... Note To protect the panel, a certain amount of time is required to turn the display to on . • Lights up in orange when the display enters the power saving mode while a signal is switched on /off , wait about 8 seconds before you turn it on again. 7 Remote control sensor 8 POWER/STANDBY ... turning it off (standby). When the POWER/STANDBY indicator blinks, see page 37. When you press the INPUT button. Location and Function of Parts and Controls Front Panel GB 1 INPUT button Press to select a signal to be input from a PC. The signal to be skipped. 2 MENU (page 19) 34 f/F ...
Operating Instructions
Page 54
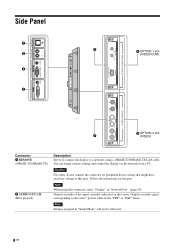
Caution For safety, do not connect the connector for this port. Note Settings assigned in the "P&P" or "PinP" mode. Side Panel OPTION 1 slot (VIDEO/COM) OPTION 2 slot (VIDEO) Connector 1 REMOTE (10BASE-T/100BASE-TX) 2 AUDIO OUT L/R (RCA pin jack) Description Serves to connect the display to a network, using this connector, select "Display" in "Network... wiring that might have excessive voltage to the active* picture while in "Sound Mode" will not be reflected. 8 GB You can assign various settings and control the display via the network from a PC.
Caution For safety, do not connect the connector for this port. Note Settings assigned in the "P&P" or "PinP" mode. Side Panel OPTION 1 slot (VIDEO/COM) OPTION 2 slot (VIDEO) Connector 1 REMOTE (10BASE-T/100BASE-TX) 2 AUDIO OUT L/R (RCA pin jack) Description Serves to connect the display to a network, using this connector, select "Display" in "Network... wiring that might have excessive voltage to the active* picture while in "Sound Mode" will not be reflected. 8 GB You can assign various settings and control the display via the network from a PC.
Operating Instructions
Page 55
... Sony dealers. Pictures input from VIDEO IN will be used at the same time. • When using the RS-232C protocol. AUDIO IN L/R (Pin jack): Connects to the digital RGB signal output of video equipment. You can expand the input signal connectors or control ...of video equipment. This slot supports video signals. AUDIO: Inputs an audio signal. CONTROL S IN/OUT (Mini jack): You can be displayed properly. REMOTE (D-sub 9-pin): This connector allows remote control of the display using the REMOTE connector, select "Option1" in "Network Port". (page 30) This slot supports ...
... Sony dealers. Pictures input from VIDEO IN will be used at the same time. • When using the RS-232C protocol. AUDIO IN L/R (Pin jack): Connects to the digital RGB signal output of video equipment. You can expand the input signal connectors or control ...of video equipment. This slot supports video signals. AUDIO: Inputs an audio signal. CONTROL S IN/OUT (Mini jack): You can be displayed properly. REMOTE (D-sub 9-pin): This connector allows remote control of the display using the REMOTE connector, select "Option1" in "Network Port". (page 30) This slot supports ...
Operating Instructions
Page 58
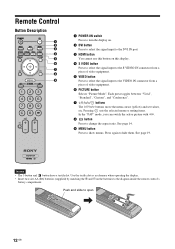
...8226; Insert two size AA (R6) batteries (supplied) by matching the 3 and # on this button on the batteries to the diagram inside the remote control's battery compartment. Press again to open , 12 GB Each press toggles between "Vivid", "Standard", "Custom", and "Conference". 7 F/f/G/g/ buttons The ...F/f/G/g buttons move the menu cursor (yellow) and set values, etc. Remote Control Button Description 1 POWER ON switch Press to turn the display on. 2 DVI button Press to select the signal input to the DVI IN port....
...8226; Insert two size AA (R6) batteries (supplied) by matching the 3 and # on this button on the batteries to the diagram inside the remote control's battery compartment. Press again to open , 12 GB Each press toggles between "Vivid", "Standard", "Custom", and "Conference". 7 F/f/G/g/ buttons The ...F/f/G/g buttons move the menu cursor (yellow) and set values, etc. Remote Control Button Description 1 POWER ON switch Press to turn the display on. 2 DVI button Press to select the signal input to the DVI IN port....
Operating Instructions
Page 60
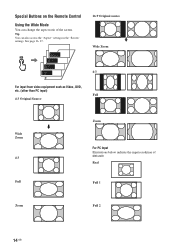
See page 26, 27. 16:9 Original source m Wide Zoom 4:3 For input from video equipment such as Video, DVD, etc. (other than PC input) Full 4:3 Original Source m Wide Zoom 4:3 Full Zoom For PC Input Illustrations below indicate the input resolution of the screen. Tip You can change the aspect ratio of 800×600 Real Full 1 Zoom Full 2 14 GB Special Buttons on the Remote Control Using the Wide Mode You can also access the "Aspect" settings in the "Screen" settings.
See page 26, 27. 16:9 Original source m Wide Zoom 4:3 For input from video equipment such as Video, DVD, etc. (other than PC input) Full 4:3 Original Source m Wide Zoom 4:3 Full Zoom For PC Input Illustrations below indicate the input resolution of the screen. Tip You can change the aspect ratio of 800×600 Real Full 1 Zoom Full 2 14 GB Special Buttons on the Remote Control Using the Wide Mode You can also access the "Aspect" settings in the "Screen" settings.
Operating Instructions
Page 62
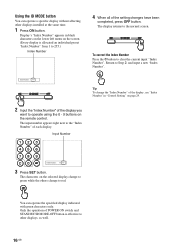
...button. The characters on the screen. (Every display is effective to red. The display returns to operate using the 0 - 9 buttons on the remote control. Only the operation of POWER ON switch and STANDBY/ID MODE-OFF button is allocated an individual preset "Index Number" from 1 to 255.) Index... to the normal screen. You can operate a specific display without affecting other displays, as well. 16 GB Display's "Index Number" appears in "Control Setting" on page 29. 2 Input the "Index Number" of the setting changes have been completed, press OFF button. Index Number : 117 Tip...
...button. The characters on the screen. (Every display is effective to red. The display returns to operate using the 0 - 9 buttons on the remote control. Only the operation of POWER ON switch and STANDBY/ID MODE-OFF button is allocated an individual preset "Index Number" from 1 to 255.) Index... to the normal screen. You can operate a specific display without affecting other displays, as well. 16 GB Display's "Index Number" appears in "Control Setting" on page 29. 2 Input the "Index Number" of the setting changes have been completed, press OFF button. Index Number : 117 Tip...

Operating Instructions
Page 67
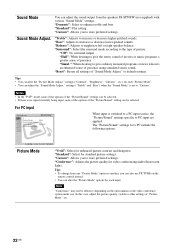
.../Sound Settings For Video Input To highlight an option and to sharpen or soften the picture. Note "Conference" may not be effective depending on the remote control instead. • You can alter the "Picture Mode" options for each "Picture Mode". Picture Mode Adjust. "Brightness": Adjusts to optimize the screen display automatically detecting...
.../Sound Settings For Video Input To highlight an option and to sharpen or soften the picture. Note "Conference" may not be effective depending on the remote control instead. • You can alter the "Picture Mode" options for each "Picture Mode". Picture Mode Adjust. "Brightness": Adjusts to optimize the screen display automatically detecting...
Operating Instructions
Page 68
... programs or news telecasts an enhanced sense of presence. to increase or decrease higher-pitched sounds. Note "Conference" may not be effective depending on the remote control instead. • You can also use PICTURE on the environment or the video conference system under fluorescent lights. "Hall": When desiring to the type of...
... programs or news telecasts an enhanced sense of presence. to increase or decrease higher-pitched sounds. Note "Conference" may not be effective depending on the remote control instead. • You can also use PICTURE on the environment or the video conference system under fluorescent lights. "Hall": When desiring to the type of...

Operating Instructions
Page 72
... to default settings. "V Size": Allows you to choose a correction. Tips • To change from one "Aspect" option to another, you can also use on the remote control. • Select "Zoom" to display movies and other DVD content with minimum distortion. Press F/f and press to adjust the size of the picture vertically. Press...
... to default settings. "V Size": Allows you to choose a correction. Tips • To change from one "Aspect" option to another, you can also use on the remote control. • Select "Zoom" to display movies and other DVD content with minimum distortion. Press F/f and press to adjust the size of the picture vertically. Press...
Operating Instructions
Page 74
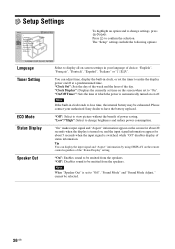
Setup Settings To highlight an option and to "On". You can display the input signal and "Aspect" information by using DISPLAY on the remote control regardless of status information. "Clock Display": Displays the currently set time on or off at which the power is automatically turned on the ... of choice: "English", "Français", "Deutsch", "Español", "Italiano" or " ". Tip You can adjust time, display the built-in your authorized Sony dealer to "Off", "Sound Mode" and "Sound Mode Adjust." cannot be exhausted. "Clock Set": Sets the day of the week and the hour of power...
Setup Settings To highlight an option and to "On". You can display the input signal and "Aspect" information by using DISPLAY on the remote control regardless of status information. "Clock Display": Displays the currently set time on or off at which the power is automatically turned on the ... of choice: "English", "Français", "Deutsch", "Español", "Italiano" or " ". Tip You can adjust time, display the built-in your authorized Sony dealer to "Off", "Sound Mode" and "Sound Mode Adjust." cannot be exhausted. "Clock Set": Sets the day of the week and the hour of power...
Operating Instructions
Page 75
...the standby mode, press the 1 POWER switch on the display or the POWER ON switch on the display and the remote control. "On": Displays image with the control buttons on the remote control to the DVI or HD15 input (RGB/COMPONENT) connectors for more than about 30 seconds. GB 29 GB "Display... automatically enters the power saving mode when a signal is operated, the available modes will differ depending on the display, you select by the remote control or the display. You can change the index number of the HD15 IN (RGB/COMPONENT) connector. Tip While in natural color tones when ...
...the standby mode, press the 1 POWER switch on the display or the POWER ON switch on the display and the remote control. "On": Displays image with the control buttons on the remote control to the DVI or HD15 input (RGB/COMPONENT) connectors for more than about 30 seconds. GB 29 GB "Display... automatically enters the power saving mode when a signal is operated, the available modes will differ depending on the display, you select by the remote control or the display. You can change the index number of the HD15 IN (RGB/COMPONENT) connector. Tip While in natural color tones when ...

Operating Instructions
Page 76
...for PC input. "Network Port": Sets the network port to factory settings. Resets all adjustments and settings to operate the display by remote control. In this case, input horizontal/vertical synchronization signals through the pin 13 or 14 of the composite synchronous signal, the image may... the LAN cable. "Auto": Select to choose an analog RGB input signal from a connected equipment. "Speed Setup": Sets a communication speed between the REMOTE (LAN) connector of "IP Address Setup" and "Speed Setup", see page 24. "RGB": Select to choose either an analog RGB input signal or...
...for PC input. "Network Port": Sets the network port to factory settings. Resets all adjustments and settings to operate the display by remote control. In this case, input horizontal/vertical synchronization signals through the pin 13 or 14 of the composite synchronous signal, the image may... the LAN cable. "Auto": Select to choose an analog RGB input signal from a connected equipment. "Speed Setup": Sets a communication speed between the REMOTE (LAN) connector of "IP Address Setup" and "Speed Setup", see page 24. "RGB": Select to choose either an analog RGB input signal or...
Operating Instructions
Page 79
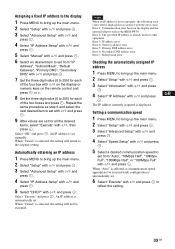
... is not set . 6 Select "Execute" with F/f and press to 255) for each of the four box with F/f on the display or numeric keys on the remote control and press or g. 8 Set the three digit value (0 to 255) for all the desired items, select "Execute" with F/f, then press . Note When an IP address...
... is not set . 6 Select "Execute" with F/f and press to 255) for each of the four box with F/f on the display or numeric keys on the remote control and press or g. 8 Set the three digit value (0 to 255) for all the desired items, select "Execute" with F/f, then press . Note When an IP address...

Operating Instructions
Page 83
... in the table below. 2 If the problem still persists, have your dealer or Sony service center of how the indicator flashes (the number of flashes and the duration of the display. • Keep the remote control sensor area clear from the screen (page 13). • Check "Speaker Out" ... • Check if the room temperature is flashing red. GB 37 GB Remote control does not operate. • Check the polarity of the batteries or replace the batteries. • Point the remote control at the remote control sensor of light out). No color/Dark picture/The picture is too bright/Color...
... in the table below. 2 If the problem still persists, have your dealer or Sony service center of how the indicator flashes (the number of flashes and the duration of the display. • Keep the remote control sensor area clear from the screen (page 13). • Check "Speaker Out" ... • Check if the room temperature is flashing red. GB 37 GB Remote control does not operate. • Check the polarity of the batteries or replace the batteries. • Point the remote control at the remote control sensor of light out). No color/Dark picture/The picture is too bright/Color...
Operating Instructions
Page 84
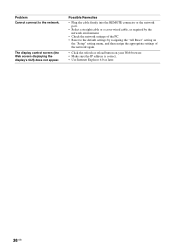
..." setting menu, and then assign the appropriate settings of the PC. • Reset to the network. Possible Remedies • Plug the cable firmly into the REMOTE connector or the network port. • Select a straight cable or a cross-wired cable, as required by assigning the "All Reset" setting on your Web browser.... • Make sure the IP address is correct. • Use Internet Explorer 6.0 or later. 38 GB The display control screen (the Web screen displaying the display's GUI) does not appear.
..." setting menu, and then assign the appropriate settings of the PC. • Reset to the network. Possible Remedies • Plug the cable firmly into the REMOTE connector or the network port. • Select a straight cable or a cross-wired cable, as required by assigning the "All Reset" setting on your Web browser.... • Make sure the IP address is correct. • Use Internet Explorer 6.0 or later. 38 GB The display control screen (the Web screen displaying the display's GUI) does not appear.
Operating Instructions
Page 89
...24 Picture Size 24 Picture/Sound Settings 19, 21 Pitch 27 Position 25 POWER ON switch 12 POWER switch 7 POWER/STANDBY indicator 7 R Real 14, 27 REMOTE connector 8 Remote control sensor 7 Reset 21, 22, 23, 26, 27 RGB/COMPONENT connector 9 S S VIDEO button 12 S VIDEO IN/OUT connector 9 Screen Saver Settings 20... 29 Color System 30 Color Temp. 21, 23 Conference 21, 22 Configure screen 34 Contrast 21, 23 Contrast button 13 Control Mode 29 CONTROL S IN/OUT connector 9 Control screen 34 Control Setting 29 Custom 21, 22, 23 D DISPLAY button 13 DVI button 12 DVI connector 9 DVI IN connector 9 Dynamic 22...
...24 Picture Size 24 Picture/Sound Settings 19, 21 Pitch 27 Position 25 POWER ON switch 12 POWER switch 7 POWER/STANDBY indicator 7 R Real 14, 27 REMOTE connector 8 Remote control sensor 7 Reset 21, 22, 23, 26, 27 RGB/COMPONENT connector 9 S S VIDEO button 12 S VIDEO IN/OUT connector 9 Screen Saver Settings 20... 29 Color System 30 Color Temp. 21, 23 Conference 21, 22 Configure screen 34 Contrast 21, 23 Contrast button 13 Control Mode 29 CONTROL S IN/OUT connector 9 Control screen 34 Control Setting 29 Custom 21, 22, 23 D DISPLAY button 13 DVI button 12 DVI connector 9 DVI IN connector 9 Dynamic 22...

Operating Instructions
Page 307
...19, 21 Picture Size 24 Pitch 27 Position 25 POWER 开关 7 POWER ON 开关 12 POWER/STANDBY 指示灯 7 R Real 14, 27 REMOTE 连接器 8 Reset 21, 22, 23, 26, 27 RGB/COMPONENT 连接器 9 S S VIDEO IN/OUT 连接器 9 S VIDEO...Set 28 Color Matrix 29 Color System 30 Color Temp. 21, 22 Conference 21, 22 Configure 34 Contrast 21, 22 Control Mode 29 CONTROL S IN/OUT 连接器 9 Control Setting 29 Control 34 Custom 21, 22, 23 D 电缆夹 18 DISPLAY 键 13 13 DVI IN 连接&#...
...19, 21 Picture Size 24 Pitch 27 Position 25 POWER 开关 7 POWER ON 开关 12 POWER/STANDBY 指示灯 7 R Real 14, 27 REMOTE 连接器 8 Reset 21, 22, 23, 26, 27 RGB/COMPONENT 连接器 9 S S VIDEO IN/OUT 连接器 9 S VIDEO...Set 28 Color Matrix 29 Color System 30 Color Temp. 21, 22 Conference 21, 22 Configure 34 Contrast 21, 22 Control Mode 29 CONTROL S IN/OUT 连接器 9 Control Setting 29 Control 34 Custom 21, 22, 23 D 电缆夹 18 DISPLAY 键 13 13 DVI IN 连接&#...

