
Operating Instructions
Page 48
... equipment and receiver. • Connect the equipment into an outlet on the rear. This equipment generates, uses, and can cause injury. CAUTION RISK OF EXPLOSION IF BATTERY IS REPLACED BY AN INCORRECT TYPE. Record the model and serial numbers in the U.S.A. Refer to qualified personnel only. Model No. To reduce the risk of Conformity Trade Name: SONY Model: FWD-50PX3 Responsible Party: Sony Electronics...
... equipment and receiver. • Connect the equipment into an outlet on the rear. This equipment generates, uses, and can cause injury. CAUTION RISK OF EXPLOSION IF BATTERY IS REPLACED BY AN INCORRECT TYPE. Record the model and serial numbers in the U.S.A. Refer to qualified personnel only. Model No. To reduce the risk of Conformity Trade Name: SONY Model: FWD-50PX3 Responsible Party: Sony Electronics...
Operating Instructions
Page 49
... ...10 Rear Panel ...11 Remote Control ...12 Button Description...12 Special Buttons on the Remote Control 14 GB Using the Wide Mode...14 Using the PAP Setting 15 Using the ID MODE button 16 Connections Connecting the Speakers...17 Connecting the AC Power Cord 17 Cable Management...18 Using the Settings Overview of the Menus ...19 Picture/Sound Settings...21 Screen Settings...24 Setup Settings...28 Screen Saver Settings ...31 Network Functions Preparations for Using the Network Functions 32 PC Operation ...34 Other Information Troubleshooting ...37 Input Signal Reference...
... ...10 Rear Panel ...11 Remote Control ...12 Button Description...12 Special Buttons on the Remote Control 14 GB Using the Wide Mode...14 Using the PAP Setting 15 Using the ID MODE button 16 Connections Connecting the Speakers...17 Connecting the AC Power Cord 17 Cable Management...18 Using the Settings Overview of the Menus ...19 Picture/Sound Settings...21 Screen Settings...24 Setup Settings...28 Screen Saver Settings ...31 Network Functions Preparations for Using the Network Functions 32 PC Operation ...34 Other Information Troubleshooting ...37 Input Signal Reference...
Operating Instructions
Page 50
... further. • Unplug the unit from the wall outlet if it . Introduction Precautions On safety • A nameplate indicating operating voltage, power consumption, etc. Although the plasma display panel is used for a long period of time, part of video or imaging software to avoid touching the panel directly. If light ghosting (image burn-in) occurs,it , use over the entire screen. When cleaning it may see some kind of...
... further. • Unplug the unit from the wall outlet if it . Introduction Precautions On safety • A nameplate indicating operating voltage, power consumption, etc. Although the plasma display panel is used for a long period of time, part of video or imaging software to avoid touching the panel directly. If light ghosting (image burn-in) occurs,it , use over the entire screen. When cleaning it may see some kind of...
Operating Instructions
Page 53
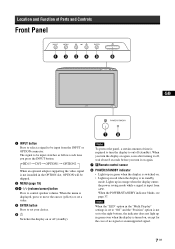
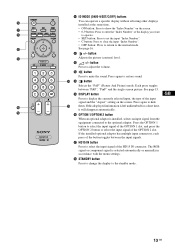
... (yellow) or set a value. 5 ENTER button Press to turn it on again. 7 Remote control sensor 8 POWER/STANDBY indicator • Lights up in green when the display is switched on. • Lights up in orange when the display enters the power saving mode while a signal is input from the INPUT or OPTION connector. When the POWER/STANDBY indicator blinks, see page 37. When an optional adaptor supporting the video signal is not installed in the OPTION...
... (yellow) or set a value. 5 ENTER button Press to turn it on again. 7 Remote control sensor 8 POWER/STANDBY indicator • Lights up in green when the display is switched on. • Lights up in orange when the display enters the power saving mode while a signal is input from the INPUT or OPTION connector. When the POWER/STANDBY indicator blinks, see page 37. When an optional adaptor supporting the video signal is not installed in the OPTION...
Operating Instructions
Page 54
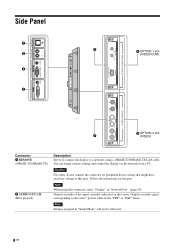
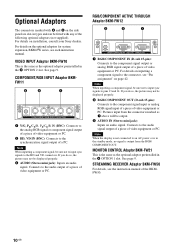
... cable. Note Settings assigned in "Network Port". (page 30) Outputs an audio of the signal currently indicated on the screen. Follow the instructions for peripheral device wiring that might have excessive voltage to this port. Outputs an audio signal corresponding to a network, using this port. Side Panel OPTION 1 slot (VIDEO/COM) OPTION 2 slot (VIDEO) Connector 1 REMOTE (10BASE-T/100BASE-TX) 2 AUDIO OUT L/R (RCA pin jack) Description Serves to connect the display to the active* picture...
... cable. Note Settings assigned in "Network Port". (page 30) Outputs an audio of the signal currently indicated on the screen. Follow the instructions for peripheral device wiring that might have excessive voltage to this port. Outputs an audio signal corresponding to a network, using this port. Side Panel OPTION 1 slot (VIDEO/COM) OPTION 2 slot (VIDEO) Connector 1 REMOTE (10BASE-T/100BASE-TX) 2 AUDIO OUT L/R (RCA pin jack) Description Serves to connect the display to the active* picture...
Operating Instructions
Page 55
... used at the same time. • When using the RS-232C protocol. Connects to the digital RGB signal output of video equipment or PC. CONTROL S IN/OUT (Mini jack): You can be switched. REMOTE (D-sub 9-pin): This connector allows remote control of the display using the REMOTE connector, select "Option1" in 6 OPTION 1 slot. * The status when the sound is preinstalled.) 8 OPTION 2 slot (VIDEO port) • This adaptor won't work when installed...
... used at the same time. • When using the RS-232C protocol. Connects to the digital RGB signal output of video equipment or PC. CONTROL S IN/OUT (Mini jack): You can be switched. REMOTE (D-sub 9-pin): This connector allows remote control of the display using the REMOTE connector, select "Option1" in 6 OPTION 1 slot. * The status when the sound is preinstalled.) 8 OPTION 2 slot (VIDEO port) • This adaptor won't work when installed...
Operating Instructions
Page 56
... page 9. MONITOR CONTROL Adaptor BKM-FW21 This is the same as 1 above will be output. 3 AUDIO IN (Stereo mini jack): Inputs an audio signal. See page 9. STREAMING RECEIVER Adaptor BKM-FW50 For details, see the instruction manual of the following optional adaptors (not supplied). Connects to the audio output of a piece of video equipment or PC. If you do so, the picture may not be displayed properly...
... page 9. MONITOR CONTROL Adaptor BKM-FW21 This is the same as 1 above will be output. 3 AUDIO IN (Stereo mini jack): Inputs an audio signal. See page 9. STREAMING RECEIVER Adaptor BKM-FW50 For details, see the instruction manual of the following optional adaptors (not supplied). Connects to the audio output of a piece of video equipment or PC. If you do so, the picture may not be displayed properly...
Operating Instructions
Page 59
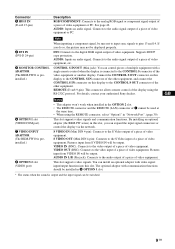
... Number". • C button: Press to clear the input "Index Number". • OFF button: Press to return to the normal mode. qa +/- button Press to the standby mode. See page 16. If this displayed information is selected automatically or manually in accordance with the menu settings. qk STANDBY button Press to change the display to adjust the volume. 0 ID MODE (ON/0-9/SET/C/OFF) buttons You can operate a specific display without affecting other displays installed at the same time...
... Number". • C button: Press to clear the input "Index Number". • OFF button: Press to return to the normal mode. qa +/- button Press to the standby mode. See page 16. If this displayed information is selected automatically or manually in accordance with the menu settings. qk STANDBY button Press to change the display to adjust the volume. 0 ID MODE (ON/0-9/SET/C/OFF) buttons You can operate a specific display without affecting other displays installed at the same time...
Operating Instructions
Page 66
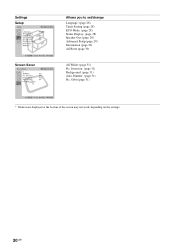
Orbit (page 31) * Menu icons displayed at the bottom of the screen may not work, depending on the settings. 20 GB Inversion: (page 31) Background: (page 31) Auto Dimmer: (page 31) Pic. Settings Setup Screen Saver Allows you to set/change Language: (page 28) Timer Setting (page 28) ECO Mode: (page 28) Status Display: (page 28) Speaker Out: (page 28) Advanced Setup (page 29) Information (page 30) All Reset (page 30) All White: (page 31) Pic.
Orbit (page 31) * Menu icons displayed at the bottom of the screen may not work, depending on the settings. 20 GB Inversion: (page 31) Background: (page 31) Auto Dimmer: (page 31) Pic. Settings Setup Screen Saver Allows you to set/change Language: (page 28) Timer Setting (page 28) ECO Mode: (page 28) Status Display: (page 28) Speaker Out: (page 28) Advanced Setup (page 29) Information (page 30) All Reset (page 30) All White: (page 31) Pic.

Operating Instructions
Page 67
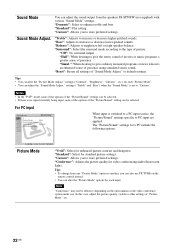
... of "Picture Mode", etc. "Reset": Resets all settings of video signal is not NTSC. "Conference": Adjusts the picture quality for video conferencing under use PICTURE on the remote control instead. • You can alter the "Picture Mode" options for each input. Picture Mode Adjust. "Noise Reduction": Select to give the white colors a red tint. "CineMotion": Select "Auto" to set the noise level. GB 21 GB Select from "Off", "Low", "Mid", "High" to optimize the screen display automatically...
... of "Picture Mode", etc. "Reset": Resets all settings of video signal is not NTSC. "Conference": Adjusts the picture quality for video conferencing under use PICTURE on the remote control instead. • You can alter the "Picture Mode" options for each input. Picture Mode Adjust. "Noise Reduction": Select to give the white colors a red tint. "CineMotion": Select "Auto" to set the noise level. GB 21 GB Select from "Off", "Low", "Mid", "High" to optimize the screen display automatically...
Operating Instructions
Page 68
... can also use PICTURE on the environment or the video conference system under fluorescent lights. "Standard": Select for enhanced picture contrast and sharpness. "Off": No surround output. to emphasize left or right speaker balance. Tips • To change from the speakers SS-SP50FW (not supplied) with various "Sound Mode" settings. "Treble": Adjusts to "Custom". settings ("Treble" and "Bass") when the "Sound Mode" is no signal currently being input, none...
... can also use PICTURE on the environment or the video conference system under fluorescent lights. "Standard": Select for enhanced picture contrast and sharpness. "Off": No surround output. to emphasize left or right speaker balance. Tips • To change from the speakers SS-SP50FW (not supplied) with various "Sound Mode" settings. "Treble": Adjusts to "Custom". settings ("Treble" and "Bass") when the "Sound Mode" is no signal currently being input, none...
Operating Instructions
Page 71
... PC input. • You can display an enlarged picture of which "Aspect" is set to "Full 2" for connecting multiple displays to form a video wall. "2×2"/"3×3"/"4×4": Sets to "Off". "LED": "On" makes the POWER/STANDBY indicator on the front panel (page 7) to be continually turned off (standby), errors are detected, or the display is set to connect multiple displays such as shown in sleep mode including the case of no signal...
... PC input. • You can display an enlarged picture of which "Aspect" is set to "Full 2" for connecting multiple displays to form a video wall. "2×2"/"3×3"/"4×4": Sets to "Off". "LED": "On" makes the POWER/STANDBY indicator on the front panel (page 7) to be continually turned off (standby), errors are detected, or the display is set to connect multiple displays such as shown in sleep mode including the case of no signal...
Operating Instructions
Page 73
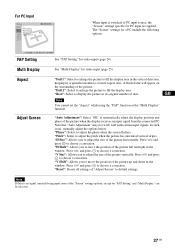
... display position and phase of the "Screen" settings options, except for PC input are applied. Note If there is switched to PC input source, the "Screen" settings specific for "PAP Setting" and "Multi Display" can be selected. 27 GB For PC Input When input is no signal currently being input, none of the picture when the display receives an input signal from the connected PC. Note that "Auto Adjustment" may not work well with certain input signals...
... display position and phase of the "Screen" settings options, except for PC input are applied. Note If there is switched to PC input source, the "Screen" settings specific for "PAP Setting" and "Multi Display" can be selected. 27 GB For PC Input When input is no signal currently being input, none of the picture when the display receives an input signal from the connected PC. Note that "Auto Adjustment" may not work well with certain input signals...
Operating Instructions
Page 74
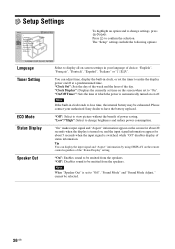
... " ". "On/Off Timer": Sets the time at a predetermined time. "On" makes input signal and "Aspect" information appear on the screen for about 20 seconds when the display is turned on, and the input signal information appear for about 5 seconds when the input signal is automatically turned on the remote control regardless of power saving. The "Setup" settings include the following options: Language Timer Setting ECO Mode Status Display Speaker Out Select to view picture without the...
... " ". "On/Off Timer": Sets the time at a predetermined time. "On" makes input signal and "Aspect" information appear on the screen for about 20 seconds when the display is turned on, and the input signal information appear for about 5 seconds when the input signal is automatically turned on the remote control regardless of power saving. The "Setup" settings include the following options: Language Timer Setting ECO Mode Status Display Speaker Out Select to view picture without the...
Operating Instructions
Page 75
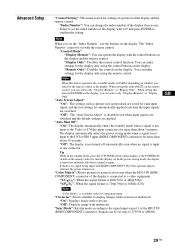
... set the "Index Number", use the buttons on the display. "Control Mode" "Display+Remote": You can make settings for the display only using the remote control. GB 29 GB You can select only "Display+Remote" or "Display Only". In the power saving mode, the display is turned on . "Y/CB/CR": When the signal format is 480i(525i) or 480p(525p) "Y/PB/PR": When the signal format is 720p(750p) or 1080i(1125i) Note "Color Matrix" is input...
... set the "Index Number", use the buttons on the display. "Control Mode" "Display+Remote": You can make settings for the display only using the remote control. GB 29 GB You can select only "Display+Remote" or "Display Only". In the power saving mode, the display is turned on . "Y/CB/CR": When the signal format is 480i(525i) or 480p(525p) "Y/PB/PR": When the signal format is 720p(750p) or 1080i(1125i) Note "Color Matrix" is input...

Operating Instructions
Page 76
... the optional adaptors. • This display does not support the three value sync format of composite sync and 576/60p. • When you select the video signal for the synchronous mode setting, you to make the settings of "IP Address Setup" and "Speed Setup", see page 24. "RGB": Select to factory settings. Note "Color System" is input. Displays the "Model Name", "Serial Number", "Operation Time", "Software Version" and "IP Address" of the...
... the optional adaptors. • This display does not support the three value sync format of composite sync and 576/60p. • When you select the video signal for the synchronous mode setting, you to make the settings of "IP Address Setup" and "Speed Setup", see page 24. "RGB": Select to factory settings. Note "Color System" is input. Displays the "Model Name", "Serial Number", "Operation Time", "Software Version" and "IP Address" of the...

Operating Instructions
Page 80
... are four display screens, divided by function: Information screen, Configure screen, Control screen, and Setup screen. Click "Apply" when done. Note Before setting the "Timer" function, make sure to configure the time setting on power to the display in the previous page as the power status and the input signal selection. PICTURE MODE Lets you make various display settings on the screen of the image. buttons Adjust the color intensity. When a user name and password have been set , and...
... are four display screens, divided by function: Information screen, Configure screen, Control screen, and Setup screen. Click "Apply" when done. Note Before setting the "Timer" function, make sure to configure the time setting on power to the display in the previous page as the power status and the input signal selection. PICTURE MODE Lets you make various display settings on the screen of the image. buttons Adjust the color intensity. When a user name and password have been set , and...

Operating Instructions
Page 81
... time the display in which the display is installed is turned on the network, setting a user name and password is recommended. Account Name: Enter the mail account name here. Password The administrator and user name and password information can enter auxiliary information here. Requires the use spaces when entering the information. Notes • If the input signal is Video or S Video and the color system of 8 characters long. Owner...
... time the display in which the display is installed is turned on the network, setting a user name and password is recommended. Account Name: Enter the mail account name here. Password The administrator and user name and password information can enter auxiliary information here. Requires the use spaces when entering the information. Notes • If the input signal is Video or S Video and the color system of 8 characters long. Owner...

Operating Instructions
Page 83
... "Picture Mode" (page 12). • Adjust the "Picture Mode" options in the table below. 2 If the problem still persists, have your dealer or Sony service center of how the indicator flashes (the number of flashes and the duration of the signal cable. • Check if the room temperature is set to switch off the fluorescent lamps. Good picture, no sound. • Check the volume control. • Press on the display do...
... "Picture Mode" (page 12). • Adjust the "Picture Mode" options in the table below. 2 If the problem still persists, have your dealer or Sony service center of how the indicator flashes (the number of flashes and the duration of the signal cable. • Check if the room temperature is set to switch off the fluorescent lamps. Good picture, no sound. • Check the volume control. • Press on the display do...
Operating Instructions
Page 294
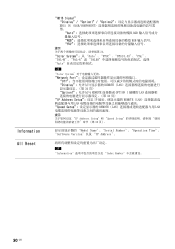
...; "PAL-M"、"PAL-N"或 "PAL60 Auto 注 "Color System "Network Port Off Display REMOTE (LAN 34 页) "Option1 REMOTE OPTION 1 插槽的 LAN 34 页) "IP Address Setup":设定 IP REMOTE (LAN LAN Speed Setup REMOTE (LAN LAN IP Address Setup"和 "Speed Setup 32 页)。 Model Name"、"Serial Number"、"Operation Time"、 "Software Version"以及 "IP Address...
...; "PAL-M"、"PAL-N"或 "PAL60 Auto 注 "Color System "Network Port Off Display REMOTE (LAN 34 页) "Option1 REMOTE OPTION 1 插槽的 LAN 34 页) "IP Address Setup":设定 IP REMOTE (LAN LAN Speed Setup REMOTE (LAN LAN IP Address Setup"和 "Speed Setup 32 页)。 Model Name"、"Serial Number"、"Operation Time"、 "Software Version"以及 "IP Address...


