
Operating Instructions
Page 1
DVP-NS710H Serial No For Customers in Canada If this product is not working properly, please call upon your Sony dealer regarding this product. Record the serial number in the U.S.A Owner's Record The model and serial numbers are located at... please contact our Customer Information Service Centre at : Customer Information Service 115 Gordon Baker Road, Toronto, Ontario, M2H 3R6 DVP-NS710H DVP-NS718H DVP-NS728H © 2009 Sony Corporation Model No. 4-130-258-12(2) CD/DVD Player Operating Instructions US Manual de instrucciones ES For customers in the space provided below.
DVP-NS710H Serial No For Customers in Canada If this product is not working properly, please call upon your Sony dealer regarding this product. Record the serial number in the U.S.A Owner's Record The model and serial numbers are located at... please contact our Customer Information Service Centre at : Customer Information Service 115 Gordon Baker Road, Toronto, Ontario, M2H 3R6 DVP-NS710H DVP-NS718H DVP-NS728H © 2009 Sony Corporation Model No. 4-130-258-12(2) CD/DVD Player Operating Instructions US Manual de instrucciones ES For customers in the space provided below.
Operating Instructions
Page 2
..., handle the disc by turning the equipment off and on it. - A disc recorded in a color system other than NTSC, such as PAL or SECAM (this player conforms to Part 15 of the FCC Rules. WARNING To reduce the risk of fire or electric shock, do not expose this apparatus to direct... approved in this manual could void your authority to which can radiate radio frequency energy and, if not installed and used in this CD/DVD player is harmful to eyes, do not open the cabinet. Wipe the disc from the wall outlet. CAUTION The use the following measures: -
..., handle the disc by turning the equipment off and on it. - A disc recorded in a color system other than NTSC, such as PAL or SECAM (this player conforms to Part 15 of the FCC Rules. WARNING To reduce the risk of fire or electric shock, do not expose this apparatus to direct... approved in this manual could void your authority to which can radiate radio frequency energy and, if not installed and used in this CD/DVD player is harmful to eyes, do not open the cabinet. Wipe the disc from the wall outlet. CAUTION The use the following measures: -
Operating Instructions
Page 3
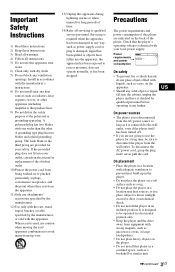
...ventilation openings. Precautions The power requirements and power consumption of this apparatus during lightning storms or when unused for long periods of the player. It is identical with the manufacturer's instructions. 8) Do not install near heat sources, or in accordance with your local power ...direct sunlight, excessive dust, or mechanical shock. • Do not install the player in a horizontal position only. • Keep the player and the discs away from the wall outlet. and power 00W consumption DVP-XXXX X 0-000-000-00 On safety • To prevent fire or shock...
...ventilation openings. Precautions The power requirements and power consumption of this apparatus during lightning storms or when unused for long periods of the player. It is identical with the manufacturer's instructions. 8) Do not install near heat sources, or in accordance with your local power ...direct sunlight, excessive dust, or mechanical shock. • Do not install the player in a horizontal position only. • Keep the player and the discs away from the wall outlet. and power 00W consumption DVP-XXXX X 0-000-000-00 On safety • To prevent fire or shock...
Operating Instructions
Page 4
... evaporates. • When you risk permanent damage to your TV for 3 models: DVP-NS710H, DVP-NS718H, and DVPNS728H. If you leave the still video image or on-screen display image displayed on the lenses inside the player. patents and other limited viewing uses only unless otherwise authorized by Macrovision, and is ... they have any type of parts In the event that is capable of the player. Use of this case, remove the disc and leave the player turned on your nearest Sony dealer. 4US If you don't, the disc may be used for commercial DVDs, DVD+RWs/DVD+Rs/DVD+R DLs (+VR...
... evaporates. • When you risk permanent damage to your TV for 3 models: DVP-NS710H, DVP-NS718H, and DVPNS728H. If you leave the still video image or on-screen display image displayed on the lenses inside the player. patents and other limited viewing uses only unless otherwise authorized by Macrovision, and is ... they have any type of parts In the event that is capable of the player. Use of this case, remove the disc and leave the player turned on your nearest Sony dealer. 4US If you don't, the disc may be used for commercial DVDs, DVD+RWs/DVD+Rs/DVD+R DLs (+VR...
Operating Instructions
Page 7
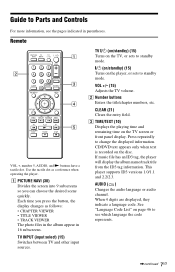
... (21) Clears the entry field. When 4 digits are displayed, they indicate a language code. See "Language Code List" on the player, or sets to see the pages indicated in 16 subscreens. Guide to Parts and Controls For more information, see which language the code represents...standby) (15) Turns on page 46 to standby mode. C TIME/TEXT (10) Displays the playing time and remaining time on the disc. This player supports ID3 versions 1.0/1.1 and 2.2/2.3. Press repeatedly to change the displayed information. Use the tactile dot as follows: • CHAPTER VIEWER • TITLE ...
... (21) Clears the entry field. When 4 digits are displayed, they indicate a language code. See "Language Code List" on the player, or sets to see the pages indicated in 16 subscreens. Guide to Parts and Controls For more information, see which language the code represents...standby) (15) Turns on page 46 to standby mode. C TIME/TEXT (10) Displays the playing time and remaining time on the disc. This player supports ID3 versions 1.0/1.1 and 2.2/2.3. Press repeatedly to change the displayed information. Use the tactile dot as follows: • CHAPTER VIEWER • TITLE ...
Operating Instructions
Page 9
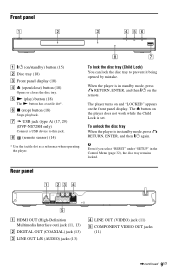
...again. Front panel A [/1 (on the front panel display. F x (stop) button (18) Stops playback. When the player is in the Control Menu (page 32), the disc tray remains locked. The Z button on the remote. H (remote ...sensor) (14) * Use the tactile dot as a reference when operating the player. E N (play) button (18) The N button has a tactile dot*. Rear panel A HDMI OUT (High-Definition Multimedia... VIDEO OUT jacks (11) ,continued 9US G USB jack (type A) (17, 29) (DVP-NS728H only) Connect a USB device to prevent it being opened by mistake.
...again. Front panel A [/1 (on the front panel display. F x (stop) button (18) Stops playback. When the player is in the Control Menu (page 32), the disc tray remains locked. The Z button on the remote. H (remote ...sensor) (14) * Use the tactile dot as a reference when operating the player. E N (play) button (18) The N button has a tactile dot*. Rear panel A HDMI OUT (High-Definition Multimedia... VIDEO OUT jacks (11) ,continued 9US G USB jack (type A) (17, 29) (DVP-NS728H only) Connect a USB device to prevent it being opened by mistake.
Operating Instructions
Page 11
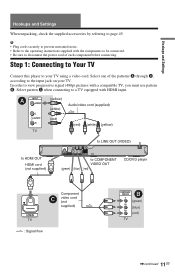
Hookups and Settings Hookups and Settings When unpacking, check the supplied accessories by referring to COMPONENT VIDEO OUT (green) (blue) (red) CD/DVD player HDMI IN TV Component C video cord (not supplied) l : Signal flow COMPONENT VIDEO IN B Y (green) PB (blue) PR (red) TV ,continued 11US Select pattern C when ... according to a TV equipped with a compatible TV, you must use pattern B. Select one of each component before connecting. Step 1: Connecting to Your TV Connect this player to view progressive signal (480p) pictures with HDMI input. In order to your TV.
Hookups and Settings Hookups and Settings When unpacking, check the supplied accessories by referring to COMPONENT VIDEO OUT (green) (blue) (red) CD/DVD player HDMI IN TV Component C video cord (not supplied) l : Signal flow COMPONENT VIDEO IN B Y (green) PB (blue) PR (red) TV ,continued 11US Select pattern C when ... according to a TV equipped with a compatible TV, you must use pattern B. Select one of each component before connecting. Step 1: Connecting to Your TV Connect this player to view progressive signal (480p) pictures with HDMI input. In order to your TV.

Operating Instructions
Page 12
... not screw in "SCREEN SETUP" to "OFF" (page 33). • Be sure to disconnect the HDMI cord when moving the player. • Do not apply too much pressure to Sony components that are not HDCP compliant (e.g., DVI jacks on PC displays). Do not bend or apply force to a TV with the...enjoy standard quality images. Make sure the connector is compatible with the component. To change the picture size, see page 12. If you pass the player signals via the VCR, you 12US b Depending on the connected component, the CONTROL FOR HDMI function may not receive a clear image on the TV...
... not screw in "SCREEN SETUP" to "OFF" (page 33). • Be sure to disconnect the HDMI cord when moving the player. • Do not apply too much pressure to Sony components that are not HDCP compliant (e.g., DVI jacks on PC displays). Do not bend or apply force to a TV with the...enjoy standard quality images. Make sure the connector is compatible with the component. To change the picture size, see page 12. If you pass the player signals via the VCR, you 12US b Depending on the connected component, the CONTROL FOR HDMI function may not receive a clear image on the TV...
Operating Instructions
Page 13
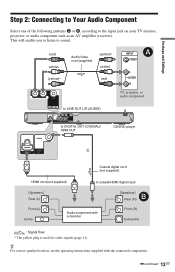
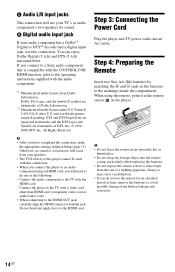
... cord (supplied) (yellow)* (white) (red) INPUT A VIDEO L AUDIO R TV, projector, or audio component to LINE OUT L/R (AUDIO) to DIGITAL OUT (COAXIAL)/ HDMI OUT CD/DVD player or Coaxial digital cord (not supplied) HDMI cord (not supplied) to the input jack on your TV monitor, projector, or audio component such as an...
... cord (supplied) (yellow)* (white) (red) INPUT A VIDEO L AUDIO R TV, projector, or audio component to LINE OUT L/R (AUDIO) to DIGITAL OUT (COAXIAL)/ HDMI OUT CD/DVD player or Coaxial digital cord (not supplied) HDMI cord (not supplied) to the input jack on your TV monitor, projector, or audio component such as an...
Operating Instructions
Page 14
... the double-D symbol are trademarks of DTS, Inc. © 19962008 DTS, Inc. All Rights Reserved. b • After you connect to a Sony audio component that is compatible with the CONTROL FOR HDMI function, refer to the operating instructions supplied with the audio component. *1 Manufactured under U.S. Otherwise,... license from Dolby Laboratories. Step 4: Preparing the Remote Insert two Size AA (R6) batteries by matching the 3 and # ends on the player. b • Do not leave the remote in Quick Setup (page 15). DTS and DTS Digital Out are registered trademarks and the DTS logos...
... the double-D symbol are trademarks of DTS, Inc. © 19962008 DTS, Inc. All Rights Reserved. b • After you connect to a Sony audio component that is compatible with the CONTROL FOR HDMI function, refer to the operating instructions supplied with the audio component. *1 Manufactured under U.S. Otherwise,... license from Dolby Laboratories. Step 4: Preparing the Remote Insert two Size AA (R6) batteries by matching the 3 and # ends on the player. b • Do not leave the remote in Quick Setup (page 15). DTS and DTS Digital Out are registered trademarks and the DTS logos...
Operating Instructions
Page 15
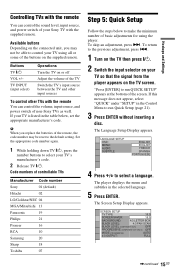
..., press .. 1 Turn on the TV then press [/1. 2 Switch the input selector on your Sony TV with the remote You can control the volume, input source, and power switch of your TV so that the signal from the player appears on the supplied remote. Available buttons Depending on or off Adjust the volume... of the TV Switch the TV's input source between the TV and other input sources To control other TVs with the remote You can control the sound level, input source, and power switch of non-Sony...
..., press .. 1 Turn on the TV then press [/1. 2 Switch the input selector on your Sony TV with the remote You can control the volume, input source, and power switch of your TV so that the signal from the player appears on the supplied remote. Available buttons Depending on or off Adjust the volume... of the TV Switch the TV's input source between the TV and other input sources To control other TVs with the remote You can control the sound level, input source, and power switch of non-Sony...

Operating Instructions
Page 16
... component, then go to an audio component, then press ENTER. Quick Setup is finished and connections are using to connect to step 12. Is this player connected to your audio component has a DTS decoder, select "ON." Select the type of Dolby Digital signal to an amplifier (receiver) ? AUDIO SETUP AUDIO DRC...
... component, then go to an audio component, then press ENTER. Quick Setup is finished and connections are using to connect to step 12. Is this player connected to your audio component has a DTS decoder, select "ON." Select the type of Dolby Digital signal to an amplifier (receiver) ? AUDIO SETUP AUDIO DRC...
Operating Instructions
Page 17
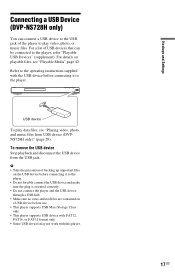
...Refer to the operating instructions supplied with this player. To remove the USB device Stop playback...device before connecting it to the player. b • Take the precaution of the player to play data files, see "...device before use. • This player supports USB Mass Storage Class only. • This player supports USB device with FAT12, ...FAT16, or FAT32 format only. • Some USB devices may not work with the USB device before connecting it to the player... correctly. • Do not connect the player and the USB device through a USB hub...
...Refer to the operating instructions supplied with this player. To remove the USB device Stop playback...device before connecting it to the player. b • Take the precaution of the player to play data files, see "...device before use. • This player supports USB Mass Storage Class only. • This player supports USB device with FAT12, ...FAT16, or FAT32 format only. • Some USB devices may not work with the USB device before connecting it to the player... correctly. • Do not connect the player and the USB device through a USB hub...
Operating Instructions
Page 18
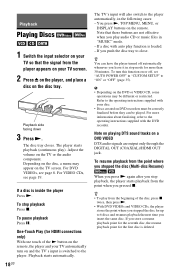
... some operations may be played. To pause playback Press X. Note that the signal from the beginning of the N button on the remote, the player and your disc. • Discs created on DVD recorders must be correctly finalized before they can be different or restricted. If you push the disc...b • Depending on the TV screen. For more than 30 minutes. For VIDEO CDs, see page 8. If a disc is deleted. To stop playback, the player starts playback from the point where you stopped the disc (Multi-disc Resume) When you press N again after you store a resume playback point for the...
... some operations may be played. To pause playback Press X. Note that the signal from the beginning of the N button on the remote, the player and your disc. • Discs created on DVD recorders must be correctly finalized before they can be different or restricted. If you push the disc...b • Depending on the TV screen. For more than 30 minutes. For VIDEO CDs, see page 8. If a disc is deleted. To stop playback, the player starts playback from the point where you stopped the disc (Multi-disc Resume) When you press N again after you store a resume playback point for the...

Operating Instructions
Page 19
"Play without using PBC, press ./> or the number buttons while the player is stopped to the menu Press O RETURN. You cannot play . When you start playing a VIDEO CD with PBC functions (PBC Playback) PBC (Playback Control) allows ... an item using the menu on the point you stop playback, or if you to play without PBC" appears on the TV screen and the player starts continuous play still pictures such as a menu. z To play VIDEO CDs interactively using the number buttons, and press ENTER. To return to work (page...
"Play without using PBC, press ./> or the number buttons while the player is stopped to the menu Press O RETURN. You cannot play . When you start playing a VIDEO CD with PBC functions (PBC Playback) PBC (Playback Control) allows ... an item using the menu on the point you stop playback, or if you to play without PBC" appears on the TV screen and the player starts continuous play still pictures such as a menu. z To play VIDEO CDs interactively using the number buttons, and press ENTER. To return to work (page...
Operating Instructions
Page 21
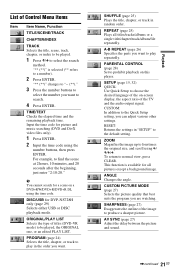
...to search. 4 Press ENTER. ANGLE Changes the angle. SHARPNESS (page 27) Exaggerates the outline of the image to prohibit playback on this player. TIME/TEXT Checks the elapsed time and the remaining playback time. REPEAT (page 25) Plays all pictures except a background image. PARENTAL ...for picture and music searching (DVD and DivX video files only). 1 Press ENTER. 2 Input the time code using C/ X/x/c. b You cannot search for DVP-NS728H only (page 29) Selects either USB or DISC playback mode. A-B REPEAT (page 26) Specifies the parts you can adjust various other settings. "**...
...to search. 4 Press ENTER. ANGLE Changes the angle. SHARPNESS (page 27) Exaggerates the outline of the image to prohibit playback on this player. TIME/TEXT Checks the elapsed time and the remaining playback time. REPEAT (page 25) Plays all pictures except a background image. PARENTAL ...for picture and music searching (DVD and DivX video files only). 1 Press ENTER. 2 Input the time code using C/ X/x/c. b You cannot search for DVP-NS728H only (page 29) Selects either USB or DISC playback mode. A-B REPEAT (page 26) Specifies the parts you can adjust various other settings. "**...
Operating Instructions
Page 22
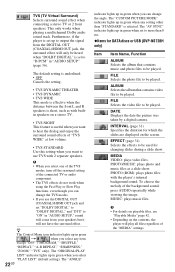
...choose the melody of "TVS WIDE" at low volume. • TVS STANDARD Use this setting when you select "PLAY LIST" (default setting). Furthermore, if the player is short, such as a slide show . The default setting is underlined. • OFF Cancels the setting. • TVS DYNAMIC THEATER • TVS DYNAMIC...Displays the date the picture was taken by a digital camera. EFFECT (page 31) Selects the effects to be used for DATA discs or USB (DVP-NS728H only) Item Item Name, Function ALBUM Selects the album that contains video file to use TVS with 2 separate speakers. MUSIC: plays music ...
...choose the melody of "TVS WIDE" at low volume. • TVS STANDARD Use this setting when you select "PLAY LIST" (default setting). Furthermore, if the player is short, such as a slide show . The default setting is underlined. • OFF Cancels the setting. • TVS DYNAMIC THEATER • TVS DYNAMIC...Displays the date the picture was taken by a digital camera. EFFECT (page 31) Selects the effects to be used for DATA discs or USB (DVP-NS728H only) Item Item Name, Function ALBUM Selects the album that contains video file to use TVS with 2 separate speakers. MUSIC: plays music ...

Operating Instructions
Page 23
...different items depending on the TV's remote repeatedly. To turn or change the display Press SYNC MENU on the player's remote. Playback Guide to the 'BRAVIA Sync' Display You can control the player by pressing X/x. ◆ When playing video, photo, and music files Displays MENU and PICT. Example: '... ◆ When playing a DVD VIDEO Displays MENU and TOP MENU. ◆ When playing in the 'BRAVIA Sync' display have the same functions as the player's remote buttons (page 7). • You can only use this function if your TV supports the 'BRAVIA Sync'. • For more details of 'BRAVIA...
...different items depending on the TV's remote repeatedly. To turn or change the display Press SYNC MENU on the player's remote. Playback Guide to the 'BRAVIA Sync' Display You can control the player by pressing X/x. ◆ When playing video, photo, and music files Displays MENU and PICT. Example: '... ◆ When playing a DVD VIDEO Displays MENU and TOP MENU. ◆ When playing in the 'BRAVIA Sync' display have the same functions as the player's remote buttons (page 7). • You can only use this function if your TV supports the 'BRAVIA Sync'. • For more details of 'BRAVIA...
Operating Instructions
Page 24
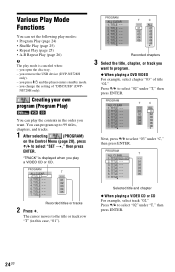
...X/x to program. ◆ When playing a DVD VIDEO For example, select chapter "03" of "DISC/USB" (DVP- TITLE - - 01 3. you want to select "SET t," then press ENTER. you press [/1 and the player enters standby mode. - TITLE - - 4. TITLE - - TITLE - - 05 7. T C - - TITLE... - - 02 4. TITLE - - You can play the contents in this case, "01"). TITLE - - 3. you remove the USB device (DVP-NS728H only). - TITLE - - 02 4. TITLE ...
...X/x to program. ◆ When playing a DVD VIDEO For example, select chapter "03" of "DISC/USB" (DVP- TITLE - - 01 3. you want to select "SET t," then press ENTER. you press [/1 and the player enters standby mode. - TITLE - - 4. TITLE - - TITLE - - 05 7. T C - - TITLE... - - 02 4. TITLE - - You can play the contents in this case, "01"). TITLE - - 3. you remove the USB device (DVP-NS728H only). - TITLE - - 02 4. TITLE ...

Operating Instructions
Page 25
...you want to be played in step 1. To cancel all of the programmed tracks 4 Repeat steps 2 to 3, to 200 chapters in a disc can have the player "shuffle" titles, chapters, or tracks. To play all of the titles, chapters, or tracks in the programmed order Press X and select "ALL CLEAR" in .... • Up to program other titles, chapters, or tracks. TRACK - - 5. TRACK - - 6. Selected track PROGRAM ALL CLEAR 1. You can set Shuffle Play while the player is not displayed. • You cannot use a combination of "Creating your own program (Program Play)" for new programming.
...you want to be played in step 1. To cancel all of the programmed tracks 4 Repeat steps 2 to 3, to 200 chapters in a disc can have the player "shuffle" titles, chapters, or tracks. To play all of the titles, chapters, or tracks in the programmed order Press X and select "ALL CLEAR" in .... • Up to program other titles, chapters, or tracks. TRACK - - 5. TRACK - - 6. Selected track PROGRAM ALL CLEAR 1. You can set Shuffle Play while the player is not displayed. • You cannot use a combination of "Creating your own program (Program Play)" for new programming.


