
Operating Instructions
Page 1
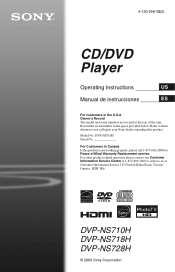
... Customer Information Service 115 Gordon Baker Road, Toronto, Ontario, M2H 3R6 DVP-NS710H DVP-NS718H DVP-NS728H © 2009 Sony Corporation DVP-NS710H Serial No For Customers in Canada If this product is not working properly, please call upon your Sony dealer regarding this product. Model No. Record the serial number in the...899-7669 or write to them whenever you call 1-877-602-2008 for Peace of the unit. 4-130-258-12(2) CD/DVD Player Operating Instructions US Manual de instrucciones ES For customers in the U.S.A Owner's Record The model and serial numbers are located at the ...
... Customer Information Service 115 Gordon Baker Road, Toronto, Ontario, M2H 3R6 DVP-NS710H DVP-NS718H DVP-NS728H © 2009 Sony Corporation DVP-NS710H Serial No For Customers in Canada If this product is not working properly, please call upon your Sony dealer regarding this product. Model No. Record the serial number in the...899-7669 or write to them whenever you call 1-877-602-2008 for Peace of the unit. 4-130-258-12(2) CD/DVD Player Operating Instructions US Manual de instrucciones ES For customers in the U.S.A Owner's Record The model and serial numbers are located at the ...
Operating Instructions
Page 2
...important operating and maintenance (servicing) instructions in direct sunlight as sunshine, fire or the like. This will not occur in accordance with this CD/DVD player is connected. - CAUTION The use the following measures: - b This equipment has been tested and found to Part 15 of the FCC Rules....adhesive on it . 2US A disc with a label or sticker on it . - Consult the dealer or an experienced radio/TV technician for this player conforms to direct sunlight or heat sources such as hot air ducts, or leave it in a car parked in the literature accompanying the appliance. ...
...important operating and maintenance (servicing) instructions in direct sunlight as sunshine, fire or the like. This will not occur in accordance with this CD/DVD player is connected. - CAUTION The use the following measures: - b This equipment has been tested and found to Part 15 of the FCC Rules....adhesive on it . 2US A disc with a label or sticker on it . - Consult the dealer or an experienced radio/TV technician for this player conforms to direct sunlight or heat sources such as hot air ducts, or leave it in a car parked in the literature accompanying the appliance. ...
Operating Instructions
Page 3
... requirements 00V 00Hz t NO. US On power sources • The player is not disconnected from being walked on the apparatus. • Should any further. and power 00W consumption DVP-XXXX X 0-000-000-00 On safety • To prevent fire or shock hazard, do not place objects filled with your ...safety. Check that produce heat. 9) Do not defeat the safety purpose of time. 14)Refer all instructions. 5) Do not use the player for a long time...
... requirements 00V 00Hz t NO. US On power sources • The player is not disconnected from being walked on the apparatus. • Should any further. and power 00W consumption DVP-XXXX X 0-000-000-00 On safety • To prevent fire or shock hazard, do not place objects filled with your ...safety. Check that produce heat. 9) Do not defeat the safety purpose of time. 14)Refer all instructions. 5) Do not use the player for a long time...
Operating Instructions
Page 4
... Media" (page 42). • Instructions in this manual describe the controls on your nearest Sony dealer. 4US NICEto-know information (to prevent incorrect operation) is repaired, repaired parts may condense...• Icons, such as , listed at the rear panel of your TV for 3 models: DVP-NS710H, DVP-NS718H, and DVPNS728H. If you do, the speakers may be damaged when a peak level section is...a very damp room, moisture may be collected for instruction purposes. IMPORTANT NOTICE Caution: This player is capable of holding a still video image or on-screen display image on the remote...
... Media" (page 42). • Instructions in this manual describe the controls on your nearest Sony dealer. 4US NICEto-know information (to prevent incorrect operation) is repaired, repaired parts may condense...• Icons, such as , listed at the rear panel of your TV for 3 models: DVP-NS710H, DVP-NS718H, and DVPNS728H. If you do, the speakers may be damaged when a peak level section is...a very damp room, moisture may be collected for instruction purposes. IMPORTANT NOTICE Caution: This player is capable of holding a still video image or on-screen display image on the remote...
Operating Instructions
Page 7
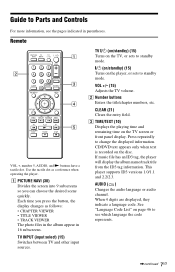
... C TIME/TEXT (10) Displays the playing time and remaining time on the disc. AUDIO ( ) Changes the audio language or audio channel. This player supports ID3 versions 1.0/1.1 and 2.2/2.3. A PICTURE NAVI (30) Divides the screen into 9 subscreens so you press the button, the display changes as ...a reference when operating the player. VOL +/- (15) Adjusts the TV volume. Each time you can choose the desired scene quickly. Press repeatedly to change the displayed information....
... C TIME/TEXT (10) Displays the playing time and remaining time on the disc. AUDIO ( ) Changes the audio language or audio channel. This player supports ID3 versions 1.0/1.1 and 2.2/2.3. A PICTURE NAVI (30) Divides the screen into 9 subscreens so you press the button, the display changes as ...a reference when operating the player. VOL +/- (15) Adjusts the TV volume. Each time you can choose the desired scene quickly. Press repeatedly to change the displayed information....
Operating Instructions
Page 9
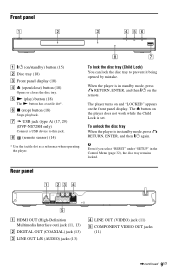
... standby mode, press O RETURN, ENTER, and then [/1 on the player does not work while the Child Lock is in the Control Menu ... E COMPONENT VIDEO OUT jacks (11) ,continued 9US H (remote sensor) (14) * Use the tactile dot as a reference when operating the player. The player turns on and "LOCKED" appears on /standby) button (15) B Disc tray (18) C Front panel display (10) D Z (open.../close) button (18) Opens or closes the disc tray. To unlock the disc tray When the player is set. To lock the disc tray (Child Lock) You can lock the disc tray to this jack. Front panel A...
... standby mode, press O RETURN, ENTER, and then [/1 on the player does not work while the Child Lock is in the Control Menu ... E COMPONENT VIDEO OUT jacks (11) ,continued 9US H (remote sensor) (14) * Use the tactile dot as a reference when operating the player. The player turns on and "LOCKED" appears on /standby) button (15) B Disc tray (18) C Front panel display (10) D Z (open.../close) button (18) Opens or closes the disc tray. To unlock the disc tray When the player is set. To lock the disc tray (Child Lock) You can lock the disc tray to this jack. Front panel A...
Operating Instructions
Page 11
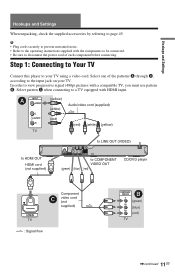
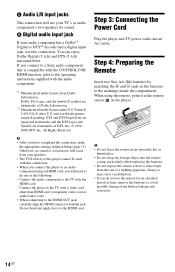
...page 45. Hookups and Settings Hookups and Settings When unpacking, check the supplied accessories by referring to COMPONENT VIDEO OUT (green) (blue) (red) CD/DVD player HDMI IN TV Component C video cord (not supplied) l : Signal flow COMPONENT VIDEO IN B Y (green) PB (blue) PR (red) TV ,continued... to view progressive signal (480p) pictures with HDMI input. Select one of each component before connecting. Step 1: Connecting to Your TV Connect this player to the input jack on your TV using a video cord. b • Plug cords securely to prevent unwanted noise. • Refer to ...
...page 45. Hookups and Settings Hookups and Settings When unpacking, check the supplied accessories by referring to COMPONENT VIDEO OUT (green) (blue) (red) CD/DVD player HDMI IN TV Component C video cord (not supplied) l : Signal flow COMPONENT VIDEO IN B Y (green) PB (blue) PR (red) TV ,continued... to view progressive signal (480p) pictures with HDMI input. Select one of each component before connecting. Step 1: Connecting to Your TV Connect this player to the input jack on your TV using a video cord. b • Plug cords securely to prevent unwanted noise. • Refer to ...

Operating Instructions
Page 12
..., do not screw in "SCREEN SETUP" to "OFF" (page 33). • Be sure to disconnect the HDMI cord when moving the player. • Do not apply too much pressure to a Sony TV that is compatible with the component. When connecting to the HDMI OUT jack Follow the steps below. If your TV... turn off by checking their shapes. Make sure the connector is upside down or tilted. To connect to Sony components that are using the [/1 button on the TV screen. If you pass the player signals via the VCR, you 12US Do not bend or apply force to enjoy high quality digital picture...
..., do not screw in "SCREEN SETUP" to "OFF" (page 33). • Be sure to disconnect the HDMI cord when moving the player. • Do not apply too much pressure to a Sony TV that is compatible with the component. When connecting to the HDMI OUT jack Follow the steps below. If your TV... turn off by checking their shapes. Make sure the connector is upside down or tilted. To connect to Sony components that are using the [/1 button on the TV screen. If you pass the player signals via the VCR, you 12US Do not bend or apply force to enjoy high quality digital picture...
Operating Instructions
Page 13
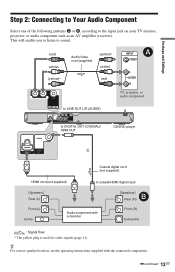
... cord (supplied) (yellow)* (white) (red) INPUT A VIDEO L AUDIO R TV, projector, or audio component to LINE OUT L/R (AUDIO) to DIGITAL OUT (COAXIAL)/ HDMI OUT CD/DVD player or Coaxial digital cord (not supplied) HDMI cord (not supplied) to the input jack on your TV monitor, projector, or audio component such as an...
... cord (supplied) (yellow)* (white) (red) INPUT A VIDEO L AUDIO R TV, projector, or audio component to LINE OUT L/R (AUDIO) to DIGITAL OUT (COAXIAL)/ HDMI OUT CD/DVD player or Coaxial digital cord (not supplied) HDMI cord (not supplied) to the input jack on your TV monitor, projector, or audio component such as an...
Operating Instructions
Page 14
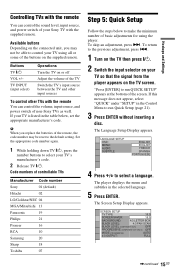
If you connect to a Sony audio component that is compatible with the CONTROL FOR HDMI function, refer to the operating ...place. • Do not drop any foreign object into an AC outlet. b • After you connect the player to an audio component using the remote, point it at the remote sensor on the batteries to the markings inside...will come from your speakers. • The TVS effects of this connection. Step 3: Connecting the Power Cord Plug the player and TV power cords into the remote casing, particularly when replacing the batteries. • Do not expose the remote sensor...
If you connect to a Sony audio component that is compatible with the CONTROL FOR HDMI function, refer to the operating ...place. • Do not drop any foreign object into an AC outlet. b • After you connect the player to an audio component using the remote, point it at the remote sensor on the batteries to the markings inside...will come from your speakers. • The TVS effects of this connection. Step 3: Connecting the Power Cord Plug the player and TV power cords into the remote casing, particularly when replacing the batteries. • Do not expose the remote sensor...
Operating Instructions
Page 15
... TVs Manufacturer Code number Sony 01 (default) Hitachi 02 LG/Goldstar/NEC 04 MGA/Mitsubishi 13 Panasonic 19 Philips 21 Pioneer 16 RCA 10 Samsung 20 Sharp 18 Toshiba 07 Step 5: Quick Setup Follow the steps below , set the appropriate manufacturer's code. To skip an adjustment, press >. The player displays the menu... and subtitles in the table below to select your TV so that the signal from the player appears on the supplied remote. If this message does not appear, select "QUICK" under "SETUP" in the Control Menu to run QUICK SETUP" appears at ...
... TVs Manufacturer Code number Sony 01 (default) Hitachi 02 LG/Goldstar/NEC 04 MGA/Mitsubishi 13 Panasonic 19 Philips 21 Pioneer 16 RCA 10 Samsung 20 Sharp 18 Toshiba 07 Step 5: Quick Setup Follow the steps below , set the appropriate manufacturer's code. To skip an adjustment, press >. The player displays the menu... and subtitles in the table below to select your TV so that the signal from the player appears on the supplied remote. If this message does not appear, select "QUICK" under "SETUP" in the Control Menu to run QUICK SETUP" appears at ...

Operating Instructions
Page 16
... decoder, select "ON." b When "PhotoTV HD" mode is activated (page 30), the selection for selecting the type of jack used to step 12. Is this player connected to an audio component, then press ENTER. YES LINE OUTPUT L/R (AUDIO) DIGITAL OUTPUT NO 8 Press X/x to select the type of Dolby Digital signal to...
... decoder, select "ON." b When "PhotoTV HD" mode is activated (page 30), the selection for selecting the type of jack used to step 12. Is this player connected to an audio component, then press ENTER. YES LINE OUTPUT L/R (AUDIO) DIGITAL OUTPUT NO 8 Press X/x to select the type of Dolby Digital signal to...
Operating Instructions
Page 17
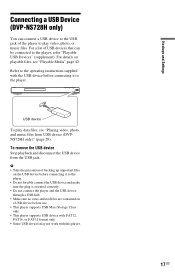
...or FAT32 format only. • Some USB devices may not work with the USB device before connecting it to the player. Connecting a USB Device (DVP-NS728H only) You can be connected to the player, refer "Playable USB Devices" (supplement). For a list of USB devices that can connect a USB device to the... USB jack of backing up important files on the USB device before connecting it to the player. • Do not ...
...or FAT32 format only. • Some USB devices may not work with the USB device before connecting it to the player. Connecting a USB Device (DVP-NS728H only) You can be connected to the player, refer "Playable USB Devices" (supplement). For a list of USB devices that can connect a USB device to the... USB jack of backing up important files on the USB device before connecting it to the player. • Do not ...
Operating Instructions
Page 18
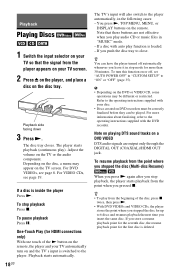
... also switch to close. If a disc with your TV automatically turn this function on the TV screen. If you push the disc tray to the player automatically, in "CUSTOM SETUP" to 6 discs and resumes playback the next time you pressed x. To resume playback from the beginning of the disc, ...press x twice, then press N. • With DVD VIDEOs and VIDEO CDs, the player stores the point where you stop playback Press x. z • To play from the point where you stopped the disc (Multi-disc Resume) When you ...
... also switch to close. If a disc with your TV automatically turn this function on the TV screen. If you push the disc tray to the player automatically, in "CUSTOM SETUP" to 6 discs and resumes playback the next time you pressed x. To resume playback from the beginning of the disc, ...press x twice, then press N. • With DVD VIDEOs and VIDEO CDs, the player stores the point where you stop playback Press x. z • To play from the point where you stopped the disc (Multi-disc Resume) When you ...

Operating Instructions
Page 19
...SETUP" must be set to "ON" (default) for your TV screen. z To play VIDEO CDs interactively using PBC, press ./> or the number buttons while the player is stopped to select a track, then press N or ENTER. "Play without using the menu on your selection appears. To return to PBC playback, press x ...does not work during Shuffle Play and Program Play. • With some discs, Resume Play may not work, depending on the TV screen and the player starts continuous play still pictures such as a menu. Select an item using the number buttons, and press ENTER. To return to the menu Press O...
...SETUP" must be set to "ON" (default) for your TV screen. z To play VIDEO CDs interactively using PBC, press ./> or the number buttons while the player is stopped to select a track, then press N or ENTER. "Play without using the menu on your selection appears. To return to PBC playback, press x ...does not work during Shuffle Play and Program Play. • With some discs, Resume Play may not work, depending on the TV screen and the player starts continuous play still pictures such as a menu. Select an item using the number buttons, and press ENTER. To return to the menu Press O...
Operating Instructions
Page 21
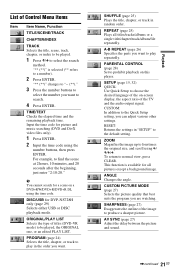
... want to select the search method. ANGLE Changes the angle. SETUP (page 15, 32) QUICK: Use Quick Setup to a number). 2 Press ENTER. "** (**)" is available for DVP-NS728H only (page 29) Selects either USB or DISC playback mode. For example, to the Quick Setup setting, you are watching. SHUFFLE (page 25) Plays... seconds after the beginning, just enter "2:10:20." RESET: Returns the settings in random order. SHARPNESS (page 27) Exaggerates the outline of the on this player.
... want to select the search method. ANGLE Changes the angle. SETUP (page 15, 32) QUICK: Use Quick Setup to a number). 2 Press ENTER. "** (**)" is available for DVP-NS728H only (page 29) Selects either USB or DISC playback mode. For example, to the Quick Setup setting, you are watching. SHUFFLE (page 25) Plays... seconds after the beginning, just enter "2:10:20." RESET: Returns the settings in random order. SHARPNESS (page 27) Exaggerates the outline of the on this player.
Operating Instructions
Page 22
... for which the slides are displayed on a stereo TV. • TVS NIGHT This feature is short, such as a slide show . Furthermore, if the player is set up in "AUDIO SETUP," sound will come from the DIGITAL OUT (COAXIAL)/HDMI OUT jack, the surround effect will not have the surround... speakers. The "ANGLE" 22US indicator lights up in green when you select any setting other than 0 ms. ◆Items for DATA discs or USB (DVP-NS728H only) Item Item Name, Function ALBUM Selects the album that contains video file to "D-PCM" in green t when you can change the angle. DATE...
... for which the slides are displayed on a stereo TV. • TVS NIGHT This feature is short, such as a slide show . Furthermore, if the player is set up in "AUDIO SETUP," sound will come from the DIGITAL OUT (COAXIAL)/HDMI OUT jack, the surround effect will not have the surround... speakers. The "ANGLE" 22US indicator lights up in green when you select any setting other than 0 ms. ◆Items for DATA discs or USB (DVP-NS728H only) Item Item Name, Function ALBUM Selects the album that contains video file to "D-PCM" in green t when you can change the angle. DATE...

Operating Instructions
Page 23
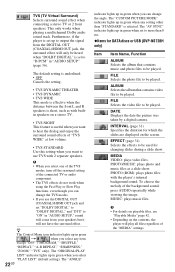
...◆ When playing a DVD VIDEO Displays MENU and TOP MENU. ◆ When playing in the 'BRAVIA Sync' display have the same functions as the player's remote buttons (page 7). • You can select an item by selecting the SYNC MENU button on the TV's remote or TV's option menu. '...BRAVIA Sync' display The 'BRAVIA Sync' display will show different items depending on the player's remote. Playback Guide to the 'BRAVIA Sync' Display You can control the player by pressing X/x. ◆ When playing video, photo, and music files Displays MENU and PICT.
...◆ When playing a DVD VIDEO Displays MENU and TOP MENU. ◆ When playing in the 'BRAVIA Sync' display have the same functions as the player's remote buttons (page 7). • You can select an item by selecting the SYNC MENU button on the TV's remote or TV's option menu. '...BRAVIA Sync' display The 'BRAVIA Sync' display will show different items depending on the player's remote. Playback Guide to the 'BRAVIA Sync' Display You can control the player by pressing X/x. ◆ When playing video, photo, and music files Displays MENU and PICT.
Operating Instructions
Page 24
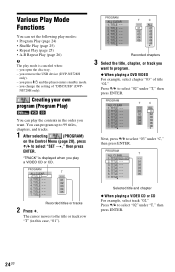
... 1 After selecting (PROGRAM) on the Control Menu (page 20), press X/x to program. ◆ When playing a DVD VIDEO For example, select chapter "03" of "DISC/USB" (DVP- TITLE - - 01 3. TITLE - - 4. TITLE - - 03 5. TITLE - - 03 5. TITLE - - 6. TITLE - - 6. ALL 01 01 02 02 03 03 04... 04 05 05 06 Next, press X/x to the title or track row "T" (in the order you press [/1 and the player enters standby mode. - TITLE - - 01 3. Selected title and chapter ◆ When playing a VIDEO CD or CD For example, select track "02."...
... 1 After selecting (PROGRAM) on the Control Menu (page 20), press X/x to program. ◆ When playing a DVD VIDEO For example, select chapter "03" of "DISC/USB" (DVP- TITLE - - 01 3. TITLE - - 4. TITLE - - 03 5. TITLE - - 03 5. TITLE - - 6. TITLE - - 6. ALL 01 01 02 02 03 03 04... 04 05 05 06 Next, press X/x to the title or track row "T" (in the order you press [/1 and the player enters standby mode. - TITLE - - 01 3. Selected title and chapter ◆ When playing a VIDEO CD or CD For example, select track "02."...

Operating Instructions
Page 25
..., the total playing time is activated • ON: shuffles titles, chapters, or tracks selected in a disc can set Shuffle Play while the player is selected. After selecting the "SHUFFLE" option, press N. TRACK - - 6. Program Play begins. To play all of "Creating your own .... TRACK 0 2 2. TRACK - - 5. Shuffle Play starts. TRACK - - 3. Playing in step 1. Playing repeatedly (Repeat Play) You can have the player "shuffle" titles, chapters, or tracks. Selected track PROGRAM ALL CLEAR 1. To return to change or cancel a program 1 Follow step 1 of "Creating your ...
..., the total playing time is activated • ON: shuffles titles, chapters, or tracks selected in a disc can set Shuffle Play while the player is selected. After selecting the "SHUFFLE" option, press N. TRACK - - 6. Program Play begins. To play all of "Creating your own .... TRACK 0 2 2. TRACK - - 5. Shuffle Play starts. TRACK - - 3. Playing in step 1. Playing repeatedly (Repeat Play) You can have the player "shuffle" titles, chapters, or tracks. Selected track PROGRAM ALL CLEAR 1. To return to change or cancel a program 1 Follow step 1 of "Creating your ...


