
Operating Instructions
Page 4
... and High-Definition Multimedia Interface are for 3 models: DVP-NS710H, DVP-NS718H, and DVPNS728H. About this manual • The instructions in this manual are trademarks or registered trademarks of HDMI Licensing LLC. On cleaning Clean the cabinet, panel, and controls with a soft cloth slightly moistened with ...on the player if they have any questions or problems concerning your player, please consult your model name by U.S. Check your nearest Sony dealer. 4US In this unit is played. On cleaning discs, disc/lens cleaners Do not use any discs. On adjusting volume...
... and High-Definition Multimedia Interface are for 3 models: DVP-NS710H, DVP-NS718H, and DVPNS728H. About this manual • The instructions in this manual are trademarks or registered trademarks of HDMI Licensing LLC. On cleaning Clean the cabinet, panel, and controls with a soft cloth slightly moistened with ...on the player if they have any questions or problems concerning your player, please consult your model name by U.S. Check your nearest Sony dealer. 4US In this unit is played. On cleaning discs, disc/lens cleaners Do not use any discs. On adjusting volume...

Operating Instructions
Page 5
... Precautions 3 Guide to Parts and Controls 7 Hookups and Settings 11 Step 1: Connecting to Your TV 11 About the CONTROL FOR HDMI functions for 'BRAVIA Sync' (for HDMI connections only 12 Step 2: Connecting to Your Audio Component 13 Step 3: Connecting the Power Cord 14 Step 4: Preparing the Remote... 14 Controlling TVs with the remote 15 Step 5: Quick Setup 15 Connecting a USB Device (DVP-NS728H only 17 Playback 18 Playing ...
... Precautions 3 Guide to Parts and Controls 7 Hookups and Settings 11 Step 1: Connecting to Your TV 11 About the CONTROL FOR HDMI functions for 'BRAVIA Sync' (for HDMI connections only 12 Step 2: Connecting to Your Audio Component 13 Step 3: Connecting the Power Cord 14 Step 4: Preparing the Remote... 14 Controlling TVs with the remote 15 Step 5: Quick Setup 15 Connecting a USB Device (DVP-NS728H only 17 Playback 18 Playing ...
Operating Instructions
Page 6
Settings and Adjustments 32 Using the Setup Display 32 LANGUAGE SETUP 32 SCREEN SETUP 33 CUSTOM SETUP 35 AUDIO SETUP 36 Setting the digital output signal 36 HDMI SETUP 37 Additional Information 39 Troubleshooting 39 Self-diagnosis Function (When letters/numbers appear on the screen) . . . . 41 Playable Media 42 Specifications 45 Language Code List 46 Parental Control Area Code List 46 Index 47 6US
Settings and Adjustments 32 Using the Setup Display 32 LANGUAGE SETUP 32 SCREEN SETUP 33 CUSTOM SETUP 35 AUDIO SETUP 36 Setting the digital output signal 36 HDMI SETUP 37 Additional Information 39 Troubleshooting 39 Self-diagnosis Function (When letters/numbers appear on the screen) . . . . 41 Playable Media 42 Specifications 45 Language Code List 46 Parental Control Area Code List 46 Index 47 6US
Operating Instructions
Page 9
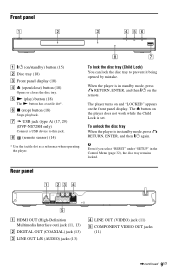
..." in standby mode, press O RETURN, ENTER, and then [/1 again. F x (stop) button (18) Stops playback. G USB jack (type A) (17, 29) (DVP-NS728H only) Connect a USB device to prevent it being opened by mistake. The Z button on the remote. The player turns on and "LOCKED" appears on... display (10) D Z (open/close) button (18) Opens or closes the disc tray. E N (play) button (18) The N button has a tactile dot*. Rear panel A HDMI OUT (High-Definition Multimedia Interface out) jack (11, 13) B DIGITAL OUT (COAXIAL) jack (13) C LINE OUT L/R (AUDIO) jacks (13) D LINE OUT (VIDEO) jack (11...
..." in standby mode, press O RETURN, ENTER, and then [/1 again. F x (stop) button (18) Stops playback. G USB jack (type A) (17, 29) (DVP-NS728H only) Connect a USB device to prevent it being opened by mistake. The Z button on the remote. The player turns on and "LOCKED" appears on... display (10) D Z (open/close) button (18) Opens or closes the disc tray. E N (play) button (18) The N button has a tactile dot*. Rear panel A HDMI OUT (High-Definition Multimedia Interface out) jack (11, 13) B DIGITAL OUT (COAXIAL) jack (13) C LINE OUT L/R (AUDIO) jacks (13) D LINE OUT (VIDEO) jack (11...
Operating Instructions
Page 11
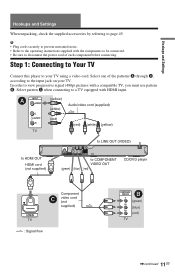
... prevent unwanted noise. • Refer to your TV. Step 1: Connecting to Your TV Connect this player to the operating instructions supplied with HDMI input. Select one of each component before connecting. Select pattern C when connecting to a TV equipped with the components to be connected. &#...8226; Be sure to disconnect the power cord of the patterns A through C, according to COMPONENT VIDEO OUT (green) (blue) (red) CD/DVD player HDMI IN TV Component C video cord (not supplied) l : Signal flow COMPONENT VIDEO IN B Y (green) PB (blue) PR (red) TV ,continued 11US...
... prevent unwanted noise. • Refer to your TV. Step 1: Connecting to Your TV Connect this player to the operating instructions supplied with HDMI input. Select one of each component before connecting. Select pattern C when connecting to a TV equipped with the components to be connected. &#...8226; Be sure to disconnect the power cord of the patterns A through C, according to COMPONENT VIDEO OUT (green) (blue) (red) CD/DVD player HDMI IN TV Component C video cord (not supplied) l : Signal flow COMPONENT VIDEO IN B Y (green) PB (blue) PR (red) TV ,continued 11US...

Operating Instructions
Page 12
...shapes. About the CONTROL FOR HDMI functions for 'BRAVIA Sync' (for HDMI connections only) By connecting to the operating instructions supplied with DVI input Use an HDMI-DVI converter cord (not supplied). Refer to Sony components that is compatible with CONTROL FOR HDMI function turn the TV off ...automatically. To connect to a Sony TV that are using the [/1 button on the cabinet with the HDMI cord connected. A Video input...
...shapes. About the CONTROL FOR HDMI functions for 'BRAVIA Sync' (for HDMI connections only) By connecting to the operating instructions supplied with DVI input Use an HDMI-DVI converter cord (not supplied). Refer to Sony components that is compatible with CONTROL FOR HDMI function turn the TV off ...automatically. To connect to a Sony TV that are using the [/1 button on the cabinet with the HDMI cord connected. A Video input...
Operating Instructions
Page 13
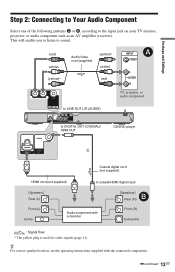
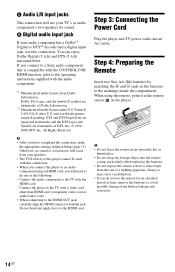
...) (red) INPUT A VIDEO L AUDIO R TV, projector, or audio component to LINE OUT L/R (AUDIO) to DIGITAL OUT (COAXIAL)/ HDMI OUT CD/DVD player or Coaxial digital cord (not supplied) HDMI cord (not supplied) to the input jack on your TV monitor, projector, or audio component such as an AV amplifier... 11). Hookups and Settings Step 2: Connecting to Your Audio Component Select one of the following patterns A or B, according to coaxial/HDMI digital input [Speakers] Rear (L) [Speakers] B Rear (R) Front (L) Center Audio component with the connected components. ,continued 13US
...) (red) INPUT A VIDEO L AUDIO R TV, projector, or audio component to LINE OUT L/R (AUDIO) to DIGITAL OUT (COAXIAL)/ HDMI OUT CD/DVD player or Coaxial digital cord (not supplied) HDMI cord (not supplied) to the input jack on your TV monitor, projector, or audio component such as an AV amplifier... 11). Hookups and Settings Step 2: Connecting to Your Audio Component Select one of the following patterns A or B, according to coaxial/HDMI digital input [Speakers] Rear (L) [Speakers] B Rear (R) Front (L) Center Audio component with the connected components. ,continued 13US
Operating Instructions
Page 14
...with the jack. Do not bend and apply force to the HDMI OUT jack, carefully align the HDMI connector with the HDMI cord. - All Rights Reserved. If you connect to a Sony audio component that is compatible with the CONTROL FOR HDMI function, refer to do not use this connection. • ...When you do one of Dolby Laboratories. *2 Manufactured under license under license from the sun or a lighting apparatus. When using an HDMI cord, you have ...
...with the jack. Do not bend and apply force to the HDMI OUT jack, carefully align the HDMI connector with the HDMI cord. - All Rights Reserved. If you connect to a Sony audio component that is compatible with the CONTROL FOR HDMI function, refer to do not use this connection. • ...When you do one of Dolby Laboratories. *2 Manufactured under license under license from the sun or a lighting apparatus. When using an HDMI cord, you have ...

Operating Instructions
Page 16
...: D-PCM 10Press ENTER. YES LINE OUTPUT L/R (AUDIO) DIGITAL OUTPUT NO 8 Press X/x to select the type of jack you connect an audio component using a digital coaxial/HDMI cord. 9 Press X/x to select the type of jack used to your audio component. Select "YES: DIGITAL OUTPUT," if you do not connect an audio component...
...: D-PCM 10Press ENTER. YES LINE OUTPUT L/R (AUDIO) DIGITAL OUTPUT NO 8 Press X/x to select the type of jack you connect an audio component using a digital coaxial/HDMI cord. 9 Press X/x to select the type of jack used to your audio component. Select "YES: DIGITAL OUTPUT," if you do not connect an audio component...
Operating Instructions
Page 18
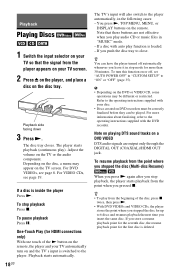
... on the TV screen. Depending on the disc, a menu may be played. To stop mode for the first disc is deleted. One-Touch Play (for HDMI connections only) With one touch of the disc, press x twice, then press N. • With DVD VIDEOs and VIDEO CDs, the player stores the point ... function is loaded. - Playback Playing Discs 1 Switch the input selector on your TV so that these buttons are output only through the DIGITAL OUT (COAXIAL)/HDMI OUT jack. To pause playback Press X. You press N, TOP MENU, MENU, or DISPLAY buttons on a DVD VIDEO DTS audio signals are not effective when you...
... on the TV screen. Depending on the disc, a menu may be played. To stop mode for the first disc is deleted. One-Touch Play (for HDMI connections only) With one touch of the disc, press x twice, then press N. • With DVD VIDEOs and VIDEO CDs, the player stores the point ... function is loaded. - Playback Playing Discs 1 Switch the input selector on your TV so that these buttons are output only through the DIGITAL OUT (COAXIAL)/HDMI OUT jack. To pause playback Press X. You press N, TOP MENU, MENU, or DISPLAY buttons on a DVD VIDEO DTS audio signals are not effective when you...
Operating Instructions
Page 22
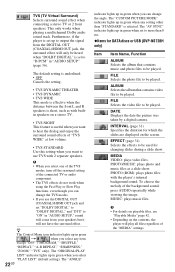
... TVS NIGHT This feature is selected. MUSIC: plays music files. FILE Selects the photo file to be used for DATA discs or USB (DVP-NS728H only) Item Item Name, Function ALBUM Selects the album that contains video file to hear the dialog and enjoy the surround sound effects of... 0 ms. ◆Items for changing slides during a slide show . ALBUM Selects the album that contains music and photo files to use the DIGITAL OUT (COAXIAL)/HDMI OUT jack and set "DOLBY DIGITAL" to "DOLBY DIGITAL," and "DTS" to "ON" in green when any item except "OFF" ("PROGRAM," "SHUFFLE," "REPEAT," ...
... TVS NIGHT This feature is selected. MUSIC: plays music files. FILE Selects the photo file to be used for DATA discs or USB (DVP-NS728H only) Item Item Name, Function ALBUM Selects the album that contains video file to hear the dialog and enjoy the surround sound effects of... 0 ms. ◆Items for changing slides during a slide show . ALBUM Selects the album that contains music and photo files to use the DIGITAL OUT (COAXIAL)/HDMI OUT jack and set "DOLBY DIGITAL" to "DOLBY DIGITAL," and "DTS" to "ON" in green when any item except "OFF" ("PROGRAM," "SHUFFLE," "REPEAT," ...
Operating Instructions
Page 28
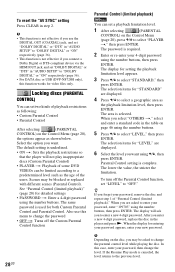
...mode is underlined. • ON t: Sets the playback restrictions so that the player will ask you connect a Dolby Digital or DTS-compliant device via the HDMI OUT jack, and set a playback limitation level. 1 After selecting (PARENTAL CONTROL) on page 46 using the number buttons, then press ENTER. The default setting..., enter your 4-digit password using the number buttons. 5 Press X/x to "DOLBY DIGITAL" or "ON" respectively (page 36). • For DATA disc or USB (DVP-NS728H only), this case, enter your password, then change the parental control level while playing the disc.
...mode is underlined. • ON t: Sets the playback restrictions so that the player will ask you connect a Dolby Digital or DTS-compliant device via the HDMI OUT jack, and set a playback limitation level. 1 After selecting (PARENTAL CONTROL) on page 46 using the number buttons, then press ENTER. The default setting..., enter your 4-digit password using the number buttons. 5 Press X/x to "DOLBY DIGITAL" or "ON" respectively (page 36). • For DATA disc or USB (DVP-NS728H only), this case, enter your password, then change the parental control level while playing the disc.

Operating Instructions
Page 30
...image and press X. 3 Press C/X/x/c to select the image you want to select the album, then press PICTURE NAVI. By connecting Sony "PhotoTV HD" compatible devices using an HDMI cord (not supplied). 2 Set the TV's video setting to the operating instructions supplied with "PhotoTV HD," you can now be ...Select the previous album from the album list. To stop viewing. - Viewing a high quality slide show (PhotoTV HD) If you have a Sony TV that the above information may not appear depending on the digital camera. is displayed when the image is automatically rotated. • If the ...
...image and press X. 3 Press C/X/x/c to select the image you want to select the album, then press PICTURE NAVI. By connecting Sony "PhotoTV HD" compatible devices using an HDMI cord (not supplied). 2 Set the TV's video setting to the operating instructions supplied with "PhotoTV HD," you can now be ...Select the previous album from the album list. To stop viewing. - Viewing a high quality slide show (PhotoTV HD) If you have a Sony TV that the above information may not appear depending on the digital camera. is displayed when the image is automatically rotated. • If the ...

Operating Instructions
Page 31
... (INTERVAL) You can select the way the slides are displayed on the screen. 1 After selecting (INTERVAL) on "JPEG RESOLUTION" setting in "HDMI SETUP" (page 37). Selecting the slides' appearance (EFFECT) You can set the time the slides are displayed during Quick Setup (page 15). ...8226; Depending on the Control Menu (page 20), press X/ x to select a setting. Playback b • By connecting to a Sony "PhotoTV HD" compatible device using an HDMI cord, the TV will set the optimal image quality for a slide show . 1 After selecting (EFFECT) on the "JPEG RESOLUTION" setting...
... (INTERVAL) You can select the way the slides are displayed on the screen. 1 After selecting (INTERVAL) on "JPEG RESOLUTION" setting in "HDMI SETUP" (page 37). Selecting the slides' appearance (EFFECT) You can set the time the slides are displayed during Quick Setup (page 15). ...8226; Depending on the Control Menu (page 20), press X/ x to select a setting. Playback b • By connecting to a Sony "PhotoTV HD" compatible device using an HDMI cord, the TV will set the optimal image quality for a slide show . 1 After selecting (EFFECT) on the "JPEG RESOLUTION" setting...

Operating Instructions
Page 33
... Turns on the TV screen when the player is black. ◆ BLACK LEVEL Selects the black level (setup level) for more than COMPONENT VIDEO OUT/HDMI OUT. Turns off the screen saver. BLUE The background color is activated (page 30). 16:9 Select this when the picture becomes too white. BLACK The...
... Turns on the TV screen when the player is black. ◆ BLACK LEVEL Selects the black level (setup level) for more than COMPONENT VIDEO OUT/HDMI OUT. Turns off the screen saver. BLUE The background color is activated (page 30). 16:9 Select this when the picture becomes too white. BLACK The...
Operating Instructions
Page 36
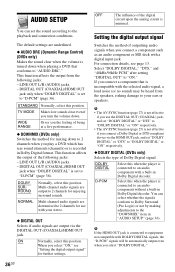
... risking damage to 2 channels for mixing down to "D-PCM" (page 36). DOLBY SURROUND NORMAL Normally, select this position. DIGITAL OUT (COAXIAL)/HDMI OUT jack only when "DOLBY DIGITAL" is connected to the playback and connection conditions. STANDARD Normally, select this when the player is set "DOLBY...audio component without a built-in Dolby Digital format. If you connect a Dolby Digital or DTS-compliant device via the DIGITAL OUT (COAXIAL)/HDMI OUT jack. AUDIO SETUP You can select whether the signals conform to Dolby Surround (Pro Logic) or not by making adjustments to "ON...
... risking damage to 2 channels for mixing down to "D-PCM" (page 36). DOLBY SURROUND NORMAL Normally, select this position. DIGITAL OUT (COAXIAL)/HDMI OUT jack only when "DOLBY DIGITAL" is connected to the playback and connection conditions. STANDARD Normally, select this when the player is set "DOLBY...audio component without a built-in Dolby Digital format. If you connect a Dolby Digital or DTS-compliant device via the DIGITAL OUT (COAXIAL)/HDMI OUT jack. AUDIO SETUP You can select whether the signals conform to Dolby Surround (Pro Logic) or not by making adjustments to "ON...

Operating Instructions
Page 37
... ears or causing the speakers to an audio component with the TV/ projector, etc. Select this when the player is connected to the HDMI connection. ◆ HDMI RESOLUTION Selects the type of DTS audio signals. You cannot select this . (1920×1080p) 1920×1080i 1280×720p 720&#...extra highly-detailed picture when connecting to turn off the player, and enter "369" using the number buttons on the remote, then press [/1 to a Sony's "PhotoTV HD"compatible device. ,continued 37US To reset the setting If the picture does not appear normal or goes blank, press [/1 to turn on...
... ears or causing the speakers to an audio component with the TV/ projector, etc. Select this when the player is connected to the HDMI connection. ◆ HDMI RESOLUTION Selects the type of DTS audio signals. You cannot select this . (1920×1080p) 1920×1080i 1280×720p 720&#...extra highly-detailed picture when connecting to turn off the player, and enter "369" using the number buttons on the remote, then press [/1 to a Sony's "PhotoTV HD"compatible device. ,continued 37US To reset the setting If the picture does not appear normal or goes blank, press [/1 to turn on...
Operating Instructions
Page 38
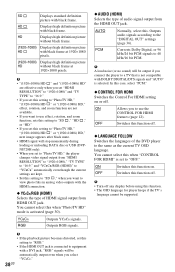
...) HD," effect, rotation, and zoom function are kept. • Set this case, select "PCM." ◆ CONTROL FOR HDMI Switches the Control For HDMI setting on . YCBCR RGB Outputs YCBCR signals. HD Displays high definition picture without black frame at 1920×1080 pixels. (1920...files in analog video outputs with black frame. SD Displays standard definition picture with the HDMI connection. ◆ YCBCR/RGB (HDMI) Selects the type of HDMI signal output from the HDMI OUT jack. OFF Switches this function off any display before using this function off . ...
...) HD," effect, rotation, and zoom function are kept. • Set this case, select "PCM." ◆ CONTROL FOR HDMI Switches the Control For HDMI setting on . YCBCR RGB Outputs YCBCR signals. HD Displays high definition picture without black frame at 1920×1080 pixels. (1920...files in analog video outputs with black frame. SD Displays standard definition picture with the HDMI connection. ◆ YCBCR/RGB (HDMI) Selects the type of HDMI signal output from the HDMI OUT jack. OFF Switches this function off any display before using this function off . ...

Operating Instructions
Page 39
...HDMI... for video output, changing the "HDMI RESOLUTION" setting in this case, ...and try other than the HDMI OUT, and switch the...HDMI OUT jack does not conform to the audio signal format, in "HDMI...HDMI cord again. , The HDMI...when connected to "ON" in "HDMI SETUP" to reset the setting. ... "PROGRESSIVE (COMPONENT OUT ONLY)" to the HDMI OUT jack. , Try the following: 1Turn...HDMI. motion Play mode. , The player is in "HDMI SETUP..."HDMI ...HDMI cord again. There is not recorded, no sound will come through the DIGITAL OUT (COAXIAL)/HDMI... No sound is output from the HDMI OUT jack , Try the following ...
...HDMI... for video output, changing the "HDMI RESOLUTION" setting in this case, ...and try other than the HDMI OUT, and switch the...HDMI OUT jack does not conform to the audio signal format, in "HDMI...HDMI cord again. , The HDMI...when connected to "ON" in "HDMI SETUP" to reset the setting. ... "PROGRESSIVE (COMPONENT OUT ONLY)" to the HDMI OUT jack. , Try the following: 1Turn...HDMI. motion Play mode. , The player is in "HDMI SETUP..."HDMI ...HDMI cord again. There is not recorded, no sound will come through the DIGITAL OUT (COAXIAL)/HDMI... No sound is output from the HDMI OUT jack , Try the following ...
Operating Instructions
Page 40
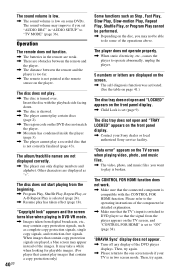
... "TRAY LOCKED" appears on some of the operations above. Then, try again. , Please return to the one screen mode if your Sony dealer or local authorized Sony service facility. The sound volume may take a while when looking for detailed explanation. , Make sure that the TV's input is switched ... disc does not start playing from the beginning. , Program Play, Shuffle Play, Repeat Play, or A-B Repeat Play is set (page 9). The CONTROL FOR HDMI function does not work. , Make sure that cannot play is compatible with the playback side facing down. , The disc is skewed. , The player cannot ...
... "TRAY LOCKED" appears on some of the operations above. Then, try again. , Please return to the one screen mode if your Sony dealer or local authorized Sony service facility. The sound volume may take a while when looking for detailed explanation. , Make sure that the TV's input is switched ... disc does not start playing from the beginning. , Program Play, Shuffle Play, Repeat Play, or A-B Repeat Play is set (page 9). The CONTROL FOR HDMI function does not work. , Make sure that cannot play is compatible with the playback side facing down. , The disc is skewed. , The player cannot ...


