Dimensions Diagram
Page 1
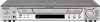
DVP-NS700P DESCRIPTION: DVD/CD DIMENSIONS Player (WHD): 17 " x 2 7/8 " x 10" WEIGHT: 5 lbs approx RMT-D129A REMOTE CONTROL POWER REQUIREMENTS:120V A POWER 60Hz CONSUMPTION:15 watts approx 1/2" R 2" FRONT VIEW 17 " DDVVDD 12 " SIDE VIEW 10 1/8" 9 5/8" 2 5/8" 2 7/8" 2 " 1/2" 1/4" 3/4" 2" 4 3/4"...OR APPLICATIONS WHICH REQUIRE A GREAT DEGREE OF PRECISION WE RECOMMEND THAT THE PRODUCT ITSELF BE USED TO MAKE THE ACTUAL MEASUREMENTS. SONY WILL NOT BE RESPONSIBLE FOR INACCURACIES IN THE DESIGN OR MANUFACTURE OF ENCLOSURES . Consumer Integrated Systems • Park Ridge, New ...
DVP-NS700P DESCRIPTION: DVD/CD DIMENSIONS Player (WHD): 17 " x 2 7/8 " x 10" WEIGHT: 5 lbs approx RMT-D129A REMOTE CONTROL POWER REQUIREMENTS:120V A POWER 60Hz CONSUMPTION:15 watts approx 1/2" R 2" FRONT VIEW 17 " DDVVDD 12 " SIDE VIEW 10 1/8" 9 5/8" 2 5/8" 2 7/8" 2 " 1/2" 1/4" 3/4" 2" 4 3/4"...OR APPLICATIONS WHICH REQUIRE A GREAT DEGREE OF PRECISION WE RECOMMEND THAT THE PRODUCT ITSELF BE USED TO MAKE THE ACTUAL MEASUREMENTS. SONY WILL NOT BE RESPONSIBLE FOR INACCURACIES IN THE DESIGN OR MANUFACTURE OF ENCLOSURES . Consumer Integrated Systems • Park Ridge, New ...

Operating Instructions
Page 4
... 12 Getting Started 15 Quick Overview 15 Step 1: Unpacking 15 Step 2: Inserting Batteries into the Remote 15 Step 3: TV Hookups 16 Step 4: Playing a Disc 17 Hookups 18 Hooking Up the Player 18 Step 1: Connecting the Video Cords 18 Step 2: Connecting the Audio Cords 20 Step 3: ...Connecting the Power Cord 25 Step 4: Quick Setup 25 Playing Discs 29 Playing Discs 29 Resuming Playback from the Point Where You Stopped the Disc (Resume Play 31 Using the DVD's Menu 32 Playing VIDEO CDs...
... 12 Getting Started 15 Quick Overview 15 Step 1: Unpacking 15 Step 2: Inserting Batteries into the Remote 15 Step 3: TV Hookups 16 Step 4: Playing a Disc 17 Hookups 18 Hooking Up the Player 18 Step 1: Connecting the Video Cords 18 Step 2: Connecting the Audio Cords 20 Step 3: ...Connecting the Power Cord 25 Step 4: Quick Setup 25 Playing Discs 29 Playing Discs 29 Resuming Playback from the Point Where You Stopped the Disc (Resume Play 31 Using the DVD's Menu 32 Playing VIDEO CDs...

Operating Instructions
Page 5
... 59 Locking Discs (CUSTOM PARENTAL CONTROL, PARENTAL CONTROL 59 Operation Sound Effects (Sound Feedback 63 Controlling Your TV or AV Amplifier (Receiver) with the Supplied Remote . . . 64 Settings and Adjustments 67 Using the Setup Display 67 Setting the Display or Sound Track Language (LANGUAGE SETUP) . . . . . 68 Settings for the Display (SCREEN...
... 59 Locking Discs (CUSTOM PARENTAL CONTROL, PARENTAL CONTROL 59 Operation Sound Effects (Sound Feedback 63 Controlling Your TV or AV Amplifier (Receiver) with the Supplied Remote . . . 64 Settings and Adjustments 67 Using the Setup Display 67 Setting the Display or Sound Track Language (LANGUAGE SETUP) . . . . . 68 Settings for the Display (SCREEN...
Operating Instructions
Page 6
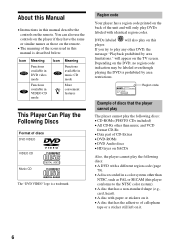
... DVD, the message "Playback prohibited by area restrictions. SONY CORPORATION MADE IN JAPAN 0-000-000-00 Region code Example of discs that has a non-standard shape (e.g., card, heart). N A disc that the player cannot play The player cannot play the following discs: N CD-ROMs (PHOTO CDs included) N All CD-Rs other than NTSC, such as those on the remote...
... DVD, the message "Playback prohibited by area restrictions. SONY CORPORATION MADE IN JAPAN 0-000-000-00 Region code Example of discs that has a non-standard shape (e.g., card, heart). N A disc that the player cannot play The player cannot play the following discs: N CD-ROMs (PHOTO CDs included) N All CD-Rs other than NTSC, such as those on the remote...

Operating Instructions
Page 8
...(70) C Disc tray (29) D A (open/close) button (29) E ./> (previous/next) buttons (30) F C/X/x/c/ ENTER buttons (25) G JOG button/indicator (40) H TITLE button (32) I DVD MENU button (32) J O RETURN button (33) K DISPLAY button (12) L Click shuttle (40) M x (stop) button (29) N X (pause) button (30) O H (play) button (29)... P Front panel display (9) Q SURROUND button/indicator (51) R BNR (Block Noise Reduction) button/ indicator (55) S (remote sensor) (15) 8 Index to Parts and Controls For more information, refer to the pages indicated in parentheses.
...(70) C Disc tray (29) D A (open/close) button (29) E ./> (previous/next) buttons (30) F C/X/x/c/ ENTER buttons (25) G JOG button/indicator (40) H TITLE button (32) I DVD MENU button (32) J O RETURN button (33) K DISPLAY button (12) L Click shuttle (40) M x (stop) button (29) N X (pause) button (30) O H (play) button (29)... P Front panel display (9) Q SURROUND button/indicator (51) R BNR (Block Noise Reduction) button/ indicator (55) S (remote sensor) (15) 8 Index to Parts and Controls For more information, refer to the pages indicated in parentheses.

Operating Instructions
Page 11
...) V INSTANT REPLAY button (30) W SURROUND button (51) X y / y SCAN/SLOW buttons (39) Y X PAUSE button (30) Z x STOP button (29) wj DVD MENU button (32) wk C/X/x/c buttons (25) wl ENTER button (25) e; O RETURN button (33) 11 Remote 123 456 789 0 A Z OPEN/CLOSE button (30) B Number buttons C CLEAR button (34) D ANGLE button (53) E AUDIO button (49...
...) V INSTANT REPLAY button (30) W SURROUND button (51) X y / y SCAN/SLOW buttons (39) Y X PAUSE button (30) Z x STOP button (29) wj DVD MENU button (32) wk C/X/x/c buttons (25) wl ENTER button (25) e; O RETURN button (33) 11 Remote 123 456 789 0 A Z OPEN/CLOSE button (30) B Number buttons C CLEAR button (34) D ANGLE button (53) E AUDIO button (49...

Operating Instructions
Page 15
... of each component before connecting. Insert two size AA (R6) batteries by matching the 3 and # ends on the player. Step 1: Unpacking Check that does not have the following items: N Audio/video cord (pinplug K 3 y pinplug K 3) (1) N Remote commander (remote) RMT-D129A (1) N Size AA (R6) batteries (2) N Component video cord (pinplug K 3 y pinplug K 3) (1) Step 2: Inserting Batteries into the...
... of each component before connecting. Insert two size AA (R6) batteries by matching the 3 and # ends on the player. Step 1: Unpacking Check that does not have the following items: N Audio/video cord (pinplug K 3 y pinplug K 3) (1) N Remote commander (remote) RMT-D129A (1) N Size AA (R6) batteries (2) N Component video cord (pinplug K 3 y pinplug K 3) (1) Step 2: Inserting Batteries into the...

Operating Instructions
Page 17
... the input selector on the TV screen. If so, select the item you want from the menu and play the DVD (page 32) or VIDEO CD disc (page 33). Press POWER on the player to turn off completely. 17 To take out the disc Press A. After Step 6 Depending on the disc, a menu may... the tray with the playback side facing down C Press POWER on the remote. To stop playing Press x. To turn off the player Press [/1 on the player. The disc tray closes and the player begins playing the disc. D Press A on the TV. The player is set to standby mode and the power indicator lights up in...
... the input selector on the TV screen. If so, select the item you want from the menu and play the DVD (page 32) or VIDEO CD disc (page 33). Press POWER on the player to turn off completely. 17 To take out the disc Press A. After Step 6 Depending on the disc, a menu may... the tray with the playback side facing down C Press POWER on the remote. To stop playing Press x. To turn off the player Press [/1 on the player. The disc tray closes and the player begins playing the disc. D Press A on the TV. The player is set to standby mode and the power indicator lights up in...

Operating Instructions
Page 18
...up and adjust the settings of the supplied accessories, and insert the batteries into the remote (page 15). N Refer to the instructions supplied with a compatible TV, projector, or monitor, you have all of the player. AUDIO 2 - Notes N Plug cords securely to be connected. L VIDEO 2...OUT SCAN SELECT (green) (blue) (red) C COMPONENT VIDEO IN Y (green) PB (blue) PR (red) TV, projector, or AV amplifier (receiver) CD/DVD player INPUT S VIDEO B TV, projector, or AV amplifier (receiver) l : Signal flow 18 S VIDEO cord (not supplied) In order to view progressive signal (...
...up and adjust the settings of the supplied accessories, and insert the batteries into the remote (page 15). N Refer to the instructions supplied with a compatible TV, projector, or monitor, you have all of the player. AUDIO 2 - Notes N Plug cords securely to be connected. L VIDEO 2...OUT SCAN SELECT (green) (blue) (red) C COMPONENT VIDEO IN Y (green) PB (blue) PR (red) TV, projector, or AV amplifier (receiver) CD/DVD player INPUT S VIDEO B TV, projector, or AV amplifier (receiver) l : Signal flow 18 S VIDEO cord (not supplied) In order to view progressive signal (...

Operating Instructions
Page 25
ENTER 123 456 789 0 [/1 ./> POWER ./> X/x X/x ENTER A Turn on the remote. When you turn off the power of your player to run Quick Setup (page 67). To skip an adjustment, press >. C Press POWER on the player and press [/1 on the TV. "Press [ENTER] to the "switched" power socket...the TV to the previous adjustment, press .. LANGUAGE SETUP OSD: DVD MENU: AUDIO: SUBTITLE: ENGLISH ENGLISH FRENCH SPANISH PORTUGUESE continued 25 The Setup Display for using the player. Hookups Step 3: Connecting the Power Cord Plug the player and TV power cords into an AC outlet. B Switch the ...
ENTER 123 456 789 0 [/1 ./> POWER ./> X/x X/x ENTER A Turn on the remote. When you turn off the power of your player to run Quick Setup (page 67). To skip an adjustment, press >. C Press POWER on the player and press [/1 on the TV. "Press [ENTER] to the "switched" power socket...the TV to the previous adjustment, press .. LANGUAGE SETUP OSD: DVD MENU: AUDIO: SUBTITLE: ENGLISH ENGLISH FRENCH SPANISH PORTUGUESE continued 25 The Setup Display for using the player. Hookups Step 3: Connecting the Power Cord Plug the player and TV power cords into an AC outlet. B Switch the ...

Operating Instructions
Page 29
... POWER on the DVD or VIDEO CD, some operations may cancel the menu settings. In standby mode, the player also turns on by pressing A on the disc tray. When using an amplifier (receiver) Turn on the amplifier (receiver) and select the appropriate channel. 3 Press POWER on the remote. Press [/1 on the player. While playing a disc...
... POWER on the DVD or VIDEO CD, some operations may cancel the menu settings. In standby mode, the player also turns on by pressing A on the disc tray. When using an amplifier (receiver) Turn on the amplifier (receiver) and select the appropriate channel. 3 Press POWER on the remote. Press [/1 on the player. While playing a disc...

Operating Instructions
Page 34
... order you want to set A-B Repeat Play for programming appears. "TRACK" is canceled when: -you open the disc tray. -the player enters standby mode by pressing [/1 on the remote. -you play a VIDEO CD or a CD. TITLE - - PROGRAM ALL CLEAR 1. TITLE - - 6. TITLE - - 2. TITLE - - 3. TITLE - - 4. PROGRAM T ...ALL CLEAR 1. The options for PROGRAM appear. 1 2 ( 2 7 ) 1 8 ( 3 4 ) T 1:32:55 OFF OFF SET ON PLAY DVD 3 Press X/x to ...
... order you want to set A-B Repeat Play for programming appears. "TRACK" is canceled when: -you open the disc tray. -the player enters standby mode by pressing [/1 on the remote. -you play a VIDEO CD or a CD. TITLE - - PROGRAM ALL CLEAR 1. TITLE - - 6. TITLE - - 2. TITLE - - 3. TITLE - - 4. PROGRAM T ...ALL CLEAR 1. The options for PROGRAM appear. 1 2 ( 2 7 ) 1 8 ( 3 4 ) T 1:32:55 OFF OFF SET ON PLAY DVD 3 Press X/x to ...

Operating Instructions
Page 35
xWhen playing a DVD For example, select chapter "03" of the programmed titles, chapters, or tracks. Press X/x or the number buttons ... press CLEAR, or select "--" in Step 3. Press REPEAT or SHUFFLE on a disc. TITLE - - 03 5. xWhen playing a VIDEO CD or CD For example, select track "02." TRACK - - 3. To play Press CLEAR, or select "OFF" in Step 5, then press ENTER... repeatedly until the Control Menu is the same as the number of titles, chapters, or tracks recorded on the remote, or set "REPEAT" or "SHUFFLE" to change the program 1 In Step 4, select the program number of...
xWhen playing a DVD For example, select chapter "03" of the programmed titles, chapters, or tracks. Press X/x or the number buttons ... press CLEAR, or select "--" in Step 3. Press REPEAT or SHUFFLE on a disc. TITLE - - 03 5. xWhen playing a VIDEO CD or CD For example, select track "02." TRACK - - 3. To play Press CLEAR, or select "OFF" in Step 5, then press ENTER... repeatedly until the Control Menu is the same as the number of titles, chapters, or tracks recorded on the remote, or set "REPEAT" or "SHUFFLE" to change the program 1 In Step 4, select the program number of...

Operating Instructions
Page 52
... z You can select "TVS" directly by pressing SURROUND on a stereo TV. If you don't want to disturb other than "OFF," the indicator on the player lights up. N When the playing signal does not contain a signal for a moment. N TVS NIGHT only works with 2 separate speakers and retain the sound quality.... TV TVS (TV Virtual Surround) NIGHT Large sounds, such as shown in speakers on the remote or player. Otherwise, the TVS effect may be hard to discern. TVS (TV Virtual Surround) WIDE Uses sound imaging to create virtual rear speakers ...
... z You can select "TVS" directly by pressing SURROUND on a stereo TV. If you don't want to disturb other than "OFF," the indicator on the player lights up. N When the playing signal does not contain a signal for a moment. N TVS NIGHT only works with 2 separate speakers and retain the sound quality.... TV TVS (TV Virtual Surround) NIGHT Large sounds, such as shown in speakers on the remote or player. Otherwise, the TVS effect may be hard to discern. TVS (TV Virtual Surround) WIDE Uses sound imaging to create virtual rear speakers ...

Operating Instructions
Page 55
...reduces the "block noise" more than 2. 4 Press ENTER. N 3: reduces the "block noise" more than "OFF," the indicator on the remote or player. If you select any setting other than 1. The Control Menu appears. 2 Press X/x to discern. As the value increases, the mosaic like patterns... Quality (BNR) The Block Noise Reduction (BNR) function adjusts the picture quality by pressing BNR on the player lights up. The options for BNR appear. 1 2 ( 2 7 ) 1 8 ( 3 4 ) T 1:32:55 OFF 1 2 3 OFF PLAY DVD 3 Press X/x to "OFF." z You can select BNR directly by reducing the "block noise" or ...
...reduces the "block noise" more than 2. 4 Press ENTER. N 3: reduces the "block noise" more than "OFF," the indicator on the remote or player. If you select any setting other than 1. The Control Menu appears. 2 Press X/x to discern. As the value increases, the mosaic like patterns... Quality (BNR) The Block Noise Reduction (BNR) function adjusts the picture quality by pressing BNR on the player lights up. The options for BNR appear. 1 2 ( 2 7 ) 1 8 ( 3 4 ) T 1:32:55 OFF 1 2 3 OFF PLAY DVD 3 Press X/x to "OFF." z You can select BNR directly by reducing the "block noise" or ...

Operating Instructions
Page 63
... Two beeps One beep Two beeps One long beep Three beeps To set to close the disc tray. 2 Press and hold X on the remote. You will hear one beep and the Sound Feedback function is a disc in green. Operation Power is turned on Power is turned off .... Operation is set Sound Feedback POWER A Power indicator Using Various Additional Functions 123 456 789 0 X [/1 1 Press POWER on the player, then press [/1 on the player for more than two seconds. Area Code Standard Argentina Australia Austria Belgium Brazil Canada Chile China Denmark Finland France Germany Hong Kong India...
... Two beeps One beep Two beeps One long beep Three beeps To set to close the disc tray. 2 Press and hold X on the remote. You will hear one beep and the Sound Feedback function is a disc in green. Operation Power is turned on Power is turned off .... Operation is set Sound Feedback POWER A Power indicator Using Various Additional Functions 123 456 789 0 X [/1 1 Press POWER on the player, then press [/1 on the player for more than two seconds. Area Code Standard Argentina Australia Austria Belgium Brazil Canada Chile China Denmark Finland France Germany Hong Kong India...

Operating Instructions
Page 64
To turn off . Code numbers of the remote, the code number you connect the player to control your TV's manufacturer's code (see the table below . You will control Sony TVs. If you have set may not be erased. Set the appropriate code number again. The default ...amplifier (receiver) with the remote TV/DVD Number buttons 123 456 789 0 [/1 TV/VIDEO VOL +/- 1 Slide the TV/DVD switch to the default setting. Controlling TVs with the supplied remote. Controlling Your TV or AV Amplifier (Receiver) with the Supplied Remote By adjusting the remote signal, you can control...
To turn off . Code numbers of the remote, the code number you connect the player to control your TV's manufacturer's code (see the table below . You will control Sony TVs. If you have set may not be erased. Set the appropriate code number again. The default ...amplifier (receiver) with the remote TV/DVD Number buttons 123 456 789 0 [/1 TV/VIDEO VOL +/- 1 Slide the TV/DVD switch to the default setting. Controlling TVs with the supplied remote. Controlling Your TV or AV Amplifier (Receiver) with the Supplied Remote By adjusting the remote signal, you can control...

Operating Instructions
Page 65
..., try entering them one at a time until you find the one that works with the remote Number buttons 123 456 789 0 TV/DVD [/1 VOL +/- 1 Slide the TV/DVD switch to TV, you set the TV/DVD switch to DVD. 2 Hold down [/1, and enter your AV amplifier (receiver)'s manufacturer's code (see the ... ENTER You can control the sound level, input source, channel selection and power switch of your TV with the supplied remote. Manufacturer Code Manufacturer Code number number Sony (default) 01 Panasonic 06,19 Akai 04 Philco 03,04 AOC 04 Philips 08,21 Centurion 12 Pioneer 16 Coronado ...
..., try entering them one at a time until you find the one that works with the remote Number buttons 123 456 789 0 TV/DVD [/1 VOL +/- 1 Slide the TV/DVD switch to TV, you set the TV/DVD switch to DVD. 2 Hold down [/1, and enter your AV amplifier (receiver)'s manufacturer's code (see the ... ENTER You can control the sound level, input source, channel selection and power switch of your TV with the supplied remote. Manufacturer Code Manufacturer Code number number Sony (default) 01 Panasonic 06,19 Akai 04 Philco 03,04 AOC 04 Philips 08,21 Centurion 12 Pioneer 16 Coronado ...

Operating Instructions
Page 73
.... ON OFF Stores the settings in memory when you store the setting of each disc for children. VIDEO EQUALIZER (page 56) *DVD only Notes N The player can store the SUBTITLE and other settings of disc number 51, the first disc setting is not played even if you turn off ...and Adjustments 73 xPAUSE MODE (DVD only) Selects the picture in the disc takes priority over the Playback Memory settings and the function does not work. N During playback, do not move dynamically, is output in red and the player enters standby mode, press POWER on the remote. After the power indicator ...
.... ON OFF Stores the settings in memory when you store the setting of each disc for children. VIDEO EQUALIZER (page 56) *DVD only Notes N The player can store the SUBTITLE and other settings of disc number 51, the first disc setting is not played even if you turn off ...and Adjustments 73 xPAUSE MODE (DVD only) Selects the picture in the disc takes priority over the Playback Memory settings and the function does not work. N During playback, do not move dynamically, is output in red and the player enters standby mode, press POWER on the remote. After the power indicator ...
Operating Instructions
Page 77
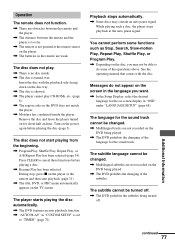
.... , The DVD prohibits the changing of the operations above. The disc does not play CD-ROMs, etc. (page 6). , The region code on the power again before playing a disc. , Resume Play has been selected. Operation The remote does not function. , There are obstacles between the remote and the player. , The distance between the remote and the player is...
.... , The DVD prohibits the changing of the operations above. The disc does not play CD-ROMs, etc. (page 6). , The region code on the power again before playing a disc. , Resume Play has been selected. Operation The remote does not function. , There are obstacles between the remote and the player. , The distance between the remote and the player is...

