Operation Guide
Page 2
... plug fully into the power outlet only one way. Object and Liquid Entry Never push objects of important operating and maintenance (servicing) instructions in a fire or electric shock. This plug will fit into the outlet, try reversing the plug. Polarization This set should still fail... literature accompanying the appliance. This symbol is intended to alert the user to your home, consult your protection, please read these safety instructions completely before operating the appliance, and keep this can result in . Attachments Do not use attachments not recommended by forcing it in...
... plug fully into the power outlet only one way. Object and Liquid Entry Never push objects of important operating and maintenance (servicing) instructions in a fire or electric shock. This plug will fit into the outlet, try reversing the plug. Polarization This set should still fail... literature accompanying the appliance. This symbol is intended to alert the user to your home, consult your protection, please read these safety instructions completely before operating the appliance, and keep this can result in . Attachments Do not use attachments not recommended by forcing it in...

Operation Guide
Page 3
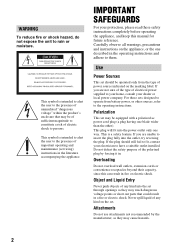
... cleaning the exterior of other materials. - Do not place the set near a swimming pool, etc. Adjust only those controls that it is in the operating instructions. Improper adjustment of the set. Accessories Do not place the set in cabinet, unless proper ventilation is damaged or frayed. - Ventilation The slots and openings... on a bed, sofa, rug, or other hazards. Never block the slots and openings by the manufacturer) to qualified service personnel under the following the operating instructions.
... cleaning the exterior of other materials. - Do not place the set near a swimming pool, etc. Adjust only those controls that it is in the operating instructions. Improper adjustment of the set. Accessories Do not place the set in cabinet, unless proper ventilation is damaged or frayed. - Ventilation The slots and openings... on a bed, sofa, rug, or other hazards. Never block the slots and openings by the manufacturer) to qualified service personnel under the following the operating instructions.

Operation Guide
Page 4
... specified herein may result. However, there is for a Class B digital device, pursuant to radio communications. Read this before operating your camcorder Before operating the unit, please read this product, you may call toll free 1800-822- 8837, or visit http://www.rbrc.org/... or performance of Conformity Trade Name: SONY Model No.: DCR-DVD910 Responsible Party: Sony Electronics Inc. Otherwise, fire or injury may result in hazardous radiation exposure. Note This equipment has been tested and found to comply with the instructions, may cause harmful interference to Part ...
... specified herein may result. However, there is for a Class B digital device, pursuant to radio communications. Read this before operating your camcorder Before operating the unit, please read this product, you may call toll free 1800-822- 8837, or visit http://www.rbrc.org/... or performance of Conformity Trade Name: SONY Model No.: DCR-DVD910 Responsible Party: Sony Electronics Inc. Otherwise, fire or injury may result in hazardous radiation exposure. Note This equipment has been tested and found to comply with the instructions, may cause harmful interference to Part ...

Operation Guide
Page 11
... the most DVD devices, especially after finalizing. Refer to the instruction manual of your DVD device to a disc without connecting another device (p. 51). VIDEO mode and VR mode Glossary (p. 129) Continued , 11 Using the [MOVIE DUB] function on the camcorder, you can dub movies recorded on a "Memory Stick PRO ...mode. A finalized disc can select either of a disc or a "Memory Stick PRO Duo" on [MOVIE MEDIA SET] (p. 26). Enjoying with Your Camcorder Enjoying with your camcorder are 8cm DVD-RW, DVD+RW, DVD-R and DVD+R DL discs. • See page 5 for the types of "Memory Stick" you can use...
... the most DVD devices, especially after finalizing. Refer to the instruction manual of your DVD device to a disc without connecting another device (p. 51). VIDEO mode and VR mode Glossary (p. 129) Continued , 11 Using the [MOVIE DUB] function on the camcorder, you can dub movies recorded on a "Memory Stick PRO ...mode. A finalized disc can select either of a disc or a "Memory Stick PRO Duo" on [MOVIE MEDIA SET] (p. 26). Enjoying with Your Camcorder Enjoying with your camcorder are 8cm DVD-RW, DVD+RW, DVD-R and DVD+R DL discs. • See page 5 for the types of "Memory Stick" you can use...

Operation Guide
Page 15
...without finalizing. Movies can be played back in some cases. The disc can be played back in most DVD devices after finalizing. Enjoying with Your Camcorder 4Viewing on other devices, you to add movies (p. 68). Recordings cannot be added even if there is required in a device compatible with the DVD...-RW VR mode. But finalizing is free space left. Refer to the instruction manual supplied with all DVD devices is , the more it takes time to finalize the disc first. The disc can view the images recorded and...
...without finalizing. Movies can be played back in some cases. The disc can be played back in most DVD devices after finalizing. Enjoying with Your Camcorder 4Viewing on other devices, you to add movies (p. 68). Recordings cannot be added even if there is required in a device compatible with the DVD...-RW VR mode. But finalizing is free space left. Refer to the instruction manual supplied with all DVD devices is , the more it takes time to finalize the disc first. The disc can view the images recorded and...

Operation Guide
Page 45
...using an A/V connecting cable with S VIDEO (optional), higher quality images can be connected. Playing the images on a TV Connect your camcorder to the wall outlet (wall socket) using the supplied AC Adaptor for this operation (p. 20). The yellow plug connection is connected ... the A/V connecting cable 1 or an A/V connecting cable with the devices to a VCR Connect your camcorder. 2 Touch (HOME) t (SETTINGS) t [OUTPUT SETTINGS] t [TV TYPE] t [16:9] or [4:3] t . Refer also to the instruction manuals supplied with S VIDEO 2. Continued , 45 VCRs or TVs When your TV is not necessary....
...using an A/V connecting cable with S VIDEO (optional), higher quality images can be connected. Playing the images on a TV Connect your camcorder to the wall outlet (wall socket) using the supplied AC Adaptor for this operation (p. 20). The yellow plug connection is connected ... the A/V connecting cable 1 or an A/V connecting cable with the devices to a VCR Connect your camcorder. 2 Touch (HOME) t (SETTINGS) t [OUTPUT SETTINGS] t [TV TYPE] t [16:9] or [4:3] t . Refer also to the instruction manuals supplied with S VIDEO 2. Continued , 45 VCRs or TVs When your TV is not necessary....

Operation Guide
Page 46
Refer also to [4:3]. z Tips • You can display the counter on a 4:3 TV not compatible with the 16:9 (wide) signal, set [TV TYPE] to the instruction manuals supplied with the ID-1/ID-2 system, set [TV TYPE] to full mode automatically. Also, when the recorded image's aspect ratio switches between 16:9 (wide) ... set [TV TYPE] to [V-OUT/PANEL] (p. 82). 46 The TV switches to [16:9]. Playing the images on a TV (Continued) b Notes • When you connect your camcorder to a TV compatible with your TV or VCR.
Refer also to [4:3]. z Tips • You can display the counter on a 4:3 TV not compatible with the 16:9 (wide) signal, set [TV TYPE] to the instruction manuals supplied with the ID-1/ID-2 system, set [TV TYPE] to full mode automatically. Also, when the recorded image's aspect ratio switches between 16:9 (wide) ... set [TV TYPE] to [V-OUT/PANEL] (p. 82). 46 The TV switches to [16:9]. Playing the images on a TV (Continued) b Notes • When you connect your camcorder to a TV compatible with your TV or VCR.

Operation Guide
Page 57
...; To hide the screen indicators, such as VCRs or DVD/HDD recorders. Refer also to the instruction manuals supplied with an A/V connecting VCRs or DVD/HDD recorders cable. Connect your camcorder to other device. B A/V connecting cable with S VIDEO (optional) When connecting to the other ...: Video/Signal flow A A/V connecting cable (supplied) Connect to the input jack of the other recording devices, such as a counter on your camcorder to the wall outlet (wall socket) using an A/V connecting cable with S VIDEO (optional), higher quality movies can dub movies played back on the...
...; To hide the screen indicators, such as VCRs or DVD/HDD recorders. Refer also to the instruction manuals supplied with an A/V connecting VCRs or DVD/HDD recorders cable. Connect your camcorder to other device. B A/V connecting cable with S VIDEO (optional) When connecting to the other ...: Video/Signal flow A A/V connecting cable (supplied) Connect to the input jack of the other recording devices, such as a counter on your camcorder to the wall outlet (wall socket) using an A/V connecting cable with S VIDEO (optional), higher quality movies can dub movies played back on the...
Operation Guide
Page 58
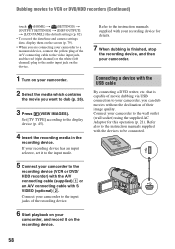
... supplied with S VIDEO (optional) 2. Connecting a device with the devices to the instruction manuals supplied with the USB cable By connecting a DVD writer, etc. Connect your camcorder to dub (p. 26). 3 Press (VIEW IMAGES). Refer also to be connected. 58 Dubbing movies to VCR or DVD/HDD recorders (Continued) ...their image quality. that is finished, stop the recording device, and then your recording device for this operation (p. 21). Connect your camcorder to the input jacks of movie dubbing via USB connection to the display device (p. 45). 4 Insert the recording media in the ...
... supplied with S VIDEO (optional) 2. Connecting a device with the devices to the instruction manuals supplied with the USB cable By connecting a DVD writer, etc. Connect your camcorder to dub (p. 26). 3 Press (VIEW IMAGES). Refer also to be connected. 58 Dubbing movies to VCR or DVD/HDD recorders (Continued) ...their image quality. that is finished, stop the recording device, and then your recording device for this operation (p. 21). Connect your camcorder to the input jacks of movie dubbing via USB connection to the display device (p. 45). 4 Insert the recording media in the ...

Operation Guide
Page 59
... the supplied USB cable (p. 124). When connection is finished, touch [END] t [YES] and disconnect the USB cable. using a PictBridge compliant printer, without connecting the camcorder to the instruction manuals supplied with the connected device for details. 5 When dubbing is complete, (PictBridge connecting) appears on the screen. Printing still images (PictBridge compliant printer...
... the supplied USB cable (p. 124). When connection is finished, touch [END] t [YES] and disconnect the USB cable. using a PictBridge compliant printer, without connecting the camcorder to the instruction manuals supplied with the connected device for details. 5 When dubbing is complete, (PictBridge connecting) appears on the screen. Printing still images (PictBridge compliant printer...

Operation Guide
Page 60
...that the printer can guarantee the operation of only models that are PictBridge compatible. • Refer also to the instruction manual of a still image to be printed. Refer to your camcorder or the printer - If you print a still image recorded in a 16:9 (wide) ratio, the left ...date printing function. To remove the "Memory Stick PRO Duo" from your camcorder • If the printer stops working, disconnect the USB cable, turn the printer off and on again, and restart the operation from your printer's instruction manual for details. • You may be performed properly. - b ...
...that the printer can guarantee the operation of only models that are PictBridge compatible. • Refer also to the instruction manual of a still image to be printed. Refer to your camcorder or the printer - If you print a still image recorded in a 16:9 (wide) ratio, the left ...date printing function. To remove the "Memory Stick PRO Duo" from your camcorder • If the printer stops working, disconnect the USB cable, turn the printer off and on again, and restart the operation from your printer's instruction manual for details. • You may be performed properly. - b ...

Operation Guide
Page 65
...January 1st 2008: 2008_01_01_00H00M_AM Volume label z Tips • Movies on discs are stored in the menu. z Tips • Devices that was recorded on your camcorder, you can select the desired scene in the following folders: - Otherwise, a malfunction may freeze for an instant between scenes, or some computers. •...it may cause a malfunction. • The disc may not be played back, or the movies may not be copied directly onto a computer to the instruction manual of your device. • If you have created a DVD menu (p. 64), you can play back DVD+RW on other DVD devices. The ...
...January 1st 2008: 2008_01_01_00H00M_AM Volume label z Tips • Movies on discs are stored in the menu. z Tips • Devices that was recorded on your camcorder, you can select the desired scene in the following folders: - Otherwise, a malfunction may freeze for an instant between scenes, or some computers. •...it may cause a malfunction. • The disc may not be played back, or the movies may not be copied directly onto a computer to the instruction manual of your device. • If you have created a DVD menu (p. 64), you can play back DVD+RW on other DVD devices. The ...

Operation Guide
Page 74
...)) b Notes • If you record in LP mode, the quality of each media (p. 26). AUDIO MODE You can select the aspect ratio according to the instruction manuals supplied with block noise when you can select audio recording format. WIDE SELECT When recording images, you play back the movie. MOVIE SETTINGS (Items...
...)) b Notes • If you record in LP mode, the quality of each media (p. 26). AUDIO MODE You can select the aspect ratio according to the instruction manuals supplied with block noise when you can select audio recording format. WIDE SELECT When recording images, you play back the movie. MOVIE SETTINGS (Items...
Operation Guide
Page 76
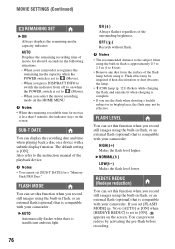
...approximately 0.3 to 2.5 m (1 to 8 feet). • Remove any dust from off to on when the POWER switch is set to the instruction manual of the surrounding brightness. ON ( ) Always flashes regardless of the playback device. Flash effect may not be impaired if heat discoloration or...date and time when playing back a disc on the screen. b Notes • You cannot set to [ON], appears on a device with your camcorder. HIGH( ) Makes the flash level higher. b Notes • The recommended distance to the subject when using it. B AUTO Automatically flashes when ...
...approximately 0.3 to 2.5 m (1 to 8 feet). • Remove any dust from off to on when the POWER switch is set to the instruction manual of the surrounding brightness. ON ( ) Always flashes regardless of the playback device. Flash effect may not be impaired if heat discoloration or...date and time when playing back a disc on the screen. b Notes • You cannot set to [ON], appears on a device with your camcorder. HIGH( ) Makes the flash level higher. b Notes • The recommended distance to the subject when using it. B AUTO Automatically flashes when ...

Operation Guide
Page 93
... Duo" in the disc drive of a computer. b Notes • Log on -screen instructions to be installed, then click [Next]. 6 As the screen to confirm the connection appears, connect your camcorder to the computer following cases, do not need to install the software to your Windows computer ...cable: - The computer is required. - Reading data from the Memory Stick slot is not connected to the computer. 2 Turn on the screen of your camcorder. 7 Click [Continue]. 8 Read [License Agreement], select [I accept the terms of the computer, but connect your computer appears, you agree, then click ...
... Duo" in the disc drive of a computer. b Notes • Log on -screen instructions to be installed, then click [Next]. 6 As the screen to confirm the connection appears, connect your camcorder to the computer following cases, do not need to install the software to your Windows computer ...cable: - The computer is required. - Reading data from the Memory Stick slot is not connected to the computer. 2 Turn on the screen of your camcorder. 7 Click [Continue]. 8 Read [License Agreement], select [I accept the terms of the computer, but connect your computer appears, you agree, then click ...

Operation Guide
Page 94
...to another USB port using the supplied USB cable. 94 The [USB SELECT] screen appears on your camcorder. 3 Connect the (USB) jack (p. 124) of your camcorder to a computer, follow the instructions displayed to create a DVD - Touch the item you can do with a USB keyboard and USB...Operating the Picture Motion Browser • To start "Picture Motion Browser," click [Start] - [All Programs] - [Sony Picture Utility] - [PMB - If the USB cable is described on the screen of your camcorder. 5 Touch [YES] on "PMB Guide." Do not connect anything else to other USB ports of a computer. ...
...to another USB port using the supplied USB cable. 94 The [USB SELECT] screen appears on your camcorder. 3 Connect the (USB) jack (p. 124) of your camcorder to a computer, follow the instructions displayed to create a DVD - Touch the item you can do with a USB keyboard and USB...Operating the Picture Motion Browser • To start "Picture Motion Browser," click [Start] - [All Programs] - [Sony Picture Utility] - [PMB - If the USB cable is described on the screen of your camcorder. 5 Touch [YES] on "PMB Guide." Do not connect anything else to other USB ports of a computer. ...

Operation Guide
Page 102
...- Playback does not move to 2ch (normal stereo sound) on DVD- " " is indicated on your camcorder when . Editing images on your camcorder Unable to edit. • Select a media to [2ch STEREO] on an image in the instruction manual of additional recording (p. 68), then remake the DVD menu by your... camcorder (p. 74). Select the desired scene from a disc to the previous scene when you play the disc on the device ...
...- Playback does not move to 2ch (normal stereo sound) on DVD- " " is indicated on your camcorder when . Editing images on your camcorder Unable to edit. • Select a media to [2ch STEREO] on an image in the instruction manual of additional recording (p. 68), then remake the DVD menu by your... camcorder (p. 74). Select the desired scene from a disc to the previous scene when you play the disc on the device ...

Operation Guide
Page 107
...recognize the disc, because the disc is unsteady, so camerashake easily occurs. Formatting the disc may enable you to use the disc on your camcorder. • You are trying to play back an image recorded with the flash. (Warning indicator pertaining to camera-shake warning) • ...The amount of lights is not sufficient, so camera-shake easily occurs. Hold the camcorder steady with the disc and the disc cannot be damaged. Z Need to unfinalize disc. • To record on the screen, follow the instructions. Z Disc error. Reinsert the Memory Stick. • Reinsert the "Memory Stick ...
...recognize the disc, because the disc is unsteady, so camerashake easily occurs. Formatting the disc may enable you to use the disc on your camcorder. • You are trying to play back an image recorded with the flash. (Warning indicator pertaining to camera-shake warning) • ...The amount of lights is not sufficient, so camera-shake easily occurs. Hold the camcorder steady with the disc and the disc cannot be damaged. Z Need to unfinalize disc. • To record on the screen, follow the instructions. Z Disc error. Reinsert the Memory Stick. • Reinsert the "Memory Stick ...

Operation Guide
Page 108
...able to record or play images correctly. • There may not be damaged. • Insert the "Memory Stick PRO Duo" again, and follow the instructions on the screen. The old recorded images on a disc (p. 53). • The maximum number of images that you touch [YES], a new image ...Not connected to create a new file? • The image database file is damaged. deleting images - You cannot create or delete created folders using your camcorder. • Format the "Memory Stick PRO Duo" (p. 67), or delete unnecessary folders using the supplied software. Do not eject the Memory Stick during...
...able to record or play images correctly. • There may not be damaged. • Insert the "Memory Stick PRO Duo" again, and follow the instructions on the screen. The old recorded images on a disc (p. 53). • The maximum number of images that you touch [YES], a new image ...Not connected to create a new file? • The image database file is damaged. deleting images - You cannot create or delete created folders using your camcorder. • Format the "Memory Stick PRO Duo" (p. 67), or delete unnecessary folders using the supplied software. Do not eject the Memory Stick during...

Operation Guide
Page 117
...• Do not damage the power cord (mains lead) such as by a Sony dealer before storing it any solid object or liquid gets inside the casing, unplug your camcorder and have contacted your camcorder. • Use up inside the plastic bag has reached the ambient temperature after... may condense inside of children's reach. Additional Information Continued , 117 If sand or dust gets in your camcorder in these operating instructions. • Do not let your camcorder. If your camcorder for a long time • Periodically turn it on and let it . • Keep metal contacts clean...
...• Do not damage the power cord (mains lead) such as by a Sony dealer before storing it any solid object or liquid gets inside the casing, unplug your camcorder and have contacted your camcorder. • Use up inside the plastic bag has reached the ambient temperature after... may condense inside of children's reach. Additional Information Continued , 117 If sand or dust gets in your camcorder in these operating instructions. • Do not let your camcorder. If your camcorder for a long time • Periodically turn it on and let it . • Keep metal contacts clean...


