
Service Manual
Page 27
... the center. ON OFF (CHG) POWER (Movie): To record movies (Still): To record still images (Play/Edit): To play back pictures on your camcorder, or to edit them (DVD-RW: VR mode only) CHG 20 To turn off automatically if you record or play back, slide the POWER switch to turn on... fasten the belt. When using it for DCR-DVD92/DVD602). • After you turn on the respective lamp. Lens cover* • When you set the POWER switch to (Movie) or (Still), the lens cover opens up to turn off the power Slide the POWER switch up (Except for the first time, the...
... the center. ON OFF (CHG) POWER (Movie): To record movies (Still): To record still images (Play/Edit): To play back pictures on your camcorder, or to edit them (DVD-RW: VR mode only) CHG 20 To turn off automatically if you record or play back, slide the POWER switch to turn on... fasten the belt. When using it for DCR-DVD92/DVD602). • After you turn on the respective lamp. Lens cover* • When you set the POWER switch to (Movie) or (Still), the lens cover opens up to turn off the power Slide the POWER switch up (Except for the first time, the...

Service Manual
Page 28
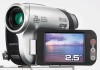
...will not be affected by the setting. Viewfinder lens adjustment lever Move it until it clicks. 90 degrees (max.) 90 degrees to the camcorder • Be careful not to press the buttons on the LCD frame accidentally when you open or adjust the LCD screen. • If you want...• You can adjust the brightness of the LCD screen. This setting is practical when you use your camcorder in bright conditions or you open the LCD screen 90 degrees to the camcorder, then rotate it 180 degrees to adjust the brightness of the viewfinder backlight by the setting. 21...
...will not be affected by the setting. Viewfinder lens adjustment lever Move it until it clicks. 90 degrees (max.) 90 degrees to the camcorder • Be careful not to press the buttons on the LCD frame accidentally when you open or adjust the LCD screen. • If you want...• You can adjust the brightness of the LCD screen. This setting is practical when you use your camcorder in bright conditions or you open the LCD screen 90 degrees to the camcorder, then rotate it 180 degrees to adjust the brightness of the viewfinder backlight by the setting. 21...

Service Manual
Page 31
... the disc cover, it may cause your camcorder to malfunction. *DCR-DVD92/DVD602 3 Set the disc with your camcorder is turned off. Move the belt to the bottom of the camcorder, then open it clicks. Step 7: Inserting a disc A new 8cm DVD-R, DVD-RW, or DVD+RW is on the LCD screen. However,...• If you catch the belt or the lens cap strap* when closing the disc cover. For details about pickup lens, see page 111. 24 Disc cover OPEN switch Pickup lens POWER switch 1 Check that the power of the arrow (OPEN ). [PREPARING TO OPEN] appears on . • You can remove the...
... the disc cover, it may cause your camcorder to malfunction. *DCR-DVD92/DVD602 3 Set the disc with your camcorder is turned off. Move the belt to the bottom of the camcorder, then open it clicks. Step 7: Inserting a disc A new 8cm DVD-R, DVD-RW, or DVD+RW is on the LCD screen. However,...• If you catch the belt or the lens cap strap* when closing the disc cover. For details about pickup lens, see page 111. 24 Disc cover OPEN switch Pickup lens POWER switch 1 Check that the power of the arrow (OPEN ). [PREPARING TO OPEN] appears on . • You can remove the...

Service Manual
Page 39
Recording LENS COVER* Opens in accordance with the setting of the arrow while pressing MODE the green button only when the POWER ON OFF switch is heard. Perform step 2. ...
Recording LENS COVER* Opens in accordance with the setting of the arrow while pressing MODE the green button only when the POWER ON OFF switch is heard. Perform step 2. ...

Service Manual
Page 43
... selected subject See [SPOT METER] on page 63. Playback To play back the images in mirror mode Open the LCD screen 90 degrees to the camcorder (), then rotate it 180 degrees to the lens side (). • A mirror-image of the LCD screen. Play back the picture you...
... selected subject See [SPOT METER] on page 63. Playback To play back the images in mirror mode Open the LCD screen 90 degrees to the camcorder (), then rotate it 180 degrees to the lens side (). • A mirror-image of the LCD screen. Play back the picture you...

Service Manual
Page 96
... not appear on the touch panel. • Touch the LCD screen lightly. • Press DISP/BATT INFO on your camcorder (or DISPLAY on /off using the DISP/BATT INFO. The buttons do not work at all. • Adjust the...selected one (p.26, 60). A problem occurs when the camcorder is not clear. • Extend the viewfinder (p.21). • Use the viewfinder lens adjustment lever to adjust the lens (p.21). Touch the LCD screen or insert a disc...DEMO MODE]. An unknown indicator appears on the screen. • The camcorder is open. Then, connect it again. This is not a malfunction.
... not appear on the touch panel. • Touch the LCD screen lightly. • Press DISP/BATT INFO on your camcorder (or DISPLAY on /off using the DISP/BATT INFO. The buttons do not work at all. • Adjust the...selected one (p.26, 60). A problem occurs when the camcorder is not clear. • Extend the viewfinder (p.21). • Use the viewfinder lens adjustment lever to adjust the lens (p.21). Touch the LCD screen or insert a disc...DEMO MODE]. An unknown indicator appears on the screen. • The camcorder is open. Then, connect it again. This is not a malfunction.

Service Manual
Page 110
... the disc is not set correctly. Format error • The disc recorded in the different format code from your camcorder is inserted. Your camcorder cannot recognize the disc because of the disc. Formatting the disc may enable you might be recorded due to some limitations of ...;nalize • To record on the finalized DVD-RW (VIDEO mode), unfinalize it (p.50). Disc error Remove disc • The incompatible disc with the strobe and disable charging. Lens cover Lens cover not fully open Turn power off once Troubleshooting 103 However, you to ...
... the disc is not set correctly. Format error • The disc recorded in the different format code from your camcorder is inserted. Your camcorder cannot recognize the disc because of the disc. Formatting the disc may enable you might be recorded due to some limitations of ...;nalize • To record on the finalized DVD-RW (VIDEO mode), unfinalize it (p.50). Disc error Remove disc • The incompatible disc with the strobe and disable charging. Lens cover Lens cover not fully open Turn power off once Troubleshooting 103 However, you to ...

Service Manual
Page 116
... repaired. • If any solid object or liquid gets inside your camcorder, [Moisture condensation Turn off for 1H] or [Cannot open Try later] appears. The indication will not appear when the moisture condenses on the camera lens. If moisture condensation has occurred Turn off any liquid gets... viewfinder or the LCD screen. - if any liquid that may condense inside of the lens. • Keep the POWER switch setting to a warm place, moisture may have it checked by a Sony dealer before storing it . • Keep metal contacts clean. • Keep the Remote Commander...
... repaired. • If any solid object or liquid gets inside your camcorder, [Moisture condensation Turn off for 1H] or [Cannot open Try later] appears. The indication will not appear when the moisture condenses on the camera lens. If moisture condensation has occurred Turn off any liquid gets... viewfinder or the LCD screen. - if any liquid that may condense inside of the lens. • Keep the POWER switch setting to a warm place, moisture may have it checked by a Sony dealer before storing it . • Keep metal contacts clean. • Keep the Remote Commander...

Service Manual
Page 124
... 39 D DATA CODE 67 DATE/TIME 68 DC IN jack 17 DC plug 17 DEMO MODE 64 DIGITAL ZOOM 60 Disc cover OPEN switch...... 24 DISC REMAIN 68 DISC SET 65 Disc title 46, 65 DISP/BATT INFO.... 21, 22, 37 Display indicators ............. 39, 40 DISP OUTPUT 68 Dubbing 79 DVD menu 45 D.EFFECT (Digital effect 63 E EASY button 27 Easy Handycam operation ... 27 Edit 72 EXPOSURE 57, 94 EXT SUR MIC... Insulation sheet 41 L LANDSCAPE 56 LCD/VF SET 66 LCD BRIGHT 66 LCD COLOR 67 Lens cover 20, 32 LP (Long Play 65 LUMI.
... 39 D DATA CODE 67 DATE/TIME 68 DC IN jack 17 DC plug 17 DEMO MODE 64 DIGITAL ZOOM 60 Disc cover OPEN switch...... 24 DISC REMAIN 68 DISC SET 65 Disc title 46, 65 DISP/BATT INFO.... 21, 22, 37 Display indicators ............. 39, 40 DISP OUTPUT 68 Dubbing 79 DVD menu 45 D.EFFECT (Digital effect 63 E EASY button 27 Easy Handycam operation ... 27 Edit 72 EXPOSURE 57, 94 EXT SUR MIC... Insulation sheet 41 L LANDSCAPE 56 LCD/VF SET 66 LCD BRIGHT 66 LCD COLOR 67 Lens cover 20, 32 LP (Long Play 65 LUMI.


